36 Bowfront Reef

rmcrom

Active Member
View Badges
Joined
Dec 31, 2020
Messages
401
Reaction score
330
Location
Texas
Rating - 0%
0   0   0
I have always wanted to have a saltwater aquarium, but I had always heard they are very hard and never tried. Well I've been reading up on the science and am slowly going to build one!

So far, I have the tank and stand and am awaiting some shipments of marco rocks to start my aquascape. I have close to 50lbs total coming, but I don't plan to use it all. I wanted to have some extra so I can choose the best pieces. Other than that, I just have the heater in a 5 gal bucket for calibration. Nothing exciting yet.

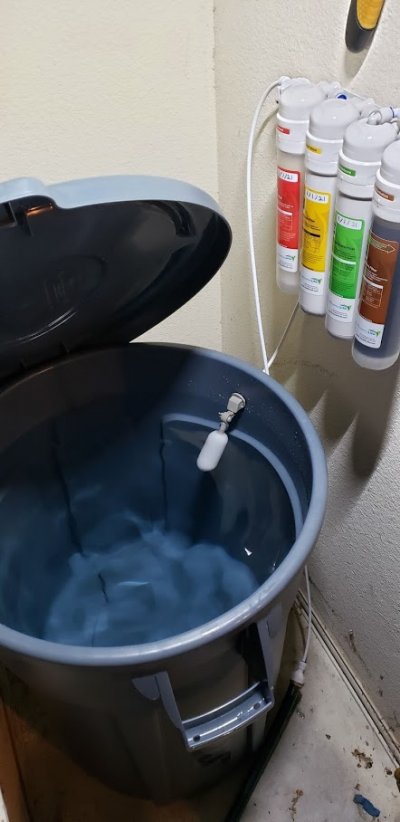
Here is my RODI that just finished my first 35 gallons run. I only have 1 storage tank. Is it better to store plain RODI water or mixed saltwater for later use?
rodi.jpg
 
Last edited:

bigjepp

Community Member
View Badges
Joined
Dec 29, 2020
Messages
29
Reaction score
21
Location
florida
Rating - 0%
0   0   0
I have kept freshwater tanks in the past. My favorite tank was a Midas 'wet pet' tank in a 72 bowfront with 20L DIY sump. I have always wanted to have a saltwater aquarium, but I had always heard they are very hard and never tried. Well I've been reading up on the science and am slowly going to build one!

So far, I have the tank and stand and am awaiting some shipments of marco rocks to start my aquascape. I have close to 50lbs total coming, but I don't plan to use it all. I wanted to have some extra so I can choose the best pieces. Other than that, I just have the heater in a 5 gal bucket for calibration. Nothing exciting yet.

Everyone comes to the member tanks section for the sweet pics, so here is one of my RODI that just finished my first 35 gallons run. I only have 1 storage tank. Is it better to store plain RODI water or mixed saltwater for later use?

rodi.jpg
Hey there! I'm starting up a similar tank, I have read that it is best to store unmixed RODI water and mix salt approximately 24 hours before a water change. Im looking into getting an RODI system for myself so I'd love to hear more about that setup if you could list the parts
 
OP
OP
rmcrom

rmcrom

Active Member
View Badges
Joined
Dec 31, 2020
Messages
401
Reaction score
330
Location
Texas
Rating - 0%
0   0   0
Hey there! I'm starting up a similar tank, I have read that it is best to store unmixed RODI water and mix salt approximately 24 hours before a water change. Im looking into getting an RODI system for myself so I'd love to hear more about that setup if you could list the parts
I am using the Aquaticlife Twist-in RODI kit which is a 75 gallon per day system. I am using the automatic float shutoff configuration. Everything needed to hook it up in that configuration is included in the kit which also includes a diagram showing how to connect the check valve and shutoff valve. For my storage, I am using a 44 gallon Rubbermaid Brute trash can. The rib inside the trashcan is right at 30 gallons of water which is where I have my float valve set to turn off the fill. The kit includes everything needed for under-sink installation. I have my RODI system in the garage next to my water heater tank, so I added a hose bib to the cold water supply line and connect my RODI system to that. For my waste water, I don't have a drain nearby so I have a long run of polyethylene tubing attached to wall with clips which dumps the water outside.
 
OP
OP
rmcrom

rmcrom

Active Member
View Badges
Joined
Dec 31, 2020
Messages
401
Reaction score
330
Location
Texas
Rating - 0%
0   0   0
I started working on a cover for the tank. I'm going for a net cover using the clear 1/4" netting from BRS. To get the curve in the front piece of screen frame, I first traced the required curve onto some plywood using the plastic top that came with the tank. Then I measured down 1" on each end and placed a dot. I then for both sides, I placed the plastic top back onto the original line and rotated it until the corner lined up with the dot and drew another line. This left me with 2 curves, the original curve of the tank and a sharper curve. The sharper curve will be used as the form because the aluminum window frame will spring back when the form is removed.
Untitled.png


To make the form, I drove screws onto the form line (blue line above). I found the screws act as pressure points when bending and leave small kinks in the aluminum where contact is made, so I used some polyethylene tube to spread out the force. I started on one side of the form, gently pulled on the aluminum to bend it around the form. I then added another row of screws to hold the aluminum in the form as I moved from one end to the other. This is the completed bend in the form.
20210104_191948.jpg


Before removing from the form, I lightly heated the aluminum with a MAP blowtorch. Not too much because of the tubing. I also used a mallet and chisel to straighten out the channel that holds the cord in a few places. Once cooled, I removed one row of screws to free the frame from the form. It sprang back some, as expected, and the resulting curve was a good fit for my tank.

The last tricky part with the bowfront cover is the front corners. I cut the bowed frame to correct length and cut two pieces to use as the short sides of my top. I connected the pieces together using the standard 90 degree plastic corners. Then I used the MAP blowtorch to lightly heat the aluminum and plastic corners to soften them and was then able to bend the plastic corner by hand to the required angle.

20210104_195447.jpg


To get a better fit in the tank, I marked the plastic corners to match the bow of the front glass. I then cut and filed the plastic corners to shape.

20210104_201420.jpg


Now that the front and sides are done, the back can be done like any other top. I will be leaving openings in the back corners to allow for equipment and cords to come out. I also plan to paint my frame black before adding the clear netting.
 
OP
OP
rmcrom

rmcrom

Active Member
View Badges
Joined
Dec 31, 2020
Messages
401
Reaction score
330
Location
Texas
Rating - 0%
0   0   0
I just had a visit from UPS Santa. I can start my rockwork tonight. :)

20210105_133041.jpg
 
Last edited:
OP
OP
rmcrom

rmcrom

Active Member
View Badges
Joined
Dec 31, 2020
Messages
401
Reaction score
330
Location
Texas
Rating - 0%
0   0   0
Awesome! can't wait to see what you come up with, also could we see some more pics of how the lid came out? I may try to do something similar for my tank.
Yes I will show more of the lid. I realized that I need to take into account the extra width of the rimless tank screen top clips, so I'm going to wait for those to arrive before I go any further. I may need to take it apart and shorten the front piece a little if it's too wide.
 
OP
OP
rmcrom

rmcrom

Active Member
View Badges
Joined
Dec 31, 2020
Messages
401
Reaction score
330
Location
Texas
Rating - 0%
0   0   0
Haven't glued it yet, but I might do something like this plus some added rock rubble in the joints..
20210105_181121.jpg
 
OP
OP
rmcrom

rmcrom

Active Member
View Badges
Joined
Dec 31, 2020
Messages
401
Reaction score
330
Location
Texas
Rating - 0%
0   0   0
Got my light on. A ReefBreeders Photon V2+ 24". A fantastic light.
20210105_204728.jpg
 
OP
OP
rmcrom

rmcrom

Active Member
View Badges
Joined
Dec 31, 2020
Messages
401
Reaction score
330
Location
Texas
Rating - 0%
0   0   0
After installing the light, it was clear that the mounts would get in the way of the cover, so I decided to just put the cover on top of the light's mounting brackets. This is the frame I will be using. I just need to sand/paint the frame and install the netting.
20210106_185320.jpg
 
OP
OP
rmcrom

rmcrom

Active Member
View Badges
Joined
Dec 31, 2020
Messages
401
Reaction score
330
Location
Texas
Rating - 0%
0   0   0
I added a Tunze nano ATO. I'm just using a 5 gallon bucket for my reservoir.
20210107_210100.jpg

20210107_210153.jpg
 

Daniel@R2R

Living the Reef Life
View Badges
Joined
Nov 18, 2012
Messages
37,592
Reaction score
64,195
Location
Fontana, California
Rating - 100%
1   0   0
Cool! Thanks for sharing your tank with us! Following along!
 
OP
OP
rmcrom

rmcrom

Active Member
View Badges
Joined
Dec 31, 2020
Messages
401
Reaction score
330
Location
Texas
Rating - 0%
0   0   0
I decided to add a skimmer. I went with the AquaMaxx HOB 1.5. I will need to rework my mesh cover again to fit.
20210114_121354.jpg
 
OP
OP
rmcrom

rmcrom

Active Member
View Badges
Joined
Dec 31, 2020
Messages
401
Reaction score
330
Location
Texas
Rating - 0%
0   0   0
I installed the clear netting onto the cover and the tension nearly collapsed my frame. I had to add these diagonal braces to reinforce the frame. If I had done just a straight 1-piece back section on my frame this probably wouldn't have happened.
20210115_145219.jpg
 

Razorp

Active Member
View Badges
Joined
Jul 23, 2020
Messages
223
Reaction score
316
Location
nacogdoches
Rating - 0%
0   0   0
following! Check out my build, exact same tank lol! ive been debating which skimmer, may go with the same one! I also should probably grab that top off, but being by mine 6 says a week all day makes it pretty easy to do manual top off for the time being!
 

Tentacled trailblazer in your tank: Have you ever kept a large starfish?

  • I currently have a starfish in my tank.

    Votes: 34 29.6%
  • Not currently, but I have kept a starfish in the past.

    Votes: 30 26.1%
  • I have never kept a starfish, but I hope to in the future.

    Votes: 26 22.6%
  • I have no plans to keep a starfish.

    Votes: 24 20.9%
  • Other.

    Votes: 1 0.9%
Back
Top