50g Cadlights Build Thread

rtparty

2500 Club Member
View Badges
Joined
Jan 19, 2010
Messages
4,679
Reaction score
8,053
Location
Utah
Rating - 100%
1   0   0
Guess it's time I start this thread. This build has been in the works for a little while and has finally progressed to a point where I can add some pictures and get things going.

Equipment List
Tank: 50g Cadlights Rimless
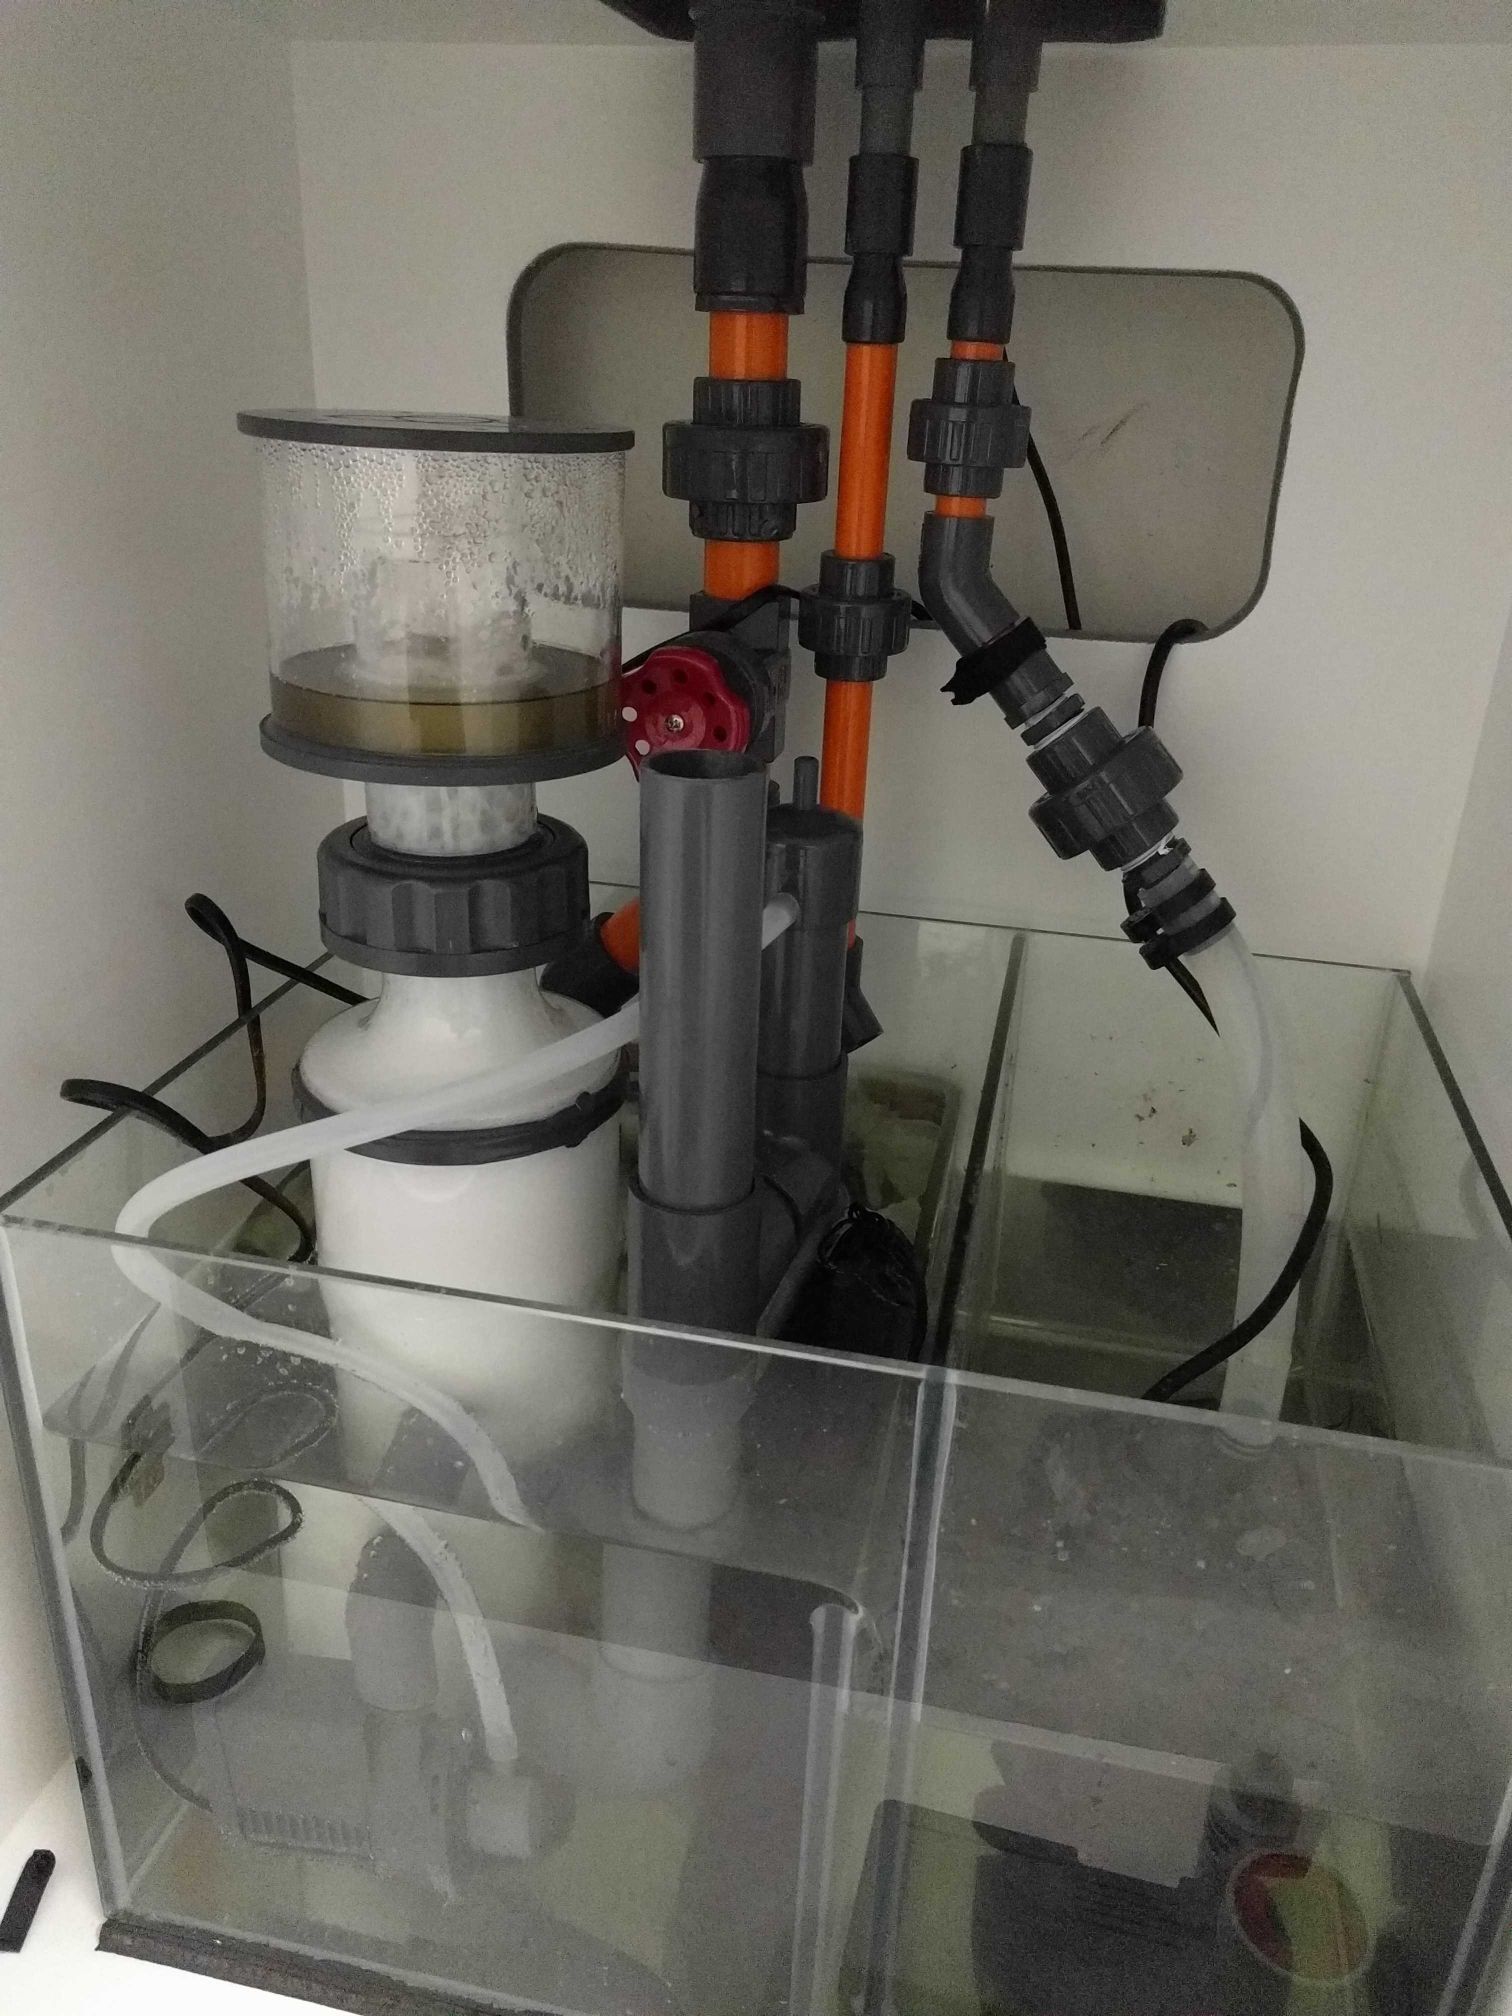
Sump: 17g Cadlights - modified
Custom built stand: 3/4" Birch plywood painted
Lighting: 24" Geisemann MH/T5 (Phoenix 14k, 2 ATI Blue Plus)
Skimmer: Cadlights PLS-100 (I think. Will be changed)
Return: Eheim Compact 3000+
Heater: Fluval E series (for now)
Controller: Apex Jr with temp probe
Powerheads: Tunze 6045x2, MP10QDx1

Misc.
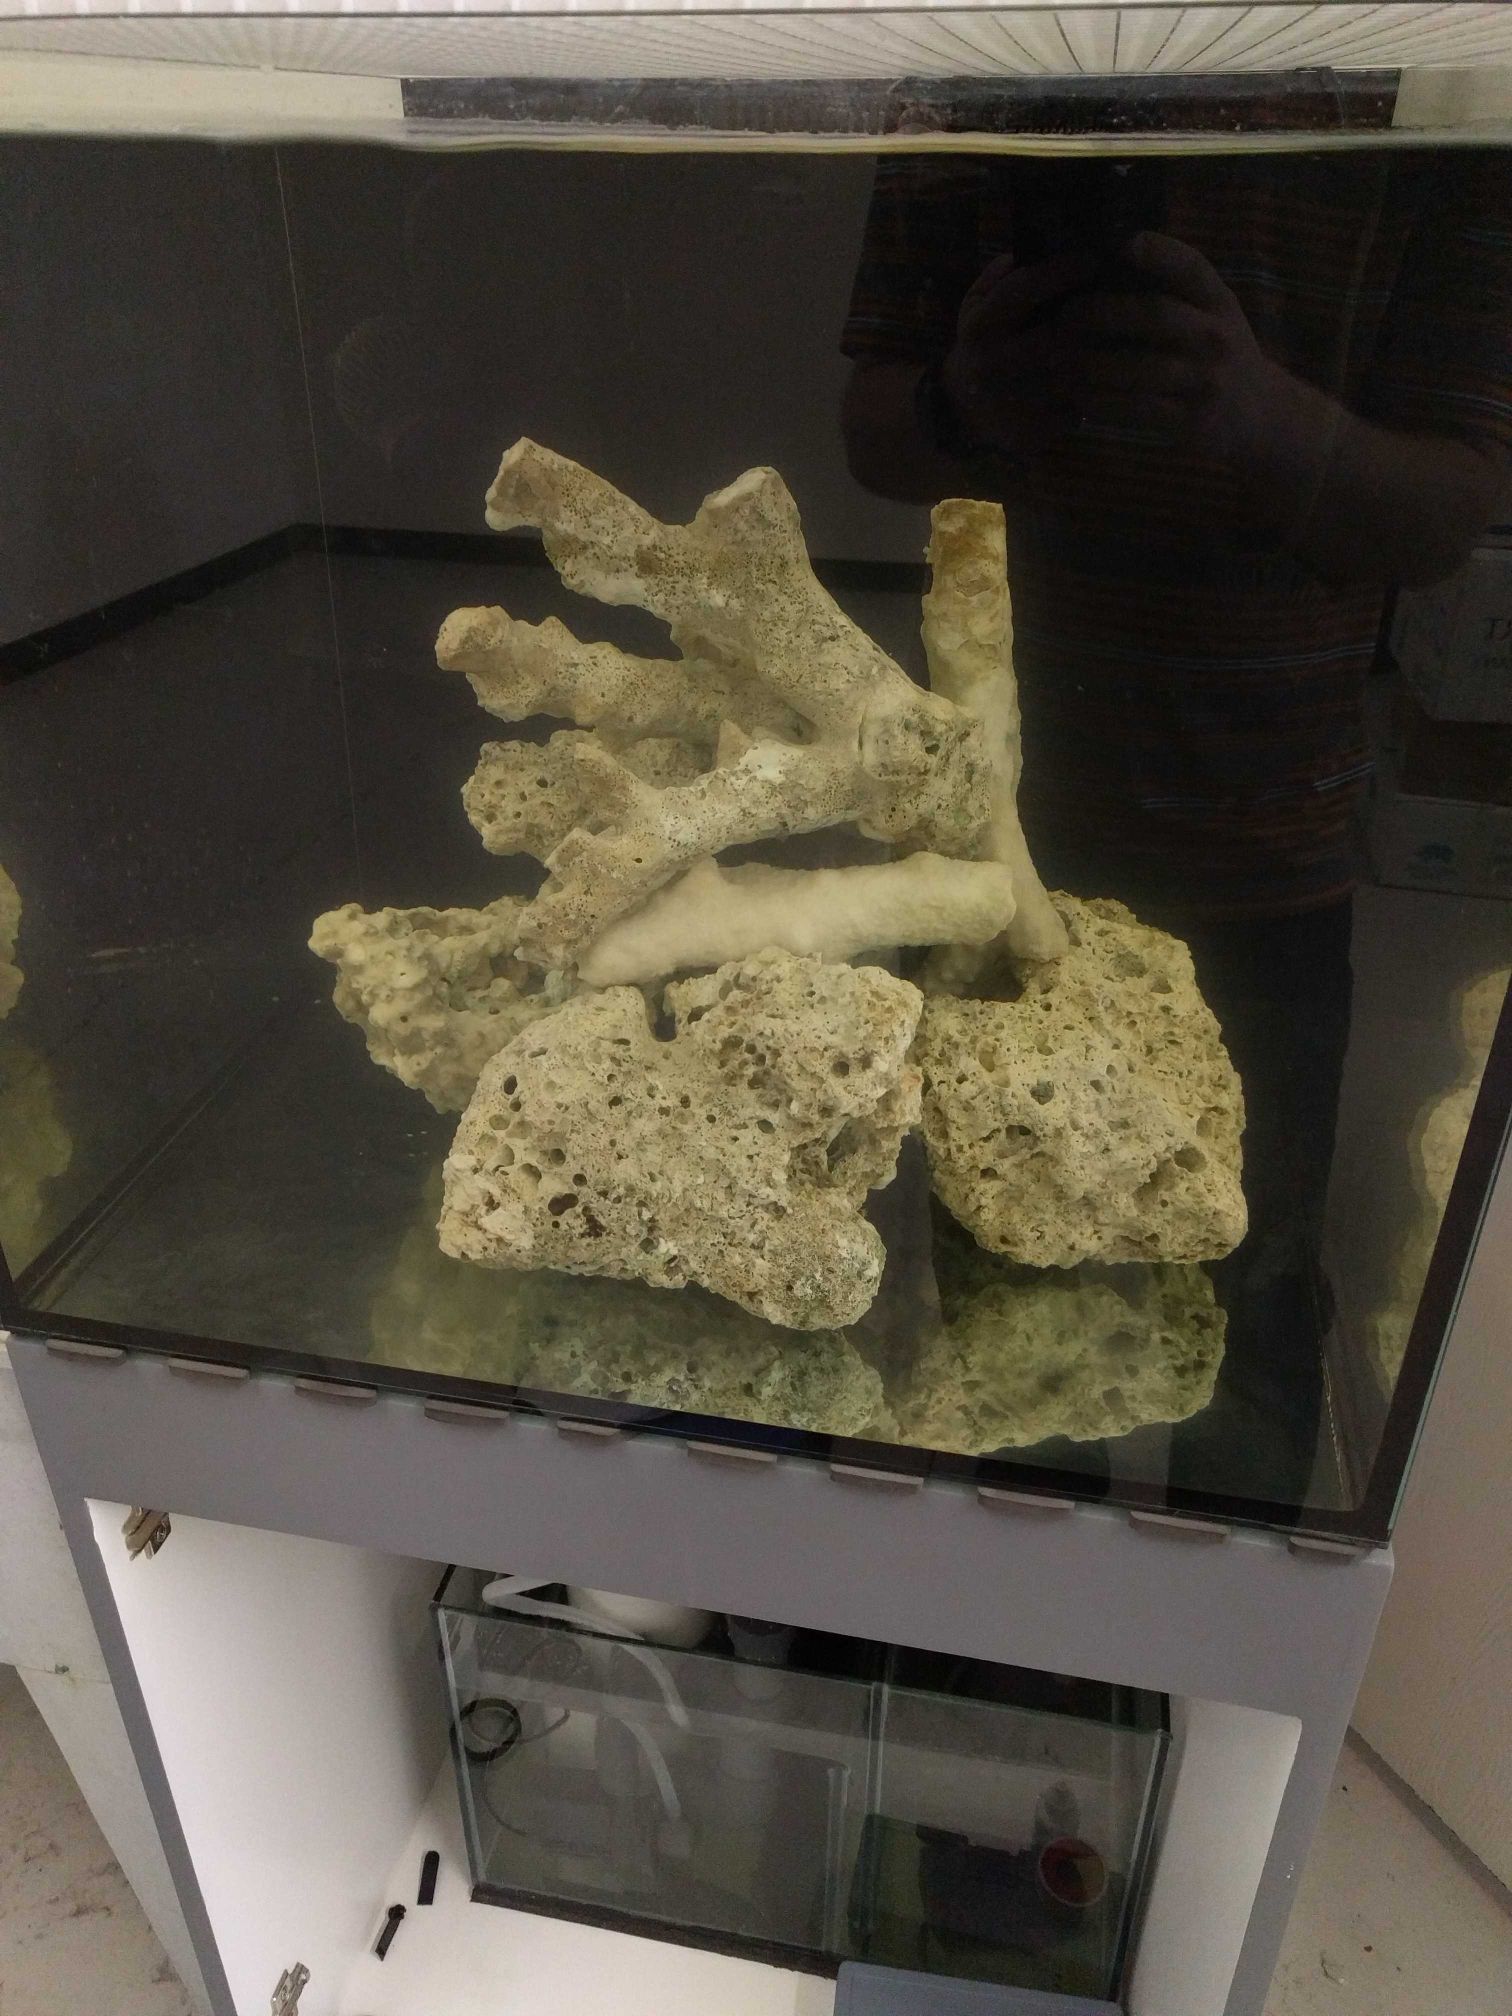
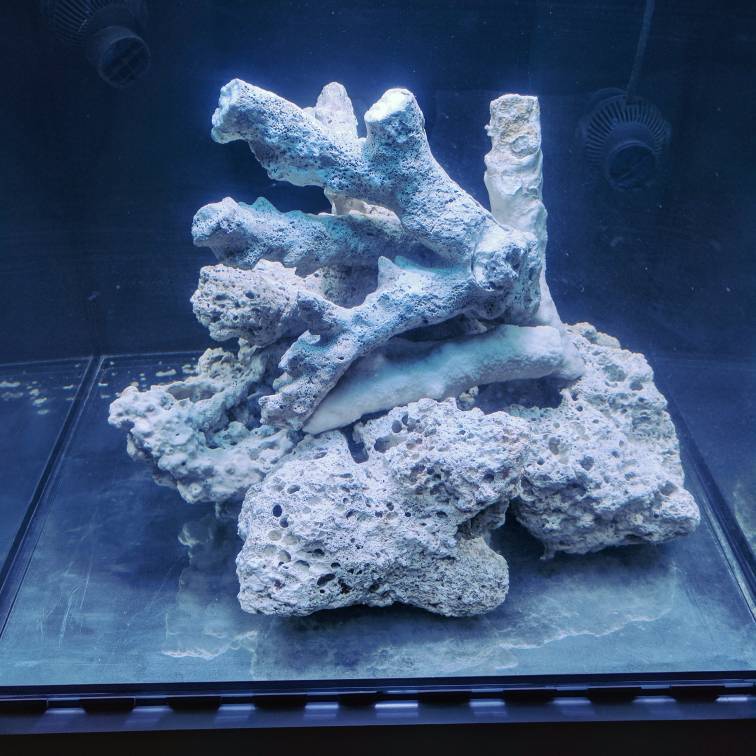
Rock: Pukani, Fiji and Tonga Branch (all dry)
Sand: Don't know yet
Plumbing: Orange PVC from BRS, SCH80 fittings. 1" Herbie Drain, 1/2" emergency and 1/2" return (modified like crazy to fit standard PVC and not metric)
Salt: Fritz Pro

Most current pic:


More to follow...
 
OP
OP
rtparty

rtparty

2500 Club Member
View Badges
Joined
Jan 19, 2010
Messages
4,679
Reaction score
8,053
Location
Utah
Rating - 100%
1   0   0
A little background first...

I've been in the hobby since early 2006. Couple breaks here and there with the most recent break being the longest (almost 3 years.)

In September of 2016 I decided it was time to look at a new tank and see what was out there. I had stayed pretty current on equipment and techniques and knew what I wanted in the space I had. I watched the local forum and local classifieds for a little bit when I came across this tank. It fit the area I had and now I had to convince the wife. (I should add I didn't need to really convince her. She is totally supportive of the hobby as long as home is taken care of first.)

So here is where we started after a few purchases:


Really wish I had earlier pictures. The sump looked 10 times worse than the tank. It was caked in algae and full of rock rubble. It took my wife and I about 2 hours of cleaning/scrubbing plus an overnight soak in vinegar to get it clean.

Next up is stand and plumbing...
 
OP
OP
rtparty

rtparty

2500 Club Member
View Badges
Joined
Jan 19, 2010
Messages
4,679
Reaction score
8,053
Location
Utah
Rating - 100%
1   0   0
Unfortunately, I don't have any pictires of the actual build. My father in law did most of it without me there. It is 3/4" birch plywood. Dadoed (is that a word?), glued and screwed together. He's much better than I at woodworking and I didn't want the 2*4 build. The inside already constricts me enough.

Stand:


Plumbing:


Sump:


Freshwater test:


Up next is RO fill and curing the rock!
 
Last edited:
OP
OP
rtparty

rtparty

2500 Club Member
View Badges
Joined
Jan 19, 2010
Messages
4,679
Reaction score
8,053
Location
Utah
Rating - 100%
1   0   0
A new skimmer has been ordered! ReefDynamics INS80 should be here this week.

The Cadlights is just too loud for where this tank is going. The Cadlights is pulling a ton of gunk while curing the rock though. Might stick around as a backup
 
OP
OP
rtparty

rtparty

2500 Club Member
View Badges
Joined
Jan 19, 2010
Messages
4,679
Reaction score
8,053
Location
Utah
Rating - 100%
1   0   0
New skimmer is in and running! The skim is just from running it wide open overnight to break in. I need to build a stand and start fine tuning it today.

34cc455bfaa280fb5d3ae9e9f24cc05f.jpg


This is where we are currently at with curing the rock...

3c5948307b20d70cacba6bd9cb28fbcd.jpg


Just waiting on my MicroBacter7 shipment. Then I will add in Matrix to get it seeded as well.
 
OP
OP
rtparty

rtparty

2500 Club Member
View Badges
Joined
Jan 19, 2010
Messages
4,679
Reaction score
8,053
Location
Utah
Rating - 100%
1   0   0
First round of MicroBacter7 has been added and I also threw in 1L of Matrix to get it seeded and going as well.

So far the skimmer has been tough to dial in but I know it's the inconsistency right now. It also spits out a ton of bubbles from the outlet. I might need to cut an inch or so off the skimmer stand.
 
OP
OP
rtparty

rtparty

2500 Club Member
View Badges
Joined
Jan 19, 2010
Messages
4,679
Reaction score
8,053
Location
Utah
Rating - 100%
1   0   0
Looking good

In for more updates
Thanks for following! I hope to move things along pretty quick once the home projects are finished.
I like the color combo.
Is that a interlocking floor part between tank and stand? I like the detail.
Thank you. That is the foam floor pads that the tank is sitting on. When I bought the tank, the guy included the garbage Cadlights stand for free. I asked him where the foam was and he had no idea what I was talking about. When it came time to FW test the tank, I wanted foam and just happened to have some spare flooring foam lying around. I threw it on there for the test and it worked well. So when I got the stand ready, I just moved it all over as is. It doesn't look good IMO but does the job.

When I get ready to move the tank home, I will get other foam that isn't so noticable and much cleaner. I originally bought a Red Sea reefer stand for this tank and the foam they used was the exact same foam you buy from a hobby shop for projects. It's around $1 for an 18x12 piece (I use it for work all the time.) I should only need a couple pieces to cover the stand top.
 
OP
OP
rtparty

rtparty

2500 Club Member
View Badges
Joined
Jan 19, 2010
Messages
4,679
Reaction score
8,053
Location
Utah
Rating - 100%
1   0   0
Tank is humming right along. The rock is probably cured but I don't have a spot for the tank yet.

Some equipment changes are in the works. My Gmann fixture has been sold and I bought another Gmann. The new fixture is the 250w SE with 4 T5s. So I will be running Radiums!!! Super stoked about it.

I sold off the MP10 to help fund the new light. 2 Tunze 6045 should be enough for now. Thinking of grabbing the Ice Cap Gyre to test out. Might let my buddy be the guinea pig there...[emoji3]

Next up is a new heater and finding a way to grow chaeto somewhere. My idea is to section off my return compartment with some egg crate, attach clear mesh to the egg crate and grow chaeto there. My return section won't be any smaller and it's the only spot left since my skimmer took up the other section.

I could also get a CPR HOB fuge and hang it on my sump...
 
OP
OP
rtparty

rtparty

2500 Club Member
View Badges
Joined
Jan 19, 2010
Messages
4,679
Reaction score
8,053
Location
Utah
Rating - 100%
1   0   0
New light is here and did a quick test run

b585183567916b59bedfb4a810a03dfa.jpg


It's probably a little more blue in person but I love the Radium color! T5s will need to be replaced in the next little bit. I might go with my fall back of 2 Blue Plus, 1 Purple Plus and 1 Actinic
 
OP
OP
rtparty

rtparty

2500 Club Member
View Badges
Joined
Jan 19, 2010
Messages
4,679
Reaction score
8,053
Location
Utah
Rating - 100%
1   0   0
What a couple weeks!

First, all home projects have been completed and the nursery is ready. Baby boy is due any day now! [emoji3][emoji3][emoji3]

This opened up my spot for the tank's final resting spot. I planned to move everything on Tuesday night but my moving help couldn't make it work. So Wednesday morning I got into work and started some RO water. When I'm cleaning up I realize there is water all over the floor. My heart sank as I figured the tank was leaking somewhere...

I immediately checked all pipes and seams and couldn't find a thing. Checked the sink next to my tank to see if the drain was leaking. Nothing. I then notice it's coming out of the bottom of the wall. I check the bathroom and the floor is flooded. Toilet is leaking out of the tank. Shut the water off and flush it. Grab a mop and start praying it didn't get under the stand. I tear the tank down as fast as I can and salvage maybe 35 gallons of water in some containers I had just bought Monday. If those weren't there, I would have been in trouble. Take a closer look and thankfully no water got to the stand! That could have been bad even with all the protection I put on the stand.

So now my rock is sitting in a Brute garbage can with some flow and heat. This gives me a chance to bring the tank, stand and all equipment home and wire everything up in my separate cabinet. I'll have to make another 25-30 gallons of water but that's just fine.

One major issue I've found is my drain. It is 1" piping and handles 500gph way too easily. My gate valve is very closed and I don't like it. I really don't want redo all my plumbing but it may save a flood. Anyone following think a ½ inch Herbie can handle 500gph? I can also turn the return pump down if needed on the smaller drain. Then I'll use the 1" for emergency

Thanks all for reading this!
 

Tokash23

Active Member
View Badges
Joined
Oct 3, 2014
Messages
498
Reaction score
296
Rating - 0%
0   0   0
What a couple weeks!

First, all home projects have been completed and the nursery is ready. Baby boy is due any day now! [emoji3][emoji3][emoji3]

This opened up my spot for the tank's final resting spot. I planned to move everything on Tuesday night but my moving help couldn't make it work. So Wednesday morning I got into work and started some RO water. When I'm cleaning up I realize there is water all over the floor. My heart sank as I figured the tank was leaking somewhere...

I immediately checked all pipes and seams and couldn't find a thing. Checked the sink next to my tank to see if the drain was leaking. Nothing. I then notice it's coming out of the bottom of the wall. I check the bathroom and the floor is flooded. Toilet is leaking out of the tank. Shut the water off and flush it. Grab a mop and start praying it didn't get under the stand. I tear the tank down as fast as I can and salvage maybe 35 gallons of water in some containers I had just bought Monday. If those weren't there, I would have been in trouble. Take a closer look and thankfully no water got to the stand! That could have been bad even with all the protection I put on the stand.

So now my rock is sitting in a Brute garbage can with some flow and heat. This gives me a chance to bring the tank, stand and all equipment home and wire everything up in my separate cabinet. I'll have to make another 25-30 gallons of water but that's just fine.

One major issue I've found is my drain. It is 1" piping and handles 500gph way too easily. My gate valve is very closed and I don't like it. I really don't want redo all my plumbing but it may save a flood. Anyone following think a ½ inch Herbie can handle 500gph? I can also turn the return pump down if needed on the smaller drain. Then I'll use the 1" for emergency

Thanks all for reading this!

Congrats on the kid ill be having one later this year myself! I am confused as to why you need to close your drain down so much noise? Maybe i am misunderstanding the setup i kind of skimmed lol
 
OP
OP
rtparty

rtparty

2500 Club Member
View Badges
Joined
Jan 19, 2010
Messages
4,679
Reaction score
8,053
Location
Utah
Rating - 100%
1   0   0
Congrats on the kid ill be having one later this year myself! I am confused as to why you need to close your drain down so much noise? Maybe i am misunderstanding the setup i kind of skimmed lol


I'm running a Herbie style drain. The drain becomes a full syphon with no air present. This cuts down noise and allows a lot more flow through the pipes. I am all about having a silent setup since this will be in my living room.

I found out from a user on the other forum that the ½" drain will easily handle the flow rates I need. So now the ½" will become my main drain and the emergency will have a slow trickle or run dry. I'll mess around when my new gate valve gets here. I ordered it from BRS and it's shipped.

In other news, the tank is going home tonight! I got most everything else there and need to wire up my extra cabinet now. The Apex was a battle but I think I got it working. I'm brand new to Apex and they are NOT user friendly IMO. They need some serious help there.

However, once I started to figure things out it became easier to use. I'll continue to mess around with it once the tank is up and running again
 

Tokash23

Active Member
View Badges
Joined
Oct 3, 2014
Messages
498
Reaction score
296
Rating - 0%
0   0   0
I'm running a Herbie style drain. The drain becomes a full syphon with no air present. This cuts down noise and allows a lot more flow through the pipes. I am all about having a silent setup since this will be in my living room.

I found out from a user on the other forum that the ½" drain will easily handle the flow rates I need. So now the ½" will become my main drain and the emergency will have a slow trickle or run dry. I'll mess around when my new gate valve gets here. I ordered it from BRS and it's shipped.

In other news, the tank is going home tonight! I got most everything else there and need to wire up my extra cabinet now. The Apex was a battle but I think I got it working. I'm brand new to Apex and they are NOT user friendly IMO. They need some serious help there.

However, once I started to figure things out it became easier to use. I'll continue to mess around with it once the tank is up and running again

I understand now missed the herbie part, sounds like you have it figured out.
 

Dxpert

Community Member
View Badges
Joined
May 22, 2015
Messages
53
Reaction score
15
Location
Ottawa, Canada
Rating - 0%
0   0   0
Great build so far! The tank and stand look great.

If you have questions about the Apex post then here and I'll be happy to chime in. You can also checkout the Apex support forum, but there is a lot of information there.
 

Creating a strong bulwark: Did you consider floor support for your reef tank?

  • I put a major focus on floor support.

    Votes: 17 51.5%
  • I put minimal focus on floor support.

    Votes: 6 18.2%
  • I put no focus on floor support.

    Votes: 9 27.3%
  • Other.

    Votes: 1 3.0%
Back
Top