Only products like "Weld-on / Scigrip #40" need a gap to work. As turbo says no gap with the thin stuff. Sand or scrape? It does not matter as long as it is flat. No rounded edges. the edge should not be "U" shaped. If sanded the finer grit paper, the better. This is why routed edges are best.@Turbo's Aquatics Thank you very much.. If the edges are not perfect and in a spot we have half millimeter gap, is that gap going to fill up with the weldon 4 or we need something else? And for welding is better to sand or scrape it?
Thanks for your time
Navigation
Install the app
How to install the app on iOS
Follow along with the video below to see how to install our site as a web app on your home screen.
Note: This feature may not be available in some browsers.
More options
You are using an out of date browser. It may not display this or other websites correctly.
You should upgrade or use an alternative browser.
You should upgrade or use an alternative browser.
Acrylic Fabrication Q & A
- Thread starter Turbo's Aquatics
- Start date
-
- Tags
- acrylic diy fabrication
- Tagged users None
@Turbo's Aquatics @lapin Thanks a lot. Right now i have only the pieces for sump and they are perfect.
So last question before i start bonding. if i bond them and not use clamps to put pressure and leave them with their own weight will be a problem?
If i use clamps and i use different forces in 2 pieces i might be end with 2 different heights? for example i have the ends with 40cm, if i press harder one side it might end up 39.8cm? That is my last fear.
thanks again for your help
- Joined
- Oct 13, 2019
- Messages
- 10
- Reaction score
- 0
So I’ve searched the thread a bit, and couldn’t find a clear answer. My company is getting rid of a pallet of 6mm(.236) plex pmacs the label also has a bunch of letters after it. So I was going to take it home and see if there was anything I could do with it. From what I’m understanding is that this is just plexiglas cheap product to compete with imports? And would be fine for sump construction. I was looking to build a short frag tank, but a couple replies here say that they wouldn’t trust it with a display tank, due to the imperfections of it. Is that just for aesthetic purposes, or are there more structural imperfections in them. Would a frag tank less than 12” be feasible?
I do not use clamps to apply pressure to the joint, I only use weights. You should be able to get a full contact joint (prior to inserting pins) with an angle bracket and possibly a few weights, depending on if the material has any bow or warp to it. Then, after pulling pins, I will typically add a few 5 lb weights. To me, clamps are too prone to squeezing a focused area of the joint and causing distortion of the flat panel, or twisting the panel out of square. Adding weights allows the angle bracket to maintain the square joint and they disperse pressure more gently and evenly.if i bond them and not use clamps to put pressure and leave them with their own weight will be a problem?
Weights are not always needed. It depends on the project. If you are bonding a small sump together, it's a good idea. If you're bonding 24" x 24" 3/4" thick panels, probably not necessary.
Post the numbers. PMACS is the same as Plexiglas-G without the warranty (basically). The numbers might indicate a coating, like UV, scratch resistant, etc. These might make the material less usefulplex pmacs the label also has a bunch of letters after it.
- Joined
- Oct 13, 2019
- Messages
- 10
- Reaction score
- 0
Under the description it saysPost the numbers. PMACS is the same as Plexiglas-G without the warranty (basically). The numbers might indicate a coating, like UV, scratch resistant, etc. These might make the material less useful
“PLEX PMACS, CL, NP, MGLMGL, 48x96x0.236 “
- Joined
- Oct 13, 2019
- Messages
- 10
- Reaction score
- 0
There is also another pallet that is from a different company that has less info on the sticker
Last edited by a moderator:
Well I can't seem to find the "NP" or "MGLMGL" codes anywhere, Arkema generally assigns a 4 digit code to all their products. Like "2025" is 0.236 black cast. But it looks like that's clear cast .236, PM2 probably means PMACS. I would call Piedmont Plastics and give them that part number and they can tell you what it is exactly. There is a "GN on that label, that could mean green tint (made to look like natural glass) but that would be really easy to spot by peeling the mask off.
I'm assuming it has a brown paper mask, with no print?
If it's truly cast .236 PMACS, don't let them toss it, a pallet of that is worth a lot right now
I'm assuming it has a brown paper mask, with no print?
If it's truly cast .236 PMACS, don't let them toss it, a pallet of that is worth a lot right now
- Joined
- Oct 13, 2019
- Messages
- 10
- Reaction score
- 0
Correct, the other has a semi transparent blue plastic mask. It’s clear as far as I can tell by just pulling back the paper mask.I'm assuming it has a brown paper mask, with no print?
- Joined
- Oct 13, 2019
- Messages
- 10
- Reaction score
- 0
The only thing like that on it is esr-1653, which was under the weight section. I just googled it and it’s an Arkema part number. The only thing I can find is a general care page for it though.Arkema generally assigns a 4 digit code to all their products
- Joined
- Oct 13, 2019
- Messages
- 10
- Reaction score
- 0
Yea I realized that after I posted, that it was more like a data sheet. Sorry, I guess I’ll have to contact them. And see what the part number is
- Joined
- Dec 23, 2019
- Messages
- 13
- Reaction score
- 17
Heyall!
Great thread!
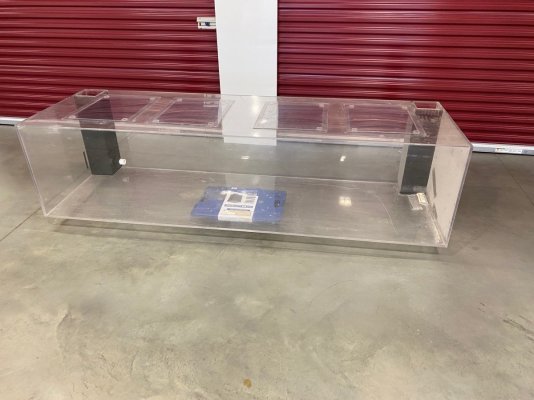
I have learned so much from this discussion! I have been in the reef hobby since 2006 and keeping aquariums since the 80's however I have never owned an acrylic tank. A few weeks ago a deal came up that I could not pass up, a 96"x24"x30" 300 gallon. The tank is in excellent condition overall, there are some small scratches that I am planning to buff out, a small chip in one corner and I would like to change the configuration.
I have a couple of questions that I can't find the answer to anywhere and was wondering if anyone had thoughts. First is the overflow boxes. The tank has two overflow boxes in the corners, they appear to be acrylic and bonded in. I would prefer to take them out and set it up as a peninsula with a coast to coast style overflow. I am not sure the product they used but from the appearance of the squeeze out on the bottom it appears to be a 2 part adhesive. I am wondering how deep the scaring would be, could I sand and polish out the damage?? I have been looking at an endmill bit for my router to take it down to within a few thousandths of the surface of the panel then sand and polish it out.
The other issue I have with a bulkhead hole that was drilled in the back panel. I am thinking that if I can cut an acrylic plug to fit the hole exactly (>.0003") and bond it in I would be able sand and polish out most of the seam to make it virtually disappear. I suspect there would a bit of distortion similar to joining two pieces at a butt joint but if it bothers me I could always park an MP60 on top of it, strength wise it should be very strong.
What's the collective wisdom of the group? Can this be done?? Or would I be better off to just live with it the way it is??
Here is the tank in all of its 8' of glory!! My wife is happy as now we can get a few of the tangs she has been drooling over and I keep saying no as we dont have the swimming space. I am pleased that it is 24" high versus the usual 30" as it makes a much better display.

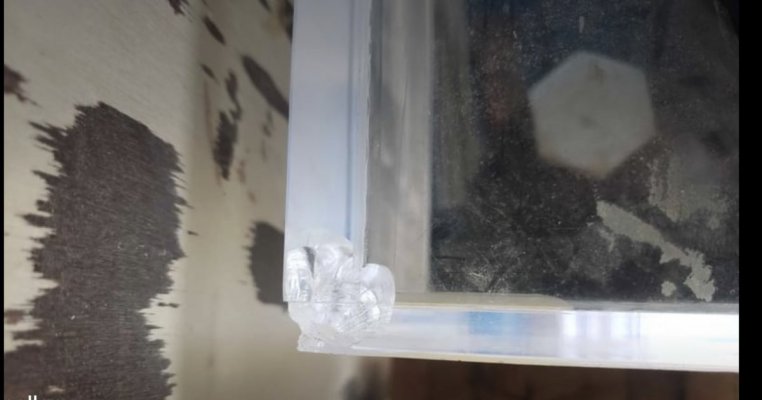
Here is the small chip I was speaking of, it hasn't affected the seam but I might want to clean it up a little, maybe re-enforce the inside of the corner with a 1" wedge bonded to the panels?

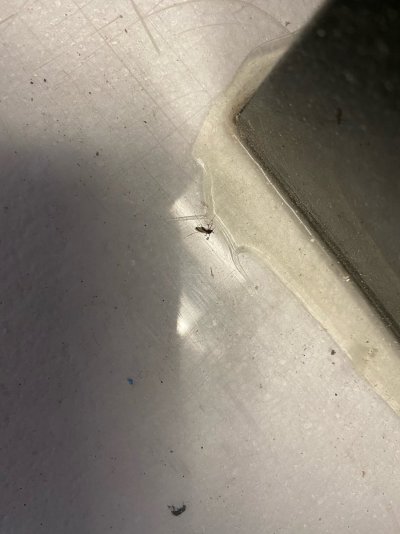
This is the bottom of the overflow box, as you can see there is a good deal of pooling of the excess. I tried to get a razor blade under an edge to see if they used a 2 part epoxy to bond it in but no such luck!

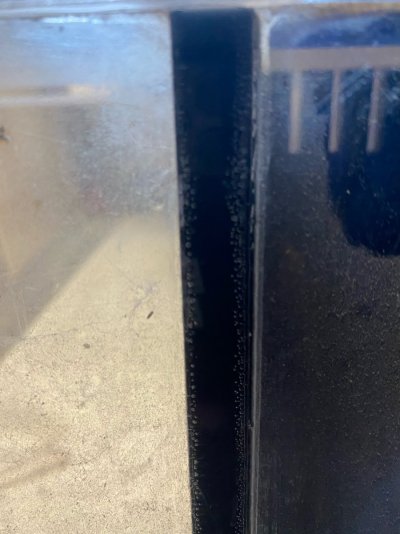
This is the same seam at the top of the tank, I am thinking if the solvent hasn't penetrated too deep it might be possible to polish out the scar. Sorry about the dust, I haven't had the chance to clean it up yet!

Great thread!
I have learned so much from this discussion! I have been in the reef hobby since 2006 and keeping aquariums since the 80's however I have never owned an acrylic tank. A few weeks ago a deal came up that I could not pass up, a 96"x24"x30" 300 gallon. The tank is in excellent condition overall, there are some small scratches that I am planning to buff out, a small chip in one corner and I would like to change the configuration.
I have a couple of questions that I can't find the answer to anywhere and was wondering if anyone had thoughts. First is the overflow boxes. The tank has two overflow boxes in the corners, they appear to be acrylic and bonded in. I would prefer to take them out and set it up as a peninsula with a coast to coast style overflow. I am not sure the product they used but from the appearance of the squeeze out on the bottom it appears to be a 2 part adhesive. I am wondering how deep the scaring would be, could I sand and polish out the damage?? I have been looking at an endmill bit for my router to take it down to within a few thousandths of the surface of the panel then sand and polish it out.
The other issue I have with a bulkhead hole that was drilled in the back panel. I am thinking that if I can cut an acrylic plug to fit the hole exactly (>.0003") and bond it in I would be able sand and polish out most of the seam to make it virtually disappear. I suspect there would a bit of distortion similar to joining two pieces at a butt joint but if it bothers me I could always park an MP60 on top of it, strength wise it should be very strong.
What's the collective wisdom of the group? Can this be done?? Or would I be better off to just live with it the way it is??
Here is the tank in all of its 8' of glory!! My wife is happy as now we can get a few of the tangs she has been drooling over and I keep saying no as we dont have the swimming space. I am pleased that it is 24" high versus the usual 30" as it makes a much better display.

Here is the small chip I was speaking of, it hasn't affected the seam but I might want to clean it up a little, maybe re-enforce the inside of the corner with a 1" wedge bonded to the panels?

This is the bottom of the overflow box, as you can see there is a good deal of pooling of the excess. I tried to get a razor blade under an edge to see if they used a 2 part epoxy to bond it in but no such luck!

This is the same seam at the top of the tank, I am thinking if the solvent hasn't penetrated too deep it might be possible to polish out the scar. Sorry about the dust, I haven't had the chance to clean it up yet!

Last edited:
Just real quick....take it off that dolly, that tank should not be supported like that, even for moving it around. BIG no no
- Joined
- Dec 23, 2019
- Messages
- 13
- Reaction score
- 17
Good to know, won’t do that again, it was only on there for a min to move it 20’ but now I know better!Just real quick....take it off that dolly, that tank should not be supported like that, even for moving it around. BIG no no
You can throw 2ea 2x4 long ways under it for support next time you need to move it.
I have had good luck repairing this sort of cosmetic damage with casting resin. I make a dam out of tape, over fill the spot then sand and polish.
If you are into the work the overflows can be removed and cleaned up. Im old and would just leave them. Cover them with new black acrylic to cover the teeth and clean it up. I would cover the bottom drain holes as a safety measure.
Can not help on the rear plug.
Well maybe (idea) if you covered the hole and the overflow was black you might not see it. Thats if it the same height as part of your C2C overflow.
Here is the small chip I was speaking of, it hasn't affected the seam but I might want to clean it up a little, maybe re-enforce the inside of the corner with a 1" wedge bonded to the panels?
I have had good luck repairing this sort of cosmetic damage with casting resin. I make a dam out of tape, over fill the spot then sand and polish.
If you are into the work the overflows can be removed and cleaned up. Im old and would just leave them. Cover them with new black acrylic to cover the teeth and clean it up. I would cover the bottom drain holes as a safety measure.
Can not help on the rear plug.
Well maybe (idea) if you covered the hole and the overflow was black you might not see it. Thats if it the same height as part of your C2C overflow.
- Joined
- Dec 23, 2019
- Messages
- 13
- Reaction score
- 17
I hadn’t thought of the casting resin, I have west systems 207 special clear in the shop right now that would probably do the trick! Honesty it is really cosmetic as it is at the back and would probably be covered up.You can throw 2ea 2x4 long ways under it for support next time you need to move it.
I have had good luck repairing this sort of cosmetic damage with casting resin. I make a dam out of tape, over fill the spot then sand and polish.
If you are into the work the overflows can be removed and cleaned up. Im old and would just leave them. Cover them with new black acrylic to cover the teeth and clean it up. I would cover the bottom drain holes as a safety measure.
Can not help on the rear plug.
Well maybe (idea) if you covered the hole and the overflow was black you might not see it. Thats if it the same height as part of your C2C overflow.
I know what you mean about the work. I would be tempted to just sell this tank and order exactly what I want but with the price of arcylic recently in Canada it would be $4-$5k!
I hadn’t thought of the casting resin, I have west systems 207 special clear in the shop right now that would probably do the trick! Honesty it is really cosmetic as it is at the back and would probably be covered up.
I know what you mean about the work. I would be tempted to just sell this tank and order exactly what I want but with the price of arcylic recently in Canada it would be $4-$5k!
Aie!
First thing to verify is whether or not there are any cracks that extend from this chip into any of the panels. If those cracks exist, even microscopic ones, they can expand after you add water (pressure) and they will not stop. So you would then have to remove material either ahead of the crack path (i.e. drill a small hole) or remove the material around the crack completely. Then, adding the cube of acrylic in the corner like you said, and like what was also mentioned, filling in the corner with resin.
For both of these steps, I would recommend Weld-on 40. The cube will have to have the corners rounded so that the faces can get snug on to the panels, the 40 will fill in the gap (40 is a gap filler).
This is likely Weld-on 40 and is of no concern. Just kind of sloppy construction.
I can't see what is wrong here? Except for the bubbles in the joint (which are not of concern)
- Joined
- Dec 23, 2019
- Messages
- 13
- Reaction score
- 17
I am not worried about the bubbles in the joint, this is one of the overflow box to viewing pane joints. It would be one of the joints I would like to cut off (the black acrylic) and polish provided it can be done and be aesthetically pleasing.
I had not thought of the possibility of cracking emminating from the chip. If they are microscopic there anything I can do preemptively or do I just have to fill the tank and see??
Thanks again for all the guidance! I will definitely be posting a build thread on this one.
I had not thought of the possibility of cracking emminating from the chip. If they are microscopic there anything I can do preemptively or do I just have to fill the tank and see??
Thanks again for all the guidance! I will definitely be posting a build thread on this one.
Ok so you want to remove one of the overflow boxes since you will be able to view the tank from the end, correct? That's a ton of work and a high risk for a minimal benefit - but that's just my opinion. Removing the black material and then sanding and polishing out the remnants is not going to be very easy, at all. I would leave it.
sand that corner down until all the crevasses are gone completely, the fill it back in using the tape/dam method to create a new corner (which will likely require some more sanding to square that corner off and make it flush with at least the bottom panel) then put in the cube insideI had not thought of the possibility of cracking emminating from the chip. If they are microscopic there anything I can do preemptively or do I just have to fill the tank and see??
Similar threads
- Replies
- 17
- Views
- 402


