I just ordered a pair of AI Prime HD lights with the hardware tank mount brackets (the L style, not the flexible ones). But Im afraid with all the Hang on back items I have on my tank I wont have room for the mounting brackets on the rim of my tank. Im thinking im going to run wood boards up the wall behind my tank to attach a custom bracket. Problem with the factory brackets is they are only 9.5" long. My tank is 4" out from the wall, and then I need another 9 inches to extend the lights out over the center. Any ideas for making custom wall LED Light brackets appreciated!

Navigation
Install the app
How to install the app on iOS
Follow along with the video below to see how to install our site as a web app on your home screen.
Note: This feature may not be available in some browsers.
More options
You are using an out of date browser. It may not display this or other websites correctly.
You should upgrade or use an alternative browser.
You should upgrade or use an alternative browser.
Any ideas for making custom wall LED Light brackets appreciated!
- Thread starter waverider
- Start date
- Tagged users None


I was concerned about my L brackets not fitting over the rim (or breaking, as a lot of reviews mentioned). Everything worked out just fine. However, my back up plan was to get some 8020 aluminum and come up with my own solution. 8020 is like a giant set of (expensive) Legos and there's a million ways to set up a mounting system for the lights and a good number of pictures, videos and tutorials. Having said that, the top of the L bracket that you got has a long slot which could easily be used for mounting to the underside of a shelf hung over the tank. I'd just make sure the actual light itself isn't under a wood shelf unless there's plenty of space for the heat to dissipate.
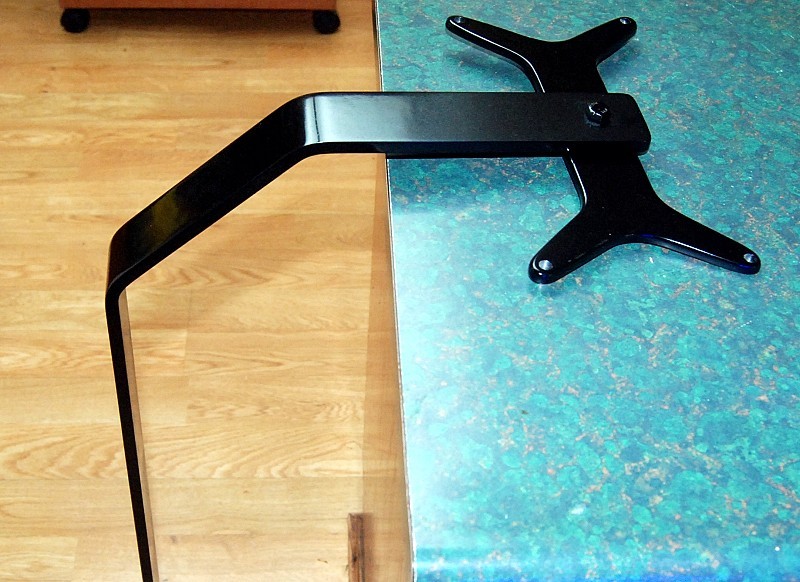
But, like you, I also have a rimmed tank (All-Glass/Aqueon) and it fit just fine. Just remember, the thumb screw goes *inside* the tank, not on the back. It should look like this:

And I'm glad the L brackets worked out. As much as I wanted to play with the 8020, this did make for a much cleaner look once I had everything where I wanted it and all the wires properly hidden.
But, like you, I also have a rimmed tank (All-Glass/Aqueon) and it fit just fine. Just remember, the thumb screw goes *inside* the tank, not on the back. It should look like this:
And I'm glad the L brackets worked out. As much as I wanted to play with the 8020, this did make for a much cleaner look once I had everything where I wanted it and all the wires properly hidden.


Oh, and like a lot of reviews (and the directions say), assemble everything on the ground and then install it. As much of a PITA it is to mount them to the tank already assembled, if you try to mount the light to the bracket as the last step, you're gonna drop it in the water.
I also mounted the top part of the L bracket upside down. It still mounted in the same place (over, not under, the lower piece), I just inverted it so the little part at the end points up instead of down. Everything seemed to work out easier that way. Easier to mount, easier cable management etc.

I also mounted the top part of the L bracket upside down. It still mounted in the same place (over, not under, the lower piece), I just inverted it so the little part at the end points up instead of down. Everything seemed to work out easier that way. Easier to mount, easier cable management etc.
OP
OP
Hey Joe, thanks for the response. Im looking up 8020 aluminum brackets now on Google.. Im also looking at Articulating Flat Screen TV mounts. There are some slick LED Reef Light articulating mount arms that people made by simply turning a TV articulating mount SIDEWAYS.. And... all of them under $50 on Amazon. Im reading your post in detail. I've learned already in this hobby, think about everything in detail before you commit to a purchase...Pondering this. So thanks!Oh, and like a lot of reviews (and the directions say), assemble everything on the ground and then install it. As much of a PITA it is to mount them to the tank already assembled, if you try to mount the light to the bracket as the last step, you're gonna drop it in the water.
I also mounted the top part of the L bracket upside down. It still mounted in the same place (over, not under, the lower piece), I just inverted it so the little part at the end points up instead of down. Everything seemed to work out easier that way. Easier to mount, easier cable management etc.
OP
OP
hey, is that Aqueon tank a 65 gallon? I have the 65. Is yours tempered? I think mine is tempered. I read in a statement from Aqueon that all their "kit" tanks -the ones that come with stand and lights and glass lid- are all tempered glass. every panel. For me, that means no drilled overflow box =(Oh, and like a lot of reviews (and the directions say), assemble everything on the ground and then install it. As much of a PITA it is to mount them to the tank already assembled, if you try to mount the light to the bracket as the last step, you're gonna drop it in the water.
I also mounted the top part of the L bracket upside down. It still mounted in the same place (over, not under, the lower piece), I just inverted it so the little part at the end points up instead of down. Everything seemed to work out easier that way. Easier to mount, easier cable management etc.

It's a 40 gallon breeder. It's not tempered, I drilled the back with no issue.
I wish I would have drilled a second hole for the return, but over the top is fine for that and I didn't want to push my luck (even though I do have a spare 40g breeder).
I wish I would have drilled a second hole for the return, but over the top is fine for that and I didn't want to push my luck (even though I do have a spare 40g breeder).
OP
OP
Yeah, I bought a Trigger Systems sump... a Reef Octopus Skimmer... a DC pump... god knows, all the PVC plumbing and an Eheim overflow box... All that died the second I realized I have tempered glass. My system is up now 8 weeks and looking awesome. I built my own mini Cheato hang on refugium and Im running a rather large fluval cannister, and with my UV and live rock my tank is cruising.


OP
OP
Looking at your photo here, it just freakin hit me: use the existing mount top bracket with the slit in it, then get a sturdy metal "L" bracket from Lowes thats about 6-8 inches, DRILL IT, and use metal screws to mount the existing top bracket to it. Done. Simple. Clean. Or I could make a decorative wooden one, stained to match my furniture.Oh, and like a lot of reviews (and the directions say), assemble everything on the ground and then install it. As much of a PITA it is to mount them to the tank already assembled, if you try to mount the light to the bracket as the last step, you're gonna drop it in the water.
I also mounted the top part of the L bracket upside down. It still mounted in the same place (over, not under, the lower piece), I just inverted it so the little part at the end points up instead of down. Everything seemed to work out easier that way. Easier to mount, easier cable management etc.
")

Like a shelf. If you put a shelf over the tank you can hang them from that, either with half of the L brackets or the ceiling mounting kit.Or I could make a decorative wooden one, stained to match my furniture.
This was bolted to the back of my stand for a Radion XR30.

- Joined
- Oct 3, 2019
- Messages
- 75
- Reaction score
- 18
Could you share your design ? i cant found your build threadHere’s my custom light bracket. Used 8020 and stainless steel bench brackets. The fixture folds up.
Details are in my build thread in the first couple pages.


Similar threads
- Replies
- 6
- Views
- 449
- Replies
- 10
- Views
- 314


