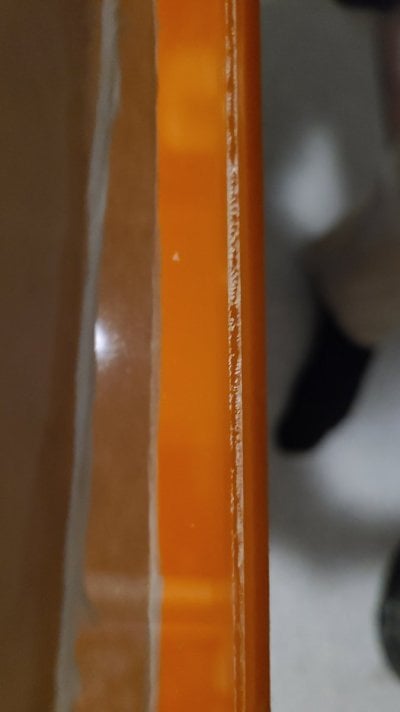
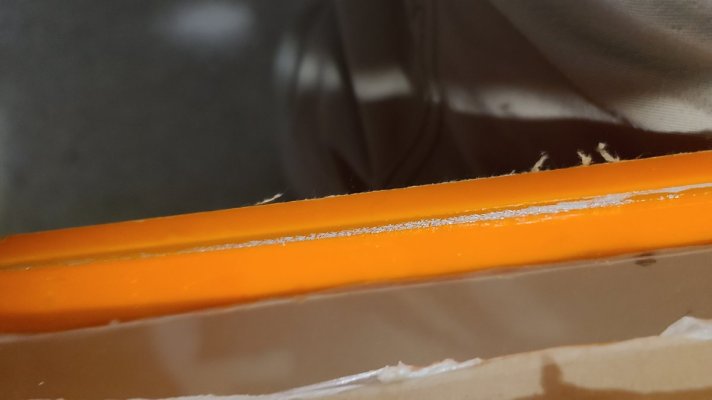
Made a bad bond today where kinda everything went wrong leaving a quarter-inch clear acrylic seam in a sump build littered with bubbles. looks awful. Is there anything that can be done at this point?

Navigation
Install the app
How to install the app on iOS
Follow along with the video below to see how to install our site as a web app on your home screen.
Note: This feature may not be available in some browsers.
More options
You are using an out of date browser. It may not display this or other websites correctly.
You should upgrade or use an alternative browser.
You should upgrade or use an alternative browser.
can you get bubbles out of a bonded acrylic seam?
- Thread starter Treehrtsme
- Start date
- Tagged users None


It's a real hassle but it can be done. Did I say it's a real hassle? Don't do this with water in hte tank. Using a dremel tool and constantly spraying water on it to keep the acrylic cool a narrow slit can be made. (Did I say it's a real hassle?) The slit then can be filled with weldon #40. The slit will need to be about 2 mm wide and as deep as the bubbles. If the joint has to be kept verticle a pocket needs to be made with painters tape, multiple layers, with an opening at the top the glue can be poured into. (Did I say it's a real hassle?) The excess glue then will need to be carefully sanded away and the joint buffed out with different grits of emory cloth or wet/dry sand paper to at least 5000 grit using water while sanding.
You can also try to cut apart the joint using a cordless circular saw, making sure to run water on the the acrylic to keep it cool and prventing crazing from happening when iglue hits the cut surfacees. Also use a carbide blade with as many teeth as possible (I use a 5 1/2" blade with 60 teeth) The areas being glued will likely need some sanding to prep it for glueing.
You can also try to cut apart the joint using a cordless circular saw, making sure to run water on the the acrylic to keep it cool and prventing crazing from happening when iglue hits the cut surfacees. Also use a carbide blade with as many teeth as possible (I use a 5 1/2" blade with 60 teeth) The areas being glued will likely need some sanding to prep it for glueing.
how noticeable will the Weldon 40 be?
Also for prep, I'm using a carbide tip table saw lade but after that cut what's the best way to prep it? sand it a little, scrape it with a razor blade? I don't have my shop space anymore so I basically don't even have a reliable sturdy table, just my equipment. The needle method just hasn't been working for me. I have been using 27 or 29 blunt syringe tips and just keeping a 3-foot panel in place is very difficult, any suggestions? I'm considering trying 28 gauge Kanthel wire again.
problem with sawing it is that it's the fourth panel between two others on a sump. i would be able to pull off the Dremel method but no matter what I do I can't get a seem without air bubbles on these large pieces.
for application what size needle do you recommend? I've been using blunt tip 27s on a syringe and I feel like that might be a part of the problem. also, would it be easier going with weldon4 over 3. this sump is already coming out pretty bad compared to my previous ones, and half of it is my frustration of working on the ground this clear panel didn't even go in completely aligned. I going to have to use my router to skim off some of the bases and maybe some of the clear panel as it has a tiny bit of overhang towards the end.... and then do a lot of polishing @Timfish
thanks

Also, since it will only be holding about 7 inches of water, is there something like Weldon 16 I could just smear on the inside for structural integrity??
Weldon #40 (and #42) has the viscocity of 90 weight gear oil and would need an applicator with a larger nozzle, I use applicator bottles from beauty supply. Both are clear when cured and no more noticable than #3 or #4. They are a lot stronger but that doesn't seem to be a consideration in this situation. If you're not worried about apperance your idea of just reinforcing the inside should work fine with either the #16 or the #40. You can also get 1/8" to 1/4" acrylic roc to reinforce the inside joint.
FWIW, to cut acrylic with power tools water needs to be use to keep the acrylic cool and preventing stress fractures that will show up as crazing when it's glued which weakens the joint. It's real messy and I always work outside with 2/4s or 4x4s laid across saw horses.
FWIW, to cut acrylic with power tools water needs to be use to keep the acrylic cool and preventing stress fractures that will show up as crazing when it's glued which weakens the joint. It's real messy and I always work outside with 2/4s or 4x4s laid across saw horses.
Yeah I just took another look at it and that might be the case, though I've only ever heard that being an issue with flame polishing. I wasn't thinking about it but I recently switched over to using a table saw as opposed to the router I was using before. I don't have a router table, or even a decent workbench at the moment, so getting cuts took me a very long time but they came out a whole lot cleaner than on the table saw. After a cut on the table saw I'd normally either sand it or see how clean it was and just go for it but looking back on my old projects the seams were a whole lot cleaner. I've never tried using water as a coolant during cutting but on previous projects it hasn't been a problem. unfortunately this panel's aesthetic so I would like it to look nice. I only have it glued to the on one side right now do you think it'd be possible to just use a Dremel cut the panel out entirely?Weldon #40 (and #42) has the viscocity of 90 weight gear oil and would need an applicator with a larger nozzle, I use applicator bottles from beauty supply. Both are clear when cured and no more noticable than #3 or #4. They are a lot stronger but that doesn't seem to be a consideration in this situation. If you're not worried about apperance your idea of just reinforcing the inside should work fine with either the #16 or the #40. You can also get 1/8" to 1/4" acrylic roc to reinforce the inside joint.
FWIW, to cut acrylic with power tools water needs to be use to keep the acrylic cool and preventing stress fractures that will show up as crazing when it's glued which weakens the joint. It's real messy and I always work outside with 2/4s or 4x4s laid across saw horses.
I keep hearing different things about how smooth you want to cut to be before you weld it. I know you're not supposed to weld polished and especially flame polished cuts. When I make the cuts with a router they tend to come out looking as smooth as polished so I was trying to weld together a bit rougher of a cut. cutting them with the table saw and then give them a quick sand and wipe em down to make sure they were clean. Think I kept reading in random places that you want a small bit of rough.
I keep also keep reading that when cutting with the router or saw you want to use really high RPMs. Typically with my router I was cutting around 4 to 5,000 using a quarter inch flute bit. Being a compact cordless router it doesn't go above 8,000. I would think my best bet would you be to get a full size corded router and mount it to a table. Using a job site table saw seemed like it would make the work go a whole lot quicker so that's why I made the transition but perhaps that's the issue let me know what you think I'll attach a couple of pictures. I believe I'm using a 8¼ 60 tooth diablo finishing blade. I was using an osb blade with a ridiculous amount of teeth, but was unsure.
Attachments


For getting smooth cuts I use a cordless circular saw and run water on it. With an aluminum straight edge you can get a cut more than adequite for #40 which needs a 1mm gap. The cuts I've done this way feel smoother than the factory cuts on sheets but I still go over them with the recomended grit sandpaper by Weldon. You can find the tech sheets on their website. If you'te really good with a skill saw you can cut apart the panels you already glued but you will shrink your dimensions by about 1.5 mm or the kerf of the saw blade. This does take practice soonly do it if you're really confidant you can cut a straight line along the glue line. (as a friend of mine put it once, "be a line splitter")
Working iwth #40 is very different than #3 or #4. If you try it practice some on scrap acrylic and read Weldon's tech sheets.
Working iwth #40 is very different than #3 or #4. If you try it practice some on scrap acrylic and read Weldon's tech sheets.
- Joined
- Jul 16, 2009
- Messages
- 3,211
- Reaction score
- 4,859
The smoother the edge the better, esp. for water thin solvents lile 4 or 16.. The finish and need to hand scrape or not depends on your tooling and seam technique too.
For non show tank work a router and straight edge can finish a panel fairly well. a shaper table or jointer can also be used. I have a cabinet saw and expensive blades that do a decent Job as well. Most people do more damage hand scraping than good.
FWIW - I never use water to cut, I don’t have the means or see the need for any of my projects. If I were building large displays, then I would have a CNC.
this was 1/2” cell cast ~20 years ago?
DIY Acrylic Sump | BeanAnimal's Reef
Plans and construction details for a 75 gallon DIY acrylic aquarium sump that includes bubble traps (baffles) and a refugium or live rock section.
beananimal.com
Last edited:
So it's unlikely that's I'll have any luck trying to cut it out? I was thinking about using a Dremel and putting it back in with Weldon 40 to make up for the gap

Bump for potentially cutting out and already bonded panel and putting a new one in maybe using something like weld on 40 any opinions appreciated
- Joined
- Jul 16, 2009
- Messages
- 3,211
- Reaction score
- 4,859
I am not sure what your goal is. You were offered several options. Is strength or aesthetics your concern? Aesthetics are going to be hard to fix - Strength is not likely an issue, but if it you are concerned add a bead of WO 40 or 42
Why would you cut it out? Just lay a fillet bead of 40-42 over the seam in question… or cut a small piece of acrylic and reinforce it… if you’re doing a show sump that’s a different story.Bump for potentially cutting out and already bonded panel and putting a new one in maybe using something like weld on 40 any opinions appreciated

- Joined
- Feb 15, 2019
- Messages
- 2,444
- Reaction score
- 3,357
Just a thought: You could probably drill two tiny holes next to each other through the panel and into the bubble, one to pump Weldon in and the other to allow air out. A syringe/applicator filled with Weldon #4 would be inserted in the first drilled hole and you'd flow the Weldon in. That should fill the hole, the problem bubble inside and the second hole you drilled.
It's unfortunately a show sump. I think the sudden change in weather we just had was something I overlooked as well...
So aesthetics is my goal sorry if I wasn't clear
I could just cut an entire inch of the sump tbh
I could just cut an entire inch of the sump tbh
I was definitely considering that but the material was a bit expensive. It's my fault for not doing certain aspects of the weld properly I'd assume, but I kind of posted this to see if anyone with more knowledge and experience than me had an idea aside from doing it over.... when I posted it over a month ago. I can't tell if that's genuine advice or not so forgive me if I'm coming off the wrong way but when you say start over could I get some more specifics? Do you mean using a Dremel or router or some sort of tool to cut out that panel where I bonded it and reprepping the surfaces and going at it again?start over
With the space I had, I have constructed it with extra room so like I had mentioned in my previous post I built this sump with some extra room so cutting and inch or so off the entirety of what I had already put together wouldn't be impossible.
It’s more hassle than it’s worth and gonna most likely look worse because you won’t get a perfectly fit joint.. live with the bubbles and reinforce it with a block or something… I think if you attempt to cut it out you’ll be tossing the entire project in the trash.I was definitely considering that but the material was a bit expensive. It's my fault for not doing certain aspects of the weld properly I'd assume, but I kind of posted this to see if anyone with more knowledge and experience than me had an idea aside from doing it over.... when I posted it over a month ago. I can't tell if that's genuine advice or not so forgive me if I'm coming off the wrong way but when you say start over could I get some more specifics? Do you mean using a Dremel or router or some sort of tool to cut out that panel where I bonded it and reprepping the surfaces and going at it again?
With the space I had, I have constructed it with extra room so like I had mentioned in my previous post I built this sump with some extra room so cutting and inch or so off the entirety of what I had already put together wouldn't be impossible.

cromag27
octoaquatics.com - ig = @octoaquatics. view my sig
View Badges
Gold Sponsor
Article Contributor
a bad weld is a bad weld. trying to fix it is not an optimal or guaranteed solution. further messing with it will most likely compromise the integrity of the seam, making it more susceptible to failure down the road.I was definitely considering that but the material was a bit expensive. It's my fault for not doing certain aspects of the weld properly I'd assume, but I kind of posted this to see if anyone with more knowledge and experience than me had an idea aside from doing it over.... when I posted it over a month ago. I can't tell if that's genuine advice or not so forgive me if I'm coming off the wrong way but when you say start over could I get some more specifics? Do you mean using a Dremel or router or some sort of tool to cut out that panel where I bonded it and reprepping the surfaces and going at it again?
With the space I had, I have constructed it with extra room so like I had mentioned in my previous post I built this sump with some extra room so cutting and inch or so off the entirety of what I had already put together wouldn't be impossible.
I agree upon examining it again it's not that bad and I don't think it will take much to keep it water tight if it's not already. I'm switching around the format of the sump so it won't be a problem, but like you mentioned the last thing I want to do is throw the entire project away. I can just modify the chambers and water flow so when placed under a cabinet some little bubbles wouldn't be noticeable and the brighter colored panels would stick out. The color scheme is a brighter yellow (2037, and 2016 and an orange) Along with the automatic fleece rollers and the refugium I'm fairly certain they would go unnoticed, and in the end I'll probably be using this myself.It’s more hassle than it’s worth and gonna most likely look worse because you won’t get a perfectly fit joint.. live with the bubbles and reinforce it with a block or something… I think if you attempt to cut it out you’ll be tossing the entire project in the trash.
Similar threads
- Replies
- 18
- Views
- 1,342
- Replies
- 6
- Views
- 413
- Replies
- 3
- Views
- 503

- Replies
- 8
- Views
- 300
-
- AMS: Article
- Replies
- 94
- Views
- 3,787


