


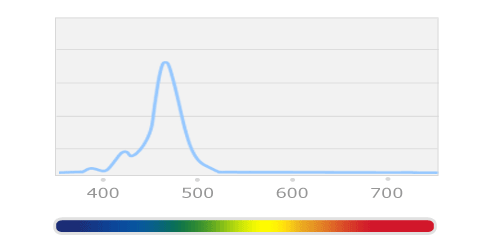
I really like the color on my Kessil A360, but I feel like it could use some more pop. Kessil does have some power down in this range, but not as much as I would like it to. Here is Kessil's representation of the output of the A360WE. Y0u can see there isn't much in the low end around 400nm.
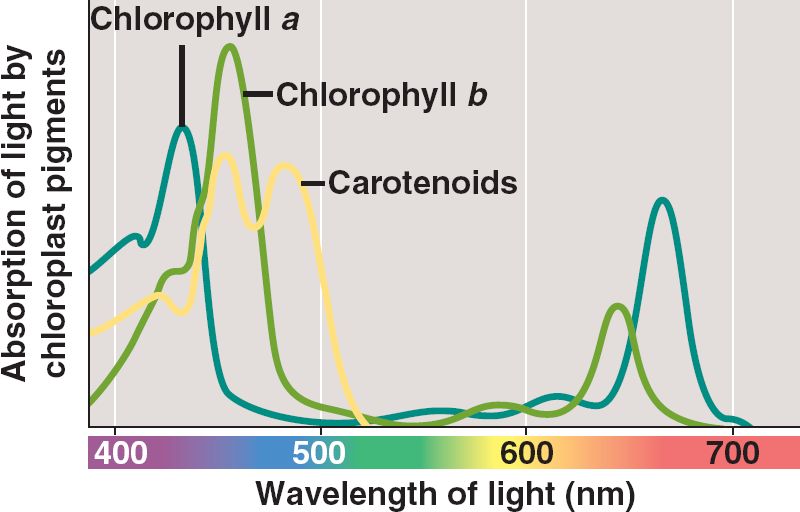
This chart shows which wavelengths chlorophyll absorbs. Notice they are at around the 430nm mark.
I decided to go the DIY route and make a small add-on for my Kessil that is unobtrusive and blends as much as possible into the existing look. I think what I've come up with is a good start in that direction. I'm still tweaking it, but here's what I have so far.
Equipment:
LEDGroupbuy 3UP Hypverviolt (430nm) LED ($9)
LEDGroupbuy 3UP XT-E 40 Degree Lens ($1.50)
Meanwell LDD-500HW LED Driver ($7.50)
12VDC Switching Power Adapter ($5)
Steel Flat Bar ($6)
Total Cost: $23
Wiring
Wiring up the device is very simple. The 12V power supply hooks up to the input of the Meanwell driver (red and black wires), the output of the Meanwell driver hooks up to the LED board (blue and yellow wires). The driver is controllable with a 10V analog signal (white wire). I plan to wire this up using the Kessil's daisychain output and I'll update when I do. The grey wire runs up to the LED itself for power. This is a 4 conductor wire and I plan on using the yellow and green wires to carry the dimming signal back down. Don't mind the tape, it is just temporarily held together for testing right now.

Mounting
I made a very simple mount for the LED using some steel bar from Home Depot. I bent it in a vise and painted it with spray paint. I need to make it one more time and use spray paint for metals, but this works as a mockup. This mounts to the same mounting screw on the center of my Kessil and it brings it down to the same height as the bottom of it.

I mounted the fixture to my Kessil and discovered my mounting hole was off an 1/8", so it sits at an angle right now. In the next version I'll fix that and cut off another 1/4-1/2" of material on the mounting pad to reduce the size of the overall fixture. The wiring is temporary right now and will follow up the mount and run through the one remaining channel in my hanging bracket.

First Test
I plugged it in to see how it looks and my corals all immediately started to open. I hope that's a good sign! This first image is with the lens mounted to the LED. Strangely enough, this makes the eye glare 100x worse. You can see in the picture, the light is a bit spotlighted on that top center rock. The color isn't actually pink like this, my iPhone is not happy about this color.

In this second picture I removed the lens. You can see the light distribution is a lot better. The glare isn't as bad this way either, although I still think I'll make a little hood out of PVC to hide it.

Still more work to do to get this in final form, but I'm going to try running this during the day today to see how it does at heat management. I found some small heatsinks that will fit on the bar if needed and I'll order them today if it gets too hot.
This chart shows which wavelengths chlorophyll absorbs. Notice they are at around the 430nm mark.
I decided to go the DIY route and make a small add-on for my Kessil that is unobtrusive and blends as much as possible into the existing look. I think what I've come up with is a good start in that direction. I'm still tweaking it, but here's what I have so far.
Equipment:
LEDGroupbuy 3UP Hypverviolt (430nm) LED ($9)
LEDGroupbuy 3UP XT-E 40 Degree Lens ($1.50)
Meanwell LDD-500HW LED Driver ($7.50)
12VDC Switching Power Adapter ($5)
Steel Flat Bar ($6)
Total Cost: $23
Wiring
Wiring up the device is very simple. The 12V power supply hooks up to the input of the Meanwell driver (red and black wires), the output of the Meanwell driver hooks up to the LED board (blue and yellow wires). The driver is controllable with a 10V analog signal (white wire). I plan to wire this up using the Kessil's daisychain output and I'll update when I do. The grey wire runs up to the LED itself for power. This is a 4 conductor wire and I plan on using the yellow and green wires to carry the dimming signal back down. Don't mind the tape, it is just temporarily held together for testing right now.
Mounting
I made a very simple mount for the LED using some steel bar from Home Depot. I bent it in a vise and painted it with spray paint. I need to make it one more time and use spray paint for metals, but this works as a mockup. This mounts to the same mounting screw on the center of my Kessil and it brings it down to the same height as the bottom of it.
I mounted the fixture to my Kessil and discovered my mounting hole was off an 1/8", so it sits at an angle right now. In the next version I'll fix that and cut off another 1/4-1/2" of material on the mounting pad to reduce the size of the overall fixture. The wiring is temporary right now and will follow up the mount and run through the one remaining channel in my hanging bracket.
First Test
I plugged it in to see how it looks and my corals all immediately started to open. I hope that's a good sign! This first image is with the lens mounted to the LED. Strangely enough, this makes the eye glare 100x worse. You can see in the picture, the light is a bit spotlighted on that top center rock. The color isn't actually pink like this, my iPhone is not happy about this color.
In this second picture I removed the lens. You can see the light distribution is a lot better. The glare isn't as bad this way either, although I still think I'll make a little hood out of PVC to hide it.
Still more work to do to get this in final form, but I'm going to try running this during the day today to see how it does at heat management. I found some small heatsinks that will fit on the bar if needed and I'll order them today if it gets too hot.


