DIY LED Controler/Driver

Sral

Valuable Member
View Badges
Joined
May 2, 2022
Messages
1,006
Reaction score
976
Location
Germany
Rating - 0%
0   0   0
Hi,
I'm still figuring out which Light to buy for my Aquarium and Reef-Pi build, but I want it to be controllable via PWM from Reef-Pi. I therefore need a nice PWM controllable dimmer. I looked up a few threads:
So I'm currently thinking of building one myself, using maybe something like Meanwell LDD, LM3414 or similar. Design parameters:
  • 5-6 channels:
    • 1 warm white (prob up to 24V 1,6 A)
    • 1 cold white (prob up to 24V 1,6 A)
    • 3 RGB (prob. up to 24V 0,25 A each)
  • up to ~ 92W in total (from planned LED)
  • 24V power supply will come with the light
  • I plan to only use non SMD solderable breadboard, since I don't have much equipment and experience yet.
Thoughts on that ?
  • Advice on the ICs to use ?
    • I would like to use IC sockets
    • easier to solder and to replace
  • Could I use two 1A channels to power the 1,6 A white LEDs ?
  • (Or is that a bad Idea since it might fry the second channel if the first dies or something ... ) ?
  • Which ICs should I use in your oppinion ?
  • What should I watch out for ?
    • protection circuits in case something breaks or fries ?
    • Bypass Capacitors to limit feedback to the power supply ?
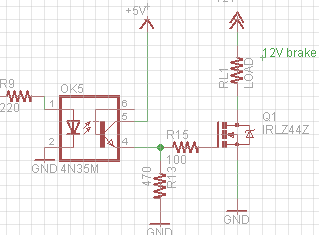
    • Optocoupler to isolate the PWM circuit ?
 
Last edited:
OP
OP
S

Sral

Valuable Member
View Badges
Joined
May 2, 2022
Messages
1,006
Reaction score
976
Location
Germany
Rating - 0%
0   0   0
Alright, got some input from the intended lights' manufacturer.

He suggested to use n-channel logic MOSFETs that enable 10A at the logics voltage pulled to Ground with a 100k resistor.

The lamps run on 24V however, so I will want an optocoupler for the pwm signals. That would mean though that I have to get some 3,3V, 5V or whatever voltage I want to run the optocoupler and MOSFETs at.

Now I have to decide on the voltage level and fitting MOSFETs, Optocouplers and means of getting the voltage level from the 24V lamp supply.
 

Ranjib

7500 Club Member
View Badges
Joined
Apr 16, 2016
Messages
9,843
Reaction score
17,056
Location
Pleasant Hill, Concord
Rating - 0%
0   0   0
i like kessil when i have money. else i just use the led strips (blue, white , UV) around with specific wavelengths as relevant to the corals from amazon, they are cheap. But im mostly using pico tank (except one rsr 300xl, that uses ap9x) .
you can choose even blackbox. its more about the aesthetics and color that you want. The controllability is kinda given (whatever you choose, you;ll control it), if its not there we wont even consider it.
 
OP
OP
S

Sral

Valuable Member
View Badges
Joined
May 2, 2022
Messages
1,006
Reaction score
976
Location
Germany
Rating - 0%
0   0   0
i like kessil when i have money. else i just use the led strips (blue, white , UV) around with specific wavelengths as relevant to the corals from amazon, they are cheap. But im mostly using pico tank (except one rsr 300xl, that uses ap9x) .
you can choose even blackbox. its more about the aesthetics and color that you want. The controllability is kinda given (whatever you choose, you;ll control it), if its not there we wont even consider it.
Yeah, the Kessil’s looks really neat and I would probably buy one, if I hadn’t a rectangular tank with 1m length. Then I would need two and that’s really starting to strain the budget … :grinning-face-with-sweat:

Also thought about building myself, but I can’t claim too know enough about the spectrum and coloring to make it worth my time. So I’ll just get the lamp that costs half a Kessil and gives the same amount of light and modability.

funny thing: the Adafruit n channel power MOSFETs from the build seem to fit what I need to PWM the LEDs ^^
 

robsworld78

Well-Known Member
View Badges
Joined
Feb 14, 2020
Messages
952
Reaction score
1,281
Location
Edmonton, Canada
Rating - 0%
0   0   0
Yeah, the Kessil’s looks really neat and I would probably buy one, if I hadn’t a rectangular tank with 1m length. Then I would need two and that’s really starting to strain the budget … :grinning-face-with-sweat:

Also thought about building myself, but I can’t claim too know enough about the spectrum and coloring to make it worth my time. So I’ll just get the lamp that costs half a Kessil and gives the same amount of light and modability.

funny thing: the Adafruit n channel power MOSFETs from the build seem to fit what I need to PWM the LEDs ^^
I wouldn't get to hung up on spectrum. I ended up using 2700k and 6700k and my plants loved them. Used Meanwell LDD drivers which dim to 0% and used a 48v power supply. Using 9w Cree LED's pushed to 6.3w max giving 164 watts total. Spent around $400 for everything and light is 6 years old and running strong.
 
OP
OP
S

Sral

Valuable Member
View Badges
Joined
May 2, 2022
Messages
1,006
Reaction score
976
Location
Germany
Rating - 0%
0   0   0
@robsworld78 Thanks for the input, but I think I prefer to buy the 250$ lamp that gives me 92W in a watertight and nicely cooled package.

For regulation I'm, thinking of simply using the Power MOSFETs from the Adafruit guide. They can switch up to 30V 10A and can run with 5V signals. I'm currently a little bit concerned about isolation to the 24V power supply of the LED lights. Sure that's not present in the guide and maybe it's not necessary, but with all the work that's going into this I don't want it to fry because I skimped on 20$ worth of optocouplers.

So I'm thinking of using something like 8 SCPL2630s in a Push-Pull configuration for 8 channels. Basically something like this, just without the resistor and capacitor at the output and feeding directly into the MOSFET gate.

Something I don't quite understand: there is a maximum Gate-source voltage listed, it's +/- 20V. I also need to have a gate-Source voltage of ~5V to reach the lowest R_DS. In the guide however, the LED is supposedly connected to the Source. That would pull the source to +12V, meening that the PWM signal could never switch it, unless it goes to 12+5V. Is that a mistake on @Ranjib 's part? He connected the middle pin to the LED, which he denoted as source pin. In the datasheet however, the middle pin is denoted as drain pin. I'm slightly confused ^^
 

Ranjib

7500 Club Member
View Badges
Joined
Apr 16, 2016
Messages
9,843
Reaction score
17,056
Location
Pleasant Hill, Concord
Rating - 0%
0   0   0
@robsworld78 Thanks for the input, but I think I prefer to buy the 250$ lamp that gives me 92W in a watertight and nicely cooled package.

For regulation I'm, thinking of simply using the Power MOSFETs from the Adafruit guide. They can switch up to 30V 10A and can run with 5V signals. I'm currently a little bit concerned about isolation to the 24V power supply of the LED lights. Sure that's not present in the guide and maybe it's not necessary, but with all the work that's going into this I don't want it to fry because I skimped on 20$ worth of optocouplers.

So I'm thinking of using something like 8 SCPL2630s in a Push-Pull configuration for 8 channels. Basically something like this, just without the resistor and capacitor at the output and feeding directly into the MOSFET gate.

Something I don't quite understand: there is a maximum Gate-source voltage listed, it's +/- 20V. I also need to have a gate-Source voltage of ~5V to reach the lowest R_DS. In the guide however, the LED is supposedly connected to the Source. That would pull the source to +12V, meening that the PWM signal could never switch it, unless it goes to 12+5V. Is that a mistake on @Ranjib 's part? He connected the middle pin to the LED, which he denoted as source pin. In the datasheet however, the middle pin is denoted as drain pin. I'm slightly confused ^^
I am not sure mosfet will suffice at 92w, I’ll recommend meanwell drivers
 
OP
OP
S

Sral

Valuable Member
View Badges
Joined
May 2, 2022
Messages
1,006
Reaction score
976
Location
Germany
Rating - 0%
0   0   0
I am not sure mosfet will suffice at 92w, I’ll recommend meanwell drivers
Should be fine. The 92 watts are split over 6 channels. That’s the point of MOSFETs in Power applications, as far as I understood:
  • in the off state they get the full 24V with only 1 micro amp current or so equaling 24 micro watt power dissipation.
  • In the on state they have about 16 milli Ohm vs the loads 16 Ohm, so they only get about 24 milli Volt of the full 24 Volt at 1,5 ampere current, equaling 36 milli Watts
  • The only power they have to dissipate is at the switching, which only takes 100 ns, where they might, as a conservative estimate, get half the power, say 18 Watts. At 2kHz that’s about 400 micro seconds of 18 watts, averaging out to about an additional 10 milli Watt.
  • Total: about 50 milli Watt power
I’m more concerned about the connection and wiring stuff. Would you take a look at the drain and source in the guide if you find the time ?
 
OP
OP
S

Sral

Valuable Member
View Badges
Joined
May 2, 2022
Messages
1,006
Reaction score
976
Location
Germany
Rating - 0%
0   0   0
Something I completely forgot to buy: a method of driving my optocoupler and MOSFET gates with 5-6V from the 24V of the LED supply. Can somebody recommend something ?
If I reed the datasheet correctly the optocoupler IC needs something like 20mA continuous supply (doesn't say if total or per channel). The MOSFET gate charge is negligible (2nC for 4.5V, at 2kHz that's about 4 micro ampere).

My current ideas:
- buy another DC/DC converter
- some bridge with resistors, diodes and zener diodes (20mA @ 24V is ~ 0.5W, sounds terribly inefficient and hot)

@Ranjib Could you look at the power MOSFET in the Light controller guide ? Not sure if you read that part in the last message ^^ I'm concerned about the labeling of Source and Drain in the text.
 

robsworld78

Well-Known Member
View Badges
Joined
Feb 14, 2020
Messages
952
Reaction score
1,281
Location
Edmonton, Canada
Rating - 0%
0   0   0
Something I completely forgot to buy: a method of driving my optocoupler and MOSFET gates with 5-6V from the 24V of the LED supply. Can somebody recommend something ?
If I reed the datasheet correctly the optocoupler IC needs something like 20mA continuous supply (doesn't say if total or per channel). The MOSFET gate charge is negligible (2nC for 4.5V, at 2kHz that's about 4 micro ampere).

My current ideas:
- buy another DC/DC converter
- some bridge with resistors, diodes and zener diodes (20mA @ 24V is ~ 0.5W, sounds terribly inefficient and hot)

@Ranjib Could you look at the power MOSFET in the Light controller guide ? Not sure if you read that part in the last message ^^ I'm concerned about the labeling of Source and Drain in the text.
I would use a DC/DC, as it's low current a 7805 should do well. If your package ever arrives I sent some of those and others but you probably need it sooner than later.
 
OP
OP
S

Sral

Valuable Member
View Badges
Joined
May 2, 2022
Messages
1,006
Reaction score
976
Location
Germany
Rating - 0%
0   0   0
@robsworld78 Thanks a lot, you are a blast mate !

I'm currently not too worried about shipping time. If the rest of the parts arrive earlier I have a lot to set up and test and a small lab style power supply to test it with, so no worries :)
 

oreo54

5000 Club Member
View Badges
Joined
Sep 18, 2017
Messages
5,585
Reaction score
3,438
Rating - 0%
0   0   0
@robsworld78 Thanks a lot, you are a blast mate !

I'm currently not too worried about shipping time. If the rest of the parts arrive earlier I have a lot to set up and test and a small lab style power supply to test it with, so no worries :)
Sounds like you are making it more complicated than necessary for simple constant voltage led channels.

 
OP
OP
S

Sral

Valuable Member
View Badges
Joined
May 2, 2022
Messages
1,006
Reaction score
976
Location
Germany
Rating - 0%
0   0   0
Sounds like you are making it more complicated than necessary for simple constant voltage led channels.

what exactly would you say I am handling too complicated and how would you advise me to change it ?

I could probably run the MOSFETs directly from the PWM chip, but if anything goes wrong I fry several hundred bucks worth of electronics and hours of effort setting it up with 24VDC because I didn’t want to invest a few hours and 20 bucks for optocouplers and a dc/dc Converter.

BTW, I did after all decide to use an optocoupling Gate driver circuit. Costs the same 20€ and has an integrated push-pull circuit designed to drive MOSFET gates.
 

oreo54

5000 Club Member
View Badges
Joined
Sep 18, 2017
Messages
5,585
Reaction score
3,438
Rating - 0%
0   0   0
Current limiting resistor serms to work fine.
If tou want the protection this is simple enough .
Interesting back and forth regarding optocoupling.

IRLZ44 seems appropriate

Sorry I just kind of poke at this stuff at times
For me most of the "legwork" is done.
No need to reinvent the wheel so to speak.

Tweaking it is worthy but time consuming.
Alternate .
Your consideration of a Opto isolator will certainly protect the arduino and would be perfectly fine.

However it is more complex than needed.

If you goal is to simply protect the Arduino you could:

add a 5k resistor in series with the gate to the Arduino.
add a 100 ohm resistor between the Arduino ground and the power ground.
Be sure the grounds are wired like:
a) Arduino stuff on one side (power supply, Arduino board etc)
b) The power stuff on the other side (LED power, MosFet Source etc)
c) connect the two sides with the 100 ohm resistor.
The reason this works is the MosFet Gate required virtually no power so the 5k (value ) will protect the Arduino in case the MosFet Fails.

Note: The failure mode of a power MosFet is shorted, sometimes D-S, sometimes D-G-S.

In any case, its important to layout and wire your system so there are no paths that rely on a wire being intact to prevent a failure. In other words the grounds and supplies should be that any connection can become open and the Arduino would still be protected.
 
Last edited:
OP
OP
S

Sral

Valuable Member
View Badges
Joined
May 2, 2022
Messages
1,006
Reaction score
976
Location
Germany
Rating - 0%
0   0   0
@oreo5457
Optocoupling itself is no problem, but the charging times for the gate might be. In the first link they calculate charging time constant to about 14µs.

If you have a PWM signal with 1 kHz (or 2 kHz) your period is 1000 µs (or 500µs).
This means that you can reasonably adjust your PWM in 0.7% (or 1.4%) steps and will massively lose linearity in the lower percentage range.

Secondly, this will stress your MOSFET. The longer the switching period, the higher the power dissipation on the MOSFET. This only amounts to something like 0.1 of a Watt, but that will increase both temperature and on resistance, which is undesirable.

That's the same for the other link about protection for the arduino. The more resistance you put in, the larger the effect on the PWM waveform.

So it might be time and effort, but since that project will stay with me for a while I think it is worthwhile to do it somewhat right. Additionally, LED lamps for Aquariums are not cheap (my 250$ lamp was already on the cheap side), so saving a few bucks and an hour of time on the driver circuit is probably unreasonable. The optocoupled gate drivers offer exactly what I need in a reasonably cheap and ready to use package. Not sure if you can find optocouplers that do a comparable job for much cheaper.
 

oreo54

5000 Club Member
View Badges
Joined
Sep 18, 2017
Messages
5,585
Reaction score
3,438
Rating - 0%
0   0   0
@oreo5457
Optocoupling itself is no problem, but the charging times for the gate might be. In the first link they calculate charging time constant to about 14µs.

If you have a PWM signal with 1 kHz (or 2 kHz) your period is 1000 µs (or 500µs).
This means that you can reasonably adjust your PWM in 0.7% (or 1.4%) steps and will massively lose linearity in the lower percentage range.

Secondly, this will stress your MOSFET. The longer the switching period, the higher the power dissipation on the MOSFET. This only amounts to something like 0.1 of a Watt, but that will increase both temperature and on resistance, which is undesirable.

That's the same for the other link about protection for the arduino. The more resistance you put in, the larger the effect on the PWM waveform.

So it might be time and effort, but since that project will stay with me for a while I think it is worthwhile to do it somewhat right. Additionally, LED lamps for Aquariums are not cheap (my 250$ lamp was already on the cheap side), so saving a few bucks and an hour of time on the driver circuit is probably unreasonable. The optocoupled gate drivers offer exactly what I need in a reasonably cheap and ready to use package. Not sure if you can find optocouplers that do a comparable job for much cheaper.
I hear ya .. Needs vs wants ..
I'll be curious as to the final circuit diagram.
Helps me learn..
 
OP
OP
S

Sral

Valuable Member
View Badges
Joined
May 2, 2022
Messages
1,006
Reaction score
976
Location
Germany
Rating - 0%
0   0   0
Alright, this project will slowly start progressing again !

I revisited the datasheets of the parts I ordered:
- PSMN022-30PL logic level MOSFET, rated for 30V, 30A
- FOD3182 MOSFET Gate Driver Optocoupler, rated for max 3A and 30V

And found out that I was complicating things way too much. The Optocoupled Gate Driver can actually handle up to 30V and the MOSFET Gate can handle up to 30V as well, so I can simply drive my whole LED system directly with the 24V, optocoupled by the PCA9685's 5V PWM like this:
67BFAC1C-9748-4E17-8EBA-CA23FF12758E.jpeg

Each channel will be driven pretty much the same. The 24 ohm resistor is there to limit the current into the gate to 1.0A, since the absolute maximum for the gate driver is 3.0A at certain frequencies and duty cycles. For safety I'll also add a 10k pull down resistor to each gate and a heatsink to each MOSFET, better be safe than sorry.

So the components themselves can handle 24V, but each channel has to drive up to 1.5A. Any ideas how I should wire this to the MOSFETS ? I have some stranded 12 AWG and 18 AWG wire left from a power cable and the MOLEX connectors. The 12 AWG should be able to handle the full system's 3.8A and the 18 AWG should be able to carry the max 1,5A per channel. Problem is now how to hook this up to the MOSFETS ... I would like to do this on a perfboard, since that's basically everything I have, but I'm not sure if that's a good idea with 1.5A per channel.
I would probably need to use very short paths, so that the perfboard is basically ownly there to keep the MOSFET pins and the wire in place, but the current mainly flows through the pins, cable and solder.

I was also thinking about using 2 MOSFETs per channel, at least for the 2 higher power white channels, to split the current between two MOSFETs and their respective cable, decreasing the load on each to 0.75A as long as nothing breaks.

Any ideas ?
 
Last edited:
OP
OP
S

Sral

Valuable Member
View Badges
Joined
May 2, 2022
Messages
1,006
Reaction score
976
Location
Germany
Rating - 0%
0   0   0
I have checked the cable and socket that the lamp's manufacturer included. He has used the same AWG 18 wire that I have and simply uses 2 of them for V+. I guess that answers my question of which cables to use ^^
 

theatrus

Valuable Member
View Badges
Joined
Mar 26, 2016
Messages
1,951
Reaction score
3,353
Location
Sacramento, CA area
Rating - 0%
0   0   0
And found out that I was complicating things way too much. The Optocoupled Gate Driver can actually handle up to 30V and the MOSFET Gate can handle up to 30V as well, so I can simply drive my whole LED system directly with the 24V, optocoupled by the PCA9685's 5V PWM like this:

There should be no need, you can drive the MOSFETs directly from the PCA9685 outputs. Anything more than about 10V is pointless, and, more importantly, 24V is above the maximum Vgs for the MOSFET (and pretty much any MOSFET)

1673133817224.png


So, just tie the ground from the PWM circuit and the PCA9685 and connect directly.

The pull-down to keep the channel off is fine.

I would like to do this on a perfboard, since that's basically everything I have, but I'm not sure if that's a good idea with 1.5A per channel.

This is fine to run on the perfboard. You can increase the current carrying capacity of a trace by laying solder on top of it for extra insurance.

I was also thinking about using 2 MOSFETs per channel, at least for the 2 higher power white channels, to split the current between two MOSFETs and their respective cable, decreasing the load on each to 0.75A as long as nothing breaks.

Not needed. Paralleling devices can be done but unless done carefully one will take the bulk of the load anyway.

I may have missed this from an earlier post, is there anything controlling the current through each LED string?
 

robsworld78

Well-Known Member
View Badges
Joined
Feb 14, 2020
Messages
952
Reaction score
1,281
Location
Edmonton, Canada
Rating - 0%
0   0   0
Alright, this project will slowly start progressing again !

I revisited the datasheets of the parts I ordered:
- PSMN022-30PL logic level MOSFET, rated for 30V, 30A
- FOD3182 MOSFET Gate Driver Optocoupler, rated for max 3A and 30V

And found out that I was complicating things way too much. The Optocoupled Gate Driver can actually handle up to 30V and the MOSFET Gate can handle up to 30V as well, so I can simply drive my whole LED system directly with the 24V, optocoupled by the PCA9685's 5V PWM like this:
67BFAC1C-9748-4E17-8EBA-CA23FF12758E.jpeg

Each channel will be driven pretty much the same. The 24 ohm resistor is there to limit the current into the gate to 1.0A, since the absolute maximum for the gate driver is 3.0A at certain frequencies and duty cycles. For safety I'll also add a 10k pull down resistor to each gate and a heatsink to each MOSFET, better be safe than sorry.

So the components themselves can handle 24V, but each channel has to drive up to 1.5A. Any ideas how I should wire this to the MOSFETS ? I have some stranded 12 AWG and 18 AWG wire left from a power cable and the MOLEX connectors. The 12 AWG should be able to handle the full system's 3.8A and the 18 AWG should be able to carry the max 1,5A per channel. Problem is now how to hook this up to the MOSFETS ... I would like to do this on a perfboard, since that's basically everything I have, but I'm not sure if that's a good idea with 1.5A per channel.
I would probably need to use very short paths, so that the perfboard is basically ownly there to keep the MOSFET pins and the wire in place, but the current mainly flows through the pins, cable and solder.

I was also thinking about using 2 MOSFETs per channel, at least for the 2 higher power white channels, to split the current between two MOSFETs and their respective cable, decreasing the load on each to 0.75A as long as nothing breaks.

Any ideas ?
1.5 amps is definitely doable, as @theatrus mentioned you can beef up the trace with solder or even easier just make a really thick trace, that's what I do. :) Here's a trace width calculator that seems to work well, I've used this from day one and have never burnt up a trace but I do always make them thicker than it says. For example I want 5 amps through one trace, it says with 10c temp raise you need 2.77mm width for external trace, I use 5mm which according to that calculator would have less than 5c temp raise. By default PCB's are 1oz cooper (thickness on the calculator), if you go 2oz cooper you can use thinner traces but be warned it's not fun soldering 2oz boards as it takes a lot of heat to get it flowing nicely so it's slow.

 
Back
Top