DIY Radion power supply replace/repair for $25

Djbrandriff150

Active Member
View Badges
Joined
Aug 1, 2014
Messages
230
Reaction score
84
Location
Ambler, Pa
Rating - 0%
0   0   0
They match up to the same thing. They should be the exact look. I just did it too
Can anyone tell me which wire goes to which or have a picture of one connected so i can copy, im not hardware savy and my husband refuse to get involved.
tch
 

jacoviii

New Member
View Badges
Joined
Aug 13, 2016
Messages
13
Reaction score
8
Rating - 0%
0   0   0
the wire on the light is red , white , black what is + /- I think I just cooked my light. I hooked up the red and black to the power supply it lite for a few seconds then went out.
 

Salt_Creep

Community Member
View Badges
Joined
May 8, 2019
Messages
91
Reaction score
100
Location
Minnesota
Rating - 0%
0   0   0
I bought some old Gen2 30 Pros, and I have the issue were it pops my GCFI outlet. Will swaping out this board fix that issue?
 

tygger

Community Member
View Badges
Joined
Jul 2, 2012
Messages
40
Reaction score
8
Rating - 0%
0   0   0
I bought some old Gen2 30 Pros, and I have the issue were it pops my GCFI outlet. Will swaping out this board fix that issue?

It would most likely fix it if your problem is with the power supply. It won't fix it if your problem is with a bad led fixture.
 

pnefos

New Member
View Badges
Joined
Feb 21, 2011
Messages
2
Reaction score
0
Location
Colorado
Rating - 0%
0   0   0
Due to an unfortunate event I burned up my Radion power supply by getting it wet a few months back and $309 to replace it seemed like a big rip off. Well I decided to open it up and take a look at the board and it was basically just a run of the mill Chinese power supply. I then decided to get the specs off the Radion power supply box then entered them into google search and wallah a replacement from china for $25. It fit perfect in the Radion power supply case and runs great. I really wanted to share this with everyone the fix was 10 minutes and its working flawlessly. Photos are on my cell I will post them separately in a moment.

S-150-36 36V 4.2A Iron Case Power Supply Transformer - Worldwide Free Shipping - DX
Thanks! Where or what model Chinese power supply did you order? Thanks in advance, Patrick
 

pnefos

New Member
View Badges
Joined
Feb 21, 2011
Messages
2
Reaction score
0
Location
Colorado
Rating - 0%
0   0   0
suppliers

I got some from asia they took an age then found a uk company. The Asian company was deal extreme this was the item number
197602S-150-36 36V 4.2A Iron Case Power Supply Transformer

Do you know if these are still available and what the voltage is for Radion Gen 2?
 

iReefer12

Well-Known Member
View Badges
Joined
Apr 22, 2012
Messages
809
Reaction score
700
Location
Boulder, CO
Rating - 100%
1   0   0

Salt_Creep

Community Member
View Badges
Joined
May 8, 2019
Messages
91
Reaction score
100
Location
Minnesota
Rating - 0%
0   0   0
Is this the right one? Will this work?

Nope. You need 36 volt 150w. the linke https://www.ledsupply.com/power-supplies/mean-well-lrs-enclosed looks like it works. on the right you select the volt and watt. Select 36 and 150, you should see the part# change to LRS-150-36.

I did this fix and it worked. 1 did burn up after about 3 months and I had to replace, other is at 6 months and still going.
 

iReefer12

Well-Known Member
View Badges
Joined
Apr 22, 2012
Messages
809
Reaction score
700
Location
Boulder, CO
Rating - 100%
1   0   0
Does it matter that they look different? I bought the correct one as far as I know.

55FB460F-E058-487D-8B68-2DC55A441DCC.jpeg
 

iReefer12

Well-Known Member
View Badges
Joined
Apr 22, 2012
Messages
809
Reaction score
700
Location
Boulder, CO
Rating - 100%
1   0   0
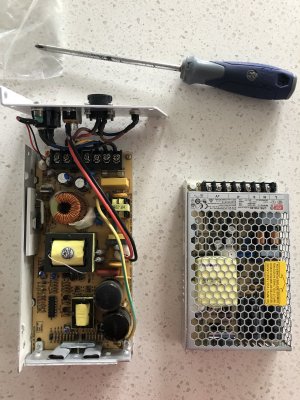
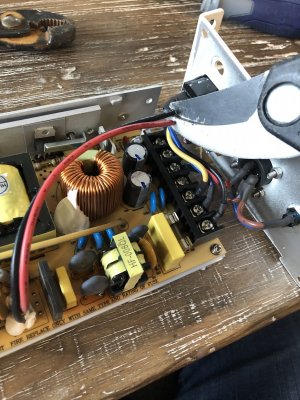
So I worked on this today. Can someone chime in on whether I did this correct?

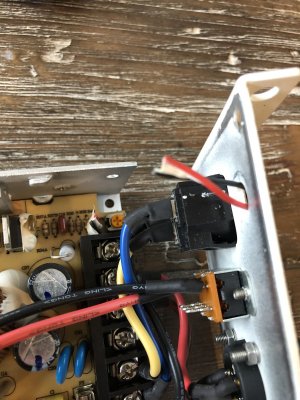
1) Chopped the wires as short as possible running to the Voltage Selector. The new circuit board had a Voltage Selector built onto it already, (the one on the EcoTech case is redundant now.)
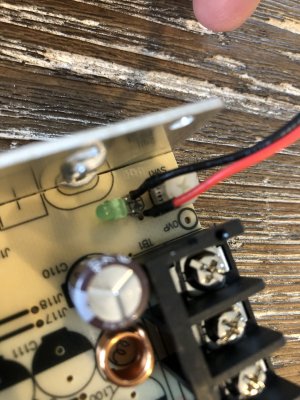
2) I chopped the LED status light off the old circuit board.
3) Soldered the LED status light onto the new circuit board.
4) Shrink wrapped the newly soldered wires.
5) Reattached all the wires to the correct terminals.
6) Reinserted back into EcoTech case (albeit the screw holes to secure the new board inside the EcoTech case, so it’s just loose inside - I won’t shake it around)

Does this look like I did it correctly - P.S. It all turned on and the lights working well now, so I’m pretty sure I did it right, but I just want to make sure I’ve not done something dangerously wrong that will bite me in the future. Thanks for any help.

41C1A2CB-FED1-4616-A0F5-16F4D94693F9.jpeg DCFEFBE1-4DE1-409A-A9C2-CAABA86E0122.jpeg D9F3D88C-4DEE-4A38-9DFB-3C95BCDC349C.jpeg 495EA842-C743-430A-8E84-3F96C106F1B5.jpeg
 

gophia

New Member
View Badges
Joined
Apr 6, 2015
Messages
11
Reaction score
2
Location
Canada
Rating - 0%
0   0   0
So I worked on this today. Can someone chime in on whether I did this correct?

1) Chopped the wires as short as possible running to the Voltage Selector. The new circuit board had a Voltage Selector built onto it already, (the one on the EcoTech case is redundant now.)
2) I chopped the LED status light off the old circuit board.
3) Soldered the LED status light onto the new circuit board.
4) Shrink wrapped the newly soldered wires.
5) Reattached all the wires to the correct terminals.
6) Reinserted back into EcoTech case (albeit the screw holes to secure the new board inside the EcoTech case, so it’s just loose inside - I won’t shake it around)

Does this look like I did it correctly - P.S. It all turned on and the lights working well now, so I’m pretty sure I did it right, but I just want to make sure I’ve not done something dangerously wrong that will bite me in the future. Thanks for any help.


Hey iReefer,

So did that ballast from digikey work out?
 

alexebrenz

New Member
View Badges
Joined
Feb 2, 2021
Messages
8
Reaction score
0
Location
Rio de Janeiro
Rating - 0%
0   0   0
I've connected my three XR30w G3 to the 220v instead of 110v (it was set to 110v). There was a "bang" loud sound then I disconnected all. Since I have one spare part of the power supply I tested all lights and all three are ok. However when I inserted the fuse of the good power supply in the onde of the bad power supplies, there were another "bang". So the I returned the fuse to the good power supply but it didn't work. Do you know what is happening? Do I need to buy this chinese board? Is there a specific orientation to insert the fuse?
 

oreo54

5000 Club Member
View Badges
Joined
Sep 18, 2017
Messages
5,602
Reaction score
3,448
Rating - 0%
0   0   0
I've connected my three XR30w G3 to the 220v instead of 110v (it was set to 110v). There was a "bang" loud sound then I disconnected all. Since I have one spare part of the power supply I tested all lights and all three are ok. However when I inserted the fuse of the good power supply in the onde of the bad power supplies, there were another "bang". So the I returned the fuse to the good power supply but it didn't work. Do you know what is happening? Do I need to buy this chinese board? Is there a specific orientation to insert the fuse?
The 110 set power supply plugged into the 220 is shot.
The fuse is also shot now.
Fuses have no orientation. Just a wire inside that melts w / too much current
 

ponyman1969

New Member
View Badges
Joined
Mar 5, 2021
Messages
1
Reaction score
0
Location
tampa, florida
Rating - 0%
0   0   0
So I worked on this today. Can someone chime in on whether I did this correct?

1) Chopped the wires as short as possible running to the Voltage Selector. The new circuit board had a Voltage Selector built onto it already, (the one on the EcoTech case is redundant now.)
2) I chopped the LED status light off the old circuit board.
3) Soldered the LED status light onto the new circuit board.
4) Shrink wrapped the newly soldered wires.
5) Reattached all the wires to the correct terminals.
6) Reinserted back into EcoTech case (albeit the screw holes to secure the new board inside the EcoTech case, so it’s just loose inside - I won’t shake it around)

Does this look like I did it correctly - P.S. It all turned on and the lights working well now, so I’m pretty sure I did it right, but I just want to make sure I’ve not done something dangerously wrong that will bite me in the future. Thanks for any help.

41C1A2CB-FED1-4616-A0F5-16F4D94693F9.jpeg DCFEFBE1-4DE1-409A-A9C2-CAABA86E0122.jpeg D9F3D88C-4DEE-4A38-9DFB-3C95BCDC349C.jpeg 495EA842-C743-430A-8E84-3F96C106F1B5.jpeg
I’m getting ready to do this. Just ordered one from Amazon. Thanks so much for posting pics. 3.5.21 and this is still very useful information when you look at when this post was started. The meanwell website didn’t have any available. The one I got from Amazon $17 plus $15 shipping.
 

Creating a strong bulwark: Did you consider floor support for your reef tank?

  • I put a major focus on floor support.

    Votes: 53 42.7%
  • I put minimal focus on floor support.

    Votes: 25 20.2%
  • I put no focus on floor support.

    Votes: 42 33.9%
  • Other.

    Votes: 4 3.2%
Back
Top