Dopey's Reef

dopey

Active Member
View Badges
Joined
Feb 24, 2018
Messages
284
Reaction score
286
Location
Sweden
Rating - 0%
0   0   0
Hi,

Been running my current 37L for about 1.5 years now -- tank thread here.

Space is a challenge here. Apartment in Sweden. However, where the current 40x30x30 AIO cube sits there is a *bit* more space. There isn't any commercially offered peninsula style tanks to fit the area tho. So custom it is.

The target dimensions are 80Lx40W and either 40 or 50 tall. This would put me either 128L or 160L size. As well a sump. Either the existing 40x30x30 cube, or a custom to fit the space inside. (Probably custom)

I plan to steal the common design that's passed around:
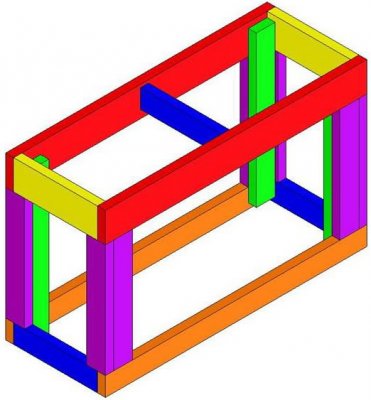
Stand.JPG
Planned dimensions:
Orange -- 76.8cm
Purple -- 79.4cm
Blue/Yellow -- 31cm
Green -- 96cm

1.6cm thick MDF panels all around, and on top. Making total dimensions 80x43.2x100cm -- if anyone wants to check the math :D

I'd like some feedback on lumber please:D I will try to explain the design but I just can't figure out how to draw it in sketchup or elsewhere...

Since this is Europe, I will be using 45x95(Tiny bit larger than a 2x4 in US) lumber all around. For this size tank, I think this is adequate all the way around. I may use a thinner piece for the green supports. Does anyone think that be a concern?

The second thing. To cover the outside my plan is to use MDF board -- Basically it'll make it look like an IKEA cabinet. They come in 40cmx100cm sheets. Practically this let's me use 2 panels on each side giving me 80cm in length(and will be doors), then sandwhich one panel between the other side. These MDF sheets are 1.6cm wide. Technically the top dimensions will be 80cmx43.2cm including the MDF, or just looking at the wood frame it would be 76.8 x 40cm

Additionally I plan to build the cabinet to be 100cm tall. (Giving me either 140 or 150cm total height with tank). My current plan is to build the 45x95 lumber frame to be 98.4 cm tall, then place a sheet of MDF on 'top'. This will recess the top MDF layer within the 80x40 'box' of MDF i've made with the panels. Giving one flat top service for a tank to sit on. (I will also use some sort of insulation pad for extra saftey).

One long side will be a set of doors(the two MDF 40x100 panels). On this side the tank will not sit on the MDF. Basically the top dimensions will be 80x43.2cm but the tank will either be 80x40 or 80x41.6. This will ensure no pressure on the MDF that is acting as doors.

If that all made sense... I have a few questions.

1.) Does anyone see a concern with this? Basically the outer 'edge' will be MDF that the tank sits on three sides of this frame. Or should I make the tank only the width of the actual lumber frame and have a 1.6cm lip around the tank?

2.) Is it ok to use 45x95(basically 2x4s) for the entire frame for this size tank? Or does the top need to be 2x6s?


But this project has officially started. After a day of riding around found all the lumber for the frame, and a mider box to cut it. (Apartment..) Had to do some rough cuts at K-Rauta before hauling it home -- Think it's around 12-14meters total wood. IMG_20190715_184252.jpg
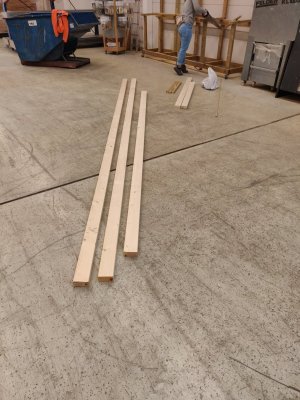

and home.. Time for dinner then to start cutting pieces for the stand. IMG_20190715_194438.jpg
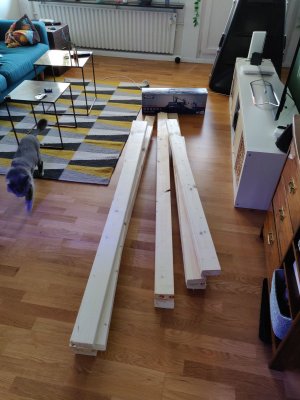
Hope to get the frame built by tomorrow. Once we have a finished stand we are happy with, will order the custom tank from a local shop.
 

Peace River

Thrive Master
View Badges
Joined
Apr 29, 2014
Messages
21,533
Reaction score
164,658
Location
USA
Rating - 100%
1   0   0
Congratulations on the new build! Always an exciting time! I will let someone else respond to the 2x4 vs. 2x6 (equivalents). I would suggest that you do not use MDF because it will swell when it gets wet (and inevitably it will get wet even if it is sealed). Good luck and I look forward to seeing this come together!
 
OP
OP
dopey

dopey

Active Member
View Badges
Joined
Feb 24, 2018
Messages
284
Reaction score
286
Location
Sweden
Rating - 0%
0   0   0
Congratulations on the new build! Always an exciting time! I will let someone else respond to the 2x4 vs. 2x6 (equivalents). I would suggest that you do not use MDF because it will swell when it gets wet (and inevitably it will get wet even if it is sealed). Good luck and I look forward to seeing this come together!
Aren't most premade stands MDF? Pretty sure the current Aqua Medic stand is MDF entirely..or atleast looks identical to the panels I was thinking to use?


Edit: and thanks!
 

Peace River

Thrive Master
View Badges
Joined
Apr 29, 2014
Messages
21,533
Reaction score
164,658
Location
USA
Rating - 100%
1   0   0
Aren't most premade stands MDF? Pretty sure the current Aqua Medic stand is MDF entirely..or atleast looks identical to the panels I was thinking to use?


Edit: and thanks!

MDF is a great product when used in the correct application. You may find aquarium stands made with MDF, however I've used MDF and seen MDF used around water enough to recommend against it. I wish you well on your build with whatever you decide, but I see MDF as an inevitable problem.
 
OP
OP
dopey

dopey

Active Member
View Badges
Joined
Feb 24, 2018
Messages
284
Reaction score
286
Location
Sweden
Rating - 0%
0   0   0
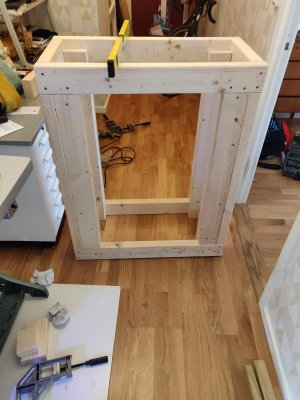
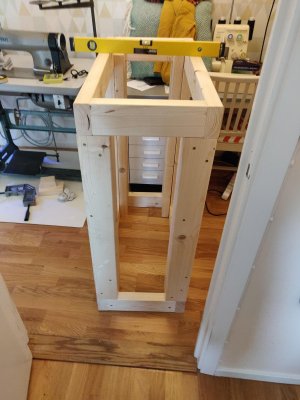
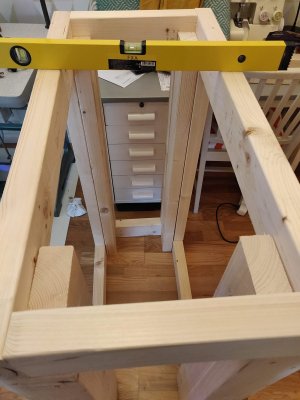
We decided to just build an 80x40x100 frame then skin it. Which practically means the premade MDF panels are out the picture :) It also means I get a slightly larger tank :)

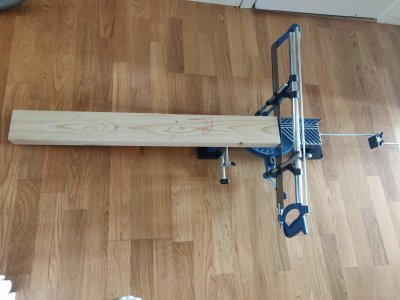
I started the day trying to use a cheap saw box I bought, since buying a proper saw for a one time project in an apartment felt odd.
IMG_20190716_150203.jpg

It sucked. Trying to saw on the floor sucked. The 90 degree measurement guide was flimpsy, so still ended with slightly uneven cuts.

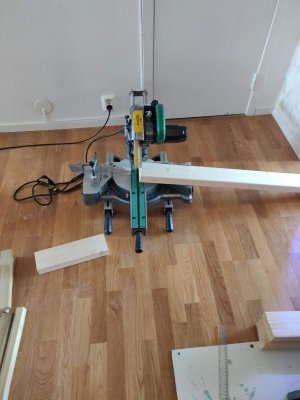
Fortunately found a local place that rents out proper tools, so for 20$..
IMG_20190716_160939.jpg

Much better :D

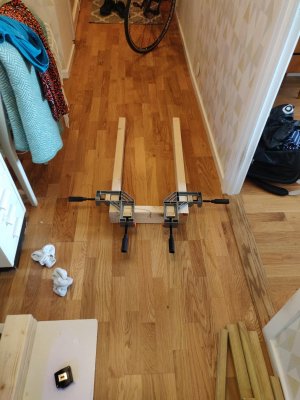
Managed to finish most of the stand today. Will add the middle braces tomorrow morning.

Trying my best to keep 90 degree edges..
IMG_20190716_152840.jpg
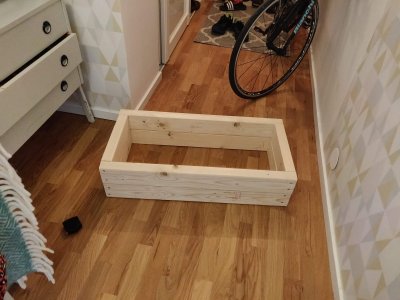
top/bottoms:
IMG_20190716_155646.jpg

and current status:
IMG_20190716_184903.jpg IMG_20190716_184912.jpg IMG_20190716_184917.jpg

Overall fairly happy. It's not perfect level but neither is this apartment. Not sure there is a straight spot in the place..Will need a few shims in the front to level the tank in it's location anyway.

Now that it's built can finalize the custom tank sizes:
Display tank: 80x39x45 (140L)
Sump: 50x38x45 (86L)
Total capacity: 226L

We debated 45 vs 50 height for the tank. An overall tank height of 150cm is just too high for me to comfortable work on the tank. Lowering the stand under 100cm also made the viewing too low. 45cm felt like the best level for us.

I need to figure out an overflow for this. The overflow will go on a 39cm wide portion of the tank. Need to solve that before I order the tank, since I will ask them to drill it.

I will order the tanks tomorrow, should arrive in 2-3 weeks. Assuming I solve the overflow question. It's my first time building a system with a sump.


As for overall parts/plans:
Lighting: 2x AI Prime HD (I already have one today)
Return Pump: 2x Tunze silence pumps(smallest ones). Already have these, believe they will give the right flow amounts and offer redundancy.
Heaters: TBD. I'd love cobalt but 99% you can't get them in Europe - or atleast I can't them.
Powerheads: MP10

Any suggestions on an overflow(In Europe) be appreciated!
 
OP
OP
dopey

dopey

Active Member
View Badges
Joined
Feb 24, 2018
Messages
284
Reaction score
286
Location
Sweden
Rating - 0%
0   0   0
Some progress!

Status:
Found a local shop who will build the two tanks.
They will start on the sump hopefully this week. The display tank will be built after I receive the overflow.
Settled on a modular marine 800gph overflow. Ordered from the USA, so fingers crossed it comes in *decent* time to Sweden. (Seriously internal overflows in EU seems to be lacking :()

I have started to consider sump design. Space will be fairly limited. I am debating whether to do a refugium or skimmer, just skimmer, or both(I'm not sure this is feasible in the space).

If I go with a skimmer will almost certainly go with a Deltac 600i . Can order through LFS and the few reviews/posts i've found give very positive reviews. It is interesting trying to do a build in Sweden, as many of the 'common' brands are just different on this side of the ocean compared to USA.

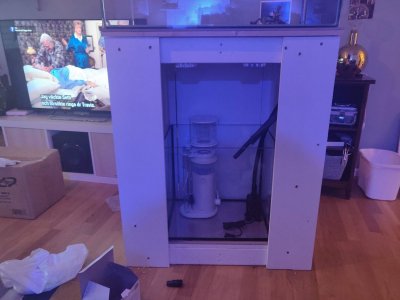
The stand itself has been a nightmare. Trying to skin it to look as good as possible is not easy, atleast not for me. Added with having to have all material precut at the hardware store due to lack of tools/space. Ultimately i'm not happy as various gaps/seams are not perfect, but at the same time the focus should be on the tank not the stand.

I ended up going with magnetic panels on three sides, allowing me to remove the panels entierly for full access under the stand. A small leather-like strap wil be on them to allow removal.

Currently applied the first coat of primer paint. Will fill in holes, sand and apply second coat either today or tomorrow. Also painting the inside with a 'bathroom' white primer/paint, as reading other threads this seems to be a common regret(not painting the inside).

The stand itself is completely and utterly overbuilt. Pretty sure you could park a car on this.. (But if anyone sees a structural flaw please let me know..)

Random photos..

Unpainted:
IMG_20190723_154939.jpg


First coat of white primer:
IMG_20190724_155933.jpg


Tank will go where the current one is. This end will be against the wall. Can see the open long sides and open front. Under the bottom floor plywood there is a 45x95 brace as well(probably overkill).


One thing I am considering, is to put a vertical panel towards the front(Basically making a small section on the 'front' of the stand) then mounting all elecrtonics in this small space. Would isolate off electronics from the open sump area... Debating that, or placing the ATO in that section perhaps a custom acrylic box.

Will probably be 3-5 weeks before I get the tanks. Goal is to get things painted, then i'll start planning electronics and other items within the stand.
 
OP
OP
dopey

dopey

Active Member
View Badges
Joined
Feb 24, 2018
Messages
284
Reaction score
286
Location
Sweden
Rating - 0%
0   0   0
Unfortunately this is going slower than I'd like. :)

I am waiting on the overflow before the tank builder can drill the tanks, they weren't comfortable drilling of written instructions. Unfortunately, I had to order the overflow from USA. It seems to of left USA Aug 2nd, now it's in the blackhole until it pops up in Sweden's postal system/notice to pay MOMs.

I ended up going with modular marin's 800gph overflow.

I'm debating on 45cm tall vs 50cm tall. I'm leaning towards taller, since water changes will be poured into the sump. (Was worried trying to pour 10L water into the display :D)

Nearly done with the stand. There was a week long break to do a bikepacking trip with my partner, returned last night. Will do additional finishing coats and try to 'finish' the stand.

Current:
IMG_20190728_142106.jpg


The initial plan was entirely white... but I was building it we came up with the idea to leave the top unfinished(will lacquer it), and the centers painted the same color as our walls. I think it's looking pretty good! (Tho I can find a milion imperfections that annoy *me*). This is primer + one coat of finishing paint.

Left to do:
Need to still lacquer the top, and screw it in place.
Apply 2nd/third finishing coats on the exterior pieces.
Attach handles. The colored middle sections are held in place with magnets, idea is to have a little leather strap to remove the entire panel. Should make access to the sump very easy.

On the inside i've primered and applied a paint meant for use in bathrooms(tolerates water).


After the stand is done:
1.) Sump design (Skimmer + fuge vs just fuge vs just skimmer?)
2.) Plan wiring and equipment location in the stand
3.) Development on my rasberry pi monitoring solution. Plan to add additional sensors and alarms
4.) Start ordering additional equipment (Don't really want to do this until the tank is being built.. just *incase* something falls through..)
 
OP
OP
dopey

dopey

Active Member
View Badges
Joined
Feb 24, 2018
Messages
284
Reaction score
286
Location
Sweden
Rating - 0%
0   0   0
It's been a while.. but the custom tanks are finally done. Was a bit surprised to get the call last Friday they were ready for pick up :)

I know this is still small by this hobby's standard.. but compared to our current tank it is massive!
new-tank.png


Honestly forgot most of the research I did months ago.. so now need to figure out the plumbing/pump needs.

Going skiing for the week, but after we return hope to work out plumbing/return pumps so I can begin cycling the tank.

(Towel is just temporary until we get a yoga mat/pad for the tank long term)
 
OP
OP
dopey

dopey

Active Member
View Badges
Joined
Feb 24, 2018
Messages
284
Reaction score
286
Location
Sweden
Rating - 0%
0   0   0
Got back from our ski trip.. and starting progress.

Getting the sump into the bottom will be tricky. Hopefully we can play some geometry games and angle/set it down. Otherwise will need to remove one of the 4 corner panels then reattach. I knew it be tight, but wanted to maximize sump size.


Total system volume seems to be around 228L. Display is 150L and Sump is 78L. Not sure what the actual numbers will be since neither will be filled to max.. Maybe around 200L in total?

As for equipment, going with:
Skimmer: Deltac 600i
Return Pump: Tunze Silence 1073.020
Overflow: Modular Marine 800gph
Rock: Carib Sea Life Rock

Have not decided on powerheads.. Definitely *want* MP series, but haven't convinced myself to spend the $$ yet.


Going to go barebottom. We actually selected a beige yoga mat for the padding under the tank. Think this may look OK actually.

Have also decided to not use baffles in the sump.

IMG_20200104_175806.jpg
IMG_20200104_175814.jpg


and new purchases today:
IMG_20200104_180708.jpg
 
OP
OP
dopey

dopey

Active Member
View Badges
Joined
Feb 24, 2018
Messages
284
Reaction score
286
Location
Sweden
Rating - 0%
0   0   0
Not as much progress as i'd like.. Many runs to various hardware stores. It was surprsingly difficult to find PVC solvent/adhesive/anything-meant-to-combine-pvc-pipes here, or atleast it was for me :)

I also hesitated allot on the plumbing. It's very daunting when you've never done it before. How to measure the cuts, where to place things. How to secure them. Whether to glue overflow stuff. Whether to use unions, if so where.. whether to have a adjustable valve on the drain pipes if so where.. how high in the overflow box each should be.. Finally just started cutting/assembling. If I don't have a leak or need to do any of it, i'll be amazed..

Fitting the sump in the bottom required taking both side panels off :D I knew it be tight, but had hopped turning/angles I could of fit it in. Oh well, used a magnet from a powerhead to find the screws and removed the panels.
IMG_20200105_174149.jpg


Look from the back(Rubber hose was hooked to the pvc pipe inside the cabinet.
IMG_20200106_151606.jpg


Will probably replace the black flex tube with braided line, and shorten it.
IMG_20200106_165101.jpg


Trying to select rocks for rockscape..
IMG_20200106_190817.jpg


This will be one of the rock pieces, used coral glue to connect the three.
Our existing Nano has a single large rock in it. It will be moved into the new tank, and this rock piece placed farther down. Going for either 2 or 3 rock islands in the tank with space between them
IMG_20200106_200000.jpg


Tank is officially in place!!!!!!!!!!! and about 42 Liters of water in it thus far.. making/mixing as fast as I can. Will probably hit 50L before bed.
Here was the first 12L of water in!
IMG_20200106_175424.jpg


Make shift brackets to add loop supports to the plumbing... Forgive the haphazard layout, should of installed the much earlier on..Was a nightmare installing them at the end.
IMG_20200106_221925.jpg


Things left to do..
  • 170L of water left to make/mix..
  • Securing the plumbing. I wasn't comfortable using hard mounts on the back as any movement of the tank/stand could 'tweak' the pipes. Idea is to use zip ties with the hooks mounted above the holes to kind of 'cradle' the pipes. I think this will work?
  • Finishing the overflow pipes in the sump. Plan to do a leak test first tomorrow evening, as the return pipes were glued earlier today -- giving them 24 hours before use.
  • Mount the electrical. It will be mounted on the front vertical, with cable routed over the top shelf.
  • Mount raspberry pi monitoring solution
  • A plan for the ATO.. Thinking about making a custom case that fits in the front. It be very narrow but could be tall enough to hold a few gallons of water.. tbd.

Unfortunately the long holidays here are over and back to work tomorrow. Will be sneaking out as soon as possible, and continue making/mixing/filling the tank while working on the remaining bits.

Hope by end of the weekend to have the full system up/running and ready for the next phase. IMG_20200106_142645.jpg
 

bdesign

Well-Known Member
View Badges
Joined
Dec 11, 2018
Messages
579
Reaction score
2,135
Location
Ohio
Rating - 0%
0   0   0
Unfortunately this is going slower than I'd like. :)

I am waiting on the overflow before the tank builder can drill the tanks, they weren't comfortable drilling of written instructions. Unfortunately, I had to order the overflow from USA. It seems to of left USA Aug 2nd, now it's in the blackhole until it pops up in Sweden's postal system/notice to pay MOMs.

I ended up going with modular marin's 800gph overflow.

I'm debating on 45cm tall vs 50cm tall. I'm leaning towards taller, since water changes will be poured into the sump. (Was worried trying to pour 10L water into the display :D)

Nearly done with the stand. There was a week long break to do a bikepacking trip with my partner, returned last night. Will do additional finishing coats and try to 'finish' the stand.

Current:
IMG_20190728_142106.jpg


The initial plan was entirely white... but I was building it we came up with the idea to leave the top unfinished(will lacquer it), and the centers painted the same color as our walls. I think it's looking pretty good! (Tho I can find a milion imperfections that annoy *me*). This is primer + one coat of finishing paint.

Left to do:
Need to still lacquer the top, and screw it in place.
Apply 2nd/third finishing coats on the exterior pieces.
Attach handles. The colored middle sections are held in place with magnets, idea is to have a little leather strap to remove the entire panel. Should make access to the sump very easy.

On the inside i've primered and applied a paint meant for use in bathrooms(tolerates water).


After the stand is done:
1.) Sump design (Skimmer + fuge vs just fuge vs just skimmer?)
2.) Plan wiring and equipment location in the stand
3.) Development on my rasberry pi monitoring solution. Plan to add additional sensors and alarms
4.) Start ordering additional equipment (Don't really want to do this until the tank is being built.. just *incase* something falls through..)

I really like the two-toned decision on the stand!
 
OP
OP
dopey

dopey

Active Member
View Badges
Joined
Feb 24, 2018
Messages
284
Reaction score
286
Location
Sweden
Rating - 0%
0   0   0
I really like the two-toned decision on the stand!

Thanks!

Got the tank filled enough to do a test run of the plumbing. Hoping to only check for leaks. Unfortunately it led to a water level that was far too high:
IMG_20200108_155518.jpg


Made a post seeking advice on modifying the internal overflow box: https://www.reef2reef.com/threads/help-overflow-on-custom-tank-mounted-too-high.678773/

The overflow box was unfortunately mounted too high by the builder. Reviewing instructions it's clear the box should be 1/4" or more *below* the top on a rimless tank. On mine it's flush/bit higher than the tank.

Fortunately after contacting Modular Marine they can provide me a custom version of the internal overflow box that will fit. I've asked them to extend the slots to the top of the bulkhead. This will bring water level low enough that I can adjust it via the secondar pipe in the bean animal overflow.

Besides that I have cut down the bulkheads in the overflox box and installed the bean animal setup.
IMG_20200110_190439.jpg


Far left is primary, middle is emergency and far right is secondary. I can only fit the U(double 90s in this case) on the far right one. I haven't set it's long term height yet, but it is/will be lower than the emergency pipe in the middle :)

I have one leak that i'm fighting. The ball valve on the primary has a slight leak coming from the top. It appears the backpressure from the valve being partially closed is pushing water up through the PVC/adapter.. This was a 25mm valve with a 25->20mm adapter into a 20mm pipe. All of this was glued together using 'Tangit' which was incredibly hard to find and on the recommendation of the local shop. Oddly none of the return PVC is leaking which I used the same process/tangit on.

I am trying to patch it with epoxy, as it's very very slow. If that doesn't work i'll need to get a new valve unfortunately. It's such a small leak i'm sure saltcreep would solve it after a bit of time.. but I don't want to start with any leaks.

Overflows are plumbed into the sump:
IMG_20200110_191006.jpg


Not really sure what else do with them. As cool as it be to have manifolds, UV sterilizer, some crazy awesome looking piping in the sump.. This is a relatively small tank and only going to have a skimmer/return/heater in the sump. Perhaps it's enough to just have them returning under the water with emergency over the top?

Left to do:
Secure the pipes with make-shift PVC hangers in the cabinet. Waiting until all leaks are solved and water level set before securing things.
Decision whether to cycle the tank then move rock/fish from 37L or move them straight over. One concern with moving them is not having anything to cover the exposed bulkheads until I receive my new internal overflow box.
 
OP
OP
dopey

dopey

Active Member
View Badges
Joined
Feb 24, 2018
Messages
284
Reaction score
286
Location
Sweden
Rating - 0%
0   0   0
Have officially moved all livestock over to the new tank!

Debated whether to share this part of journey or wait till I either succeed, or spectacularly fail and have to restart :)

My little 37 Nano was going quite well. Weekly 10L water changes, corals growing quite nicely, etc.

I then, knowing 110% better, introduced a Zoa frag with a bit of caulerpa on it. I knew better. The girlfriend liked the colors and instead of explaining the 100 reasons why this is the stupidest thing for us to do, I got it.

The caulerpa started to spread. Trying to prune it feels like a futile task as you break pieces off which float, and start elsewhere.

Eventually, albeit way too late, removed the Zoa but the caulerpa continued to spread.

Increased water changes and got an emerald crab. It seemingly vanished over a short period of time. Awesome, victory won. Tank probably look best it ever did.

This was around when we decided to build a new custom tank/stand. We were both quite happy with how the tank looked. This was taken in July:
IMG_20190712_171022.jpg


Making the stand was a summer project.. and the hunt for a custom tank with overflow took a while, but it was started then as well.

Then Life/work/stuff got in the way and the tank was heavily neglected. I'd say no water changes for a good couple months and no regular water changes for 4-6 months.

Then on Dec 19th I get a phone call my new custom tanks are ready for pickup..

Here is what the 37L looked like when I took delivery of the new custom tank.
IMG_20200104_173641.jpg


Shameful. Competely preventable, and will take 100x more effort and energy than had I kept to my maintenance routine.

Fortunately nothing has *died* but all corals are severely reduced/unhappy/shrunk. Caulerpa is only thing thriving by a long shot.

The easiest solution be to full restart. However as both punishment to myself and a desire to not lose the corals we've built over the first two years. I want to save them, and fight off this caulerpa.

Unfortunately that will not be easy. I could not find really any success stories in fighting off caulerpa.

I also debated whether to try and solve it within the 37L or to solve it in the larger tank. Ultimately chose to take the battle in the larger tank, feeling I have more tools at my disposal with a larger tank. -- Actual skimmer, more options in fish/CuC selection, etc.

Here is how the full tank looks today:
IMG_20200114_172238.jpg


I did add a two spotted surgeon fish. I believe my tank size is a tad on the small size for him, but will rehome if it becomes an issue. Out of the herbivore fish known to eat caulerpa this felt like the smallest option. He has been consistently eating the caulerpa since he's been introduced.

Additionally to the surgeonfish, My hope by essentially transplanting the existing rock/infestation into the new tank I have placed it in a very low/0 nitrate/phosphate environment... even tho it doesn't seem that alone has a big impact on killing of caulerpa

My plan going forward:
  • Doing smaller 5-10% water changes every couple days to keep nitrate/phosphate levels exceedingly low.
  • Limit feeding for the clownfish
  • Locate some emerald crabs at the LFS
  • Each night do minimal pruning to try to prevent fragments from floating

It's too early to tell if this is a massive, massive mistake or not. But I caused this mess, and while it's not fun at all sharing my neglect.. I think it's important to share the failures as well.. and if nothing else reinforce the importance of a consistent routine.

On a plus side, all corals have been much more open since the move than they were in the 37L tank.

If the above doesn't work I will try H202 on the caulerpa.. but having never done that i'm a bit apprehensive.
 
OP
OP
dopey

dopey

Active Member
View Badges
Joined
Feb 24, 2018
Messages
284
Reaction score
286
Location
Sweden
Rating - 0%
0   0   0
Update a weekish later :)

Began seeing ammonia increase according to red sea tests. Oddly the fish/inverts didn't seem to be in stress. Still eating, active, etc.

Immediately began water changes, and tested against fresh RODI water. The ammonia was real :(

After a week of doing nightly water changes, and double water changes each day over the weekend. Happy to say ammonia is either gone or nearly gone. Last water change was Sunday evening. Seneye doesn't report any now, and red sea is < 0.2 .

I *hope* it was just a mini cycle due to the move, but will continue testing each evening. If it begins to rise again will resume water changes.

As for the caulerpa.. It's hard to say.
This was the 17th:
IMG_20200117_182400.jpg


and tonight. The middle section isn't new growth it's long strands that seem to be floating now, with white fuzz where leaves were. I hope this is due to being eaten :)
IMG_20200122_200948.jpg


My Hyde (Surgeon fish) is regularly grazing on it. Each day I tend to see quite long strands with 'white' fuzz where leaves normally are. I am hoping this is from the surgeon fish and emerald crab and not new growth.

There hasn't been any caulerpa on the new rocks.

On a positive note corals look better than they have in months. Hammer coral fully opening, zoas, candycane and some of the mushrooms showing through the caulerpa.

I can't say it's clear progress, but I also don't think it's getting worse.

Imagine I still have month(s) of larger/frequent water changes, and manual removal before things look presentable again.
 

Mastiffsrule

Where ever you go, there you are, so be nice 2 you
View Badges
Joined
Feb 10, 2019
Messages
8,440
Reaction score
33,571
Location
Charlotte
Rating - 0%
0   0   0
Evening

wow, great build. Tank is really nice. Well thought out. Keep putting up those pics with your progress
 
OP
OP
dopey

dopey

Active Member
View Badges
Joined
Feb 24, 2018
Messages
284
Reaction score
286
Location
Sweden
Rating - 0%
0   0   0
Weekend Update:

Ammonia still 0
Nitrates: <5

Ended up going with an MP40. It was a tough call compared to MP10 but given I am trying to create flow from one end of the peninsula figure better to have the extra power. Better to run the MP40 at 20-40% than an MP10 at 100%.

Happy birthday/christmas to myself?
IMG_20200124_171300.jpg


Have it currently set at 4/12 on reef crest mode. A bit below the return. It certainly creates quite the storm.

At the moment have a second Tunze powerhead I had laying around in the bottom corner. Trying to keep the bottom cleared, it's set in pulsing mode. Debating whether to go with a MP10 on that side instead, mainly to hide the cables.

A tip; When going with an MPXX it does greatly limit your placement.. I didn't even think about the exterior plumbing :D Greatly limits placement options compared to an intank pump! The controller/pump itself was also too large to fit through the pre-drilled holes I made for running wiring. Will have to find a new solution now :X

As for the caulerpa I did something I should of done long ago. Using just a rubber hose sucked out as much as I could during a water change. I had tried before with the cleaner pipe attached, and a much smaller hose. Now i'm using a much larger diameter hose for faster water changes. This with my thumb, resulted in the best removal method so far for this algea. I don't know why but I was pretty hesitant to use my thumb+hole as a vacumn cleaner... it was insanely effective!

Before(few days ago)
IMG_20200117_182400.jpg


after:
IMG_20200125_190027.jpg


Can actually see the candy canes and zoa colonies!! Mr Hyde(surgeon fish) is grazing on the aglae, but more than happy to be able to help him get ahead of the growth this way.

Will do another water change tomorrow solely for additional removal of this stuff. So nice to actually see the corals again.

I still have lots of cabling to finalize. Keep telling my partner that until I settle on pumps/lighting there is *no point* in tidying up *all* the cables :)

IMG_20200125_194938.jpg
 
OP
OP
dopey

dopey

Active Member
View Badges
Joined
Feb 24, 2018
Messages
284
Reaction score
286
Location
Sweden
Rating - 0%
0   0   0
Quick update.

After two cleaning sessions during water changes really feel this is attainable now. A large hose + your thumb is incredibly effective.


Close up of the rock:
IMG_20200128_201706_735.jpg


Just a week ago it was essentially a carpet of caulerpa all over the rock. you couldn't even see half the corals.

And a full tank shot:
IMG_20200128_201719_236.jpg


Will continue to vacuum during water changes and told myself no additional corals nor add more lighting until the caulerpa is 100% gone.
 
OP
OP
dopey

dopey

Active Member
View Badges
Joined
Feb 24, 2018
Messages
284
Reaction score
286
Location
Sweden
Rating - 0%
0   0   0
Well things had been going great. Seeing slowly but surely decline of caulerpa. Fish all seemed to be happy, eating well, no signs of aggression.

Had one woopsie where I sucked a mushroom off the rock while trying to remove caulerpa and had a makeshift mushroom recovery facility in the tank hoping it would reattach to rubble.

But then.. We bought a new fish, from the 'big box' retailer nearby. Instead of from the dedicated SW LFS that all other fish, and pretty much all things for the tank came from.

A couple days later, get a text from my partner saying there was white spots on mr rockstar (his name). She sent a photo and unfortunately instantly recognized it as likely velvet.

By time I got home, he was knocking on death's door and passed away before bed. Meanwhile started trying to formulate the best QT method in our situation. Posted for advice here -- https://www.reef2reef.com/threads/treating-velvet-in-display.689913/

Ended up losing three fish. The remaining fish are as active as ever, eating and not showing any odd behaviour. I can see some white dust on each of them though.

Following the instructions of Munster Odimor medicine. It does contain copper and feedback from local (good) lfs is it's a good choice.

I hope to cure the remaining fish over the coming weeks and let the corals/inverts fallow for 6+ weeks.

First time dealing with a killer disease, first time doing a QT of any kind. It's been a not fun 24 hours. On the positive side, if successful with this QT -- ridding my DT of copper included -- this is another proverbial badge in the hobby.

Will give some updates either when this succeeds or if there is more causalities. I expect the caulerpa will make a return during this time, tho there is an emerald crab with the corals so perhaps i'll see how much he's contributed to the reduction compared to the surgeon fish.


... Just random insights... The big box store I used, does sell corals. But during this I realized those tanks were larger and wondered if they were on a different system than their fish tanks. Especially since, upon reflection, there is no inverts or corals in their fish only displays. While not surprising they do indeed run two systems and the fish system does maintain copper. As well, considering the amount of fish we saw in the displays the day we purchased this last fish, I suspect it was a recent shipment. I imagine (maybe way off here), but selecting a fish which has been in copper for an extended time is less likely to bring disease home.... Compared to the local dedicated SW LFS, they have inverts/corals mixed throughout all their tanks with fish. I talked with them today and it is one system on all their customer facing tanks. They do not (nor could) run copper.

current situation:
IMG_20200213_190656.jpg
 

Malifry97

Valuable Member
View Badges
Joined
Oct 7, 2019
Messages
2,015
Reaction score
2,067
Location
Duncannon,PA
Rating - 0%
0   0   0
Well things had been going great. Seeing slowly but surely decline of caulerpa. Fish all seemed to be happy, eating well, no signs of aggression.

Had one woopsie where I sucked a mushroom off the rock while trying to remove caulerpa and had a makeshift mushroom recovery facility in the tank hoping it would reattach to rubble.

But then.. We bought a new fish, from the 'big box' retailer nearby. Instead of from the dedicated SW LFS that all other fish, and pretty much all things for the tank came from.

A couple days later, get a text from my partner saying there was white spots on mr rockstar (his name). She sent a photo and unfortunately instantly recognized it as likely velvet.

By time I got home, he was knocking on death's door and passed away before bed. Meanwhile started trying to formulate the best QT method in our situation. Posted for advice here -- https://www.reef2reef.com/threads/treating-velvet-in-display.689913/

Ended up losing three fish. The remaining fish are as active as ever, eating and not showing any odd behaviour. I can see some white dust on each of them though.

Following the instructions of Munster Odimor medicine. It does contain copper and feedback from local (good) lfs is it's a good choice.

I hope to cure the remaining fish over the coming weeks and let the corals/inverts fallow for 6+ weeks.

First time dealing with a killer disease, first time doing a QT of any kind. It's been a not fun 24 hours. On the positive side, if successful with this QT -- ridding my DT of copper included -- this is another proverbial badge in the hobby.

Will give some updates either when this succeeds or if there is more causalities. I expect the caulerpa will make a return during this time, tho there is an emerald crab with the corals so perhaps i'll see how much he's contributed to the reduction compared to the surgeon fish.


... Just random insights... The big box store I used, does sell corals. But during this I realized those tanks were larger and wondered if they were on a different system than their fish tanks. Especially since, upon reflection, there is no inverts or corals in their fish only displays. While not surprising they do indeed run two systems and the fish system does maintain copper. As well, considering the amount of fish we saw in the displays the day we purchased this last fish, I suspect it was a recent shipment. I imagine (maybe way off here), but selecting a fish which has been in copper for an extended time is less likely to bring disease home.... Compared to the local dedicated SW LFS, they have inverts/corals mixed throughout all their tanks with fish. I talked with them today and it is one system on all their customer facing tanks. They do not (nor could) run copper.

current situation:
IMG_20200213_190656.jpg
Keep on chugging along. Hope to see everything get better!
 

Looking for the spotlight: Do your fish notice the lighting in your reef tank?

  • My fish seem to regularly respond to the lighting in my reef tank.

    Votes: 48 75.0%
  • My fish seem to occasionally respond to the lighting in my tank.

    Votes: 6 9.4%
  • My fish seem to rarely respond to the lighting in my tank.

    Votes: 5 7.8%
  • My fish seem to never respond to the lighting in my tank.

    Votes: 0 0.0%
  • I don’t pay enough attention to my fish to notice if they respond to the lighting.

    Votes: 2 3.1%
  • I don’t have any fish in my tank.

    Votes: 2 3.1%
  • Other.

    Votes: 1 1.6%
Back
Top