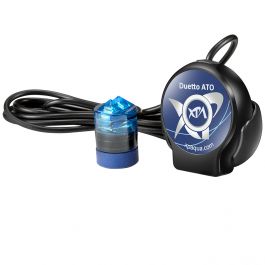
Easy Budget ATO

M3d1C

Community Member
View Badges
Joined
Feb 9, 2020
Messages
85
Reaction score
133
Rating - 0%
0   0   0
Okay everyone, to add some context to the following conversation, I'm a firefighter/paramedic and have been working a lot of extra hours lately with the recent pandemic going on. Having said that, the maintenance and upkeep of my tank has greatly fallen on my wife's shoulders. My tank is only a little 7 gallon and topping off has usually been done by a measuring cup a couple times a week but my wife doesn't understand how to check salinity or do water testing and I'm nervous about the salinity spiking or falling and killing everything. I emailed Bulk Reef Supply asking for suggestions and they suggested the Tunze Osmolator but the $200 price tag kind of scares me with my wife being furloughed right now and the unknown about when her work is opening back up. I asked if they had anything a little cheaper and all I got back was a rude email that said, "It's not a cheap hobby." ...While I'm very much aware of that fact, I'm hoping that maybe you all have an option for me that will help. Thank you in advance.
 

RyansReef

Community Member
View Badges
Joined
Mar 29, 2019
Messages
45
Reaction score
25
Rating - 0%
0   0   0
Okay everyone, to add some context to the following conversation, I'm a firefighter/paramedic and have been working a lot of extra hours lately with the recent pandemic going on. Having said that, the maintenance and upkeep of my tank has greatly fallen on my wife's shoulders. My tank is only a little 7 gallon and topping off has usually been done by a measuring cup a couple times a week but my wife doesn't understand how to check salinity or do water testing and I'm nervous about the salinity spiking or falling and killing everything. I emailed Bulk Reef Supply asking for suggestions and they suggested the Tunze Osmolator but the $200 price tag kind of scares me with my wife being furloughed right now and the unknown about when her work is opening back up. I asked if they had anything a little cheaper and all I got back was a rude email that said, "It's not a cheap hobby." ...While I'm very much aware of that fact, I'm hoping that maybe you all have an option for me that will help. Thank you in advance.
First thanks for your service. Be safe out there.

I think tunze has a nano for cheaper like $99 or checkout this video I had seen previously looking into an ATO for my system.


o-townFLA

Active Member
View Badges
Joined
Feb 29, 2020
Messages
107
Reaction score
134
Location
SoCal
Rating - 0%
0   0   0
I’m a Pro FF, so I understand your issue.

I have a 40b DT. I went with the $99 Tunze Nano ATO pulling RO/DI from a 5g bucket. Works just fine for my application

D86C6D2F-B313-4689-A491-E3EA227291F8.jpeg
 

NowGlazeIT

Happy to help, Ask away.
View Badges
Joined
Oct 28, 2017
Messages
6,119
Reaction score
11,438
Location
Coachella Valley
Rating - 0%
0   0   0
Oh yea there is options for diy and that will drop the price tag. Thank you for your help during this pandemic. I know you don’t have a lot of free time for a DIY but this is the cheap route. First think about a gravity fed top off, so no power pump or flow sensor. What I do is I get some bulkheads and a float valve. Then pick a container that you can drill threw. Something like Tupperware with a lid. Drill a hole in the bottom of the Tupperware and apply a bulkhead here. Connect bulkhead to RO tubing, connect RO tubing to float valve, apply float valve to your main tank, place Tupperware above tank to apply gravity feed.
 

bevo5

Well-Known Member
View Badges
Joined
Apr 24, 2015
Messages
831
Reaction score
673
Location
Portland
Rating - 100%
2   0   0
Jeeze - what a super customer service response there.

Is there a way to just make it super easier on her? If you mark the water level you want on the tank, it should be pretty easy to just keep it there. That's all the Tunze is going to do anyway. Not like it's measuring your salinity.

I'd just want to be really careful hooking up a new piece of equipment linked to 5g of fresh water - when I can't really be there to monitor for a while. Ya know?
 

lilgrounchuck

Well-Known Member
View Badges
Joined
Sep 12, 2019
Messages
694
Reaction score
987
Rating - 0%
0   0   0
I’ve been using the tunze nano w/5 gal bucket for over a year now with zero issues. You could also just get a cheap float valve and place a container of water above the tank. When the water level drops, the valve opens and freshwater flows in. As the level goes up to your desired waterline the float goes up and the valve closes. It won’t look pretty with a jug or whatever, but there’s no electronics to fail and it’ll do until all this passes. Those valves are only a few bucks and you can usuallyfind them at hw stores.
 
OP
OP
M3d1C

M3d1C

Community Member
View Badges
Joined
Feb 9, 2020
Messages
85
Reaction score
133
Rating - 0%
0   0   0
I’ve been using the tunze nano w/5 gal bucket for over a year now with zero issues. You could also just get a cheap float valve and place a container of water above the tank. When the water level drops, the valve opens and freshwater flows in. As the level goes up to your desired waterline the float goes up and the valve closes. It won’t look pretty with a jug or whatever, but there’s no electronics to fail and it’ll do until all this passes. Those valves are only a few bucks and you can usuallyfind them at hw stores.
Awesome! Thank you!
 

Pntbll687

Valuable Member
View Badges
Joined
Oct 4, 2017
Messages
2,088
Reaction score
2,604
Rating - 0%
0   0   0
Here's the one I use


I have two going on my systems, and bought a third for a frag tank that is going up.
 

LDog74

Active Member
View Badges
Joined
Dec 27, 2019
Messages
213
Reaction score
257
Location
Encinitas, CA
Rating - 0%
0   0   0
I currently have 3 QT tanks running right now. I use painters tape for a reference and add RO/DI as needed once or twice a day. Stuck at home now anyways so it's easy...
 

Eagle_Steve

Grandpa of Cronies
View Badges
Joined
Jan 30, 2018
Messages
11,564
Reaction score
60,955
Location
Tennessee
Rating - 0%
0   0   0
First off, Amazon is delaying items that are not essential, but I just ordered all of the below to build a few more of these for friends, and got them in 3 days instead of the normal 2. It really all depends on where you are located. Also, ignore the crude paint sketches lol. I am not an artist.

List of items you need from amazon. Most of the others you probably have lying around or at least something comparable.

USB powered water pump. I use the one below and it works well. I have also built these for friends on the hobby and they have had no issues either.


Float switches. I like these as they have not failed yet. Probably will now as I just jinxed myself. They are sealed and the wire is aluminum and not copper. (even though the wire is sealed covered with insulation, don't want to take a chance.)


Other items:
Old salt bucket or something else to store your RODI in.
Liquid electrical tape or heat shrink and silicone works also.
Old USB phone charger.
2 suction cups (optional)
piece of scrap acrylic or something similar.
Super Glue Gel or similar
RO tubing or even flexible airline for a bubbler works.

Prep Work -
1. Build the bracket the will hold the float switches. You can do this with the scrap piece of Acrylic. A heat gun, small torch or even a lighter will work to heat the piece and allow for you to bend it. You can bend it at both ends and make the bracket a hang on, or use some suction cups to make it stick to the side of the sump. Either way and be made adjustable. The suction cup method is easiest, but it can fall down if the suction cups are not the greatest, this is why I use 2 of them. The hang on method, can be adjusted, but you need some way of making it adjustable. Slots and zip ties, holes and platic screws into threaded holes, whatever you can come up can work lol.

2. Once you have the bracket made, you will need to drill 2 holes in the bracket for the float switches, and 2 more for the suction cups if you are using them.

3. When the bracket is made, it should look like the below. Again, excuse the crudeness of the drawing lol.
1586453562750.png


1586453579562.png


Again, if you make it a hang on, the top will have the bend to allow it to hang from the topside of the sump.

When this is complete, you can begin the wiring.

1. You will need to tie 1 lead from each float switch to each other.
2. twist the wires together well and fold them over themselves.
3. Apply a good drop of super glue gel to the wires. Let that dry.
4. Apply a small amount of liquid electrical tape over the area. If you do not have that, but have some heat shrink tubing and silicone, be sure to slide the heat shrink over the wire before twisting together and gluing. Apply silicone and then slide the heat shrink down over it and apply some heat.
5. When all of that is done, you are ready to build the lead to break the negative feed from the power supply to the pump.
6. somewhere on the USB lead from the pump, you will need to remove the outer insulation from the lead. Small knife or razor works well. Just slice off a small bit at a time, until you see the red and black wires underneath.
7. Once you see the wires, you can work it so that there is more of the wires showing. You only need about 1" of the red and black wire showing.
8. Now you need to cut the black wire in two and strip the ends of each a little.
9. Connect one lead from the float switches to one end and the other lead to the other end of the black wire you just cut and stripped. Apply super glue to the wires after they are twisted together, let dry and then apply liquid electrical tape to that.
10. For the RO feed line or air tubing, the little feed out of the USB pump is a hair smaller than the RO tubing most of the time, but can be larger. Either way, you can gently heat one or the other and enlarge it with a pen or pencil.
11. You then apply a small bit of super glue to the 2 and slide one over the other.
12. Your Top off feed does not need to lower than the maximum water level of the bucket. This could make it siphon utnil the end of the tube is level with the water level. A way around that is to use a small piece of pipe that comes up out of the sump, but does not go down too far, and then put the feed tube in that. That is if you care about hearing the top off run.
13. When all of that is dry, you now have an ATO that has redundancy.

It does need to be noted: You will need to remove the plastic clip that holds the float on the bar and flip the float for at least one float. You can check this with a multimeter (set on ohms) to see when the float is open or closed. You want the bottom float to be closed when it is down and the top closed when it is down (down as both closest to the water level). The bottom will need to go to open when it gets as far as it can travel to the bracket.

These little things work great, and they have redundancy in case the first float fails, something gets in its way, etc. The second float goes up and breaks the circuit as a back up.

Last but not least, as some have asked this. "What happens if the leads get damaged and they are open in the water?"
It is 5v feed and you are using the negative end of the power feed. It will provide a ground for the tank, but that is it.

Here is a pic of a rough wiring look and a rough look at the setup.

1586454619490.png


1586454643723.png
 

KiloReefer

New Member
View Badges
Joined
Sep 9, 2019
Messages
21
Reaction score
43
Rating - 0%
0   0   0
only problem is the delayed amazon shipping on non essential items. these can be cut to fit tanks with rims, but not as stable.

Link: rimless ato option

I'm a full-time EMT so I am in the same predicament as the OP here with little time for tank maintenance. My wife is working from home but I do not want to put the burden of my little budget 5gal pico on her. Do you have any experience with this gravity fed item? I was looking at the same product the other week but wasn't sure if it would be a good fit for me as my tank is on my desk and any overflowing would ruin our computers.
 

slojim

Active Member
View Badges
Joined
Feb 2, 2020
Messages
358
Reaction score
231
Location
League City
Rating - 0%
0   0   0
M3diC - when I had a 12 gallon, I set up a siphon system when I went on vacation. It used a 2 qt glass bottle, a rubber stopper, and some tubing - a water suction that went from the bottom of the jug, through the stopper, and into the tank, and a siphon break that was tied to the tank lid at the desired tank level, and just penetrated the stopper. The bottle was above the level of the aquarium. Maybe there was some risk of overflow, but it would have been a half gallon at most. It took a little effort to fill and establish the siphon conditions, but then it was good to go for a week or more on that tank.
What approximate location are you in? Maybe someone local has parts on hand already. I still have mine in a bin in the garage.
 

r20crazy

Well-Known Member
View Badges
Joined
Mar 10, 2020
Messages
538
Reaction score
939
Location
California
Rating - 0%
0   0   0
I'm a full-time EMT so I am in the same predicament as the OP here with little time for tank maintenance. My wife is working from home but I do not want to put the burden of my little budget 5gal pico on her. Do you have any experience with this gravity fed item? I was looking at the same product the other week but wasn't sure if it would be a good fit for me as my tank is on my desk and any overflowing would ruin our computers.

thread seal tape the bottle to the unit, and be sure to angle cut the tubes. worked fine b4 i went automated
 

slojim

Active Member
View Badges
Joined
Feb 2, 2020
Messages
358
Reaction score
231
Location
League City
Rating - 0%
0   0   0
and I guess don't overthink it - I don't see the need to test salinity when adding make-up water as long as the level isn't changing much. It slowly rises as it evaporates and drops back when you add, unless you have something like heavy skimming. Heck, if you are feeding frozen/liquid foods, just use a little more rodi to melt the cube and make it all one step for now, until things go back to normal.
good luck
 

Being sticky and staying connected: Have you used any reef-safe glue?

  • I have used reef safe glue.

    Votes: 62 84.9%
  • I haven’t used reef safe glue, but plan to in the future.

    Votes: 5 6.8%
  • I have no interest in using reef safe glue.

    Votes: 3 4.1%
  • Other.

    Votes: 3 4.1%
Back
Top