GregG 220 Peninsula build

Greg Gdowski

Active Member
View Badges
Joined
Oct 16, 2017
Messages
337
Reaction score
757
Location
Rochester, NY
Rating - 0%
0   0   0
I've been contemplating a new build for a number of years. I never pulled the trigger because I was really just waiting for the right opportunity. About a week ago, I thought about poking around on the marketplace on FB and came across an ad for a 220G Miracles tank. This is a picture of the tank the owner provided from about 2yrs ago when it was purchased.

Tank 1.JPG


The tank wasn't originally set up as a peninsula tank but ironically had a Reefsavy ghost overflow on the right which immediately caught my eye. It only has starphire on 2 sides, but the price was right and it came with a lot of additional items that I knew would get me far along the path to being functional like my 90G tank. There are 2 hydra 52s on the tank, but the owner included the 3rd that had not been installed. I may eventually go for 4 -- but I'm a bit dismayed that the 52 was discontinued for a new model. I'll add more on the other equipment that came along with this (including the limited livestock and corals that were in the tank at the time of purchase).

Here is the target destination in our house.
Room2.JPG

Room1.JPG


I will be putting the tank in front of an opening that already exists in the wall separating our living room and hall way. Fortunately, the house is a bit older --- so ironically each side of that hallway (including under the wall with the opening) has a steel beam running along the floor that holds up the 10" joists that run perpendicular to where the tank will reside. I may still strengthen up that floor before the tank goes in, but it is essentially the strongest part of the floor in our house.

I would have made the stand --- but I have one great wife ;-) She wanted to have a stand that was far better than what we have had in the past. I am working with Caribbean Forest out of Rochester to build the stand. My wife found this design online, and we will likely model the stand after this design.
Stand concept 1.JPG


There is a lot of work to do -- but I'm glad I cut my teeth on the 90G and plumbing into the basement. I know far more than I did then but a peninsula brings new challenges --- some of which have been highlighted on my first thread on this endeavor by others here at R2R.

Let the journey begin!
 
Last edited:

Super Fly

Valuable Member
View Badges
Joined
Apr 19, 2018
Messages
1,454
Reaction score
1,103
Rating - 0%
0   0   0
that old stand doesn't do justice to a Miracles tank, glad you plan to build a proper stand for it. GL!
 

Super Fly

Valuable Member
View Badges
Joined
Apr 19, 2018
Messages
1,454
Reaction score
1,103
Rating - 0%
0   0   0
Nick has done 2 amazing large Miracles peninsula builds that u can read up on here.
 

Brett S

Valuable Member
View Badges
Joined
Nov 28, 2016
Messages
1,062
Reaction score
1,373
Location
Orlando
Rating - 0%
0   0   0
This looks like it’s going to be amazing:). I did something similar where I put my 220 behind a hole in the wall so I could see the other side of the tank from another room. I didn’t have a ready made hole though, so I had to make the hole myself. There are more details in my build thread here...

 
OP
OP
Greg Gdowski

Greg Gdowski

Active Member
View Badges
Joined
Oct 16, 2017
Messages
337
Reaction score
757
Location
Rochester, NY
Rating - 0%
0   0   0
that old stand doesn't do justice to a Miracles tank, glad you plan to build a proper stand for it. GL!
In his defense, he had intended to skin it. They had a smaller house and wanted to have another child --- so the tank had to go a little earlier than they anticipated.

I probably could have built that stand in the picture. I've done a number of projects like this in the house. My wife wanted something a little nicer and I think wanted to save some of my time for other home projects.

I thought about putting his old stand in my basement to support the sump... but the thing looks very heavy and overkill for anything I would do in the basement.
 
OP
OP
Greg Gdowski

Greg Gdowski

Active Member
View Badges
Joined
Oct 16, 2017
Messages
337
Reaction score
757
Location
Rochester, NY
Rating - 0%
0   0   0
This looks like it’s going to be amazing:). I did something similar where I put my 220 behind a hole in the wall so I could see the other side of the tank from another room. I didn’t have a ready made hole though, so I had to make the hole myself. There are more details in my build thread here...


Thanks... that spot in the house always had me thinking about a peninsula tank. I suspect the prior owner would have opened it up completely but there is a post in the middle of the open space. It might be hard to see in that picture. The wall is a little higher than a typical stand (41.5" high). Love your tank. I'll look over the parts of the controller portion. I ran my 90G as a non-water change system using the Balling method (with dosing). I have a friend in Rochester that has done a similar thing with a 270G tank. He started that tank around the same time I started the 90G.

I took a look at Reefbums videos and I'm thinking a lot about minimizing rock work in the DT to give more room for corals. Also thinking about a bare bottom tank instead of a sanded. I'm a little tired of the sand bed becoming a litter pan.
 

Duffer

Valuable Member
View Badges
Joined
Dec 9, 2017
Messages
1,639
Reaction score
1,416
Location
Rochester,NY
Rating - 0%
0   0   0
Looking forward to the build. Caribean Forest (Millie) will build an awesome stand, she is that good, which i'm sure you already know..
 

mrpergo

Community Member
View Badges
Joined
Mar 25, 2014
Messages
38
Reaction score
13
Location
Hilton, NY
Rating - 0%
0   0   0
I looked at that stand online the other day on Pintrest I think..........
It's a beauty and I'm sure Millie will do it justice.
good luck with the build
 
OP
OP
Greg Gdowski

Greg Gdowski

Active Member
View Badges
Joined
Oct 16, 2017
Messages
337
Reaction score
757
Location
Rochester, NY
Rating - 0%
0   0   0
Agree... looking forward to having Millie put together the stand. I need to get her some more dimensions.

As I think about this build more... I am acquiring a used tank from someone that has sand in it. It is about 2yrs old. Wondering if I should pitch the sand, or vacuum it and move forward, or go bare-bottom on the tank.

I have a lot of seasoned rock in my current sump that I will use to get this through a quick cycle. That is what I did when I transitioned from my 45G to the 90G and it worked very well. The sand and rock in the 220 actually looks ok to me, but I have been thinking about trying a bare-bottom tank.

One of the things I started thinking more about is strengthening up the joists in the basement even more by bridging and adding support poles. I think I am ok, but the notion of a joist rolling can't even be a possibility. One of the hazards below my space is a gas furnace that is in close proximity.
 
OP
OP
Greg Gdowski

Greg Gdowski

Active Member
View Badges
Joined
Oct 16, 2017
Messages
337
Reaction score
757
Location
Rochester, NY
Rating - 0%
0   0   0
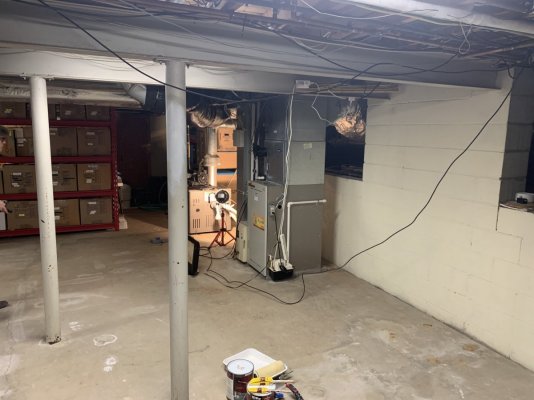
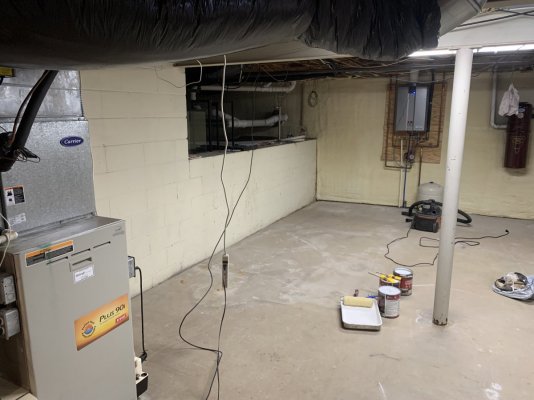
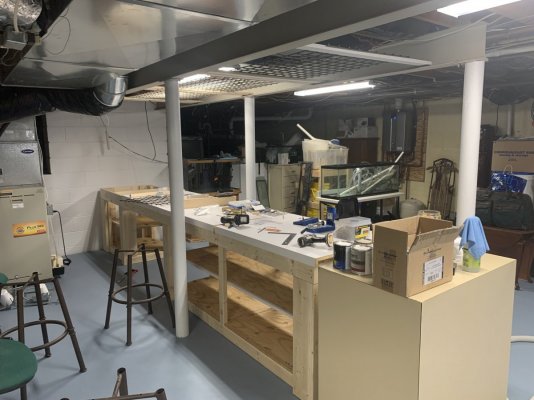
I thought I would give a brief update. I have been renovating the basement where the sump will be located. This turned out to be more of a major project. We first had to cleanup the area in the basement. Then decided to paint the floors and walls. I utilized an area in the basement that was difficult to utilize. An area with steel beams and many poles. I built cabinets in between the poles and created enough space for the 150G RO/DI water reservoir, sump, refugium, frag tank and various filters. All electricals will be done over the top along the ceiling within the basement. I did not want any electrical on the floor. I wanted to minimize them at best. The 40G bow front in the picture will be a quarantine tank.

sump_area_before 1.JPG sump_area_before 2.JPG sump cabinets 1.JPG sump cabinets 2.JPG
 
Last edited:
OP
OP
Greg Gdowski

Greg Gdowski

Active Member
View Badges
Joined
Oct 16, 2017
Messages
337
Reaction score
757
Location
Rochester, NY
Rating - 0%
0   0   0
Wow, a lot has happened since my last post. One of the things that I started a while back was the plumbing to the basement. I had originally planned to plumb through the floor. However, my wife wasn't too keen on that. I had to plan to go through the wall behind the tank. That had several challenges, including a steel beam that was not to far below the floor joists where the plumbing would have to run. I had to put through seven plumbing lines including (3 1" drains, 2 1.5" returns, 1 1.5" waste line, and 1 1.5" electrical passthrough. In addition, I had to run the electrical circuit from the basement to the wall behind the tank.

I had to work between two sets of studs in orde
IMG_7351.JPG
r to get all of the piping through to the basement.

One thing that I learned from my 90G build was to minimize the number of 90degree turns. I didn't have much choice within the wall. Two 45deg fittings ends up not fitting nice in the wall cavity.

The plumbing seemed to take me forever. There was the plumbing through the wall to the ba
IMG_7384 2.JPG
sement. Then there was the plumbing from the ceiling in the basement to the sump. Then there was the plumbing from the wall to overflow and the tank. All of which I hard plumbed with the exception of a 2foot stretch between the return pump and the line going up to the first floor.

I did finally manage to get the wall repaired and repainted. You won't see much of this under the tank, but it came out pretty nice.

I also ran one of the three circuits I have in the basement up into this space. That allows me to put all of the other tank resident equipm
IMG_7385 2.JPG
ent (lights, powerheads, etc.) on the same circuits.

Here are what some of the connections looked like in the basement. The plumbing has really taken a lot of time. More to come on this later.
 
OP
OP
Greg Gdowski

Greg Gdowski

Active Member
View Badges
Joined
Oct 16, 2017
Messages
337
Reaction score
757
Location
Rochester, NY
Rating - 0%
0   0   0
The big debate started when the prior owner started getting anxious about moving the tank. It didn't leave a lot of time left for creating the stand with a local store. I finally opted to utilize the current stand that he had and build a
IMG_7388.JPG
skin for it myself at a later time.

The first challenge that occurred was that the height of the prior stand was 33" and I had to raise that height to about 41" so that the tank would reside in the "window" cutout on that wall. The second challenge was that I had a heat vent right on the same wall where the tank would reside.

I ended up building a base that would contain a toe-ductor from the wall to the front of the stand.
IMG_7389.JPG


There was also a third challenge. That challenge was that I wanted direct access to the wood floor underneath so that I could dry it off as best I could if there was a spill in the future.

All of this was achieved with high quality dimensional lumber (2x4, and 4x4s). The top was covered with 3/4" plywood. You can see the center cutouts that will allow access to the floor below the tank.

That brought me right up to tank delivery day.
IMG_7392.JPG
IMG_7390.JPG
 

Mar344

Community Member
View Badges
Joined
Jan 26, 2020
Messages
64
Reaction score
76
Rating - 0%
0   0   0
Wow, a lot has happened since my last post. One of the things that I started a while back was the plumbing to the basement. I had originally planned to plumb through the floor. However, my wife wasn't too keen on that. I had to plan to go through the wall behind the tank. That had several challenges, including a steel beam that was not to far below the floor joists where the plumbing would have to run. I had to put through seven plumbing lines including (3 1" drains, 2 1.5" returns, 1 1.5" waste line, and 1 1.5" electrical passthrough. In addition, I had to run the electrical circuit from the basement to the wall behind the tank.

I had to work between two sets of studs in orde
IMG_7351.JPG
r to get all of the piping through to the basement.

One thing that I learned from my 90G build was to minimize the number of 90degree turns. I didn't have much choice within the wall. Two 45deg fittings ends up not fitting nice in the wall cavity.

The plumbing seemed to take me forever. There was the plumbing through the wall to the ba
IMG_7384 2.JPG
sement. Then there was the plumbing from the ceiling in the basement to the sump. Then there was the plumbing from the wall to overflow and the tank. All of which I hard plumbed with the exception of a 2foot stretch between the return pump and the line going up to the first floor.

I did finally manage to get the wall repaired and repainted. You won't see much of this under the tank, but it came out pretty nice.

I also ran one of the three circuits I have in the basement up into this space. That allows me to put all of the other tank resident equipm
IMG_7385 2.JPG
ent (lights, powerheads, etc.) on the same circuits.

Here are what some of the connections looked like in the basement. The plumbing has really taken a lot of time. More to come on this later.
Awesome work! Excited to see this come together.
 
OP
OP
Greg Gdowski

Greg Gdowski

Active Member
View Badges
Joined
Oct 16, 2017
Messages
337
Reaction score
757
Location
Rochester, NY
Rating - 0%
0   0   0
Tank delivery day. Damm what a stressful
IMG_7393.JPG
day. This is definitely not a job that I want.

All in all, the move took about 3hrs. It took it longer to get it from the truck into our house than it did on the other end.

I've done a lot of simple carpentry around the house, but the stress of not knowing whether the old stand would fit perfectly on the base that I made was a killer.

At the end of the day, it worked out great. The base and the stand perfectly meshed together and we got the tank right where it had to be in that open window on the wall.

IMG_7395 2.JPG
63769937868__576BC6C0-C043-4A68-89B0-4CD82C0D25EF 2.JPG

A few things did not necessarily go as planned. The back of the stand was now the front of the stand. In part, because the bracing interfered with the plumbing that I had to put through the wall. I was also not entirely happy with the stand construction on the back side. I've since reworked the stand to greatly strengthen it.

This tank was also not used as a peninsula tank, so it had a black film on the one side that had to be removed.
 
OP
OP
Greg Gdowski

Greg Gdowski

Active Member
View Badges
Joined
Oct 16, 2017
Messages
337
Reaction score
757
Location
Rochester, NY
Rating - 0%
0   0   0
Here is where I am today.

IMG_7439.JPG

The amount of work to get here has really been substantial. You will notice a lot of changes in these pictures.

1. Removed the vinyl backing on the tank. I credit my wife for figuring out how to grab it so that it could be gently pulled off the back. I was advised by the company to use a heat gun -- which I tried. The heat only created a larger mess.

2. I removed the sand bed, cleaned it out, and replaced the sand bed with a back
IMG_7431.JPG
IMG_7440.JPG
ABS plastic sheet to protect the bottom. I will be trying a bare-bottom tank and I wanted to protect the glass as best I could. It was relatively easy to install. I have not yet siliconed it in place. I'm not sure if it will or will not be necessary. It snaps into the bottom are fairly tightly.

3. I completed the plumbing to the 22" reef savvy ghost overflow. It seemed so simple... but I
IMG_7437.JPG
IMG_7433.JPG
had to plumb from one side of the tank to the other and then through the wall. One of the challenges was to minimize the 90 turns and to ensure that the one length of horizontal run under the tank still had a sufficient slope to create a siphon. The other challenge was running all of the piping around the one end of the tank (as opposed to the back side). I to plan out the plumbing carefully so that I could still put powerbeads on that glass pane.

4. I plumbed the two return lines. This tank was not drilled for the returns, so they had to go over the top. That was a bit of a bummer -- but it is what it is. I'm going to anticipate a question on the size of the return lines. I used 1.5" pipes to match the output of the return pump. I was able to find some nice valves on FB for a great price. That allowed me to create a dual pump return manifold. In this configuration, I can use one pump and still deliver water to both the front and back sides. If I add a second pump, I can directly deliver water to each side with and individual pump. In some of these pictures you can see the magnet of the Octo Pulse 4 that will be on the side pane. I really did have to plan out the spacing of all the pipes so that I could place the Octo Pulse 4 in desired locations. The output of the return line is fed back into the tank with two 3/4" loc-line systems. I may change that in the future but decided to give that a try in the beginning.

5. I also modified the tank stand so that it didn't have the original bottom rail. I moved the bottom rail to the inside on either side of the piping that I put in. That also allowed me to true up the stand and firmly secure it to the base.

There is a lot more to come but I thought I would give a good update.
IMG_7436.JPG
IMG_7435.JPG
IMG_7438.JPG
 

Being sticky and staying connected: Have you used any reef-safe glue?

  • I have used reef safe glue.

    Votes: 101 86.3%
  • I haven’t used reef safe glue, but plan to in the future.

    Votes: 8 6.8%
  • I have no interest in using reef safe glue.

    Votes: 5 4.3%
  • Other.

    Votes: 3 2.6%
Back
Top