Help with building sump

cylon032

Active Member
View Badges
Joined
Aug 28, 2018
Messages
180
Reaction score
114
Rating - 0%
0   0   0
So I'm deciding to attempt to build a sump as I don't have a lot of height space in my stand and I can't find any sump that's shallow. I have a eshopps r200 right now but it's kind of tall and it's a pain to remove the skimmer to clean, also want a bigger refugium, I was planning on building a LxWxH 48x14x12 sump. Can someone help and point me in the right direction. I've been looking for thickness some sites say 1/4 (.25) is fine then on other sites I read 3/8 (9.525). Seen some people on here make some amazing tanks and sumps hoping you could throw some of that knowledge this way :)
 

Ratherbeflyen

Well-Known Member
View Badges
Joined
Mar 9, 2018
Messages
571
Reaction score
935
Location
Houston
Rating - 0%
0   0   0
48" is pretty long for no bracing, but baffles are fantastic braces. If you have no section that is bigger than 36" between baffles, then I would use 1/4" glass. A 40 breeder uses 1/4" glass and is 36" x 16".
 
OP
OP
C

cylon032

Active Member
View Badges
Joined
Aug 28, 2018
Messages
180
Reaction score
114
Rating - 0%
0   0   0
Thanks for the response. None of the sections would be 36" they would be shorter. Would I need to go thicker if I go longer maybe 60x14x12, or would I need to add eurobracing? Now I'm thinking of adding a section for frags like a frag tank or would that not be possible in a sump?
 

FortReef

New Member
View Badges
Joined
Dec 13, 2019
Messages
16
Reaction score
38
Rating - 0%
0   0   0
Just did the assembly on my first attempt at a sump today.
5B0E44FB-486C-4562-BF4F-708449734C6B.jpeg
12B7A707-DB8B-4E29-B969-D1E81527D496.jpeg
032F1284-E4FC-4A2B-8637-603842B86247.jpeg


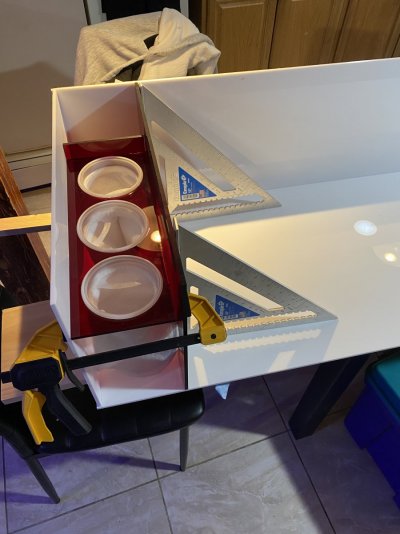
Mines only 30 “ long but 15 deep and 18 tall. 1/4” glass if you’re cutting your own glass I used a palm sander with 220 grit paper and it cleans the edges up real nice other than that I’d say an extra set of hands is nice but it can be done alone. I taped a square to the first panel so I could install the second.
 

FortReef

New Member
View Badges
Joined
Dec 13, 2019
Messages
16
Reaction score
38
Rating - 0%
0   0   0
also make sure to squeeze all the air pockets out of the seams. I used tape here but those quick clamps with rubber jaw protectors would work well too
 

FortReef

New Member
View Badges
Joined
Dec 13, 2019
Messages
16
Reaction score
38
Rating - 0%
0   0   0
Depends what you’re able to work with. I got a good deal on the glass and it’s not that hard to cut
 

lapin

10K Club member
View Badges
Joined
Dec 16, 2017
Messages
10,787
Reaction score
17,945
Location
Austin
Rating - 0%
0   0   0
I was thinking of going acrylic or is glass better?
As said above. Both are equal.
The thicker you go the stronger the seams should be. There will be more bonding surface.
 

Ratherbeflyen

Well-Known Member
View Badges
Joined
Mar 9, 2018
Messages
571
Reaction score
935
Location
Houston
Rating - 0%
0   0   0
Thanks for the response. None of the sections would be 36" they would be shorter. Would I need to go thicker if I go longer maybe 60x14x12, or would I need to add eurobracing? Now I'm thinking of adding a section for frags like a frag tank or would that not be possible in a sump?

The total length of the tank doesn't matter. Since a baffle almost covers the entire height of the tank, its' like making that section a whole new tank. IE. if you have two separate tanks that are 30x12x14, it would have the same amount of stress on the glass panels as one 60" panel with a full piece of glass splitting it in half at 30". (Not "exactly" the same because the baffle has to be a little shorter to allow water movement.)

If you are not going to use any bracing or baffles, then yes there is a huge difference in strength between at 30"x12" panel and a 60"x12" panel. You could make a 120" long sump as long as you put in baffle/bracing every ~36", it'll be more than strong enough with 1/4" glass.

Yes, you can put a frag tank in the sump. My sump is a DIY 75 conversion and has a section/lighting for frags.

IMG_20180203_092044.jpg


IMG_20200407_125505.jpg
 
OP
OP
C

cylon032

Active Member
View Badges
Joined
Aug 28, 2018
Messages
180
Reaction score
114
Rating - 0%
0   0   0
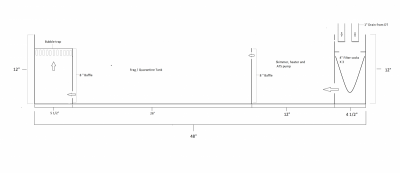
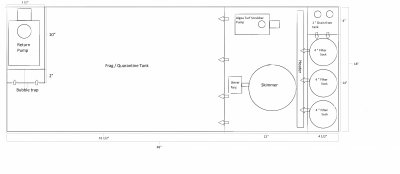
I finally had sometime to draw it out let me know what you think. Would it work, should I add remove stuff. Criticism always welcome:)

sump front.png sump top.png
 

lapin

10K Club member
View Badges
Joined
Dec 16, 2017
Messages
10,787
Reaction score
17,945
Location
Austin
Rating - 0%
0   0   0
Looks good to me
I would go 5" for the socks instead of 4.5"
With the ring mine are about 4.25"
 

Ratherbeflyen

Well-Known Member
View Badges
Joined
Mar 9, 2018
Messages
571
Reaction score
935
Location
Houston
Rating - 0%
0   0   0
I finally had sometime to draw it out let me know what you think. Would it work, should I add remove stuff. Criticism always welcome:)

sump front.png sump top.png


I like it. I agree with lapin though, I would make the section for the socks a little bit bigger. I would also leave the return pump section a little bigger. Even if you have a pump picked out, you may want to upgrade down the road. I'm also a big fan of having a refugium, but that could be as simple as adding some lighting diffuser into the frag portion.
 
OP
OP
C

cylon032

Active Member
View Badges
Joined
Aug 28, 2018
Messages
180
Reaction score
114
Rating - 0%
0   0   0
Will make those bigger, I wasnt sure of the sock rim size, didn't even think of the pump section bigger because I have both of the same pumps on my mixing station also. But that's true I might want a different pump.
 
OP
OP
C

cylon032

Active Member
View Badges
Joined
Aug 28, 2018
Messages
180
Reaction score
114
Rating - 0%
0   0   0
I was gonna do seperate refugium / frag tank in that section but I'm gonna go with a algae turf scrubber instead
 
OP
OP
C

cylon032

Active Member
View Badges
Joined
Aug 28, 2018
Messages
180
Reaction score
114
Rating - 0%
0   0   0
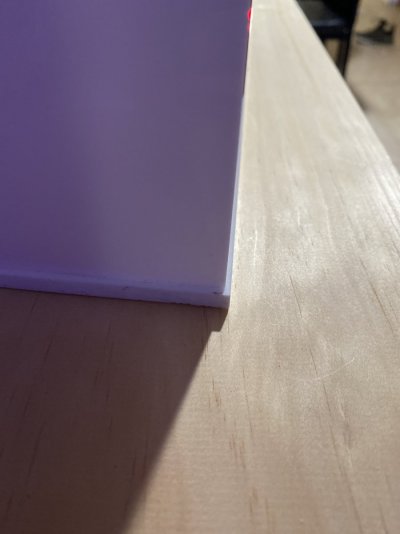
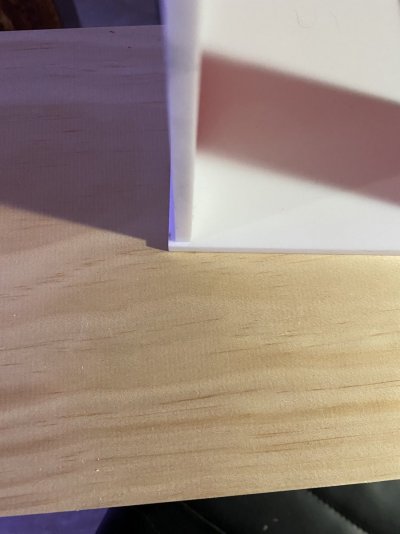
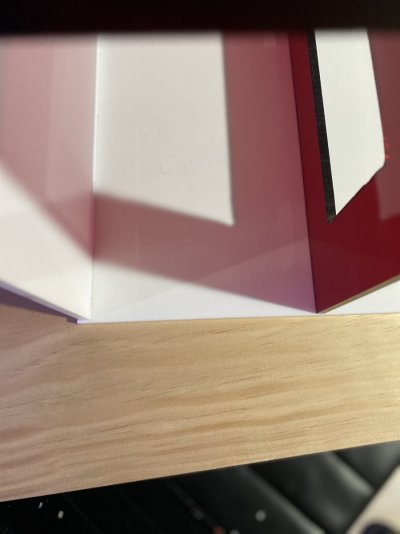
Did I just screw up or is there a fix? Finally got some time to start it didn’t realize when I glued it one of the corners isn’t even to the bottom leaving a gap if I put the front panel on
 

Attachments

  • B412EE09-CFF1-44A7-A885-4B9A7ED73C87.jpeg
    B412EE09-CFF1-44A7-A885-4B9A7ED73C87.jpeg
    86.3 KB · Views: 24
  • CF160506-7B80-4EDA-8BAC-519D6462E33E.jpeg
    CF160506-7B80-4EDA-8BAC-519D6462E33E.jpeg
    138 KB · Views: 24
  • DB21ECE9-29C3-4854-ADE0-6F03486F4F5E.jpeg
    DB21ECE9-29C3-4854-ADE0-6F03486F4F5E.jpeg
    91.8 KB · Views: 31
  • 577E3386-2232-48E8-AF38-87E909F27A55.jpeg
    577E3386-2232-48E8-AF38-87E909F27A55.jpeg
    141.4 KB · Views: 28
OP
OP
C

cylon032

Active Member
View Badges
Joined
Aug 28, 2018
Messages
180
Reaction score
114
Rating - 0%
0   0   0
Thanks, the front panel covers that part I mean the bottom left corner see how the white acrylic standing up is not flush with the bottom panel there’s not enough space for the front panel to rest on top of that and if I put it flush with the bottom and the red there’s going to be a gap I’ll take a picture with a piece attached to it
Front
43B36257-DB75-495D-8314-7F4B37465E05.jpeg
side view
64CB3891-63F7-4D1F-8ECB-C0CCC469C1F1.jpeg

Up close front
4B2E916C-CCF1-4428-91B6-977A4BA599E2.jpeg
 
OP
OP
C

cylon032

Active Member
View Badges
Joined
Aug 28, 2018
Messages
180
Reaction score
114
Rating - 0%
0   0   0
If I put the front flush with the bottom I have a pretty gap and putting it on top there’s very little contact surface
0031840B-E43D-4400-BDDC-3CB57C37761F.jpeg
9CB42D79-F145-4EF9-80BC-0E8777A4F772.jpeg
 

TDEcoral

Active Member
View Badges
Joined
Apr 14, 2017
Messages
359
Reaction score
387
Rating - 0%
0   0   0
Yeah that's a problem. If you have a router and a straight edge, you could cut that front edge on the bottom to be flush with the side. Then glue the front panel flush with the bottom like your second pic.
 

lapin

10K Club member
View Badges
Joined
Dec 16, 2017
Messages
10,787
Reaction score
17,945
Location
Austin
Rating - 0%
0   0   0
It would help to let us know what has been bonded together in the pictures.
Back to side? Back to bottom? SIde to bottom? Red to back? Red to bottom?
 

Algae invading algae: Have you had unwanted algae in your good macroalgae?

  • I regularly have unwanted algae in my macroalgae.

    Votes: 37 34.9%
  • I occasionally have unwanted algae in my macroalgae.

    Votes: 22 20.8%
  • I rarely have unwanted algae in my macroalgae.

    Votes: 9 8.5%
  • I never have unwanted algae in my macroalgae.

    Votes: 6 5.7%
  • I don’t have macroalgae.

    Votes: 29 27.4%
  • Other.

    Votes: 3 2.8%
Back
Top