

I've been working on this for a few years now. I gave up for a long time because there just wasn't the right kind of technology out there until recently. In the past I tried to use a USB camera but this required the camera to be attached to a computer and a program to always be running (slowing down my computer). I was also not able to use a mobile device to check the camera using this process.
I tried the process again using an IP camera and an online streaming app called Angelcam.com. In total I probably spent $50-$100.
Here is the link to my camera:
http://fishcam-2.click2stream.com/
Required materials:
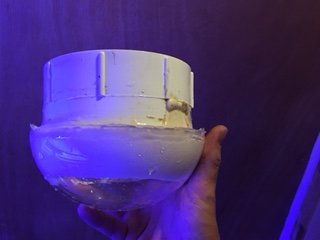
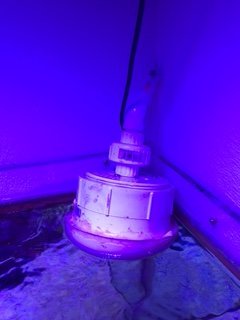
1. First step is to epoxy the dome to the PVC pipe. I pretty much just set the 4" coupler screw side up into the acrylic dome and poured the epoxy around the sides. JUST MAKE SURE THE EPOXY DOESNT DRIP TOO LOW TO COVER THE FRONT PART OF THE DOME. Once that dried I topped it off with aquarium silicon to make sure it was really water tight. I took a Drimmel and cut off the extra acrylic dome and screw lip to clean it up. Took about a day to do that. May not look very pretty but it does the job.
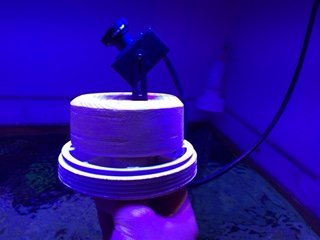
2. Next step you need to get the camera ready for the enclosure. What I did was change out the lens and the only issue was when you go to install the other wider angle lens you cannot screw it on enough to focus the camera. I had to totally take apart the camera and get the front section off. I used an old lens and put it in from the back and ground down the front. ( The old lens was there to re-thread the threads after I ground the end down. Only took about 1/8-1/16 of an inch off the end ( just enough were you can still use the set screw). Now when I put the camera back together I can use the wide angle lens and it will come in focus. This step is not that necessary because the 3.6mm lens works, I just wanted wider.
After I got the camera set up I got it ready for the enclosure. I took a 2x4 and using a 2.5" hole saw i cut out a circle that would fit in the 4" PVC coupler. I screwed the 2x4 plug into the PVC cap and then attached the camera to the other side of the 2x4 plug and ran the cord through a hold in the cap I cut (Later filling with silicon to make water tight)
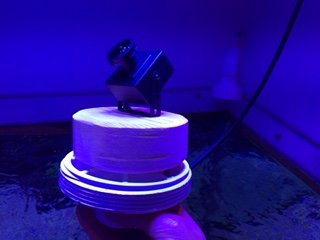
Now you will be able to screw the cap and camera into the coupler with acrylic dome and it "should" be water tight if you sealed it up tight. I wouldn't put the screw threads under water or the entire enclosure though.\
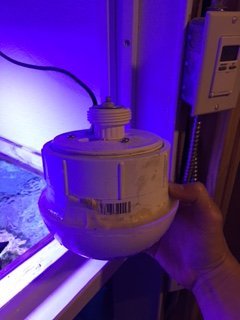
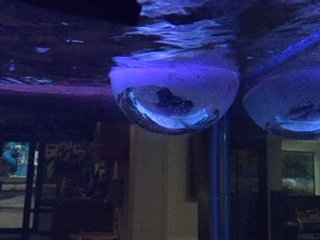
Im not going to go into mounting because it's all up to what you want to do. Heres a picture though.
3. The next step and really the last step is setting up the camera and its probably the hardest step especially if you are not computer savvy. The camera is Chinese made so when it comes its all in Chinese but they do include instructions to set it up into English. Install all the software especially the "device manager". Once you have hooked up the camera to your network you need to open the device manager.
In device manager. Press "IP Search". When you find the camera click the "Same to PC" on the right side and click "modify". I used the RTSP way to login so you need to port forward 554 to the IP address on your camera which I think the default is 192.168.1.11. If you don't know about port forwarding you can google it or contact me and I can try to explain.
Once you have the port forwared check it at check canyouseeme.org.
Now you need to set up with Angelcam.com. Its free unless you want more perks and want to pay montly.
Here are the steps on Angelcam.com to add a camera:
As long as you dont change the password on the camera this should work. I had the hardest time setting the camera up and it took me hours of working on it but this should work. Once you have the camera installed all you have to do is add a new app and add the "Broadcasting" app and set it up.
The only thing that I have found that I wasnt expecting was that sometimes tiny bubbles will show up on the bottom of the dome. Let me know if you have any other questions I can try to explain anything.


I tried the process again using an IP camera and an online streaming app called Angelcam.com. In total I probably spent $50-$100.
Here is the link to my camera:
http://fishcam-2.click2stream.com/
Required materials:
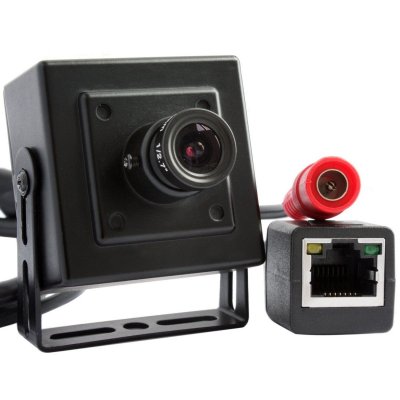
- IP Camera - ELP IP1881 (or any camera but this was a direct connect cat5 so no loss or wireless signal in inclosure)
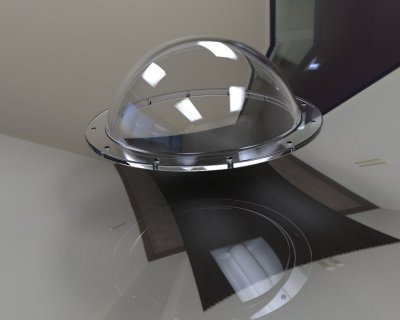
- Acrylic Dome - anyone will work but I used one for a GoPro
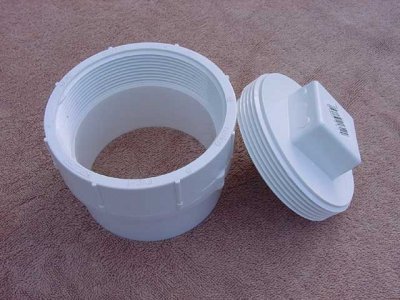
- 4" PVC Slip/Threaded coupler with screw cap.
- Marine epoxy
- Cat5 cable
- Something to mount the enclosure to tank (my case I used PVC pipe and detachable union to remove)
- Wide angle lens - 1.8MM CCTV Camera board 3 M mega pixel 185 degree 1/2.7 IR fisheye Lens (3.6 comes with the camera which is good but I wanted wider and with some modifications to the camera was able to put the 1.8mm on. Modifications to follow)
- Some wood to mount the camera
- Stainless steel or aluminum screws
1. First step is to epoxy the dome to the PVC pipe. I pretty much just set the 4" coupler screw side up into the acrylic dome and poured the epoxy around the sides. JUST MAKE SURE THE EPOXY DOESNT DRIP TOO LOW TO COVER THE FRONT PART OF THE DOME. Once that dried I topped it off with aquarium silicon to make sure it was really water tight. I took a Drimmel and cut off the extra acrylic dome and screw lip to clean it up. Took about a day to do that. May not look very pretty but it does the job.
2. Next step you need to get the camera ready for the enclosure. What I did was change out the lens and the only issue was when you go to install the other wider angle lens you cannot screw it on enough to focus the camera. I had to totally take apart the camera and get the front section off. I used an old lens and put it in from the back and ground down the front. ( The old lens was there to re-thread the threads after I ground the end down. Only took about 1/8-1/16 of an inch off the end ( just enough were you can still use the set screw). Now when I put the camera back together I can use the wide angle lens and it will come in focus. This step is not that necessary because the 3.6mm lens works, I just wanted wider.
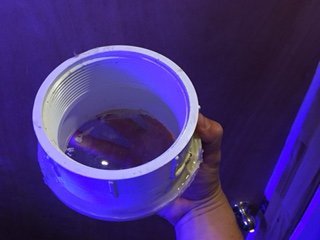
After I got the camera set up I got it ready for the enclosure. I took a 2x4 and using a 2.5" hole saw i cut out a circle that would fit in the 4" PVC coupler. I screwed the 2x4 plug into the PVC cap and then attached the camera to the other side of the 2x4 plug and ran the cord through a hold in the cap I cut (Later filling with silicon to make water tight)
Now you will be able to screw the cap and camera into the coupler with acrylic dome and it "should" be water tight if you sealed it up tight. I wouldn't put the screw threads under water or the entire enclosure though.\
Im not going to go into mounting because it's all up to what you want to do. Heres a picture though.
3. The next step and really the last step is setting up the camera and its probably the hardest step especially if you are not computer savvy. The camera is Chinese made so when it comes its all in Chinese but they do include instructions to set it up into English. Install all the software especially the "device manager". Once you have hooked up the camera to your network you need to open the device manager.
In device manager. Press "IP Search". When you find the camera click the "Same to PC" on the right side and click "modify". I used the RTSP way to login so you need to port forward 554 to the IP address on your camera which I think the default is 192.168.1.11. If you don't know about port forwarding you can google it or contact me and I can try to explain.
Once you have the port forwared check it at check canyouseeme.org.
Now you need to set up with Angelcam.com. Its free unless you want more perks and want to pay montly.
Here are the steps on Angelcam.com to add a camera:
- Connect New Camera
- Connect directly
- Select the "I don't know brand" because ELP is not listed.
- For your address this is what I used: rtsp://12.123.124.124:554/user=admin&password=&channel=1&stream=0.sdp
- Press detect camera.
- It should find it
As long as you dont change the password on the camera this should work. I had the hardest time setting the camera up and it took me hours of working on it but this should work. Once you have the camera installed all you have to do is add a new app and add the "Broadcasting" app and set it up.
The only thing that I have found that I wasnt expecting was that sometimes tiny bubbles will show up on the bottom of the dome. Let me know if you have any other questions I can try to explain anything.


") The eye in the sky Welcome to R2R also.
The eye in the sky Welcome to R2R also.


