Jim00's Raspberry Pi build tutorial with reef-pi

daytonajim00

Community Member
View Badges
Joined
Feb 10, 2018
Messages
26
Reaction score
75
Rating - 0%
0   0   0
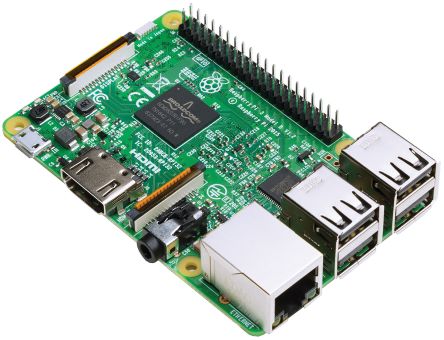
Jim00's Raspberry Pi Controller with Reef-pi Build

I wanted to document my DIY controller build. I also wanted to give my version of a step-by-step to try and make a concise tutorial in what seems like a plethora of information- it's not as hard as it seems. There's already great material out there and I will start off by citing the sources that I used in my build:

https://reef-pi.github.io/ This link is the official reef-pi page
https://www.reef2reef.com/threads/r...tank-controller-based-on-raspberry-pi.289256/ This is Ranjib's thread here


boxclosed600.jpg
 
Last edited:
OP
OP
daytonajim00

daytonajim00

Community Member
View Badges
Joined
Feb 10, 2018
Messages
26
Reaction score
75
Rating - 0%
0   0   0
1. Introduction

I hate wires and timers and clutter! I love the idea of open source. I recently discovered the Raspberry Pi and set out to build a controller for my lighting and equiptment.

The task seems daunting at first glance. But once you know the "skinny" on what's needed and understand certain aspects of a proper install, the build is pretty simple.

There are (3) main components of this Raspberry Pi relay controller:

1) Raspberry Pi
R1225826-01.jpg

2) Relay module
03_63_large.jpg

3) And receptacle to make a receptacle bank
CR015-2PW_66d6dabd-23d2-429c-be94-4e2db7ca067e_large.jpg


Excuse me if my terminology is off- I'm no expert...

For those who don't know- The Raspberry Pi is a small computer that many people use for projects like this. It has WiFi , an HDMI port to plug in a monitor, USB ports for keyboard/mouse/etc., and more. The RP has a micro SD slot. A Micro SD card functions as the hard drive so after the operating system is loaded, whatever space is left over will be used for system storage. The common operating systems ran on these Pi's are open source meaning they were collectively built through a worldwide network of programmers. Open source software is free- it's like a community garden. I have a 32GB card with something like 28GB's of free space on my reef controller-this project won't need massive storage so I could of used a smaller card.

The Raspberry Pi has GPIO (In/Out) pins that need to be utilized for a project like this- controlling relays that close 120v contact points to turn things on and off. A $10 relay module is used for this purpose. In this instance, the aquariums' lights and equiptment are turned on and off based on a program that is installed. There are several reef controller programs that you can download on the Raspberry Pi but I settled on "ReefPi". I found it the most efficient, stable, and streamlined for what I needed which is simply various aquarium power sources controlled off timing schedules.

I decided to go with a $10 8-channel relay module made by Sainsmart. This is a board with 8 individual relays and 8 signal inputs. I wired 8 signal wires from the RP's GPIO pins to each channel. There is a constant 120v hot "waiting" on one side of the relay and on the other side, we leave the relay to the receptacle. In short, the receptacle is turned on and off via the relay, controlled by a separate signal wire.

picture.php


I had to build a receptacle bank because I needed 8 individual channels to control- though I'm only using 6 currently (White, Actinic, Return, Auxillary Pumps, Skimmer, refugium light). The picture I've shown of the white receptacle is more accurately a "duplex receptacle" because it has two receptacles in one device. We commonly call it a receptacle but that is not entirely correctly. There is a metal tab on the device in which you can remove to isolate each receptacle. That way I need only (4) duplex receptacles which is actually (8) individual receptacles once physically separated. Might sound confusing but it's simple.

That is the intro on my Raspberry Pi reef controller using Reef-pi. I will add more soon for anyone who is interested and hopefully if may be more clear...
 
Last edited:
OP
OP
daytonajim00

daytonajim00

Community Member
View Badges
Joined
Feb 10, 2018
Messages
26
Reaction score
75
Rating - 0%
0   0   0
2. The Controller

Here is a picture of the Raspberry Pi and relay module. I mounted them inside a box I had laying around. There are two cords coming into the box: a butchered utility cord that provides 120v power coming from the wall (house) and a standard phone charger (micro USB) that powers the Pi. So to clarify, there are only two cords visibly seen from outside my tank stand that physically plug into the wall: the Pi's power and the tank power main line.

boxopen600.jpg


Here's an angle of the box showing the receptacle bank that I chase nippled into the controller box. It shows the 8 individual receptacles (4 duplex with hot tabs removed). Once again- that is 8 separate channels that I can independently control.

boxclosed600.jpg


There are other ways to make a bank of receptacles. You can look at other people's builds but I think this way is the best.

Bonus: This build can be used for any automated project needing timed relays; not just fish tanks!
 
Last edited:
OP
OP
daytonajim00

daytonajim00

Community Member
View Badges
Joined
Feb 10, 2018
Messages
26
Reaction score
75
Rating - 0%
0   0   0
3. Setting up Raspberry Pi OS and Reef Pi Software

When I first set up my Raspberry Pi, I played around with it for a while. I used it as a regular computer to get familiar with it. When you load an open source (free) operating system like Raspbian, it is pretty easy to do simple things like navigate around the desktop, surf the web, etc. as it is similar to any other OS in that regard. The magic comes in the fact that there is a constantly growing library of open source (free) software available from the community worldwide, you can "break out" of the small computer to auxiliary hardware (like we will be doing), and it is a relatively inexpensive computer- $65 for the kit. You may need to get a $20 USB keyboard/mouse if you already don't have one- I currently use my main computer's USB keyboard/mouse and plugged it in just to initially set up the reef controller. It can be unplugged afterward and the RP will do it's thing.

I have the Raspberry Pi Version 3 Model B which is the newest model. I think you can use the Raspberry Pi Zero and make an even cheaper build but I opted to get the Pi 3. The Raspbian OS version that is currently being used is "Stretch". I think some of the tutorials were written while the "Jessie" OS version was the newest and some of the steps were a little different. I tried to make my tutorial more adaptable to version upgrades by using steps that should be universal.

With that said, I am a complete amateur with both programming and the Pi, so feel free to correct me or shed some more light if anybody see's something I missed.

Here's how I set up the software portion of the build...

 
Last edited:
OP
OP
daytonajim00

daytonajim00

Community Member
View Badges
Joined
Feb 10, 2018
Messages
26
Reaction score
75
Rating - 0%
0   0   0
3.1 Setting up Raspberry Pi OS and Reef Pi Software (cont.)

Updated 12/13/2020


On your Windows, Mac, or Linux main computer:

1.) Format an SD Card

-Download SD card formatter

-Format an SD card with formatter


2.) Download the Raspberry Pi “NOOBS” file


3.) Extract NOOBS file to formatted SD card


Setup Raspberry Pi OS:


4.) Insert SD card with “NOOBS” on it into Raspberry Pi and power the unit ON


5.) Select "Raspberry Pi OS Full" and click “install”. (This takes about 15 minutes)


6.) Follow setup instructions when complete.


7.) Open Raspbian’s Wi-Fi settings and sign into your network (if not already done in initial setup)


8.) Update to newest OS version (if not already done in initial setup):

Open Raspbian terminal and perform:

-sudo apt-get update -y

-sudo apt-get upgrade -y (this takes about 15 minutes)


9.) Set time zone (if not already done in initial setup) (this

Open Raspbian terminal and perform:

-sudo raspi-config

-Select “Localisation Options” from the list

-Select “Change Timezone”

-Follow prompts to set the appropriate time zone


10.) Change password (I had to do this even after doing it in setup):

-passwd (stock password is "raspberry" so change to something

custom) (note: you will not see characters as you are typing)


11.) Enable network time:

-sudo systemctl start systemd-timesyncd

-sudo systemctl enable systemd-timesyncd


Setup Raspberry Pi Modules:

12.) Activate ssh, i2c, uart, and 1-wire

Open Raspbian terminal and perform:

-sudo raspi-config

-Select “Interfacing Options” from the list

-Select and enable SSH, I2C, Serial (uart) (if available), and 1-wire


13.) See https://learn.adafruit.com/reef-pi-installation-and-configuration/raspberry-pi-configuration if you want to setup PWN (dimmer control) and temperature sensor


14.) Go BACK to the terminal and perform reboot:

-sudo reboot


Install Reef Pi:


10.) Open your web browser from the Raspbian desktop and navigate to https://reef-pi.github.io


12.) Navigate to the “Guides” page ---> “Overview” page -----> Scroll down to the “Software installation & configuration”---> Select the "Configuration and Installation" section---> Scroll half way down and select "download the latest release of reef-pi" link---> and select the “release” linked text


13.) This will take you to the newest version of reef-pi where you will either copy the Pi Zero OR Pi 3 .deb link depending on which Raspberry Pi you have.


14.) Right click your version and select “copy link address”


15.) Download your reef-pi software. In the terminal type:

wget -c (right click and paste the copied link address starting with http...)

16.) Depackage the download. In the terminal type:

sudo dpkg -i reef-pi-4.0-pi3.deb

-Notice how I highlighted "4.0" and "pi3". 4.0 represents the version and Pi3 represents that it is for the Pi 3. You will need to have the correct characters matching your download. Fix it to whatever your download version was. Mine just happened to be version 4.0 and I have a Pi3.

17.) Check that reef-pi is running by using the terminal command:

sudo systemctl status reef-pi.service

*Somewhere within the text it should include “active (running)” if it is correct


18.) Find out your raspberry pi’s ip address

-Place the cursor over the “wifi” tab on the Raspbian desktop tool bar

-It will list your “wlan0” ports

-The first set of numbers you will copy. They should look something like “192.168.0.2/24”

-Type that numerical address in your Raspberry’s web browser bar

-Reef Pi’s “Sign In” screen should open


19.) Default reef-pi login username and password both is set as reef-pi
 
Last edited:
OP
OP
daytonajim00

daytonajim00

Community Member
View Badges
Joined
Feb 10, 2018
Messages
26
Reaction score
75
Rating - 0%
0   0   0
4. RP's GPIO's

Reef-pi software is installed and now ready to be setup. Reef-pi 'talks' to the hardware portion of the controller though what is called the Raspberry Pi 'in and outs' or 'GPIO Pinouts'. The previous Raspbian OS setup activated these pinouts and they are ready to be used but the hardware portion of the build must be completed first.

rpi2.jpg
 
Last edited:
OP
OP
daytonajim00

daytonajim00

Community Member
View Badges
Joined
Feb 10, 2018
Messages
26
Reaction score
75
Rating - 0%
0   0   0
5. Relays Explained (at least my understanding and explanation of them)

I will document my hardware build but will first give a brief presentation on the components involved. It is better to understand the workings of a machine than simply following the steps blindly while building one. Once again, if i missed something that someone else notices, please let me know.

The controller is a set of electrical relays controlled by the computer (Raspberry Pi) and it's software (reef-pi). A relay is basically a switch; like a light switch.

light switch.jpg

Like a common light switch, a relay simply closes the path for electricity to continue to its "load" or device being operated.

relaydrawing1.jpg
Since we don't want to manually operate the switch we can wire a SEPARATE circuit to serve as the "trigger". Our trigger in this case is a 5 volt signal that will come from the Raspberry Pi. The computers GPIO's are 3.3v circuits (adapted to 5v) activated by the reef-pi software. The software uses the computers internal clock to send signals according to a timing schedule which we will later set. When the 5v signal circuit closes the relay, the device will come on! Whether it be actinic lights, white lights, a protein skimmer, pumps, or whatever! Notice the picture below shows the relay "open" and "waiting" for the signal to close it. That is a normally open or "N.O." relay.

relaydrawing2.jpg
That is the explanation of automatically operated electrical relays in a nutshell. Like all things, there are more layers that can be involved; there are some things to consider:

Relay voltage and current ratings
One thing to consider is the voltage of both the output and signal circuits. The other thing to consider is the size of the load being served. Just to say we covered all of the bases we must consider TOTAL load- that's all the devices or loads being served.

1. Voltage rating. Since we are controlling devices that plug into a standard household receptacle we are talking about a 120v (United States) relay. I am controlling up to 8 separate devices so I got an 8 channel relay module.

https://www.amazon.com/SainSmart-101-70-102-8-Channel-Relay-Module/dp/B0057OC5WK

2. Current rating. Current is sized in amps. My relays are rated for 10 amps a piece so I don't want to operate any device over- let's say- 960 Watts, to be safe. Otherwise, the relay could burn up and go bad. Luckily 960 amps happens to be a lot in the home aquarium world and the only thing I can think of that might approach that might be a large chiller or such. In that case I would add a single, larger sized relay to handle that specific load. Otherwise, I can operate my whole aquarium or anything else under 960 Watts off relays like these.

3. Total load. I started to write a long explanation of this but I will leave it at this: total load of a circuit holds true whether you are adding a controller or not. The circuit I'm referring to is the wall outlet everything is plugged into- that's your whole tanks system on one circuit. If anyone is running an exceptionally large system (over 1,400 watts) of combined loads, you may want to consider your electrical systems design. Once again: this holds true whether you are using a controller or not. Don't just keep resetting the breaker when it trips from overload- design the larger system right!

relaymodule.jpg
 
Last edited:
OP
OP
daytonajim00

daytonajim00

Community Member
View Badges
Joined
Feb 10, 2018
Messages
26
Reaction score
75
Rating - 0%
0   0   0
7. Setting in my Reef-Pi

I am using constant voltage lights, not dimming. I want to control my Blues, Full Spectrum, Refugium Light, and Skimmer.

1. Create Outputs

My first step is to create 8 outputs even though I will only be using 4 channels for now. I go into configuration/connectors and start creating my outputs. I assign the corresponding GPIO's.

Output 1- Pi(14)
Output 2- Pi(15)
Output 3- Pi(17)
Output 4- Pi(27)
Output 5- Pi(22)
Output 6- Pi(23)
Output 7- Pi(24)
Output 8- Pi(25)

2. Create Equipment

Then I will create Equipment and assign outputs.

Channel 1- Blues
Channel 2- Full Spectrum
Channel 3- Refugium Light
Channel 4- Skimmer

3. Create Timers

Next, I will create timers for the equipment. I will need to create 2 timers for each piece of equipment that I want to control: ON and OFF.

Blue ON @ 14:00 (2PM)
Blue OFF @ 2:00 (2AM)
Full Spectrum ON @ 17:00 (5PM)
Full Spectrum OFF @ 20:00 (8PM)
Refugium Light ON @ 8:00 (8AM)
Refugium Light OFF @ 20:00 (8PM)
Skimmer ON @ 4:00 (4AM)
Skimmer OFF @ 17:00 (5PM)

And it is good to go. I may be adding an small HMI (screen). I also want to add a small UPS. I've had problems with what I expect to be random power loses in the day.

Shot out to everybody sharing information and those who created and continue this stuff!
 
Last edited:

Ranjib

7500 Club Member
View Badges
Joined
Apr 16, 2016
Messages
9,843
Reaction score
17,058
Location
Pleasant Hill, Concord
Rating - 0%
0   0   0
Great thread. Thanks for sharing. The official reef-pi docs are old, I'll be updating them soon. Your build has one of the cleanest wiring (AC recpetacles+ relay). Great job on that front.
 
OP
OP
daytonajim00

daytonajim00

Community Member
View Badges
Joined
Feb 10, 2018
Messages
26
Reaction score
75
Rating - 0%
0   0   0
Great thread. Thanks for sharing. The official reef-pi docs are old, I'll be updating them soon. Your build has one of the cleanest wiring (AC recpetacles+ relay). Great job on that front.

wow. thanks a lot. Your thread helped get me into it. I'm loving R2R!

I'm about to upload a pretty cool presentation on relays explained. Although there's people with many more years vested than myself, I work with relays on a regular and wanted to contribute my part.

Unfortunately I can't seem to edit my posts now and want to paste my presentation on my prior post allocated for my presentation. Gotta see if a moderator can help...
 
Last edited:

Ranjib

7500 Club Member
View Badges
Joined
Apr 16, 2016
Messages
9,843
Reaction score
17,058
Location
Pleasant Hill, Concord
Rating - 0%
0   0   0
wow. thanks a lot. Your thread helped get me into it. I'm loving R2R!

I'm about to upload a pretty cool presentation on relays explained. Although there's people with many more years vested than myself, I work with relays on a regular and wanted to contribute my part.

Unfortunately I can't seem to edit my posts now and want to paste my presentation on my prior post allocated for my presentation. Gotta see if a moderator can help...
Become a paid member :)
 

arman

Active Member
View Badges
Joined
Aug 28, 2015
Messages
387
Reaction score
58
Rating - 0%
0   0   0
I'm going to do the same thing but not with raspberry because it's not efficient.I will do this with stm32 MCUs and my plan is some timers and some kalk and calcium and etc. doser and if I have the time setting up my own lightning using PWM control.Especially a temperature and water height controller.
 

Ranjib

7500 Club Member
View Badges
Joined
Apr 16, 2016
Messages
9,843
Reaction score
17,058
Location
Pleasant Hill, Concord
Rating - 0%
0   0   0
I'm going to do the same thing but not with raspberry because it's not efficient.I will do this with stm32 MCUs and my plan is some timers and some kalk and calcium and etc. doser and if I have the time setting up my own lightning using PWM control.Especially a temperature and water height controller.
You sure you’ll have performance issue to run something as trivial as this with pi ? We are running quiet a bit of workload under 30% cpu load in reef-pi. Pi 3 is 1ghz , 4 core processor
 
OP
OP
daytonajim00

daytonajim00

Community Member
View Badges
Joined
Feb 10, 2018
Messages
26
Reaction score
75
Rating - 0%
0   0   0
You sure you’ll have performance issue to run something as trivial as this with pi ? We are running quiet a bit of workload under 30% cpu load in reef-pi. Pi 3 is 1ghz , 4 core processor


Right. Not that the Pi 3 could hold a candle to today's high end processors but I'd be willing to bet we got to the moon with less (Apollo missions' processing power). It's what you do with it that counts!
 

arman

Active Member
View Badges
Joined
Aug 28, 2015
Messages
387
Reaction score
58
Rating - 0%
0   0   0
You sure you’ll have performance issue to run something as trivial as this with pi ? We are running quiet a bit of workload under 30% cpu load in reef-pi. Pi 3 is 1ghz , 4 core processor
Do you mean that the things I want to do is not possible with other MCUs and I have to use pi?
 

Ranjib

7500 Club Member
View Badges
Joined
Apr 16, 2016
Messages
9,843
Reaction score
17,058
Location
Pleasant Hill, Concord
Rating - 0%
0   0   0
Do you mean that the things I want to do is not possible with other MCUs and I have to use pi?
No. It is likely capable of doing everything , and more. I meant the statement "pi is not efficient" is subjective. If you put down metrics.. like power consumption, ease of programming, ecosystem etc we can do somewhat faire comparison of two different solutions (MCUs or SBCs). Though I think we should not hijack this thread. And let the OP document his build log.
 
OP
OP
daytonajim00

daytonajim00

Community Member
View Badges
Joined
Feb 10, 2018
Messages
26
Reaction score
75
Rating - 0%
0   0   0
It's okay. It actually has me thinking: how can I put the processing power of the RP 3 in perspective?

Here's an interesting article on processing power over time.
https://pages.experts-exchange.com/processing-power-compared

Here's a list I made of computer power over time. I had to screen shot what I typed because it formatted wrong on the post attempt. I think I got the numbers right...

power chart.jpg


The exponential growth of computing power over the last 50 years is jaw dropping! Whats more is when you take in account processing power in relation to dollars! Combine that with the implications of what open sourcing can do and it's 'crazy scary exciting times we live in'!

We can buy a computer at our local retail market, that is a million times faster and thousands of times cheaper, than what it took to launch a man to the moon a mere 50 years ago!
 
Last edited:

Creating a strong bulwark: Did you consider floor support for your reef tank?

  • I put a major focus on floor support.

    Votes: 56 40.3%
  • I put minimal focus on floor support.

    Votes: 29 20.9%
  • I put no focus on floor support.

    Votes: 49 35.3%
  • Other.

    Votes: 5 3.6%
Back
Top