My 30IM EXT display

Sea_Monkey

Well-Known Member
View Badges
Joined
Feb 6, 2014
Messages
921
Reaction score
1,138
Location
Dallas, TX
Rating - 0%
0   0   0
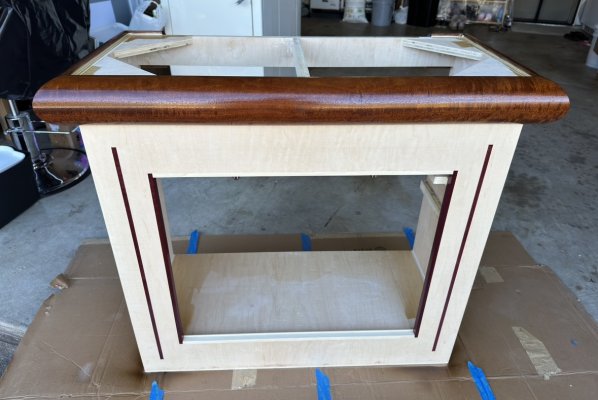
hey r2r, this time around I decided to make a nice display stand for my 30IM ext. I’ve been keeping corals for a long time but never really had a display tank with a nice stand.

I picked up this tank used, it only came with some used plumbing. I need a stand, need a sump, I pretty much need everything else but the tank.

I had some solid half round radius mahogany wood with tiger stripes and solid Purple Heart wood laying around from my previous projects. I decided to use what I ha to make a display stand for this awesome 30IM.

it all started with a drawing…

5A5843B0-839B-407A-B709-52F10B64847C.jpeg


I have everything I needed except for the plywood, went to Home Depot and picked up 1 sheet of 4’x8’x 3/4” maple plywood for this stand. 3/4” thickness would be plenty strong where I don’t need to use 2x4.
D6BC4685-55EC-46A5-AD57-BA4F9ED00D3A.jpeg


still be on good terms with my ex boss that allow me to come in to build whatever I want using his machinery’s. This is where the fun begin, turning my 2d vision into a 3d object. Enjoy.
AB570325-5A4C-4337-8951-6A55AEF03C2F.jpeg

I did a 45 degree cut on the corners so it can hide the layers of the plywood when I bond the 2 side panels to the front panel.


Did a dry fit before I pull out the wood glue and nail gu
AF429C06-2E5F-4735-888E-5A7EC1D99DCA.jpeg


After I glue the plywood panels together and secure it with nails, I then moved onto the half round radius solid mahogany trim piece. I have a very limited supply of this, I measure twice and cut once. No room for error.
0DD68D22-A2E1-4DAB-B8F9-06DA61966624.jpeg

02C9BBDD-B445-4920-9C0C-712F2691B111.jpeg
 
OP
OP
Sea_Monkey

Sea_Monkey

Well-Known Member
View Badges
Joined
Feb 6, 2014
Messages
921
Reaction score
1,138
Location
Dallas, TX
Rating - 0%
0   0   0
After measuring out the door opening, I cut out the door and trim the edge of the plywood with solid wood to high the plywood layers.
3D7BB7A2-FE15-4F38-91C7-11FC4F09399C.jpeg


opening is cut, now it’s time to figure out an accent I want to do with the solid Purple Heart wood. After placing the Purple Heart in different areas of the stand. I’ve decided I like them to be vertical insert accent. Definitely not exactly how I had it on drawing.
1F3145DF-BA1C-4585-B390-BC958F1B57C6.jpeg

CCB4D18B-BFE9-43FF-9CB2-EF30F3BD6194.jpeg


at this point I held up the solid Purple Heart stripes with headless pin nail. Did a 360 walk around to make sure that’s what I like before I insert them into the plywood.
F06FCDAF-BA38-4263-9DB9-E68492A053FB.jpeg

73EA325A-9CC0-48C4-A9FF-07C5D26CBE35.jpeg

B6E1B103-D238-43E6-9DE7-D5A50F4853D8.jpeg


next, time to route out the plywood where my Purple Heart wood will be inserted into the plywood.
85EDCEF0-692C-469B-8924-D0BFB56652D0.jpeg


as you can see, my solid Purple Heart wood is now flushed with my plywood.
B6E1D88B-9868-49D8-930E-CE6CCDB3F55B.jpeg

09B515F1-5609-408E-B9AC-E1C147D9D776.jpeg


Now that all of the Purple Heart wood is inserted, time to make the door panel, just plywood and thin strip of solid wood along the plywood edges to hide the plywood layers. I ran out of the 4’x8’ 3/4” maple plywood. So for the door I just grab a piece of 3/4” birch laying around.
E92759D2-64FA-48FC-878E-C51CBC044822.jpeg

73E01900-00DB-4A59-8DCD-0DB6F162425D.jpeg
 
OP
OP
Sea_Monkey

Sea_Monkey

Well-Known Member
View Badges
Joined
Feb 6, 2014
Messages
921
Reaction score
1,138
Location
Dallas, TX
Rating - 0%
0   0   0
Before taking it home, had to celebrate with a cold one! Cheers!!!
7781D3E4-D3DF-44C8-BF5C-99AD1160AF1A.jpeg


too excited had to do a tank dry fit, even though I know it’ll fit.
5791D886-71DD-4623-A033-59268B867202.jpeg


after dry fitting, it’s time for the fun part. The finishing touch. Taped out the plywood and only leaving the solid mahogany/Purple Heart wood expose. Added some clear coat to the solid wood since I only want the wood to show its natural wood colors.
49E309FE-351E-435A-AC1F-B72647C04FAA.jpeg

DAF929E8-9CBE-4406-8C21-DC2C60841523.jpeg

Check out the tiger stripes in the mahogany, clear coat made it more pronounced! Love it!!
F293C525-8769-4393-AB23-B35AD5CF1D32.jpeg


after allowing the clear coat on the solid wood to dry, it was time to remove the blue tape.
1AE7FE37-2E79-4B5A-9989-B022CB8B7745.jpeg

DFE481BC-4D7B-4B72-B748-664B92B1CBA6.jpeg
FA21E5B7-1704-44B6-AC12-09A5171DDB16.jpeg


Retapping the stand again, this time, I am tapping over the solid wood leaving the plywood exposed for white painting.


083CACFF-2F96-47E2-951B-AC652D9212EC.jpeg

CC219657-8128-4102-AC7C-9753F7343E2F.jpeg


Giving it the first layer of white
E33D75E1-385C-4429-A6D8-672ADD497455.jpeg


after the second layer of white, I sanded the whole white paint with 220 grit sandpaper
2FB32629-EC15-4FAC-BA27-B8042613F0E5.jpeg


I sand in between layers to remove and imperfections.
74F59312-0850-40B8-B6DB-EFD382ACEC05.jpeg

3946C362-6350-4C83-8D2A-B88E1813AAB3.jpeg


the final white coat of paint, there’s 6 layers of white paint.
42F28D12-A614-4D28-BCE9-AD8BC0ECE346.jpeg

D223B1F5-C6D4-4B66-805B-62CD88907467.jpeg


after allowing the white paint to dry for a couple of days, it was show time…. Pulling off all tape/paper to expose the finish of the solid wood and plywood!!!!!!!! I am digging it!! It’s hard to tell in the pic, but when the lights hit it at an angle. The solid Purple Heart wood accent give off a nice deep natural purple color. Same with the half round radius solid mahogany, nice rich red color with tiger stripes dancing all along the wood trim.
AD702911-068C-4D31-83CB-C03DF4938F39.jpeg

48F7D4E6-660E-436A-97BA-178F3B6DC800.jpeg

448584BB-635F-4454-8F41-022C7D33BFD8.jpeg
 
Last edited:
OP
OP
Sea_Monkey

Sea_Monkey

Well-Known Member
View Badges
Joined
Feb 6, 2014
Messages
921
Reaction score
1,138
Location
Dallas, TX
Rating - 0%
0   0   0
Once everything is dry, took the stand inside and did some plumbing work.
B955188C-E04F-4F4C-BDF6-A433F4AAAB1D.jpeg

173054D5-E046-4A2C-85E7-010DEE4C258F.jpeg


im the type of reefer that enjoy minimal rock work and leaving a lot of empty space for corals to grow in. I reached out to Zenreef to make me a custom magnet with a radius base plate. Then I find me a suitable dry rock, grind the rock until the zenreef fit to my liking. I then bond the rock to the zenreef mag.
0A9E5BA9-C97A-443E-91C3-8A93EC79B758.jpeg


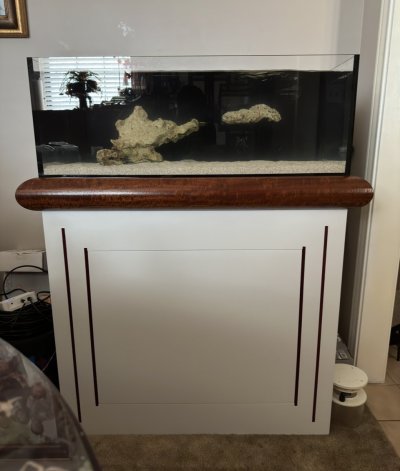
this is how my freshly set up 30IM EXT looks like sitting on my one of a kind stand built with love and elbow grease. Only two rocks In the tank, the float shelf one will only hold OG high end sps. The big one piece rock on the sandbed will hold selected gonis, HG torch, and some very selected zoas. Sandbed will be for my selected OG poletti, TDF, Andre jawbreakers along with my Og/high end lps.
4C9BBBB3-6034-4BC3-9C42-0866B629A455.jpeg
D7BDD01F-4CE9-44F1-B3F2-24A3A69A3307.jpeg


I love Dat stand!!!!!!!! To be continued as I sit and wait and wait for my new paradise to finish cycling.
 

Gumbies R Us

Another Fish in the Sea
View Badges
Joined
Nov 10, 2022
Messages
9,919
Reaction score
19,091
Location
North Georgia
Rating - 0%
0   0   0
Once everything is dry, took the stand inside and did some plumbing work.
B955188C-E04F-4F4C-BDF6-A433F4AAAB1D.jpeg

173054D5-E046-4A2C-85E7-010DEE4C258F.jpeg


im the type of reefer that enjoy minimal rock work and leaving a lot of empty space for corals to grow in. I reached out to Zenreef to make me a custom magnet with a radius base plate. Then I find me a suitable dry rock, grind the rock until the zenreef fit to my liking. I then bond the rock to the zenreef mag.
0A9E5BA9-C97A-443E-91C3-8A93EC79B758.jpeg


this is how my freshly set up 30IM EXT looks like sitting on my one of a kind stand built with love and elbow grease. Only two rocks In the tank, the float shelf one will only hold OG high end sps. The big one piece rock on the sandbed will hold selected gonis, HG torch, and some very selected zoas. Sandbed will be for my selected OG poletti, TDF, Andre jawbreakers along with my Og/high end lps.
4C9BBBB3-6034-4BC3-9C42-0866B629A455.jpeg
D7BDD01F-4CE9-44F1-B3F2-24A3A69A3307.jpeg


I love Dat stand!!!!!!!! To be continued as I sit and wait and wait for my new paradise to finish cycling.
Stand looks amazing!!
 

reefluvrr

Well-Known Member
View Badges
Joined
Aug 20, 2016
Messages
523
Reaction score
609
Rating - 0%
0   0   0
I have been very impressed with the primo colors of LPS and mushrooms you have collected and successfully grown.
Do you mind sharing your success so that I can replicate trying to grow shrooms and blastos?

I had an OG that just shrank and lost its bubble. Nice looking blasto that slowly died. You obviously can keep higher end colored specimens and make them grow new heads or split.

Any help would be appreciated!
 
OP
OP
Sea_Monkey

Sea_Monkey

Well-Known Member
View Badges
Joined
Feb 6, 2014
Messages
921
Reaction score
1,138
Location
Dallas, TX
Rating - 0%
0   0   0
I have been very impressed with the primo colors of LPS and mushrooms you have collected and successfully grown.
Do you mind sharing your success so that I can replicate trying to grow shrooms and blastos?

I had an OG that just shrank and lost its bubble. Nice looking blasto that slowly died. You obviously can keep higher end colored specimens and make them grow new heads or split.

Any help would be appreciated!

Hey, I keep my system simple. I only run a calcium reactor on a kamoer pump, skimmer, ato, apex to control my equipments. I feed heavy, spot feeding my lps with frozen lrs, and whatever fish poop they get from my fish. I do a 10% water change every week.
 

reefluvrr

Well-Known Member
View Badges
Joined
Aug 20, 2016
Messages
523
Reaction score
609
Rating - 0%
0   0   0
Hey, I keep my system simple. I only run a calcium reactor on a kamoer pump, skimmer, ato, apex to control my equipments. I feed heavy, spot feeding my lps with frozen lrs, and whatever fish poop they get from my fish. I do a 10% water change every week.
How about your shrooms? What about your PO4 and NO3?

Thank you for your reply!
 

Algae invading algae: Have you had unwanted algae in your good macroalgae?

  • I regularly have unwanted algae in my macroalgae.

    Votes: 48 35.0%
  • I occasionally have unwanted algae in my macroalgae.

    Votes: 28 20.4%
  • I rarely have unwanted algae in my macroalgae.

    Votes: 11 8.0%
  • I never have unwanted algae in my macroalgae.

    Votes: 10 7.3%
  • I don’t have macroalgae.

    Votes: 36 26.3%
  • Other.

    Votes: 4 2.9%
Back
Top