Started this build about a year and a half ago, designed the stand I would want with Parker T-Slots Aluminium Design Architect.

I then started looking for the tank I would want to match the stand. After much inquiry, I decide to go with SCA 150 Gallon Starfire Tank because the price point was really friendly and the quality to me seemed to be above most other aquarium manufacturers. Which I was amazed how quickly I got it, ordered on a Friday, was at my house by Wednesday.

After I confirmed the tank I wanted, I started looking for companies that I can get the 80/20 aluminum extrusions from. I looked at 80/20.com, t-nutz.com, framingtech.com and Alufab. Getting quotes from all, Alufab wan the bid, Michael Nimmo there was amazing and understood exactly what I wanted. I also got my leveling casters from casterhq.com, I chose to go with eight casters with rubber foot soles so the weight is more evenly distributed on my floor.


 My next step was to go have the cabinetry built, originally I wanted to get two 8‘ x 4‘ sheets of 1/2” thick acrylic in an opaque white. But unfortunately, the price of acrylic went through the roof.
When I first looked into the price of those acrylic sheets they’re roughly between 250 and $300 per sheet.
Where by this time in my project inflation hit hard in the plastics industry and now the price of acrylic is closer to $700 and $800 per sheet. So going with all acrylic cabinetry fell a bit out of my price point. But maybe one day as I still have these design files to have the acrylic cut to the exact measurements I would want.
Here would have been the bottom panel with the doors, the smaller pieces were for me to have a brim around the bottom panel, so that It could contain water, should there be a minor leak.
 This would have been the top panel with the doors and more brims for the bottom panel

Since going with acrylic was out of the picture had to go with the next best thing.
For the top and bottom panels went with birch plywood .725” thickness and MDF for the doors and used my table saw to cut the sheets.
 checking to make sure my lip for my top panel was flush with the doors


One of the hardest things to find was the right hinge. Eventually found one of the Blum compact soft closed hinges that met my needs perfectly and also got the Blum tip-on push in spring opener to easily open the doors with a push


once I knew, all the pieces were perfect, then came the painting process. I used Duralux which is a high quality marine boat paint, it is enamel based paint so it’s a bit tricky to work with.

but after filling and sanding the wood to have it be at smooth as it can be, then, did the same with the priming, priming and sanding, until to smooth as it can be. Then over again with the paint. The final outcome: impeccable.


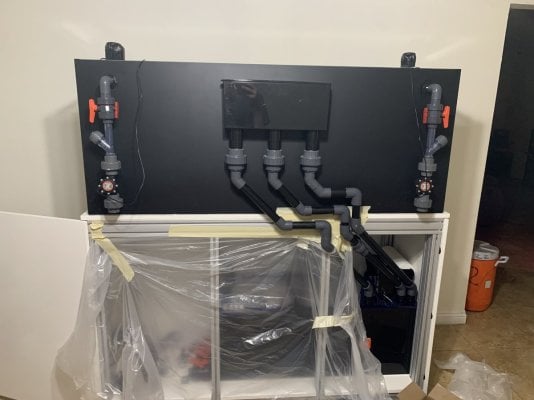
I also choose to get the Trigger Systems Platinum 39 sump, but because I wanted to have a dual return pumps for redundancy and of course wanted it to look clean I ordered another 1” return outlet and drilled and bored new threads to add on that new outlet fitting

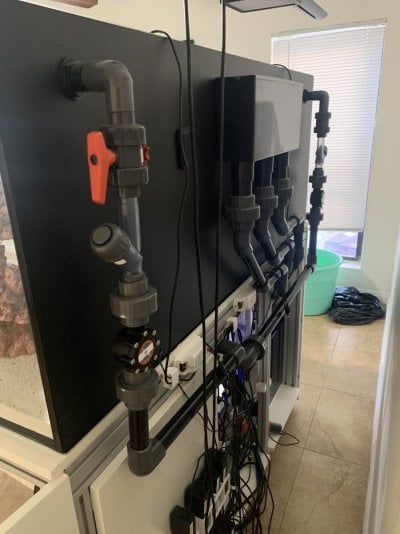
as far as the plumbing goes in to do a return, I have one check valve on one side and another on the other side, I also utilized a 1 inch flow meter from Neptune systems on both sides, one of the main reasons why I wanted to have a dual return it should I need to take one flow meter off for maintenance. I can still run the system on the other side. Soon I have a replacement flowmeter so I can swap it out not have it down for too long.
 of course, had to go with the Cepex ball fittings and the Georg Fischer Wye Check Valve

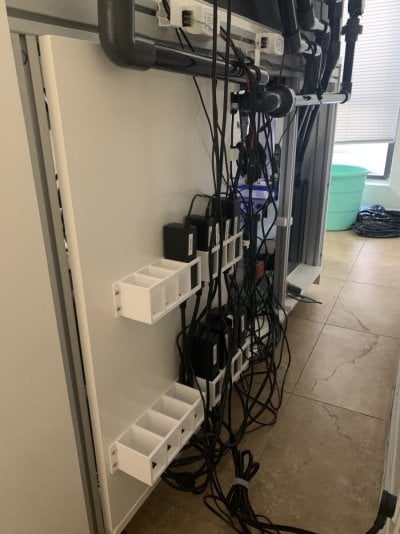
Also 3D printed some brick holders to tidy things up, I was really happy to have the leveling casters to just scoot this tank off-the-wall very easily

Here is my Aqua scape that also took quite some time to design, used the Aquaforest AF Rock, used about 4 boxes or about 200lbs with a few spare pieces left over

Took about two months to cycle, I used DR Tim’s one and only, one small bottle for the extra rock I left “cooking” in a brute trash with a few bubblers and a heater at a lower salinity for a few months before I got to the final stages of getting water in big boy and another big bottle once I had this system running. which soon after had a diatom bloom but that went away after about Two more weeks.
 And here it is:

One day I will clean up this rats nest, but what I was most happy about was the door sensors to turn the lights on and off whenever I open up the doors


Here’s my dual return, one COR-20 that has it’s own manifold to go to the Algae Reactor, and the other Vectra S2 that has its own manifold to feed my avast ozone reactor

 Recently swapped my PAX Bellum out for a ATS from clear water, because keeping chaeto alive is a bit difficult with all of the hair algae, suffocating the chaeto


Needed to remove the center brace from the sump to fit my Kalk Stirrer, but I still wanted to keep the integrity of the sump the same so I cut the brace to be flush with the lip of the sump and printed an 8020 beam in white to attach to my stand. Think I may print a black one to match the brace color one of these days.

Here it is today with about 22 frags that I just recently added most from corals I was able to bank and collect back some fragments and keep in my QT for little over 3 months.
then as far as fish I have the yellow tang, purple tang(even though they’re both zebrasomas, they get along quite well) two clowns that are extremely prolific, a wrasse named Roy and a goby.
for invertebrates I have 8 tuxedo urchins and about 20 cerith snails.
Let me know what you think, or if you have any questions.
as far as the photos below, ignore them, there duplicates that I can’t seems to delete no matter how many times I edit this.
But thanks for checking out my build


I then started looking for the tank I would want to match the stand. After much inquiry, I decide to go with SCA 150 Gallon Starfire Tank because the price point was really friendly and the quality to me seemed to be above most other aquarium manufacturers. Which I was amazed how quickly I got it, ordered on a Friday, was at my house by Wednesday.
After I confirmed the tank I wanted, I started looking for companies that I can get the 80/20 aluminum extrusions from. I looked at 80/20.com, t-nutz.com, framingtech.com and Alufab. Getting quotes from all, Alufab wan the bid, Michael Nimmo there was amazing and understood exactly what I wanted. I also got my leveling casters from casterhq.com, I chose to go with eight casters with rubber foot soles so the weight is more evenly distributed on my floor.
When I first looked into the price of those acrylic sheets they’re roughly between 250 and $300 per sheet.
Where by this time in my project inflation hit hard in the plastics industry and now the price of acrylic is closer to $700 and $800 per sheet. So going with all acrylic cabinetry fell a bit out of my price point. But maybe one day as I still have these design files to have the acrylic cut to the exact measurements I would want.
Here would have been the bottom panel with the doors, the smaller pieces were for me to have a brim around the bottom panel, so that It could contain water, should there be a minor leak.
Since going with acrylic was out of the picture had to go with the next best thing.
For the top and bottom panels went with birch plywood .725” thickness and MDF for the doors and used my table saw to cut the sheets.
One of the hardest things to find was the right hinge. Eventually found one of the Blum compact soft closed hinges that met my needs perfectly and also got the Blum tip-on push in spring opener to easily open the doors with a push
once I knew, all the pieces were perfect, then came the painting process. I used Duralux which is a high quality marine boat paint, it is enamel based paint so it’s a bit tricky to work with.
but after filling and sanding the wood to have it be at smooth as it can be, then, did the same with the priming, priming and sanding, until to smooth as it can be. Then over again with the paint. The final outcome: impeccable.
I also choose to get the Trigger Systems Platinum 39 sump, but because I wanted to have a dual return pumps for redundancy and of course wanted it to look clean I ordered another 1” return outlet and drilled and bored new threads to add on that new outlet fitting
as far as the plumbing goes in to do a return, I have one check valve on one side and another on the other side, I also utilized a 1 inch flow meter from Neptune systems on both sides, one of the main reasons why I wanted to have a dual return it should I need to take one flow meter off for maintenance. I can still run the system on the other side. Soon I have a replacement flowmeter so I can swap it out not have it down for too long.
Also 3D printed some brick holders to tidy things up, I was really happy to have the leveling casters to just scoot this tank off-the-wall very easily
Here is my Aqua scape that also took quite some time to design, used the Aquaforest AF Rock, used about 4 boxes or about 200lbs with a few spare pieces left over
Took about two months to cycle, I used DR Tim’s one and only, one small bottle for the extra rock I left “cooking” in a brute trash with a few bubblers and a heater at a lower salinity for a few months before I got to the final stages of getting water in big boy and another big bottle once I had this system running. which soon after had a diatom bloom but that went away after about Two more weeks.
One day I will clean up this rats nest, but what I was most happy about was the door sensors to turn the lights on and off whenever I open up the doors
Here’s my dual return, one COR-20 that has it’s own manifold to go to the Algae Reactor, and the other Vectra S2 that has its own manifold to feed my avast ozone reactor
Needed to remove the center brace from the sump to fit my Kalk Stirrer, but I still wanted to keep the integrity of the sump the same so I cut the brace to be flush with the lip of the sump and printed an 8020 beam in white to attach to my stand. Think I may print a black one to match the brace color one of these days.
Here it is today with about 22 frags that I just recently added most from corals I was able to bank and collect back some fragments and keep in my QT for little over 3 months.
then as far as fish I have the yellow tang, purple tang(even though they’re both zebrasomas, they get along quite well) two clowns that are extremely prolific, a wrasse named Roy and a goby.
for invertebrates I have 8 tuxedo urchins and about 20 cerith snails.
Let me know what you think, or if you have any questions.
as far as the photos below, ignore them, there duplicates that I can’t seems to delete no matter how many times I edit this.
But thanks for checking out my build


Last edited:


