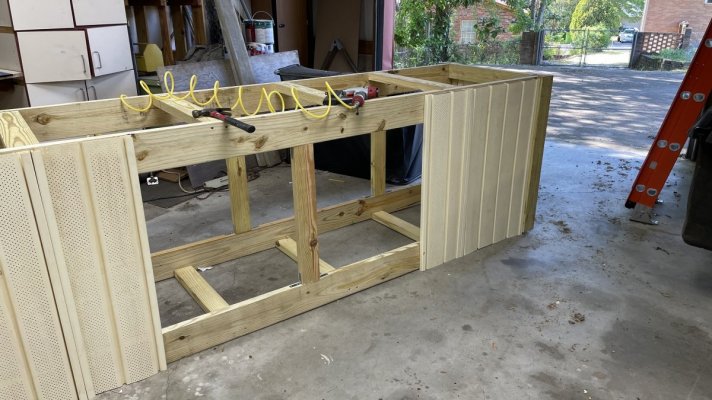
My new stand construction underway

Pmauro55

Community Member
View Badges
Joined
Jun 17, 2019
Messages
73
Reaction score
91
Location
Columbia SC
Rating - 0%
0   0   0
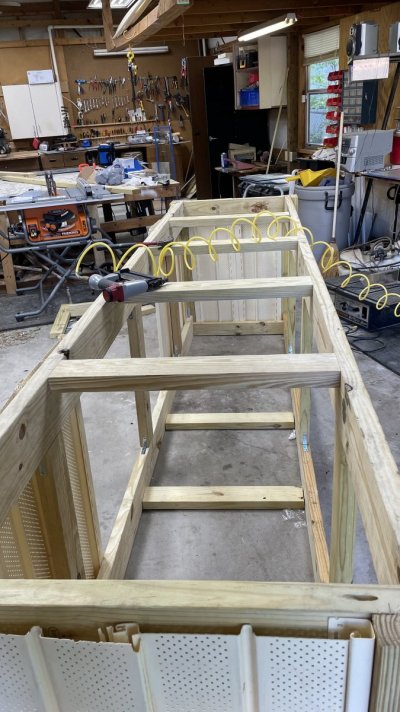
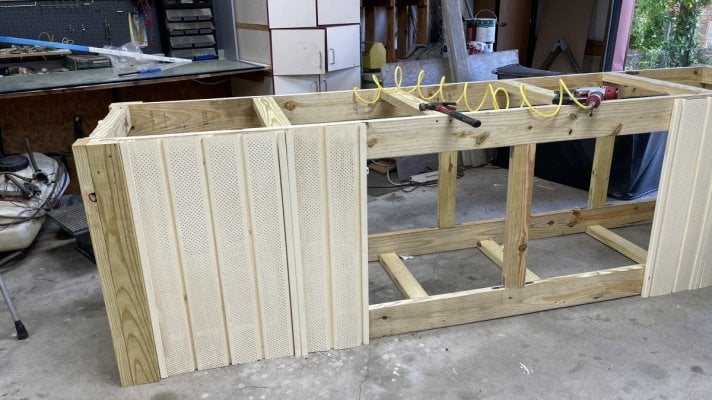
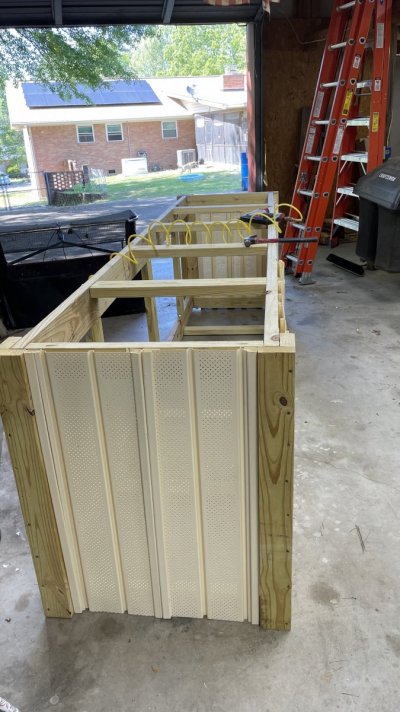
Using 2x6 for main framing re-enforcing with 3 inch angle bracing at every 90 degree joint. Also using removable ventilated panels to allow for air flow in sump area. There will be 2 removable wood panels / doors in the back and 4 in front. Top will have ½ cdx plywood and there will be a 6 fr x 2 ft cabinet with 4 doors and 4 adjustable shelves on the left end
BA56C608-BB55-4CD2-8E95-1A0AA76075CD.jpeg 9060EECC-0222-4867-81F5-06B1011292EA.jpeg 4007036A-A946-45DC-A3DD-BFB35CB13881.jpeg A5866948-8447-4909-B8A9-8AECA846BC63.jpeg
 

Lost in the Sauce

BANGERANG!!!!
View Badges
Joined
Feb 10, 2021
Messages
18,889
Reaction score
91,539
Location
Southern California
Rating - 0%
0   0   0
Looks good. What's going to be holding your removable panels on? If you haven't looked into it yet, I'd say give a peek at rare earth magnets. They are very strong. I normally counter bore them into the wood to sit just subflush,and cover with a thin layer of epoxy.
 
OP
OP
Pmauro55

Pmauro55

Community Member
View Badges
Joined
Jun 17, 2019
Messages
73
Reaction score
91
Location
Columbia SC
Rating - 0%
0   0   0
Looks good. What's going to be holding your removable panels on? If you haven't looked into it yet, I'd say give a peek at rare earth magnets. They are very strong. I normally counter bore them into the wood to sit just subflush,and cover with a thin layer of epoxy.
They are interlocking so they are pretty stable and tight in place and once I put the top channel in place they won’t move until I remove them for maintenance. The stand (tank space) is 10 feet the stand is 3 foot tall and 30 inches deep it will hold a 150 and 90 end to end and 2 90s for sumps
 

Apotack

Well-Known Member
View Badges
Joined
Feb 25, 2013
Messages
859
Reaction score
290
Location
New York
Rating - 0%
0   0   0
Using 2x6 for main framing re-enforcing with 3 inch angle bracing at every 90 degree joint. Also using removable ventilated panels to allow for air flow in sump area. There will be 2 removable wood panels / doors in the back and 4 in front. Top will have ½ cdx plywood and there will be a 6 fr x 2 ft cabinet with 4 doors and 4 adjustable shelves on the left end
BA56C608-BB55-4CD2-8E95-1A0AA76075CD.jpeg 9060EECC-0222-4867-81F5-06B1011292EA.jpeg 4007036A-A946-45DC-A3DD-BFB35CB13881.jpeg A5866948-8447-4909-B8A9-8AECA846BC63.jpeg
The angle braces aren’t going to do much of anything, is there anything else connecting those joints?
 

Scratch08

Valuable Member
View Badges
Joined
Mar 3, 2016
Messages
1,895
Reaction score
13,360
Location
Gulf Shores
Rating - 0%
0   0   0
Looks like pressure treated lumber? If so, keep a close eye on it...as it dries, it can and usually does, warp and sometimes crack/split. Also, aggree about the brackets, would be better to run another board up the backside(inside) from bottom to top, glued and screwed.

Also, just went back and noticed, you need to reinforce your corners between the top and bottom frames. You need to add a board in between the 2 frames like you did on the front and back, essentially doubling up the corners. The way it is now, you will bet putting a lot of faith...and weight...on the shear strength of the nails/screws.
 
Last edited:
OP
OP
Pmauro55

Pmauro55

Community Member
View Badges
Joined
Jun 17, 2019
Messages
73
Reaction score
91
Location
Columbia SC
Rating - 0%
0   0   0
Looks like pressure treated lumber? If so, keep a close eye on it...as it dries, it can and usually does, warp and sometimes crack/split. Also, aggree about the brackets, would be better to run another board up the backside(inside) from bottom to top, glued and screwed.

Also, just went back and noticed, you need to reinforce your corners between the top and bottom frames. You need to add a board in between the 2 frames like you did on the front and back, essentially doubling up the corners. The way it is now, you will bet putting a lot of faith...and weight...on the shear strength of the nails/screws.
Thanks I will make the corrections good advice
 

izzyishh

Well-Known Member
View Badges
Joined
Mar 4, 2015
Messages
530
Reaction score
387
Location
Dallas TX
Rating - 0%
0   0   0
Looks good. What's going to be holding your removable panels on? If you haven't looked into it yet, I'd say give a peek at rare earth magnets. They are very strong. I normally counter bore them into the wood to sit just subflush,and cover with a thin layer of epoxy.
Can you share more info on this please I am working on my tank and want magnetic panels much appreciated!
 

Lost in the Sauce

BANGERANG!!!!
View Badges
Joined
Feb 10, 2021
Messages
18,889
Reaction score
91,539
Location
Southern California
Rating - 0%
0   0   0
Can you share more info on this please I am working on my tank and want magnetic panels much appreciated!
Sure thing. Do you have specific questions about it?

In essence, you will start with a built out frame. Did this, I'll assume kiln dried non PT 2x4's (notional one and a half by three and a half)

Install a bottom and top runner board parallel to each other that will wrap the front and both sides of the tank. This will leave you with a frame and kind of a top/bottom moulding. Using paint stirrer thickness x2 (this step builds in a1/8" gap top and bottom) measure the opening and cut your panels to size.

Once you have your panels, mark the locations top/bottom/sides where the magnets will be. use a forstner bit, appropriately sized to the magnet you chose to drill down the thickness of the magnet + 1/16". Insert the magnets ensuring the proper polarity into the holes and cover with resin. After drying, you should be able to attach and remove the panels leaving your frame behind.

I should note that I don't recommend a full skeleton frame. Racking of the frame could be disastrous if someone accidentally bumped into the full aquarium. It needs to be triangulated somewhere. For this I use 6"-8" wide 3/4" Marine grade ply installed inside the frame on the rear and both sides. At least 4 fasteners should be used where the ply lays on the frame.

I hope that makes sense, I could make a little sketch if it's easier. Feel free to ask any follow-ups.
 

izzyishh

Well-Known Member
View Badges
Joined
Mar 4, 2015
Messages
530
Reaction score
387
Location
Dallas TX
Rating - 0%
0   0   0
Sure thing. Do you have specific questions about it?

In essence, you will start with a built out frame. Did this, I'll assume kiln dried non PT 2x4's (notional one and a half by three and a half)

Install a bottom and top runner board parallel to each other that will wrap the front and both sides of the tank. This will leave you with a frame and kind of a top/bottom moulding. Using paint stirrer thickness x2 (this step builds in a1/8" gap top and bottom) measure the opening and cut your panels to size.

Once you have your panels, mark the locations top/bottom/sides where the magnets will be. use a forstner bit, appropriately sized to the magnet you chose to drill down the thickness of the magnet + 1/16". Insert the magnets ensuring the proper polarity into the holes and cover with resin. After drying, you should be able to attach and remove the panels leaving your frame behind.

I should note that I don't recommend a full skeleton frame. Racking of the frame could be disastrous if someone accidentally bumped into the full aquarium. It needs to be triangulated somewhere. For this I use 6"-8" wide 3/4" Marine grade ply installed inside the frame on the rear and both sides. At least 4 fasteners should be used where the ply lays on the frame.

I hope that makes sense, I could make a little sketch if it's easier. Feel free to ask any follow-ups.
Makes a ton of sense! I just sent this to my buddy who will be making the panels for the new build. Thank you very much for all the help!
 

Lost in the Sauce

BANGERANG!!!!
View Badges
Joined
Feb 10, 2021
Messages
18,889
Reaction score
91,539
Location
Southern California
Rating - 0%
0   0   0
Makes a ton of sense! I just sent this to my buddy who will be making the panels for the new build. Thank you very much for all the help!
Feel free to pm me if you or your buddy has any questions mid build. Anything I can't explain I can draw out. If I can't draw it out, I can mock it up in the shop or FaceTime.
 

Lost in the Sauce

BANGERANG!!!!
View Badges
Joined
Feb 10, 2021
Messages
18,889
Reaction score
91,539
Location
Southern California
Rating - 0%
0   0   0
MVP! I really appreciate you offering to help! last thing what brand magnets did you use?
I cannot recall a name brand. I purchased a lot of 200 a few years ago and haven't run out yet. They are 3/4" across and 4 have plenty of holding power for solid hard maple frame and panel doors.
 

Exthinker

New Member
View Badges
Joined
Jun 3, 2021
Messages
5
Reaction score
1
Location
USA
Rating - 0%
0   0   0
Have you finished it? Can we see the results?
Can we see the results? Your stand looks a lot like a scaffold that I made for construction on my house. Well, the scaffolding I had was wider, but it was terrible. I couldn't do anything with it because I was too scared to use the thing I build myself, lol.
I decided to get the scaffolding from https://petesuen.com/, and it was probably a good decision on my side. The stuff I got from them was much better built than the thing I created myself.
It's essential to stay safe in these situations, and I didn't want to die from my scaffold. It would be a stupid way to die...
 

Looking for the spotlight: Do your fish notice the lighting in your reef tank?

  • My fish seem to regularly respond to the lighting in my reef tank.

    Votes: 88 75.9%
  • My fish seem to occasionally respond to the lighting in my tank.

    Votes: 14 12.1%
  • My fish seem to rarely respond to the lighting in my tank.

    Votes: 8 6.9%
  • My fish seem to never respond to the lighting in my tank.

    Votes: 0 0.0%
  • I don’t pay enough attention to my fish to notice if they respond to the lighting.

    Votes: 2 1.7%
  • I don’t have any fish in my tank.

    Votes: 2 1.7%
  • Other.

    Votes: 2 1.7%
Back
Top