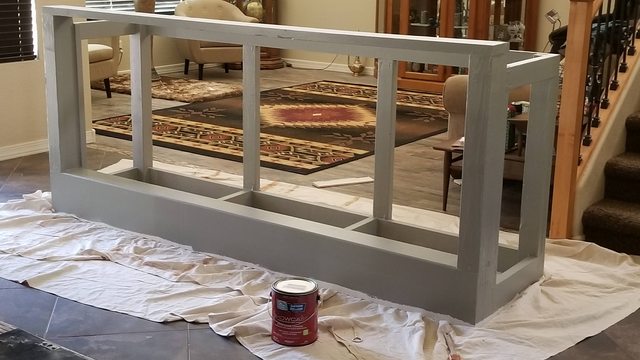
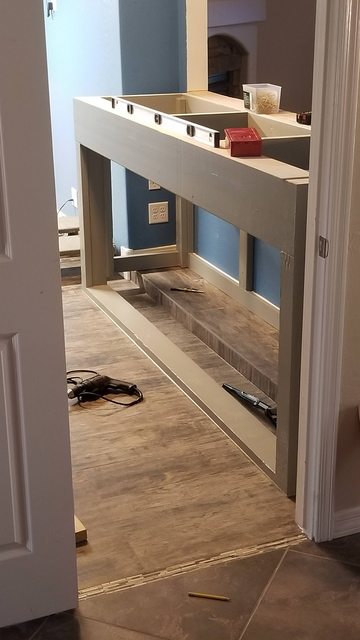
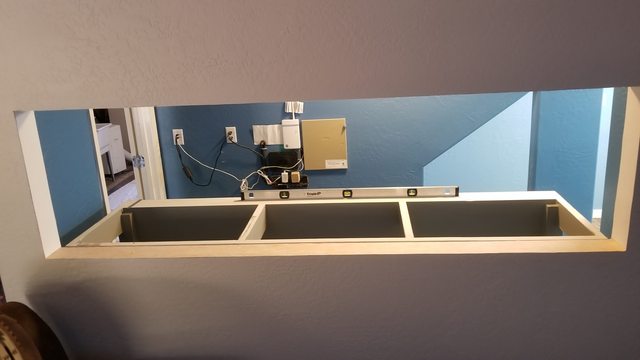
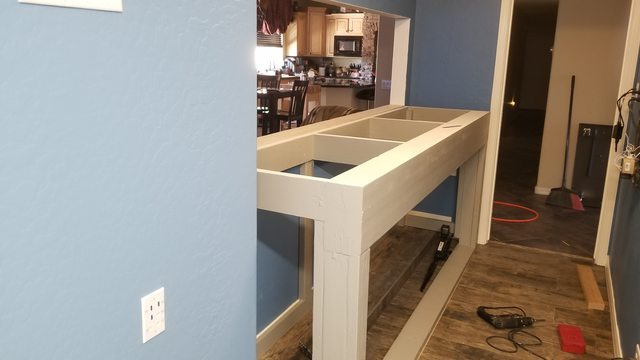
My rendition of 300

OP
OP
Sisterlimonpot

Sisterlimonpot

Effortless Perfection
View Badges
Joined
Jul 15, 2009
Messages
3,911
Reaction score
7,951
Location
Litchfield Park
Rating - 0%
0   0   0
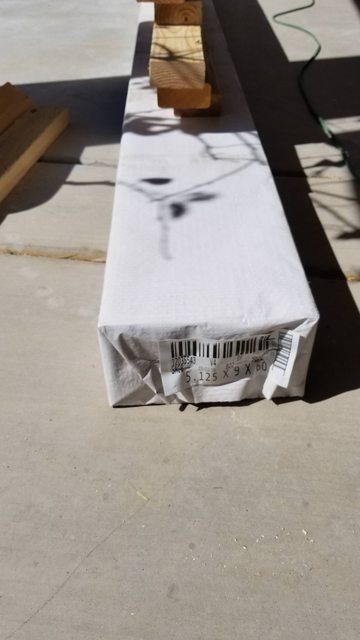
The waterproofing membrane made it here in perfect timing. I was almost at a stand still,

2y1uHzkl.jpg


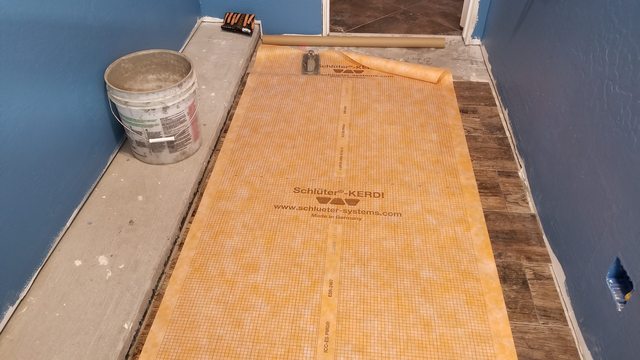
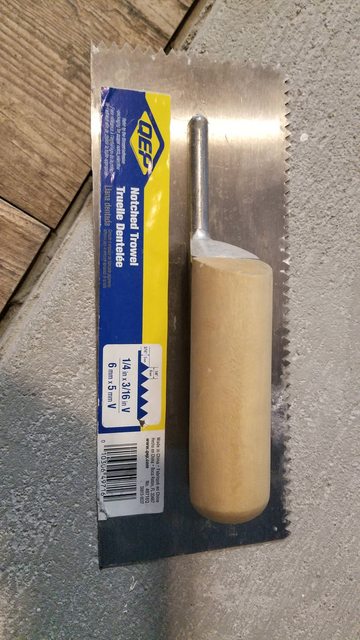
This is the trowel that the company recommends to provide a thin layer of thinset in between to provide good adhesion.

f2nHeJCl.jpg


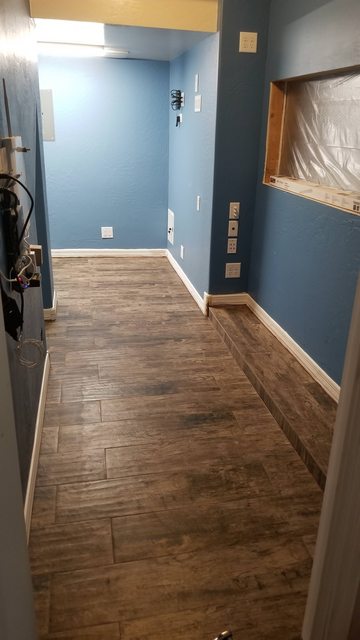
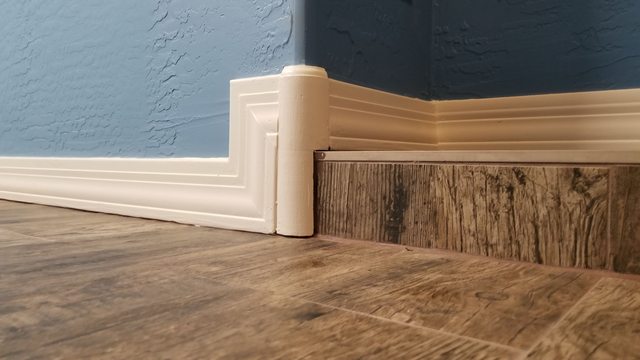
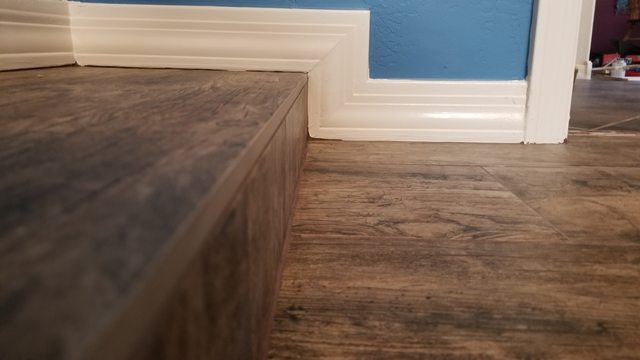
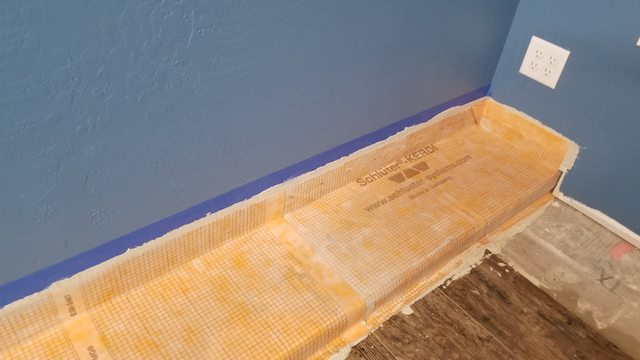
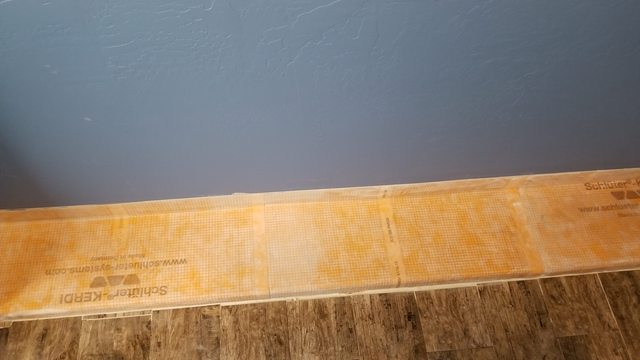
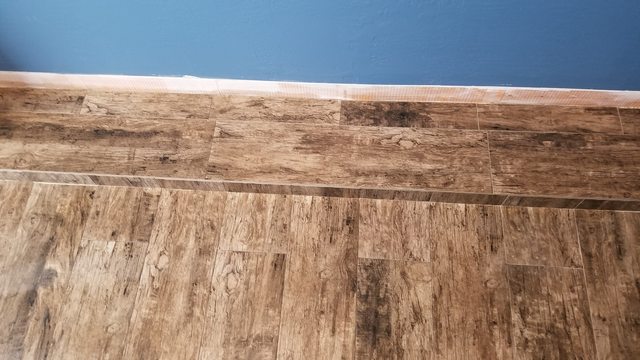
I went 4" up the wall, if any water leaks and collects on the step, it isn't going to seep into the walls, it will either sit there until I clean it up or if I did things right is will slope down and onto the floor.

JJM2WyKl.jpg


4lb6oyLl.jpg


69WtG52l.jpg


A little clean up and later this evening I can put in the grout.

YformT9l.jpg


qgQNsu8l.jpg


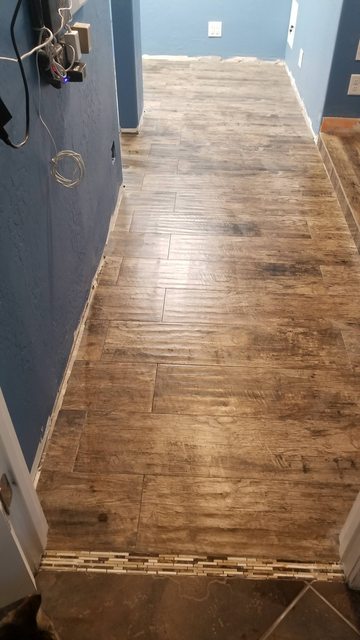
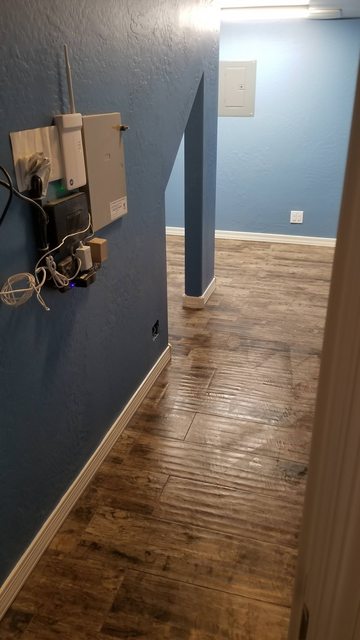
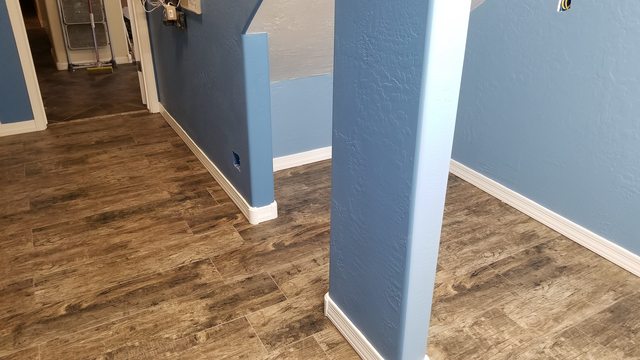
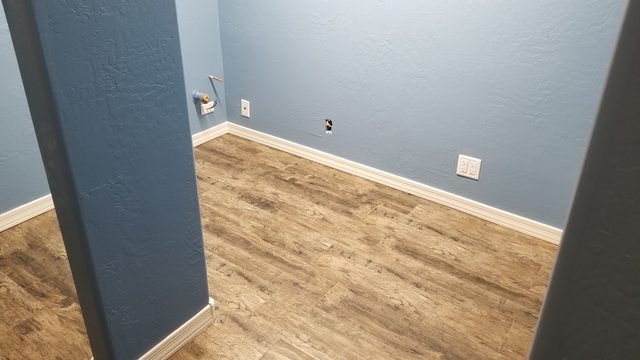
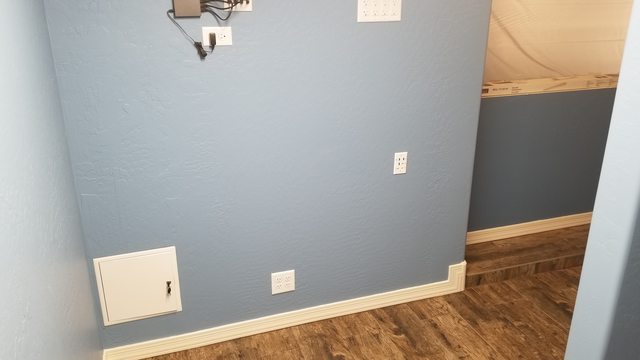
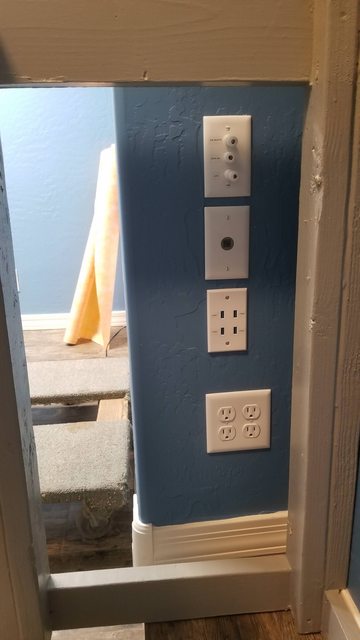
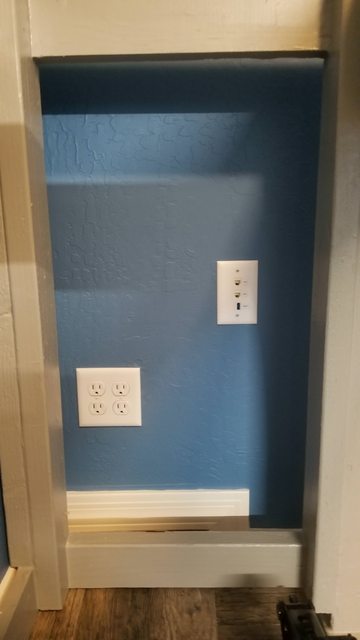
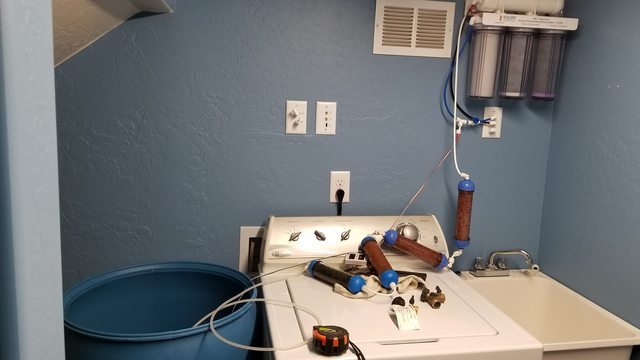
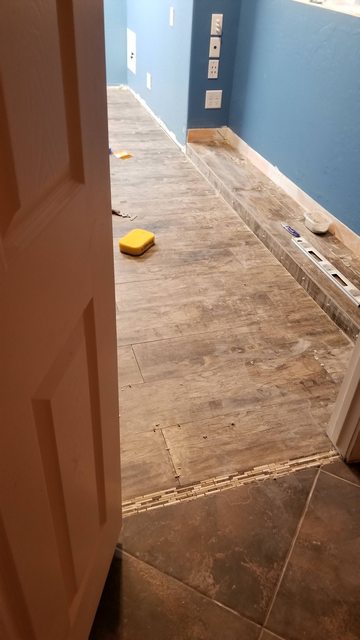
Just a little more insight of how I'm going to keep water from seeping into any other wall that is on ground surface. I always have to keep in the back of my mind that when it's time to take the tank down, that room has to be converted back into a closet. The gaps where the floor and wall meet are going to be filled with spray foam which is more to keep the bugs out, immediately after the foam has been sprayed and before it expands, I nail the base board down. Then I caulk the top AND bottom of the base board to seal the floor, keeping any standing water from making its way to the walls. If I do all this correctly, in the event of a flood the way that the room is sightly sloped, it will collect in the back of the room. In a catastrophic failure, nothing is going to help, I'll just be squeegee-ing water outside... hehe.

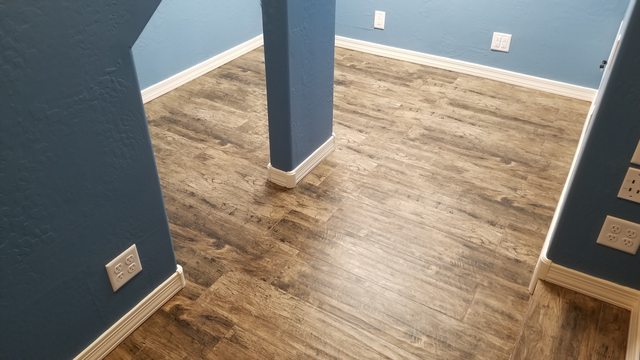
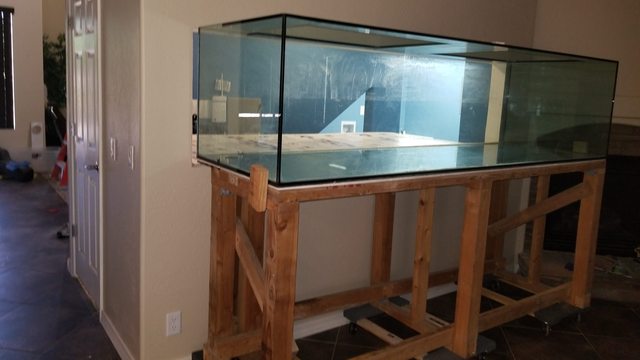
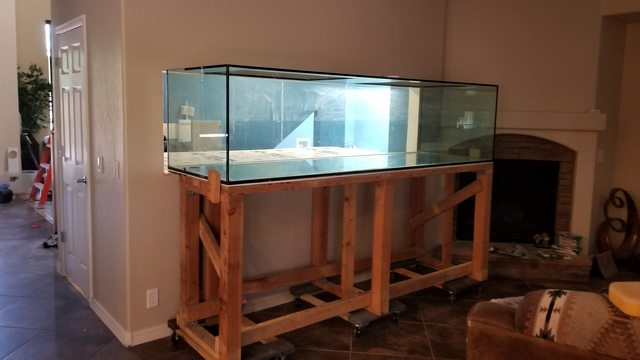
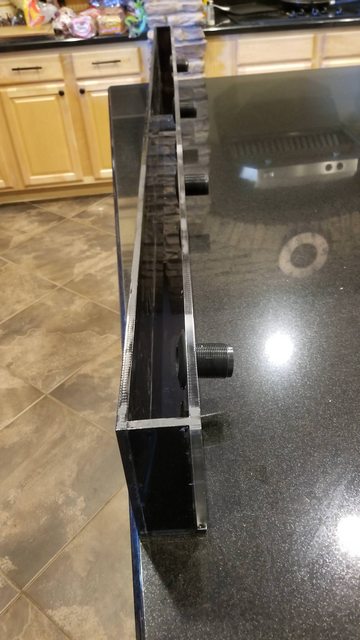
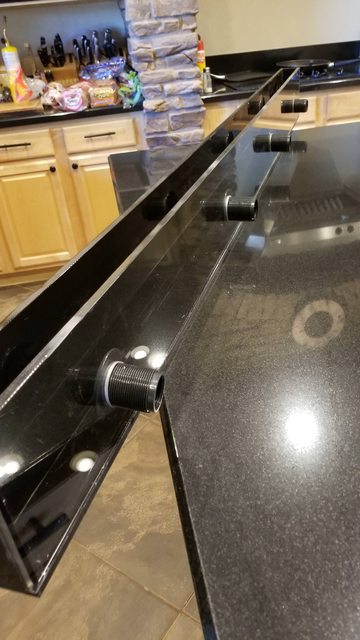
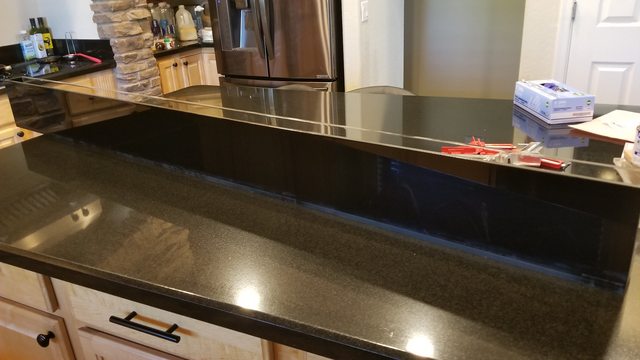
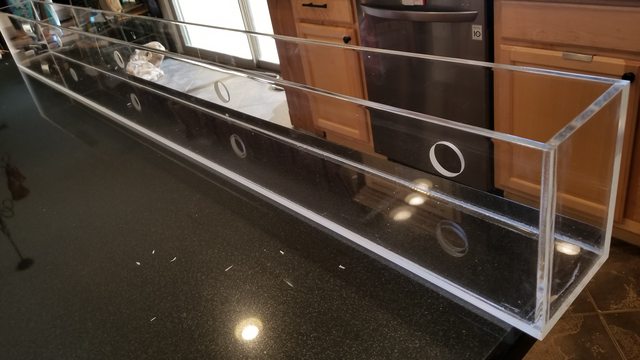
I'd like to think that the room will be completely done soon, which means I can finally turn my attention to the tank.
 
OP
OP
Sisterlimonpot

Sisterlimonpot

Effortless Perfection
View Badges
Joined
Jul 15, 2009
Messages
3,911
Reaction score
7,951
Location
Litchfield Park
Rating - 0%
0   0   0
I wanted the tank stand to be completely open on the back so that I wouldn't be impeded by vertical columns when servicing the equipment under the tank. This required more math to calculate deflection across an 8 foot span. I had to order another glue laminate in order to get what I wanted.

NYiNBMol.jpg


For some reason I ordered 8' and when I picked i up it was 10'. I guess I can make some stumps to sit on. hehe

2gc60Hql.jpg
 
OP
OP
Sisterlimonpot

Sisterlimonpot

Effortless Perfection
View Badges
Joined
Jul 15, 2009
Messages
3,911
Reaction score
7,951
Location
Litchfield Park
Rating - 0%
0   0   0
The stand has been built, it took a while to get everything measured and cut, I don't know why but I was having a hard time adding fractions. Usually this is easily done in my head, I had to actually write it all out to ensure accuracy... All initial joints were pocket screwed and glued with titebond 3. See the big massive beam?? that by itself is over 100 lbs...

jNVnNjrl.jpg


I used a masonry waterproofing paint to seal the stand, I read some accounts of how this was achieved on wood simply by thinning out the paint so that it can soak into the wood and give it a good seal. I put on 3 coats, then used caulk to seal all the seams

EjLTmGwl.jpg


...And yet another trip to the hardware store for paint. I picked out a gray that hopefully compliments the blue. I still have to flip it and paint the top side then I can move it into the room and secure it to the wall.

gQdNgTil.jpg
 
OP
OP
Sisterlimonpot

Sisterlimonpot

Effortless Perfection
View Badges
Joined
Jul 15, 2009
Messages
3,911
Reaction score
7,951
Location
Litchfield Park
Rating - 0%
0   0   0
With the help of 3 furniture dolly's my wife and I were able to bring the tank around the back of the house and fill it half way to do a leak test, I wasn't comfortable filling it all the way on the old stand. It sat all night and it was dry as a bone this morning, but I don't know how the tank will do completely full so.... We moved the tank inside

6Gt4OUAl.jpg


Pushed it up against the wall, the tank is just 1.5" too tall on the furniture dolly's,

uh94xtzl.jpg


Took the dolly's out and stacked some 2x4s under the stand to bring it level and pushed it right into the hole

Y6tlv5il.jpg


OvIkpenl.jpg


Finally has its new resting place... woohoo. The whole time that I carried this tank all over the western united states I never wanted to take it off the stand for the sole reason that I didn't want to have to lift it up from the ground... So long old tired stand, you served your purpose.

Y0njVPTl.jpg


Some back story on the tank, I purchased it from Shawn Bennett, his contribution to the hobby was keeping corals alive long before anyone else could, a lot of his corals are still trading in the community. Hopefully this tank will do his legacy proud.

On a lighter note, I was bored yesterday waiting for the leak test so I fired up the laser...

R2HWKmxl.jpg


Bwckclul.jpg


A bit too presumptuous to christen the tank I figured this would look good right here

R7yCwWLl.jpg
 
OP
OP
Sisterlimonpot

Sisterlimonpot

Effortless Perfection
View Badges
Joined
Jul 15, 2009
Messages
3,911
Reaction score
7,951
Location
Litchfield Park
Rating - 0%
0   0   0
If I was smart, I would have been proactive about planning my next moves and having all the pieces in place to start the next few steps, I'm in a holding pattern waiting on quotes and supplies. I need acrylic to build the sump and some other little containers for automated water change. I'm also figuring out and pricing all the plumbing that's needed. funny thing is, I don't remember schedule 80 being so expensive, I may just shed the unnecessary expense and paint the plumbing the color I want. And lastly I'm trying to decide whether or not to update some of the equipment I have with new or stick with what I have now, and make upgrades later.

Not all is stopped, I plumbed the sink and the RODI, and in the process of storing 110 gallons so that when the sump is made and the tank is drilled I will be 1/3 of the way done!!!!

PF0kut3l.jpg


It's a mess but an organized one.

DXmhskQl.jpg
 
OP
OP
Sisterlimonpot

Sisterlimonpot

Effortless Perfection
View Badges
Joined
Jul 15, 2009
Messages
3,911
Reaction score
7,951
Location
Litchfield Park
Rating - 0%
0   0   0
I might have a little movement in my britches. Awesome build!
Hehe, I really appreciate it. Looking back it was a lot of work, but definitely worth it.

I didn't realize how hard it was going to be to find USB cables (eh-em I mean aqua bus cables) in lengths of anything less than 1.5 feet. To keep with the theme of wanting to keep wire spaghetti down to a minimum, I decided to turn my search to Digikey and make my own cables, that way they will be exactly the length I want.

If I remember correctly, these connectors were roughly $1 each and I was able to re-purpose a lot of my old broken phone charging chords.

8jgH6qml.jpg


The next series of pictures are the process of me making them:

LRKtMGbl.jpg


ny9PN38l.jpg


eDvSRl3l.jpg


x7yY3d3l.jpg


FlXIv9vl.jpg


4xnikeMl.jpg


JmDNNe0l.jpg
 
Last edited:
OP
OP
Sisterlimonpot

Sisterlimonpot

Effortless Perfection
View Badges
Joined
Jul 15, 2009
Messages
3,911
Reaction score
7,951
Location
Litchfield Park
Rating - 0%
0   0   0
j3DYAokl.jpg


HoS7Dwvl.jpg


AogmQ2Ol.jpg


Nice and Clean!!!

I sent a text to Tim at Ecotech Marine to tell him the good news of my new tank, after catching up, he convinced me that gen1 lights weren't going to do this tank justice. With some reluctance on my part, not only did I order 8 gen4 pro's, I also got 4 MP60s, 2 MP40s, Vectra L1, Vectra S1, Reef Link, and battery backups to go along with them all.

WzO4UCHl.jpg


qAl6xqol.jpg


I was planning on using jebao return pumps that I purchased right before I took my 125g down, I knew that they weren't reliable so I bought 3 just to have backups, I'm glad that I get the chance to give these Vectra's a try. Plus being able to control them wirelessly is definitely a plus. Once they get broken in, I will give an honest review of them.

All of the pieces are slowly starting to fall into place. At the beginning of the week, I hitched up the trailer and purchased enough acrylic to make a decent size refugium with a possible separate benthic tank to hold sponges and pods.

I also ordered all the gate, ball valves and true unions needed to plumb the tank and mixing station. I was going to go with all schedule 80 piping but the only reason would be for aesthetics. If they were slightly more in price, I could justify it, but when the price is 4.5 times more than schedule 40, it's a no brainer to go with sch 40. If I want it to be gray I can get some krylon fusion.
 
OP
OP
Sisterlimonpot

Sisterlimonpot

Effortless Perfection
View Badges
Joined
Jul 15, 2009
Messages
3,911
Reaction score
7,951
Location
Litchfield Park
Rating - 0%
0   0   0
I settled on a sump design and cut out ll the pieces, it's outer dimensions are going to be 60X24X14. I mocked it up to get an idea of size and how certain equipment fit inside, I have to say it's a lot bigger than I thought

zUViQHyl.jpg


oMPhoLxl.jpg


A friend in the hobby that lives up the road (Bill a.k.a. SawCJack00) came over and we hashed out this design, and one of his great suggestions was to have some of the baffles removable in order to change compartment sizes to accommodate different pieces of equipment that may be available further down the road. To do this I had to cut a bunch of little pieces of acrylic so that when glued to the sump will act as channels for the baffles to slide into. those are getting cut out by the laser. it has been working over time since yesterday to complete all the cuts. I will post more when they are done. and I will share a drawing of the final rendition of the sump.
 
OP
OP
Sisterlimonpot

Sisterlimonpot

Effortless Perfection
View Badges
Joined
Jul 15, 2009
Messages
3,911
Reaction score
7,951
Location
Litchfield Park
Rating - 0%
0   0   0
I cut the acrylic to make the the dual 1 gallon tanks for the auto water change system, I didn't take too many pictures of the process but these are what I have:

WzJWNJVl.jpg


Yvjx7pYl.jpg


VXnyEPZl.jpg


Finally the leak test:

NWkPyK2l.jpg


Over the last 3 days my laser etcher has been working overtime to cut the 3/8" acrylic. Now, it's rated to cut through 1/2" acrylic however, it has taken a very long time and many passes to get through it. But in the mean time, I have been systematically gluing some pieces together while I wait on the baffles. My wife is out of town on business for the week and I am abke to sprawl out in the kitchen (avoid being out in the heat!!) Again, not too many pictures but at least you can see my progress.

P3z12t6l.jpg


dRWWR1rl.jpg


One of the baffles that I cut
tqRMZwjl.jpg


And the bubble trap
JmAXLKel.jpg
 
OP
OP
Sisterlimonpot

Sisterlimonpot

Effortless Perfection
View Badges
Joined
Jul 15, 2009
Messages
3,911
Reaction score
7,951
Location
Litchfield Park
Rating - 0%
0   0   0
After I get the sump built, I need to:
1. Build and paint the platform under the tank for the sump
2. Cut out the acrylic for the ghost overflow
3. Glue the overflow
4. Drill holes in the tank for the overflow
5. Drill holes in the tank for the returns
6. Cut and glue all the plumbing for the drain and return

After that I can start filling the tank with RODI water.

The good news is that plumbing parts like bulkheads and gate valves are starting to trickle in. A buddy of mine in California had all the ball valves and true unions I needed so my wife will be returning with those at the end of the week.

In the interim of waiting for panels to dry and the laser to cut, I was able to tape off and paint all the sch40 plumbing to "sort of" match the sch80 parts that will be used.

You can see the sch80 (1.5" gate valve and bulkheads) is a bit darker but this was the darkest grey that krylon fusion made, it will have to do:

iGeexpdl.jpg


Finally, the last of the Ecotech goodies have arrived. I was told that these were on back order and would take 5 weeks to get them in, I don't think I waited more than 10 days for them.

2RcRGnJl.jpg


The box that they were shipped in was banged up pretty bad, so I took the worst one out of the box to inspect it as well as to see the beauty within.

ITN0KhRl.jpg


Only being exposed to the gen1 lights, there has been a huge transformation from the flat acrylic pieces that formed the exterior, they are more refined and extremely appealing to the eye. It's nice to see that they did away with the capacitive buttons that seem to have a mind of their own. I haven't even turned them on yet and I'm extremely impressed. Great Job Ecotech!!!!

KaFJaccl.jpg


The only thing that irks me is that I planned and installed a dedicated 20A circuit for the Gen1's and the gen 1 ballast were going to sit to the right of those 8 outlets in a really nice displayed fashion, the new lights come with black "brick" power supplies that can virtually be placed anywhere, now I have to rack my brain to figure out a clever way to display those bricks.

hhNLuWgl.jpg


Hopefully more to come tomorrow.
 
OP
OP
Sisterlimonpot

Sisterlimonpot

Effortless Perfection
View Badges
Joined
Jul 15, 2009
Messages
3,911
Reaction score
7,951
Location
Litchfield Park
Rating - 0%
0   0   0
Shifting gears a bit, while waiting for glued panels to dry I turned my attention to the auto water change box that I will eventually incorporate. I planned for this by running two 1/4" tubes in the wall to remove 1 gallon of old sw from the sump and replace it with 1 gallon of nsw.

This box will hang up on the wall next to the 55 gallon salt water container, it has 2 mirrored compartments able to hold roughly 1.25 gal each and will be connected to 4 peristaltic pumps that will do the task of removing old sw and replacing with new. I am planning to build a completely stand alone circuit to carry out the task, however I've been contemplating just to have the Apex do it for me. The jury is still out on that decision.

Here it is:

Cut out and etched the graduations on a black piece of acrylic,

lY9xZgrl.jpg


NWkPyK2l.jpg


Before removing the protective cover, I painted the etching grey so I can see them better
8sq4bEEl.jpg


I filled both chambers with exactly 128 ounces of water, to my surprise the graduation lines are off a bit.
1R7JJjRl.jpg


That's my fault for not setting the laser to the right location when setting up the machine. This isn't that big of a deal because it's not volume accuracy that I am aiming for. I am hoping to achieve a 1:1 ratio to maintain a steady salinity.

More to come later, I finished the sump last night and giving it time to fully cure, hopefully I will conduct a leak test later today to see if it's going to be a sump or an expensive planter!!! hehe
 
OP
OP
Sisterlimonpot

Sisterlimonpot

Effortless Perfection
View Badges
Joined
Jul 15, 2009
Messages
3,911
Reaction score
7,951
Location
Litchfield Park
Rating - 0%
0   0   0
After I get the sump built, I need to:
1. Build and paint the platform under the tank for the sump DONE
2. Cut out the acrylic for the ghost overflow
3. Glue the overflow
4. Drill holes in the tank for the overflow
5. Drill holes in the tank for the returns
6. Cut and glue all the plumbing for the drain and return

Looking back, I should've done this when I built the stand, it was so much harder to cut the plywood to fit.
FBUpd8nl.jpg


Got the sump outside for a leak test, I filled each section up and checked for internal leaks as well as external.

ZEX6zHPl.jpg


vCa35Z5l.jpg


Then I filled the sump to about a half inch from the top and let it sit for 5 hours in the baking sun

iMnMJDSl.jpg


I'm happy to report that the outside was bone dry. I siphoned the water into the pool, no need to waste it. Then it made its way to the garage to have the edges routed flush (no pictures of that)

The sump measures 60.25x24x14.5, which comes out to 90 gallons when full. With the baffle heights it's only going to have 55 gallons running through it at any given time.

For me this next number is very important, the sump can hold an extra 35 gallons, in the event the return pump shut off thus allowing some of the main tanks water to drain/siphon into the sump. In the past I have experienced floods due to the perfect storm of a clogged anti siphon hole drilled into the return plumbings loc-line and for what ever reason the return pump was shut off, for a feeding schedule or a power outage. When that happened, the tank water continued to drain into the sump until the siphon was broke, usually wherever the end of the loc-line was in the tank (I always had it a couple inches below the water surface). That resulted in a flood. Of course the main problem was that the sump was too small for the tank. This time I made sure that there was going to be plenty of extra space in the sump to accommodate the water in the likelihood that this event occurs. 35 gallons is 11.6% of 300 gallons, which means that the tank level would have to drop almost 3 inches before there was a flood. All I have to do is make sure that the loc-line doesn't go deeper than 3 inches past the water surface. Wow! talk about getting into the weeds!!!

My daughter helped me set the sump in it's final resting place:
ECu4G0Xl.jpg


ULzsCdal.jpg


9Cvfmn3l.jpg


ZkJHnGql.jpg


Water flow is a basic horseshoe pattern, water will be returned to 2 filter socks in the front right and travel left to a 23"x11 3/8" chamber that can be sectioned off with removable baffles, then to a 15 3/8"x24" skimmer section, where it turns back to the right into another 23"x11 3/8" chamber that can be sectioned off as well, finally to the bubble trap and into the return pump section. All those vertical slots are for removable baffles so that I can section off different chambers for chaeto and siporax etc. Seeing that it takes 2 days to cut slits into 3/8" acrylic, It's going to be a while before all the removable baffles are cut.

Final word, I now appreciate and understand why sumps are so expensive. I was quoted almost $1500 for this custom sump, I spent $430 on 2 sheets of clear 3/8" acrylic, used an entire bottle of weldon 4 and tube of weldon 16. It took me 4 days to cut, joint edges (for a perfectly straight edge), bonded each piece together, leak test it and route edges flush. That's a lot of time and effort and almost worth every penny of what was quoted, I'm just glad I am skilled enough to do it myself. It's not as pretty as most of those custom sumps but mine will function just as well as any of them.

I hope you enjoyed this post, now I have to turn my attention to step number 2....
 
OP
OP
Sisterlimonpot

Sisterlimonpot

Effortless Perfection
View Badges
Joined
Jul 15, 2009
Messages
3,911
Reaction score
7,951
Location
Litchfield Park
Rating - 0%
0   0   0
Over the coarse of this build, I started to notice that the laser needed to do extra passes just to cut through 3/8" acrykic. I braved the heat this afternoon and checked the alignment of the mirrors and tube, come to find out the mirrors were fine but the tube was way off!!! after a bunch of adjustments, the laser is cutting through 3/8" in 5 passes....as opposed to probably 50+ passes the other day...

and the laser itself is so much brighter!!!

A few test cuts on scrap

CJxQMjkl.jpg


g08Lz2Fl.jpg


WzGuOLUl.jpg


the cut is perpendicular as well, so now the real test, I will cut out a removable baffle.... fingers crossed!!!!
 
OP
OP
Sisterlimonpot

Sisterlimonpot

Effortless Perfection
View Badges
Joined
Jul 15, 2009
Messages
3,911
Reaction score
7,951
Location
Litchfield Park
Rating - 0%
0   0   0
Time to cut holes in the tank, drilling went pretty smooth, even though this was the first time cutting on a vertical surface, I had a spray bottle in one hand and the drill in the other

four plugs
EkDJeBwl.jpg


and 4 holes
5Uwaoq4l.jpg


After plumbing, I can do the aquascape then start filling with water to get the cycle started. while that's taking place I will be making the light rack and getting those new gen4 pro radions on line... I'll have to start a new list for the next phase.... ahh! it's never ending... I long for the days that I can sit and look at my slice of the reef.
 
OP
OP
Sisterlimonpot

Sisterlimonpot

Effortless Perfection
View Badges
Joined
Jul 15, 2009
Messages
3,911
Reaction score
7,951
Location
Litchfield Park
Rating - 0%
0   0   0
I've been poking around on the Bean Animal thread, reading up on new innovative ways that hobbyist have incorporated his design and I really like the ghost weir design, having a small coast to coast footprint inside the tank and have a box outside to channel the water down through the fail safe system to the sump. Seeing that you can't find the ghost weir longer than 2 feet unless you special order, I took it upon myself to make my own.

Here's the inside coast to coast, it measures 72"x2"x6.5", I made the back panel clear so that I can see if any critters are in the overflow
f16bYJOl.jpg


I had to put the bulkheads inside before bonding the pieces together
gOdBGNOl.jpg


0XJkKg0l.jpg


Then I made the outside box out of clear it needs to have 1.5" bulkheads coming out of the bottom so it had to be a bit wider, it's 72"x5"x7.5"

8Bx2cRIl.jpg


JEi2aKMl.jpg


Now I need to climb in the tank to line up the inside while someone screws it all together from the outside...

1. Build and paint the platform under the tank for the sump DONE
2. Cut out the acrylic for the ghost overflow DONE
3. Glue the overflow DONE
4. Drill holes in the tank for the overflow DONE
5. Drill holes in the tank for the returns
6. Cut and glue all the plumbing for the drain and return
 
OP
OP
Sisterlimonpot

Sisterlimonpot

Effortless Perfection
View Badges
Joined
Jul 15, 2009
Messages
3,911
Reaction score
7,951
Location
Litchfield Park
Rating - 0%
0   0   0
I needed help securing the ghost overflow to the tank, I had to enlist my wife for help. I climbed in the tank to line up the bulkheads that are in the weir with the holes drilled in the tank, all the while my wife stood on a ladder outside the tank trying to line up the 4 holes on the outer piece. That took some trial ad error and it would've been comical if someone was recording us and that proverbial football, if you get the reference. We persevered and eventually got it.

s3yu3FSl.jpg

I filled it with water to make sure that the seals held water
JJwv0ktl.jpg


gCZVyf6l.jpg


I should've mention that my wife works from home and it takes a lot to pull her away from the office to come down to help me. Roughly an hour after the ghost overflow was installed the black window tint came in and instead of getting frustrated and work around the ghost overflow, I decided to take it back down. I had to pull my wife from her work yet again to help!!! I thought that she was going to be upset, but she said that it would be more work to try to fit the tint with it on there. So we pulled it back down.

The tint went on really easy, I'm not sure if I like it yet, it definitely blocks the view enough that when the lights are off in the equipment room you can't make out much, you would have to consciously be trying to see through it, which is what I wanted. From around the back side looking in the tank I can definitely see inside, so it might work out, once I get the lights up and running, I will have a better idea.

Good news, the second time attaching the overflow went much quicker, it took no time at all.

Now the plumbing... WOOHOO!!
dcGkdg4l.jpg


5QhZTtfl.jpg


VryAJoal.jpg


o3xU03Ml.jpg


dRmBU05l.jpg


From left to right is the open channel, emergency standpipe and the full siphon. Open channel will drain into the left filter sock terminating under the water, the full siphon will drain in the right filter sock terminating underwater as well. I still have to laser a hole in the filter sock holder to run the emergency line through a uniseal (which will be here Friday) and I will know how big to cut the hole. I probably have to do some reconfiguring of the open channel, I think it needs to be a little higher so that the full siphon has time to purge itself at start up. I should be able to do all that once the tank is running.

Next, I will be plumbing the return lines and after that happens, I can start filling the tank with RODI water.... getting closer!!!!

Thanks for sticking by while I wade through all this work!!!!
 

When to mix up fish meal: When was the last time you tried a different brand of food for your reef?

  • I regularly change the food that I feed to the tank.

    Votes: 41 23.0%
  • I occasionally change the food that I feed to the tank.

    Votes: 60 33.7%
  • I rarely change the food that I feed to the tank.

    Votes: 57 32.0%
  • I never change the food that I feed to the tank.

    Votes: 16 9.0%
  • Other.

    Votes: 4 2.2%
Back
Top