This is all I'm saying right now...
Wish me luck!!!


Wish me luck!!!
Follow along with the video below to see how to install our site as a web app on your home screen.
Note: This feature may not be available in some browsers.


stop stalling and post some pics man...lol J/K mine set in the garage for a few days before I got help you get in in the house.
BTW get lots of help like 4 strong guys 6 even better if you got stairs better be safe than sorry.

Thankfully no stairs but we need to take it round the back as the front door has a 90 degree turn that it will never make. We need to take some fence panels out to get it through (which are old and are due to be replaced anyway) but I will try and document the move (or not - depending on how much I need to be involved!). I think I will buy some glass suction handles which should make iteasierpossible. I reckon 6 strong guys should be enough.
First steps are to build the cabinet and see how we will integrate it with our newly renovated kitchen/living room space. I'll be sure to post some pics as we go.
Very excited and next will be a shopping list of aquascape/substrate and equipment but that is still being decided.
 I think we have done pretty good - we wanted to build a habitat for the animals first and foremost but also something easy on the eye. We tried to build in hiding places and swim throughs and also leave some open areas. The rock is at least 3 inches from the tank sides all the way around. Hardest part was constructing the big overhang at the top. Took a while - I tried drilling through and superglueing an acrylic rod but unfortunately it snapped while we were assembling so we just superglued the rock in several places, glued in a couple of small support rocks in strategic locations and then applied copious mortar around the cured joints. It's pretty solid and I don't think it will come apart. Actually I love the way it turned out. We used 3 boxes of CaribSea Life Rock shapes and although I don't have any experience with other products I can say we are very pleased with this rock. We used EcoTech CoralGlue (gel) and Nyos Reef Cement. The cement/mortar took a couple of batches to get used to - it goes off REALLY fast - like less than a minute if you mix it according to their instructions. You can get a couple of minutes if you wet it down a little more than they say and we found the best way was to have 2 of you doing it. One mixing, one applying. Applier to wear nitrile gloves, pinch small amounts off a lolly stick which the mixer/stirrer would hold out for the person applying. In this way we were able to reinforce all the rock joints which had already been cemented with superglue and left to cure for at least a few days. It cures quickly and appears to be strong. We will see.. Largest fish will probably be no more than 3-4 inches I reckon as we will be buying them young and growing them on in most cases I'm sure. We should have no more than 2 fish in this at any one time. We will also use it to acclimatise corals eventually.


Did they say what the cutaway doors were for? I assumed they were “handle” type cutouts. I have one on each side of the sump. Obviously, the cuts outs don’t work for handles LOL. I thought that was a curious thing. But now that I see how you used mounted them, that makes more sense.Got the stand built. Couple of minor issues. Seems 2 of the 8 doors that we were sent seem to be from a different WB cabinet build. They have partial cutaways at the top and bottom but have the same form factor and are marked the same as the other 4 right hinged doors (marked B). No biggie for me but one of them is quite bowed which means it sits a little proud even after adjusting it's hinges to the max. Not sure I'll make a big fuss about this. The partial cutaways (which look like handles to pull open from the top when closed) should not be visible once the tank is sitting above. Some pics of what I am talking about below. Oh and we got a mix of feet colours. We got 9 white feet and the rest black so we decided to hide the white ones under the cabinet and go with black 'visible' at the edge which I reckon is probably better than all white since they are sitting in the shadow most of the time and are pretty much invisible. Other than those 'minor' points the cabinet build went quite smoothly and was pretty straightforward.
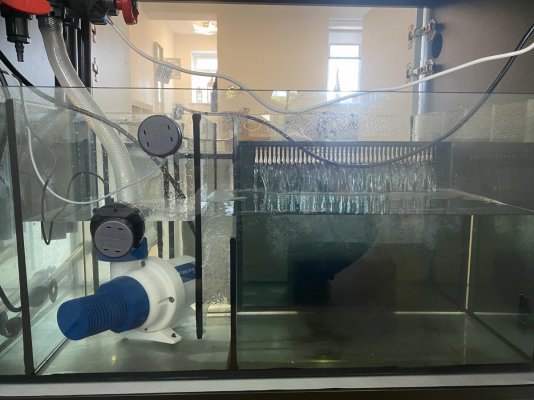
You can see where the aquarium will go - it's going to be an awesome room divider!!! We are going to build a floor to ceiling equipment cupboard to the right of it in the first pic.

2 of the B (RH hinge) doors look like this... They should be completely plain flat panels.

From the top you can see the cutaways...

See the bowing...

It is only noticeable if you want it to be, or if you know it's there...

The major issue so far is that the sump tank, ato tank, pipework and all the accessories that should have come packaged in the main DT crate were missing!!!
This is what we found when we (first) opened the main DT crate last night...

Basically the packaging is there but all the goodies are gone! Even the weir cover is gone. Just the DT remains. It took a few seconds to sink in actually - I only knew what I should have got from other folks build threads.
What was impressive was that I emailed both Waterbox USA and H2O Aquatics UK who I purchased through last night at about 9PM - straight after the discovery - and both of them had responded within the hour. Waterbox apologised and told me to fill in their warranty claim form, which I did promptly. Being late on Friday night (in the UK) I am not expecting anything to happen until Monday earliest but I will keep you posted...
The main thing that concerns me at the moment is that the tank might be a return. I had hoped to get it moved into the house but I do not want to make those arrangements only to find out it's got an issue. I'll wait it out and see what Waterbox propose to do. They might not want me to unpack it any further if they want to swap it out for instance.
The DT does look new but I guess you never know what has happened - it could have been repackaged, but then why is the packaging for the sump and other items in there...?
HiDid they say what the cutaway doors were for? I assumed they were “handle” type cutouts. I have one on each side of the sump. Obviously, the cuts outs don’t work for handles LOL. I thought that was a curious thing. But now that I see how you used mounted them, that makes more sense.

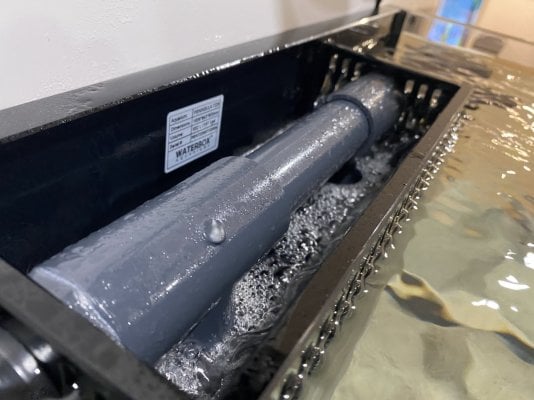
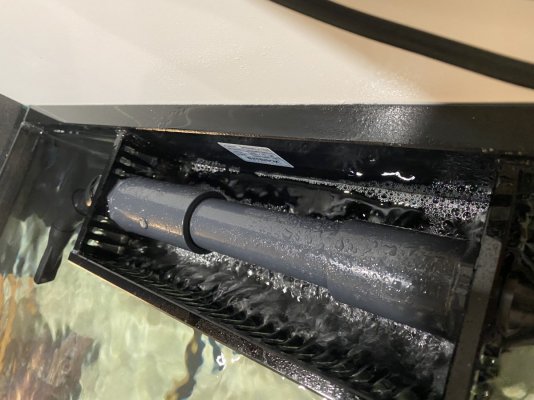
When you say ‘raise the water level until the screen is almost or barely covered’. Do you mean the water level inside the weir chamber? If I close off the gate valve enough to do that then the water will just drop down the emergency overflow pipe and make a load of noise. The quietest I can get my weir is to have the water level right at the top of the emergency overflow, some of the weir run off will still get down there, but not enough to make any noise. I’m gonna go read up some of the sump threads. Thanks for your info on whether to use the refugium chamber or not. I will experiment with that!Regarding chambers in the sump, the one you describe is for the refugium. If you don’t plan on using one, definitely can remove the divider. I didn’t have the splash issues you describe. However, I did have a bad batch of chaeto that disintegrated and clogged up the weir. This did make it noisy until it was removed. It is otherwise dead silent.
As for the weir for the overflow. Mine is dead silent. But it isn’t always. Few things: there is definitely a tuning process. Most of it is tuning the gurgle for the drains. Raise the water level until the screen is almost or barely covered. That water level seems optimal for eliminating noise (due to fall distance). Also, if the weir is clogged or flow disrupted on the inside of the overflow) it will make noise.

Hi,When you say ‘raise the water level until the screen is almost or barely covered’. Do you mean the water level inside the weir chamber? If I close off the gate valve enough to do that then the water will just drop down the emergency overflow pipe and make a load of noise. The quietest I can get my weir is to have the water level right at the top of the emergency overflow, some of the weir run off will still get down there, but not enough to make any noise. I’m gonna go read up some of the sump threads. Thanks for your info on whether to use the refugium chamber or not. I will experiment with that!
Ok so I have had the water level in the weir chamber that low before and because of the volume of water flowing back into the weir (alot), it is noisier. What turnover have you got your return pump set to? If I run my return pump at like 5% then yes, having it at that height is silent for me. It's the water gushing back into the weir that is making the noise - and the further it drops, the noisier it is.Hi,
I meant the strainer for the primary overflow pipe. Close the gate valve just enough so that the water level cones up to the top of the strainer of the primary drain. That leaves a bit of separation in water level between primary and secondary. It is dead silent for me.
I’ll take pictures tomorrow and a short video if you haven’t tuned it by then, perhaps that’s will help.