Need some help on how to skin a stand well!

ps2cho

Well-Known Member
View Badges
Joined
Apr 17, 2014
Messages
876
Reaction score
268
Location
United States
Rating - 0%
0   0   0
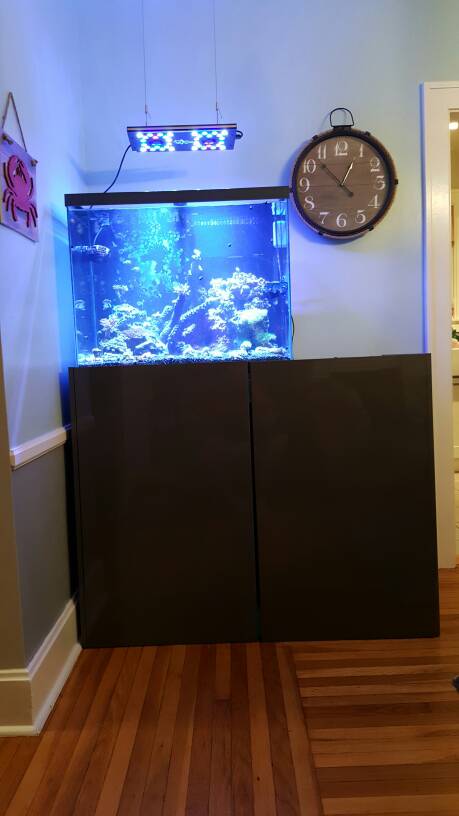
So to be blunt my tank stands are hideous when it comes to skinning the stand...
I can build the frames perfectly fine, but when it comes to getting it covered, it looks really poor.

I have a gift card so I am thinking of buying the Dewalt DW745 table saw today and starting from scratch on skinning the stand.

Can someone here give me some tips on how to skin a stand well?

1) What type of wood? How thick?
2) What design to use?

I guess overall, I am just clueless from start to finish...I'm very capable with tools and all my stand frames have come out great -- I just have no plans and have no friends/family that do carpentry.

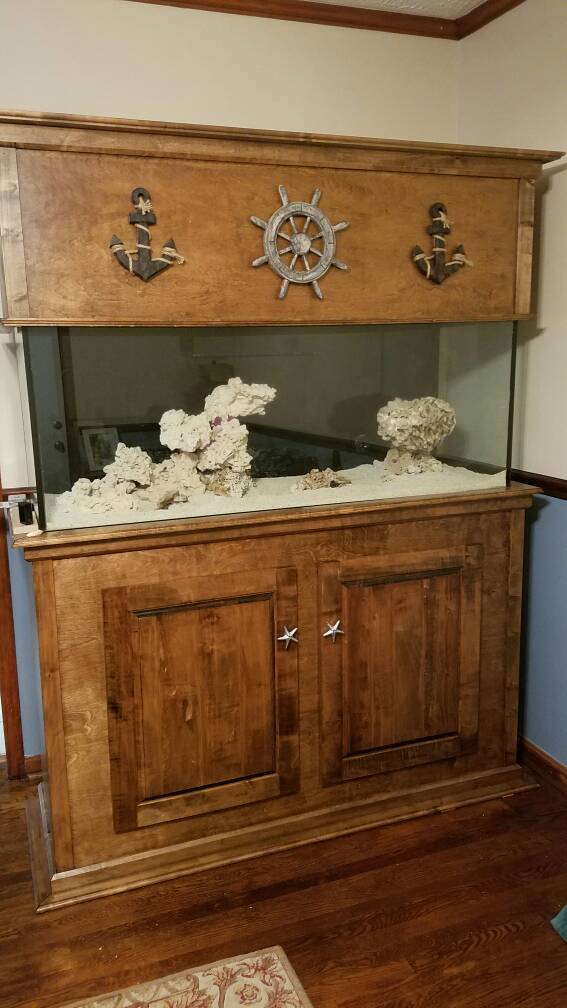
Something simple like this -- nothing crazy. I would even be fine with no top trim.
976D15C1-71E3-491E-9815-A558830A386F-401-0000006093A9D3B9_zps5498b2b2.jpg
 

Brew12

Electrical Gru
View Badges
Joined
Aug 14, 2016
Messages
22,488
Reaction score
61,036
Location
Decatur, AL
Rating - 0%
0   0   0
I have a gift card so I am thinking of buying the Dewalt DW745 table saw today and starting from scratch on skinning the stand.

Can someone here give me some tips on how to skin a stand well?

1) What type of wood? How thick?
2) What design to use?


First, if you don't already have one, a compound miter saw is almost a must for a project like this. Even more useful than the table saw. The other tool you will need to get a nice finish is a router with a routing table.

To answer your questions, if you want to stain the stand I would recommend oak. That is what was used in the picture you posted. Since it is only a skin, the thickness doesn't really matter. When I build furniture I use varying thicknesses of wood to fit the design I pick out.

I really can't pick out a design for you. Giving you step by step directions would require you having a design and would become a very long post. Have you looked at any woodworking forums for advice? You don't need to look for aquarium stands, you can lean the techniques you need from any furniture finishing posts.
 
OP
OP
P

ps2cho

Well-Known Member
View Badges
Joined
Apr 17, 2014
Messages
876
Reaction score
268
Location
United States
Rating - 0%
0   0   0
I own a miter saw obviously for the stand build...I also own a router, but no routing table.

The reason why I am getting the table saw is because I felt like the half the issues were that I couldn't get a straight cut using my jigsaw and nothing would line up.

My question on design though is -- Do you take one large piece of oak, and cut a large hole in it, or build a rectangle? Whats the best way to make it look good?
 

Brew12

Electrical Gru
View Badges
Joined
Aug 14, 2016
Messages
22,488
Reaction score
61,036
Location
Decatur, AL
Rating - 0%
0   0   0
I own a miter saw obviously for the stand build...I also own a router, but no routing table.

The reason why I am getting the table saw is because I felt like the half the issues were that I couldn't get a straight cut using my jigsaw and nothing would line up.

My question on design though is -- Do you take one large piece of oak, and cut a large hole in it, or build a rectangle? Whats the best way to make it look good?
I've done both. It really depends on the design. For something with large openings or doors I typically prefer to use boards.

I use my compound miter saw to do most of my shorter straight cuts. I only pull out the table saw if it is over 10".
 
OP
OP
P

ps2cho

Well-Known Member
View Badges
Joined
Apr 17, 2014
Messages
876
Reaction score
268
Location
United States
Rating - 0%
0   0   0
My miter saw is fixed and not sliding, so I figure the table saw would be a better choice than buying a sliding?
 

Brew12

Electrical Gru
View Badges
Joined
Aug 14, 2016
Messages
22,488
Reaction score
61,036
Location
Decatur, AL
Rating - 0%
0   0   0
My miter saw is fixed and not sliding, so I figure the table saw would be a better choice than buying a sliding?
It will work, but it take a lot longer to do the cuts. Just need to make sure you have a good T-square with the table saw to make nice straight cuts.
 

Dapperjman

Active Member
View Badges
Joined
Sep 30, 2014
Messages
168
Reaction score
99
Location
Georgia
Rating - 0%
0   0   0
I took a 3/4" sheet of birch plywood and cut the holes for the doors then used soft maple for the trim and the doors. It's not perfect, but I'm proud of it.

af5f844b229fdeabcd22cff2c2a503f1.jpg
 

CastAway

Prone to wander, never lost.
View Badges
Joined
Jun 9, 2013
Messages
4,457
Reaction score
3,310
Location
Knoxville TN
Rating - 0%
0   0   0
Tagging along.
I have yet to skin my stand, after two years or so.
 

cromag27

octoaquatics.com - ig = @octoaquatics. view my sig
View Badges
Joined
Sep 7, 2013
Messages
8,249
Reaction score
11,239
Location
arizona
Rating - 0%
0   0   0
Skip the 2xs and just build the whole thing from 3/4" plywood.
 

Justin Hartmann

Active Member
View Badges
Joined
Sep 24, 2016
Messages
123
Reaction score
95
Location
Fort Collins, CO
Rating - 0%
0   0   0
IMO you can use really anything you want. For example I did not use one sheet of anything, I used cedar fence pickets and put them on like a house would be with siding but no overlap. I did not have any long cuts to make. I am happy with the way it came out. Its just about the look you want, just offering up other ideas for a wrap. Here is what mine came out as, I like it but may not be for you. I do need to stain the ends of the boards haha.

unfill-front-jpg.401434
 

Crimsonvice

Valuable Member
View Badges
Joined
Oct 12, 2015
Messages
1,375
Reaction score
948
Location
Cincinnati
Rating - 0%
0   0   0
IMO you can use really anything you want. For example I did not use one sheet of anything, I used cedar fence pickets and put them on like a house would be with siding but no overlap. I did not have any long cuts to make. I am happy with the way it came out. Its just about the look you want, just offering up other ideas for a wrap. Here is what mine came out as, I like it but may not be for you. I do need to stain the ends of the boards haha.

unfill-front-jpg.401434
Looks cool! Its nice to see the creativity with the stand just as much as the tank itself. I started with a small stand that came with my tank, and the built a 2x4 stand and wrapped it with panels I found at Ikea in the "as is section" for $8 a piece.

Old stand that I sanded and painted.
e1676e24b2ac7856636b5fee5dbc5733.jpg


Current 2x4 stand(built to fit a 120... My next tank).
acdd7df74dc1ac5dffe44f40237eae9c.jpg
b40b3858fbfa9e1c402319bad479b95e.jpg
 

revhtree

Owner Administrator
View Badges
Joined
May 8, 2006
Messages
47,856
Reaction score
87,978
Rating - 100%
1   0   0
Best of luck and keep us updated!
 
OP
OP
P

ps2cho

Well-Known Member
View Badges
Joined
Apr 17, 2014
Messages
876
Reaction score
268
Location
United States
Rating - 0%
0   0   0
What's the trick with making the stain not look one dimensional? Is there a recommended type of wood that works best to make the stains look natural rather than just "flat"?

I'm ordering a few more woodworking tools like a better square, some more jigsaw blades etc so I am ready to tackle this again maybe in the coming weeks.

I might start with my hood as it's probably less wasted money if it looks like crap and I redo it.
 
OP
OP
P

ps2cho

Well-Known Member
View Badges
Joined
Apr 17, 2014
Messages
876
Reaction score
268
Location
United States
Rating - 0%
0   0   0
I'll post a picture of my other furniture later tonight as approval of larger tanks in the future I am absolutely sure would only be allowed if the tank stand looked reasonably close to our other furniture!

Maybe that will help visualize what I'm trying to accomplish and give me the best direction on how to get there...
 

stevo01

R33F!N @DD!CT
View Badges
Joined
Jan 27, 2016
Messages
3,412
Reaction score
3,376
Location
Lebanon, NH
Rating - 0%
0   0   0
NHreefguy (Nick) built my 2 reef tank stands. I live in a cabin ranch with rough cut finished walls. It's a rustic look that I like so I wanted the stands to match that. Both stands are made from 2x4 pine (framing), 1/2" birch plywood (tops), and 2x6 cedar (skin). Both are painted with white water base paint on the inside, walnut stain and poly on the outside. The 20g has a deep draw with 2 doors underneath (it will fit a 10g sump, or two 5 stage canister filters). It has some black hardware for the doors and drawer. The 65g stand has no drawer or doors. I want the 40g sump on display and easy to get to as it's going to be a frag tank in the center section. It does have a cool hidden panel on the side for the cords and electronics. These stands are built to last a lifetime. Good work Nick!
 
OP
OP
P

ps2cho

Well-Known Member
View Badges
Joined
Apr 17, 2014
Messages
876
Reaction score
268
Location
United States
Rating - 0%
0   0   0
Looks nice!

Where are you guys getting the wood from and what prep work is done on it? I've been getting mine from Home Depot -- so I need a planet/jointer to be successful in the process?

Trying to figure out any possible missing steps
 

Brew12

Electrical Gru
View Badges
Joined
Aug 14, 2016
Messages
22,488
Reaction score
61,036
Location
Decatur, AL
Rating - 0%
0   0   0
Looks nice!

Where are you guys getting the wood from and what prep work is done on it? I've been getting mine from Home Depot -- so I need a planet/jointer to be successful in the process?

Trying to figure out any possible missing steps
I get most of my wood from Lowes or Home Depot.

Pocket screws are your friend! Very easy to use and they work very well.
 

Just grow it: Have you ever added CO2 to your reef tank?

  • I currently use a CO2 with my reef tank.

    Votes: 8 7.3%
  • I don’t currently use CO2 with my reef tank, but I have in the past.

    Votes: 4 3.6%
  • I have never used CO2 with my reef tank, but I plan to in the future.

    Votes: 5 4.5%
  • I have never used CO2 with my reef tank and have no plans to in the future.

    Votes: 88 80.0%
  • Other.

    Votes: 5 4.5%
Back
Top