Plywood stand design review

TimeTwister

Community Member
View Badges
Joined
Jan 14, 2016
Messages
89
Reaction score
53
Rating - 0%
0   0   0
My boss (wife) gave me the green light to order a 150 gallon SCA aquarium and it will be here next week. It is a 5x2x2 tank drilled for the Shadow overflow. Since this is my "big upgrade" and is meant to last a long time I want to make sure the stand both looks good, and is as functional as possible. I want to go for more of a cabinet grade looking stand this time instead of the typical 2x4 construction stands I do. I looked around the forums, and while there are some great threads showing off plywood stands there are not nearly as many actual build threads as there are for rocket engineer's design. This will be my first build like this so I would like others who have built plywood stands to look this over to make sure everything seems right.

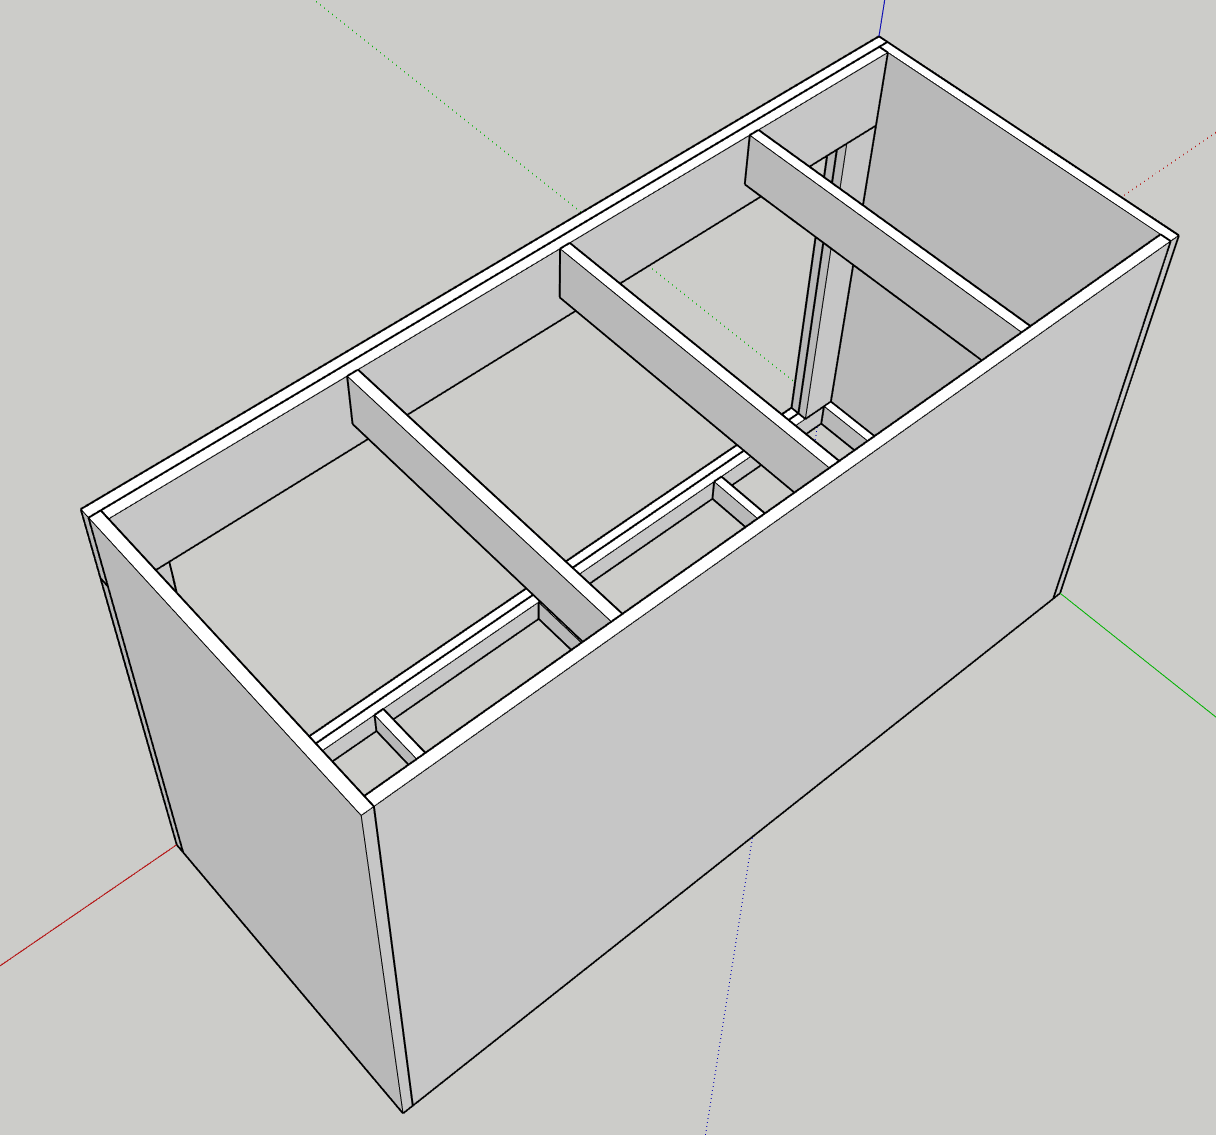
This is a picture of the frame, minus the top and bottom shelves to make it easier to see the structure. It is all 3/4 ply and joined with pocket holes and glue. The sides and back are just solid pieces while the front was built face frame style. The top cross beam is 6", bottom 2" and verticals are 3.5". the bottom shelf supports are also all 2" to align with the front. The top cross braces are 4". With the top shelf on the stand will be 36" high and it will be 60" 1/4 x 24" 1/4 to allow for a 1/4" tolerance between the trim and aquarium.
XnDOHlm.png


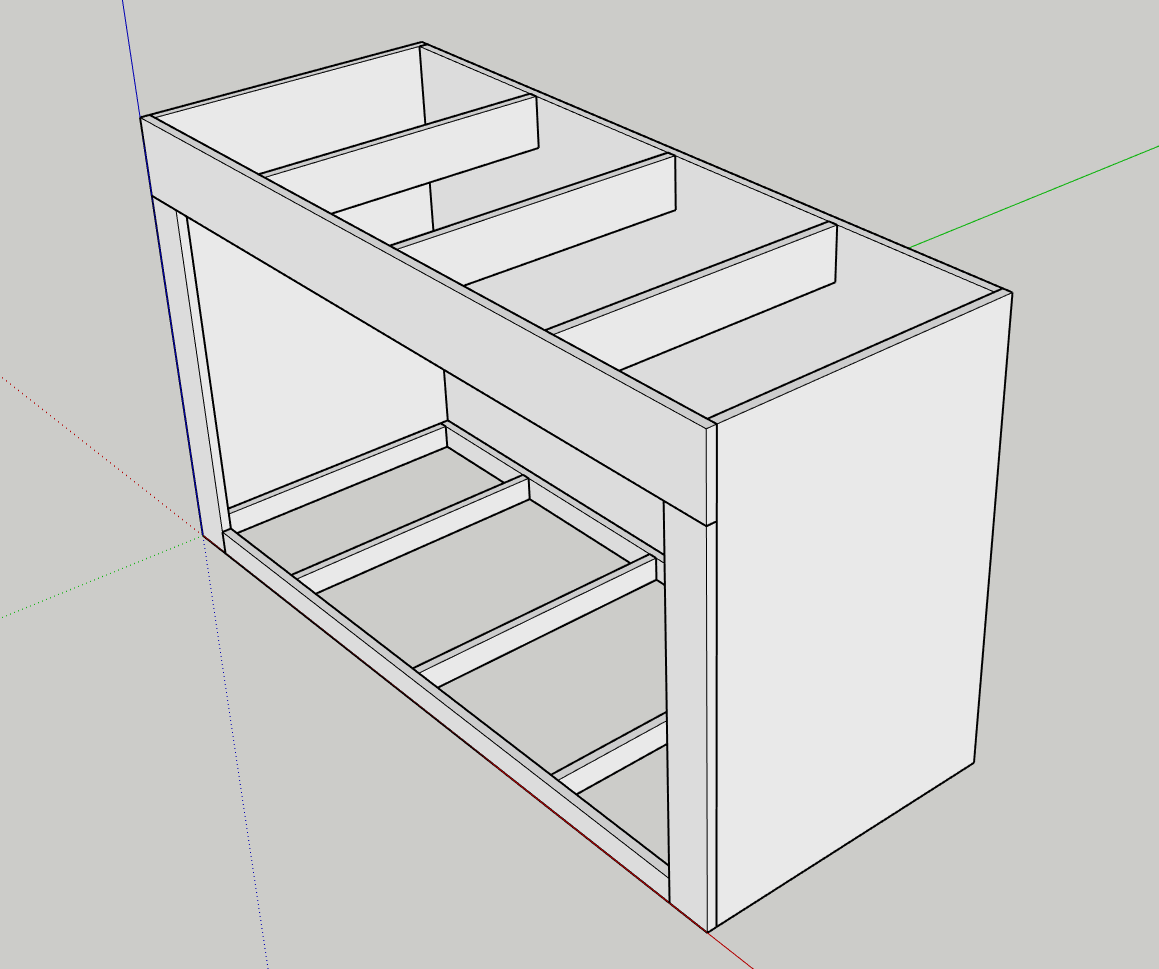
Here is another view with shelving.
hjFrlo6.png


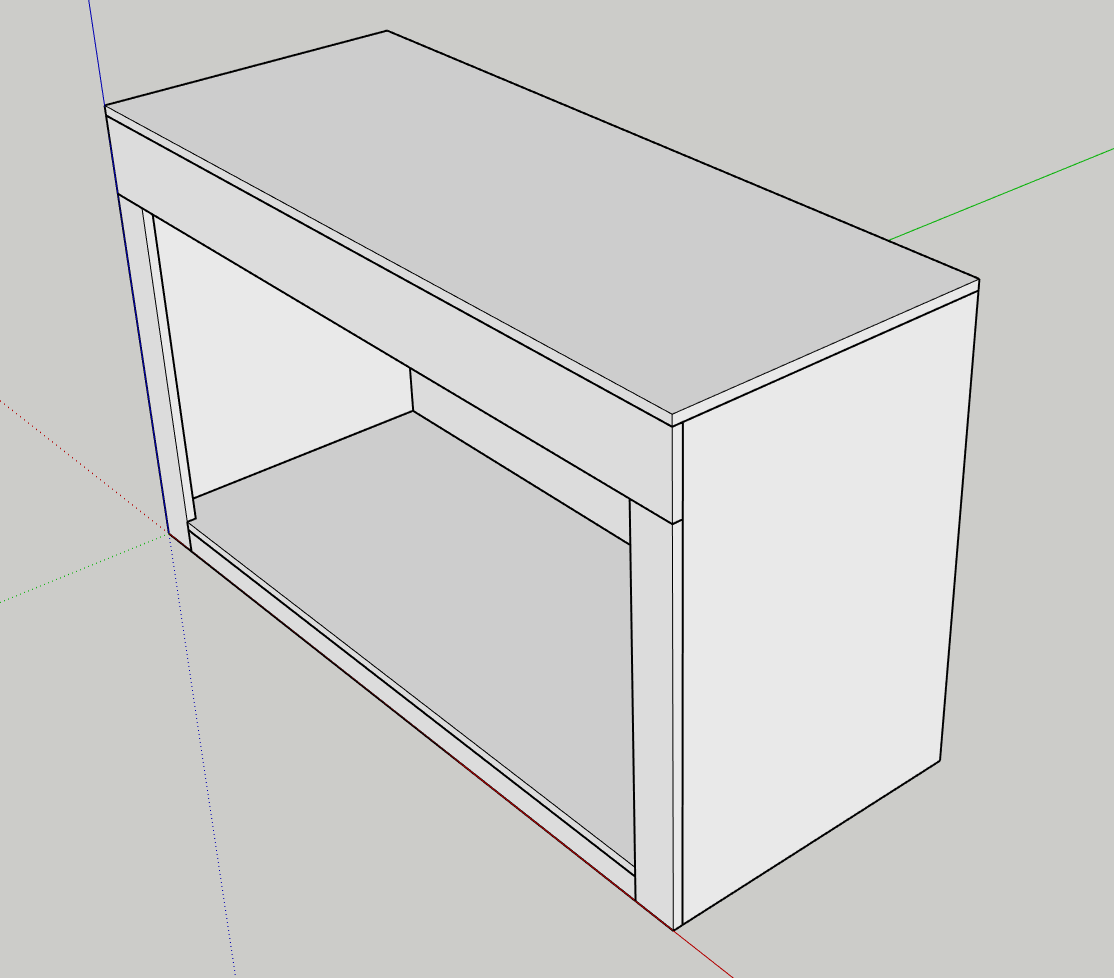
I did not plan to skin this in another layer of plywood. My goal was just to add decorative trim, doors and paint.

Is this good as is, or are there spots I need more support? I thought about doing a two layer laminate beam for the top cross brace, but want to avoid unnecessary wood/weight if it isn't needed. I also wanted to add doors to the sides, but then both sides would need to be built face frame style too and i was afraid that would weaken the structure too much and end up requiring all the pieces to be laminated and doubled up.

Thoughts?
 

AngryOwl

Angry
View Badges
Joined
Sep 25, 2017
Messages
1,132
Reaction score
1,642
Location
Houston, TX
Rating - 0%
0   0   0
Is the bottom of the new tank framed? If so, I think standard framing is 1/4 inch, so that would be 1/4 on all 4 sides. So you'd have to be at 60.5" and 24.5". Design looks good to me.

I'm jealous you were able to do this in sketchup... I tried and was horrible. Currently building my plywood stand as well, just started today!
 

Matthew Frost

Active Member
View Badges
Joined
Jul 13, 2017
Messages
396
Reaction score
471
Rating - 0%
0   0   0
Why not do a metal stand and skin it?

The reason I ask is engineering a plywood stand that can carry a dead load of 3/4 ton with minimal deflection and have a 4' opening in the front is no small/easy task. My .02 is anything over 125 gallons should sit on a metal stand. The benefits of metal over time make it a no brainer over wood for peace of mind long term.
 

rossco

.
View Badges
Joined
Jul 25, 2006
Messages
761
Reaction score
1,142
Location
Redding, CA
Rating - 0%
0   0   0

AngryOwl

Angry
View Badges
Joined
Sep 25, 2017
Messages
1,132
Reaction score
1,642
Location
Houston, TX
Rating - 0%
0   0   0
Looks very similar to mine. Take a look at the first page of my build thread. I did beef it up in a few places vs your drawings with laminated plywood beams and vertical supports for those beams so just the glue and pocket screws weren’t holding all the weight. It is still standing rock solid 6 years later.

https://www.reef2reef.com/threads/rosscos-210-gallon-led-sps-reef.97806/#post1095591
Awesome build! You didn't even use a full sheet on the back! This provides me some assurance mine will be just fine ;Playful
 

Muttley000

Valuable Member
View Badges
Joined
Apr 24, 2017
Messages
1,780
Reaction score
8,344
Location
West Unity, Ohio
Rating - 0%
0   0   0
I have built a few plywood stands in my wood shop over the years. I would at double the thickness by laminating another piece of plywood on your top front span. Doing the same with the uprights that hold it up would be cheap insurance too if you have room. Make sure you glue all joints along with the poker hole screws. Nice sketch up work, wish I had those skills!
 

rossco

.
View Badges
Joined
Jul 25, 2006
Messages
761
Reaction score
1,142
Location
Redding, CA
Rating - 0%
0   0   0
Awesome build! You didn't even use a full sheet on the back! This provides me some assurance mine will be just fine ;Playful

Thanks!

It might not be apparent from the photos, but that back beam is an inch and a half thick, made from two 3/4 inch by 1 foot tall pieces of birch plywood screwed and glued together.
 

andy020

Active Member
View Badges
Joined
Aug 15, 2018
Messages
138
Reaction score
111
Rating - 0%
0   0   0
I have built a few plywood stands in my wood shop over the years. I would at double the thickness by laminating another piece of plywood on your top front span. Doing the same with the uprights that hold it up would be cheap insurance too if you have room. Make sure you glue all joints along with the poker hole screws. Nice sketch up work, wish I had those skills!

Agree 100%
 
OP
OP
T

TimeTwister

Community Member
View Badges
Joined
Jan 14, 2016
Messages
89
Reaction score
53
Rating - 0%
0   0   0
I drilled and glued and dowelled mine.. no screws
I do plan to glue and screw (pocket hole), but I didn't have a lot of luck last time I tried dowels (personal skill, not capability of the dowel). I wish someone would make a cheaper, knockoff of the domino, but I think we have a while before that patent is up.

So per recommendations I doubled up the front frame. Rather than just make an exact copy of the front frame to double it's thickness I shortened some of the pieces to create a short of half-lap joint with the side and bottom pieces. Is this actually helping to create a stronger join you think or am I just over complicating it?
FEqVJKG.png
 

davocean

2500 Club Member
View Badges
Joined
Apr 28, 2014
Messages
3,197
Reaction score
4,831
Location
San Diego CA
Rating - 0%
0   0   0
Last pic looks really good, and I would have doubled up front same way.
 

Muttley000

Valuable Member
View Badges
Joined
Apr 24, 2017
Messages
1,780
Reaction score
8,344
Location
West Unity, Ohio
Rating - 0%
0   0   0
I do plan to glue and screw (pocket hole), but I didn't have a lot of luck last time I tried dowels (personal skill, not capability of the dowel). I wish someone would make a cheaper, knockoff of the domino, but I think we have a while before that patent is up.

So per recommendations I doubled up the front frame. Rather than just make an exact copy of the front frame to double it's thickness I shortened some of the pieces to create a short of half-lap joint with the side and bottom pieces. Is this actually helping to create a stronger join you think or am I just over complicating it?
FEqVJKG.png
The change you made increases glue surface area, great idea!
 

andy020

Active Member
View Badges
Joined
Aug 15, 2018
Messages
138
Reaction score
111
Rating - 0%
0   0   0
Add a few corner brackets, which is overkill.. but I like overkill.

That’s a solid design, especially any lapping you can do
What about the electronics? Could do a false wall with cooling fans..
 
OP
OP
T

TimeTwister

Community Member
View Badges
Joined
Jan 14, 2016
Messages
89
Reaction score
53
Rating - 0%
0   0   0
Add a few corner brackets, which is overkill.. but I like overkill.

That’s a solid design, especially any lapping you can do
What about the electronics? Could do a false wall with cooling fans..
Originally I wanted one of the sides to have a door and I would build an electronics section there blocked off from the rest of the sump area, but honestly just not sure how I could incorporate another door/cutout without sacrificing strength and stability.
 

jsker

Reefing is all about the adventure
View Badges
Joined
Apr 11, 2015
Messages
24,974
Reaction score
79,737
Location
Saint Louis
Rating - 0%
0   0   0
I have built a few plywood stands in my wood shop over the years. I would at double the thickness by laminating another piece of plywood on your top front span. Doing the same with the uprights that hold it up would be cheap insurance too if you have room. Make sure you glue all joints along with the poker hole screws. Nice sketch up work, wish I had those skills!
+1
 

jsker

Reefing is all about the adventure
View Badges
Joined
Apr 11, 2015
Messages
24,974
Reaction score
79,737
Location
Saint Louis
Rating - 0%
0   0   0
Originally I wanted one of the sides to have a door and I would build an electronics section there blocked off from the rest of the sump area, but honestly just not sure how I could incorporate another door/cutout without sacrificing strength and stability.

Box the end out with a door would actually strengthen the end and not weaken the cabinet
 
OP
OP
T

TimeTwister

Community Member
View Badges
Joined
Jan 14, 2016
Messages
89
Reaction score
53
Rating - 0%
0   0   0
Box the end out with a door would actually strengthen the end and not weaken the cabinet
When you say box the end, do you mean I should just make the sides like i did the front with a double thickness face frame vs the solid piece of ply?
 

jsker

Reefing is all about the adventure
View Badges
Joined
Apr 11, 2015
Messages
24,974
Reaction score
79,737
Location
Saint Louis
Rating - 0%
0   0   0
When you say box the end, do you mean I should just make the sides like i did the front with a double thickness face frame vs the solid piece of ply?
What program are you using to do your drawing work? If it is AutoCad I would draw a example in
 

Reefing threads: Do you wear gear from reef brands?

  • I wear reef gear everywhere.

    Votes: 19 14.2%
  • I wear reef gear primarily at fish events and my LFS.

    Votes: 9 6.7%
  • I wear reef gear primarily for water changes and tank maintenance.

    Votes: 1 0.7%
  • I wear reef gear primarily to relax where I live.

    Votes: 21 15.7%
  • I don’t wear gear from reef brands.

    Votes: 75 56.0%
  • Other.

    Votes: 9 6.7%
Back
Top