Good day all!
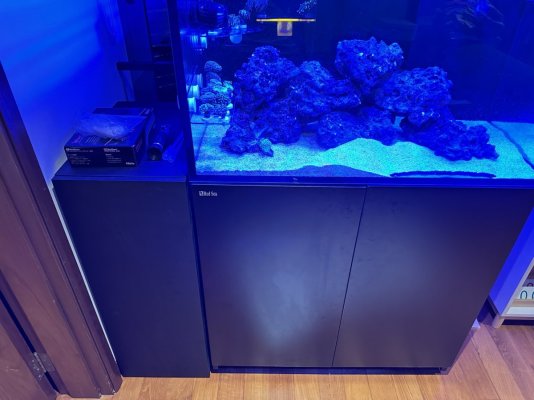
So finally completed a 4 straight day stint of setting up the tank above and its about 95% complete and believe some learning points should be shared to make life easier for others looking at getting the above unit.
Introduction:-
Had a Red Sea Max Nano tank first and ran it in the bathroom(I like the therapeutic time on the throne and watching the corals) - Pic attached for viewing pleasure.

Well unfortunately, one of the wires caught fire and basically sounded like a transformer catching fire and thankfully was at home to catch it and ran to the bathroom to see a super amazing blue light with the sound of arcing electricity like Nicola Tesla lit a coil up and the lovely smell of acrid plastic smoke. Was basically super burnt out and told the lady boss I have had enough of it as work has been super demanding and I did not have time to figure it out anymore. Chiller also ceased working, have basically lost all my acros and a few torches by the end of the week since the mini fire.
Few days passes and Im reaching out to some mates to take the whole setup with everything FOC just get it the hell outta my life and sight. Lady boss suddenly starts saying that I should continue it and restart in another area as a standalone(have always told her I was going to build one but never got the time around it), I still was adament on getting it removed completely and I was done. That until she sends me a photo of our kid standing infront of the tank staring in at the corals and fishes and says, if not for me then for her you should be restarting. Sure enough now I am here with a Red Sea Reefer 250 G2.
The beginning:-
Work started to get amazing and closed a few large deals and decided I was going to take time away from the office to rebuild it all.
Started purchasing all the parts(apologies no photos as my mind was more occupied with getting it up as fast as possible thus tunnel vision to just start working), equipment used:-
Tank:- Red Sea Reefer 250 G2
Return Pump:- Skimz QuietPro QP4.0 DC water pump 4000L/H
Rock:- CaribSea Life Rock Set 40lbs + Aquaforest Stone fix
Substrate:- CaribSea Arag-Alive Special Grade Reef Sand
Chiller:- HAILEA HK-300A Chiller (I live in a tropical country thus it is basically baking)
Chiller Pump:- Skimz QuietPro QP1.2 DC water pump 1200L/H
Return Pump:- Skimz QuietPro QP4.0 DC water pump 4000L/H
Filter system:- Red Sea ReefMat 500
Skimmer:- Deltec Skimmer 600ix
UV:- Deltec UV 20 watt
ATO:- Tunze 3351 ATO optical sensor
Refugium light:- Kessil H80 with the gooseneck
Reactors:- Two Little Fishes mini reactor(yet to be installed, ran out of joints and pipe through wastage)
Additional parts/equipment:-
25mm Diameter red PVC piping ~ 3m
25mm union joints - 3
25mm 90 elbows - 10
25mm T-joints - 2
25mm gate valves - 2
25mm threaded male - 2(UV)
20mm Diameter red PVC piping ~ 2
20mm union joints - 3
20mm 90 elbows - 10
PVC PIPE CUTTER
PVC PIPE GLUE
EPOXY - where needed
TEFLON TAPE
Start of the process, ordered the G2 and got the V3 unit delivered instead. Was completely livid as I had already planned to be away from the desk for the days and told them to immediately replace it but was told to wait a week or I could have the unit unassembled instead. So unfortunately obviously had no other option but to also have to assemble the cabinet. didnt have a choice as I wanted to place the reefmat in without further modification and the sumps were different.

Gone with the V3 and in with the completely unassembled G2 in black instead.
Got started prepping the rockwork and substrate;

-Learned from the first tank that the size of the grain was a large factor with having snowstorms in the tank and going everywhere, thus decided to use Caribsea special grade sand.
-Also rinsed the sand with a strainer to just capture the bigger grains and the finer snow storm grains are gone for good. Run the sand through normal piped water and run the strainer in a bucket of RO water thereafter deposit into the holding bucket for processed sand ready to be used in the tank once completed, repeat until 2 bags of 20lb bags are cleaned.
Rockwork;

- Draw out the outline of the tank on a piece of cardboard and start your rough idea on rockscape desired.
- Get plastic cups, gloves and plastic spoons to prepare cement mixes as it dries within 10 minutes.
- I used mainly a mix of 50ml of cement with 20ml of water to get the consistency that was not to runny while not un malleable.
- Once the blocks are mainly dry, mix a batch of cement that has the consistency of a smoothie and tilt the rock and let it flow through all the cracks and crevices to improve the bond.
- Leave the rockscape the dry for the day to allow it to completely bond.
Start of the tank preparation;

Above is the base photo of the G2 with the chiller within and the tentative placement of the inline UV I am running.

Apologies but I barely have photos of the process through this period until today where its nearly completed.


Still have a few final improvements:-
-Hard piping chiller outflow into return section of the sump
-Attaching 2 reactors to the gate valves
I do have to emphasize, please be super careful with the PVC pipe cutter. My fingers are completely sliced up and I never notice the cuts until my hands were sticky from the blood - USE RUBBER 3M GLOVES when working with the PVC piping.
I just posted this to possibly share what I am working with and hopefully it will assist someone in their journey planning. I would be completely open to any input its all a learning curve here so shoot away.
So finally completed a 4 straight day stint of setting up the tank above and its about 95% complete and believe some learning points should be shared to make life easier for others looking at getting the above unit.
Introduction:-
Had a Red Sea Max Nano tank first and ran it in the bathroom(I like the therapeutic time on the throne and watching the corals) - Pic attached for viewing pleasure.
Well unfortunately, one of the wires caught fire and basically sounded like a transformer catching fire and thankfully was at home to catch it and ran to the bathroom to see a super amazing blue light with the sound of arcing electricity like Nicola Tesla lit a coil up and the lovely smell of acrid plastic smoke. Was basically super burnt out and told the lady boss I have had enough of it as work has been super demanding and I did not have time to figure it out anymore. Chiller also ceased working, have basically lost all my acros and a few torches by the end of the week since the mini fire.
Few days passes and Im reaching out to some mates to take the whole setup with everything FOC just get it the hell outta my life and sight. Lady boss suddenly starts saying that I should continue it and restart in another area as a standalone(have always told her I was going to build one but never got the time around it), I still was adament on getting it removed completely and I was done. That until she sends me a photo of our kid standing infront of the tank staring in at the corals and fishes and says, if not for me then for her you should be restarting. Sure enough now I am here with a Red Sea Reefer 250 G2.
The beginning:-
Work started to get amazing and closed a few large deals and decided I was going to take time away from the office to rebuild it all.
Started purchasing all the parts(apologies no photos as my mind was more occupied with getting it up as fast as possible thus tunnel vision to just start working), equipment used:-
Tank:- Red Sea Reefer 250 G2
Return Pump:- Skimz QuietPro QP4.0 DC water pump 4000L/H
Rock:- CaribSea Life Rock Set 40lbs + Aquaforest Stone fix
Substrate:- CaribSea Arag-Alive Special Grade Reef Sand
Chiller:- HAILEA HK-300A Chiller (I live in a tropical country thus it is basically baking)
Chiller Pump:- Skimz QuietPro QP1.2 DC water pump 1200L/H
Return Pump:- Skimz QuietPro QP4.0 DC water pump 4000L/H
Filter system:- Red Sea ReefMat 500
Skimmer:- Deltec Skimmer 600ix
UV:- Deltec UV 20 watt
ATO:- Tunze 3351 ATO optical sensor
Refugium light:- Kessil H80 with the gooseneck
Reactors:- Two Little Fishes mini reactor(yet to be installed, ran out of joints and pipe through wastage)
Additional parts/equipment:-
25mm Diameter red PVC piping ~ 3m
25mm union joints - 3
25mm 90 elbows - 10
25mm T-joints - 2
25mm gate valves - 2
25mm threaded male - 2(UV)
20mm Diameter red PVC piping ~ 2
20mm union joints - 3
20mm 90 elbows - 10
PVC PIPE CUTTER
PVC PIPE GLUE
EPOXY - where needed
TEFLON TAPE
Start of the process, ordered the G2 and got the V3 unit delivered instead. Was completely livid as I had already planned to be away from the desk for the days and told them to immediately replace it but was told to wait a week or I could have the unit unassembled instead. So unfortunately obviously had no other option but to also have to assemble the cabinet. didnt have a choice as I wanted to place the reefmat in without further modification and the sumps were different.
Gone with the V3 and in with the completely unassembled G2 in black instead.
Got started prepping the rockwork and substrate;
-Learned from the first tank that the size of the grain was a large factor with having snowstorms in the tank and going everywhere, thus decided to use Caribsea special grade sand.
-Also rinsed the sand with a strainer to just capture the bigger grains and the finer snow storm grains are gone for good. Run the sand through normal piped water and run the strainer in a bucket of RO water thereafter deposit into the holding bucket for processed sand ready to be used in the tank once completed, repeat until 2 bags of 20lb bags are cleaned.
Rockwork;
- Draw out the outline of the tank on a piece of cardboard and start your rough idea on rockscape desired.
- Get plastic cups, gloves and plastic spoons to prepare cement mixes as it dries within 10 minutes.
- I used mainly a mix of 50ml of cement with 20ml of water to get the consistency that was not to runny while not un malleable.
- Once the blocks are mainly dry, mix a batch of cement that has the consistency of a smoothie and tilt the rock and let it flow through all the cracks and crevices to improve the bond.
- Leave the rockscape the dry for the day to allow it to completely bond.
Start of the tank preparation;
Above is the base photo of the G2 with the chiller within and the tentative placement of the inline UV I am running.
Apologies but I barely have photos of the process through this period until today where its nearly completed.
Still have a few final improvements:-
-Hard piping chiller outflow into return section of the sump
-Attaching 2 reactors to the gate valves
I do have to emphasize, please be super careful with the PVC pipe cutter. My fingers are completely sliced up and I never notice the cuts until my hands were sticky from the blood - USE RUBBER 3M GLOVES when working with the PVC piping.
I just posted this to possibly share what I am working with and hopefully it will assist someone in their journey planning. I would be completely open to any input its all a learning curve here so shoot away.


") . Also is this not a build thread? A little confused as it says build thread.
. Also is this not a build thread? A little confused as it says build thread.