Reef-PI build thread, go big or go home

OP
OP
Tristanzs

Tristanzs

Community Member
View Badges
Joined
Jan 4, 2019
Messages
95
Reaction score
158
Rating - 0%
0   0   0
Got more parts in the mail sadly still waiting on my hat, power supplies, connectors for the specialized hat, nylon stand offs and various other bits. Unfortunately I've been unable to do anymore work with what I did receive as work sent me to texas the day after I returned from west Virginia.
 
OP
OP
Tristanzs

Tristanzs

Community Member
View Badges
Joined
Jan 4, 2019
Messages
95
Reaction score
158
Rating - 0%
0   0   0
Got most of the high voltage wiring done today. Ended up breaking off the jumpers on both the positive and negative side of my outlets so had to run jumpers to each negative. Live and learn I guess.

20190126_162405.jpg


20190126_162410.jpg


20190126_162409.jpg
 
OP
OP
Tristanzs

Tristanzs

Community Member
View Badges
Joined
Jan 4, 2019
Messages
95
Reaction score
158
Rating - 0%
0   0   0
Yeah it's going to be the main attraction, people won't even want to look at the fancy saltwater tank sitting in front of it.
 
OP
OP
Tristanzs

Tristanzs

Community Member
View Badges
Joined
Jan 4, 2019
Messages
95
Reaction score
158
Rating - 0%
0   0   0
Finished up everything I can until more parts arrive. Major parts I'm waiting on are power supplies, temp sensors, pre wired plugs for my hat, ph boards, female to female jumpers, the standoffs and screws to mount various parts. I'm pretty happy with the way most of it is coming together so far, and I've learned a ton that will help me once my custom enclosure is finished.

20190127_143524.jpg


20190127_143529.jpg
 

Diamond1

Valuable Member
View Badges
Joined
Oct 17, 2013
Messages
1,368
Reaction score
1,911
Location
Cleveland Ohio
Rating - 0%
0   0   0
Finished up everything I can until more parts arrive. Major parts I'm waiting on are power supplies, temp sensors, pre wired plugs for my hat, ph boards, female to female jumpers, the standoffs and screws to mount various parts. I'm pretty happy with the way most of it is coming together so far, and I've learned a ton that will help me once my custom enclosure is finished.

20190127_143524.jpg


20190127_143529.jpg
Looking at the AC wiring into your relays, you may want to switch the red and black wires. The way you have it wired will work, but the best way to do it is have the hot wires from the AC supply going to the center terminal(Comm) of the relay and the socket wires going to the left terminal (Normally Open).
 
OP
OP
Tristanzs

Tristanzs

Community Member
View Badges
Joined
Jan 4, 2019
Messages
95
Reaction score
158
Rating - 0%
0   0   0
I agree the wire nuts where a pain especially since I've got carpal tunnel. Just went out and got push connectors from the start, easy to install, no real guess work, and you can visibly see everything. I'm hoping my parts will arrive soon as I want this done and ready when I setup my tank.
 

b4tn

Valuable Member
View Badges
Joined
Jun 17, 2015
Messages
1,673
Reaction score
2,242
Location
Columbia MD
Rating - 0%
0   0   0
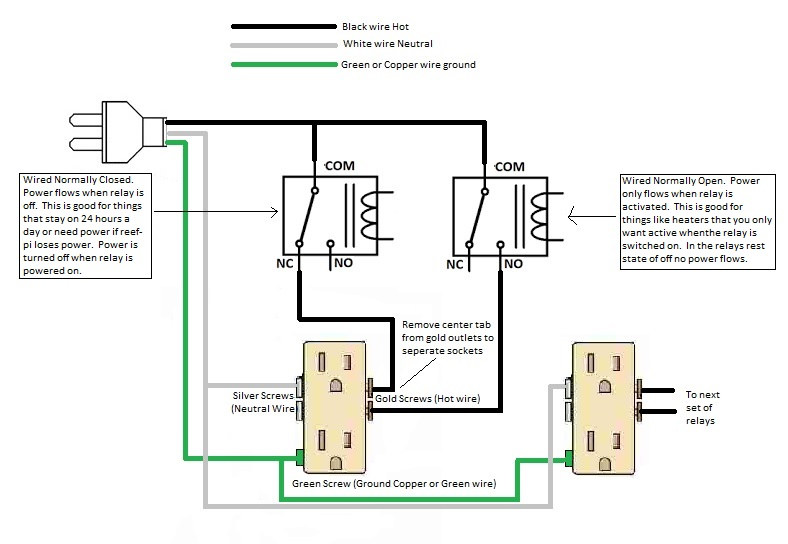
Looking good! I did an all in one build with mine with a satellite doser box. I would have done 16 outlets also but ran out of GPIO pins, I think I only have 2 GPIO pins left available right now. I am going to be building another one for more outlets in the very near future. I really banged my head up against the wall trying to get a good understanding of the high voltage side since I had never done it before. I ended up wiring half of my outlets Normaly open and half normally closed. I did this so that if reefpi ever looses power or connection the normally closed outlets still have power. I made this diagram to to help myself better understand what I was doing.

31238544737_80bcea96bd_b.jpg
 
OP
OP
Tristanzs

Tristanzs

Community Member
View Badges
Joined
Jan 4, 2019
Messages
95
Reaction score
158
Rating - 0%
0   0   0
Ok I've been trying to solder mini VLC connectors all night and have come to the conclusion that my old soldering iron just isn't the right tool for the job. It's way too hot even on it's low 20w setting. I'm thinking new setup with flux and solder. I'd appreciate it if you guys with more experience could point me in the right direction.
 

b4tn

Valuable Member
View Badges
Joined
Jun 17, 2015
Messages
1,673
Reaction score
2,242
Location
Columbia MD
Rating - 0%
0   0   0
Ok I've been trying to solder mini VLC connectors all night and have come to the conclusion that my old soldering iron just isn't the right tool for the job. It's way too hot even on it's low 20w setting. I'm thinking new setup with flux and solder. I'd appreciate it if you guys with more experience could point me in the right direction.

I used my 35 watt weller soldering iron I got when I was in high school that’s probably 25 years old lol. It gave me issues with some of the connectors that required a hotter iron but is still going strong so I think that says someone about weller. I have been eyeballing this one but have not pulled the trigger yet.

https://www.amazon.com/dp/B000BRC2XU/ref=cm_sw_r_sms_awdb_t1_.X8tCbHXSFZ0V
 

Bigtrout

Valuable Member
View Badges
Joined
Dec 16, 2018
Messages
1,189
Reaction score
2,826
Rating - 0%
0   0   0
Ok I've been trying to solder mini VLC connectors all night and have come to the conclusion that my old soldering iron just isn't the right tool for the job. It's way too hot even on it's low 20w setting. I'm thinking new setup with flux and solder. I'd appreciate it if you guys with more experience could point me in the right direction.
Sometimes a 20 watt iron is NOT hot enough for connectors, it seems backwards but with a smaller iron you may have to hold it to the connector way too long to reach solder melting temp. That lets the heat "soak" into the connector heating everything up too much, where a hotter iron will heat up quicker to melt the solder without heat soaking too far away from where u want to solder.

I use a 40 watt weller with a variable temp setting. Its similar to the one diamond linked, but available at home depot. Its the Weller WLC100
 
Last edited:
OP
OP
Tristanzs

Tristanzs

Community Member
View Badges
Joined
Jan 4, 2019
Messages
95
Reaction score
158
Rating - 0%
0   0   0
Some progress made today, I now have a functioning 8 channel switchable power strip. I realized I cannot do 16 with the way my hat is setup. Guess I should have read the documentation better. Going to look into options to expand to the full 16 but for now 8 should suffice. Also again huge shout out to the members of this forum for all their help without which I'd never be as far along as I am.

20190130_202929.jpg


20190130_202925.jpg


20190130_202917.jpg


20190130_202911.jpg
 

Bigtrout

Valuable Member
View Badges
Joined
Dec 16, 2018
Messages
1,189
Reaction score
2,826
Rating - 0%
0   0   0
Some progress made today, I now have a functioning 8 channel switchable power strip. I realized I cannot do 16 with the way my hat is setup. Guess I should have read the documentation better. Going to look into options to expand to the full 16 but for now 8 should suffice. Also again huge shout out to the members of this forum for all their help without which I'd never be as far along as I am.

20190130_202929.jpg


20190130_202925.jpg


20190130_202917.jpg


20190130_202911.jpg
Ahh, but yes you can do 16!!! You have another power connector with all you need to feed a second uln on another board...or you can do what im doing...mount a uln2803 on a perma proto hat and use a stackable header. Use the pins that the leftover power header on mike lanes hat use for power1 connector.
 

How much do you care about having a display FREE of wires, pumps and equipment?

  • Want it squeaky clean! Wires be danged!

    Votes: 76 44.4%
  • A few things are ok with me!

    Votes: 79 46.2%
  • No care at all! Bring it on!

    Votes: 16 9.4%
Back
Top