Rio LED 125 with Sump Build WIP

CornishCrustyCorals

Active Member
View Badges
Joined
Dec 15, 2020
Messages
168
Reaction score
179
Location
Cornwall
Rating - 0%
0   0   0
So I am new to the hobby and bought a juwel rio for my first tank setup so far I have added about 1/3 of the total rock I will need and it was all live rock from the LFS. I am going to add the rest as dry rock in the new year.
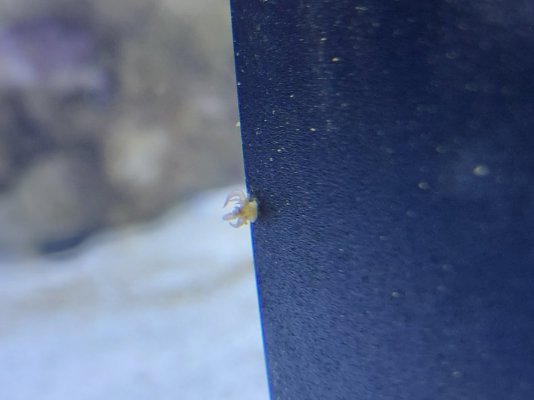
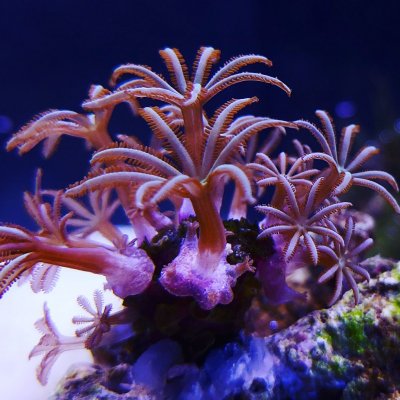
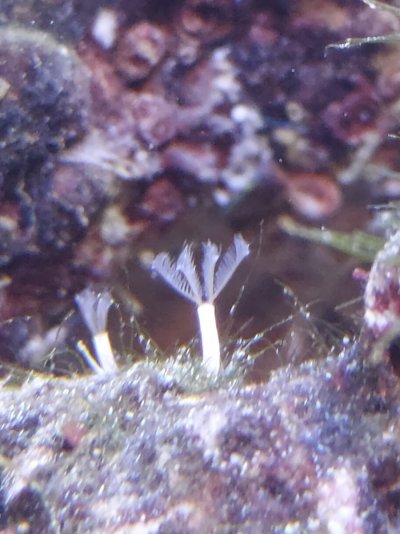
I've added a couple of small frags so far I have 3 zoas a paly, some Clove Polyps and some blue sympodium. Today I added two very young small clown fish to keep the kids happy I mostly just want to do corals.

Heres some pics

IMG_20201221_144519_035.jpg IMG_20201220_190126_846.jpg IMG_20201219_124154_140.jpg IMG_20201218_174221_886.jpg IMG_20201215_193042_119.jpg 20201222_165744.jpg
The frags are still on their plugs as I was testing out the flow and how they reacted and the height in the tank. Once I do my scape u will glue them
 

Peace River

Thrive Master
View Badges
Joined
Apr 29, 2014
Messages
21,521
Reaction score
164,624
Location
USA
Rating - 100%
1   0   0
Great start! Pictures look good so far!
 
OP
OP
CornishCrustyCorals

CornishCrustyCorals

Active Member
View Badges
Joined
Dec 15, 2020
Messages
168
Reaction score
179
Location
Cornwall
Rating - 0%
0   0   0
Can't wait to get some more bits for the tank. Today I had found a little hitch hiker which thanks to you guys advise I removed the potentially aptasia. And then this evening noticed my clove Polyps starting to spread. I need to get myself some long tools for the tank and I think I'm going to buy about 20kg of marco rock to make a scape with. My idea is to make a scape keeping the live rock I bought from the LFS in until the marco rock is well established and then the two really big bits of rock I got from the LFS I want to remove as I am not a fan. They have like a algae grass on them which is impossible to remove and its already started to make a mess. The cleaner live rock I have would stay. Not sure if this is a viable option? It would be removing about 3.5kg of live rock i don't like leaving around 4.5kg that I do like and the rest being the marco rock. Also not sure how long it would take before it would be ready to be classed as "live rock" this is definitely what I am doing next before any more frags though.
 

Attachments

  • 20201226_153625.jpg
    20201226_153625.jpg
    102.9 KB · Views: 55
  • IMG_20201226_192758_137.jpg
    IMG_20201226_192758_137.jpg
    232.4 KB · Views: 54
OP
OP
CornishCrustyCorals

CornishCrustyCorals

Active Member
View Badges
Joined
Dec 15, 2020
Messages
168
Reaction score
179
Location
Cornwall
Rating - 0%
0   0   0
Tank surprises me everyday. Today I found 4 mini feather dusters in my tank and the growth on my clove Polyps is insane. I bought some reef roids and put the smallest amount in and thats how I spotted the feather dusters as they fanned out immediately after. Got a pic of 3 days growth.
 

Attachments

  • 20201229_162116.jpg
    20201229_162116.jpg
    151.2 KB · Views: 57
  • Polish_20201229_180129269.jpg
    Polish_20201229_180129269.jpg
    260.6 KB · Views: 55
OP
OP
CornishCrustyCorals

CornishCrustyCorals

Active Member
View Badges
Joined
Dec 15, 2020
Messages
168
Reaction score
179
Location
Cornwall
Rating - 0%
0   0   0
So after looking at loads of options now after buying my tank I now realise that I bought a tank I kinda wish I hadn't. However I do like a good project :D

The main reason I don't like this tank is because it does not have a sump. I don't particularly want to take up all my tank space with equipment and I don't really want to have stuff hanging on the sides so would like to keep everything within the design of the tank visually I do enjoy.

So with that my project of 2021 has begun!

One of the biggest problems about doing the sump in the tank is the cabinet that came with it has a centre partition. I have seen the same tanks without it but as it came with it and I really don't fancy removing the bolts which are between the glass bottom and the top of the cabinet its going to have to stay.

The next problem between the back of the cabinet and the front it is only slightly over 260mm which most small tanks are at least a variant of 300mm x 40 or 60 etc so the width has proven a problem.

Another issue back to the actual tank is that it is not drilled and has a big plastic border before the lid about 4/5 inches.
I don't fancy drilling a brand new tank that has just finished cycling so I've been looking into Hang on back syphon drains. Every single one I have found simply wont fit without me having to remove a section of the lid and to be honest until I can afford or even justify getting a new light setup I am going to try and keep the lid as long as possible. If I ever change the lights that's when I may consider drilling the tank but not this time around.

So after lots of planning and making cardboard templates etc I have managed to design a little syphon system that will work through a section of the lid that would keep it totally hidden and would give a nice 2" syphon pipe

Then the sump system I gave up trying to find two small tanks that would do it so I am going to have a go at making some acrylic tanks that will fit in the bottom of the cabinet on both sides 30L 26W 30H then I will Join them in the middle with the biggest bulkhead I can or maybe a few small ones to make them one of the sump divider panels between the skimmer and refugium.

I bought some acrylic today at least to give it a good try and if it turns out terrible I will just get one made for it. started cutting up the pieces "rough cuts" going to sand them all down tomorrow and get to sticking! The way I am doing this will mean I can revert to the basic in tank filtration that is on it already if this project turns out a failure :D

Hob Project.png 135007355_403868094206984_8870253169394763534_n.jpg project.png 135516501_338082300481878_8395205518649225930_n.jpg
I know its going to be a tiny sump but it means I can get rid of the in tank filter and heater and gain a skimmer and more tank space so I think its worth!
 
OP
OP
CornishCrustyCorals

CornishCrustyCorals

Active Member
View Badges
Joined
Dec 15, 2020
Messages
168
Reaction score
179
Location
Cornwall
Rating - 0%
0   0   0
So today I started with the first sump box going in the left side. It was my first time ever making a tank and using acrylic. Took me a while to get the initial pieces glued together I ended up using the centre brace from the cabinet with some clamps and pushing the bottom piece in tight to get it held perfectly square. Then once I had a corner it seemed to go a lot quicker although i did watch 4 marvel films whilst doing it and its now 1.30am so I guess time fly's when your having fun.
Now that's all done tomorrow will be onto the next one its currently being taped overnight and I may wet test it tomorrow afternoon. I'm not sure the cement stuff I used is going to be good or not as like I said, I've never done anything like this before. Most recommended products online I found on YouTube etc I couldn't get my hands on so if what I used fails I will just silicone on top.

I hadn't realised when measuring that I didn't account for the front and back to be glued not on top of the base if that makes sense so it made the sump an extra 10mm wider bringing it closer to where the door meets the centre of the cabinet. If you look in the second pic it really couldn't have worked out any better! I've got a nice 3mm gap left

Hopefully more progress tomorrow

135217928_118583213423985_8045835293819579945_n.jpg 135802772_454395319283927_4034654504402359109_n.jpg
 
OP
OP
CornishCrustyCorals

CornishCrustyCorals

Active Member
View Badges
Joined
Dec 15, 2020
Messages
168
Reaction score
179
Location
Cornwall
Rating - 0%
0   0   0
Only a small update.

Water tested both sump tanks next step I need to get the plumbing bits so I can make the HOB drain and I need to get the filter socks so I can make a section for them and the skimmer.

20210105_211912.jpg
 
OP
OP
CornishCrustyCorals

CornishCrustyCorals

Active Member
View Badges
Joined
Dec 15, 2020
Messages
168
Reaction score
179
Location
Cornwall
Rating - 0%
0   0   0
Something was telling me to double check the tanks and good job I did as one was seeping slightly so decided to go over all the joins with silicone just to be on the safe side.

I also made a syphon tube for my display tank drain it definitely isn't pretty so I have modelled one up and a friend is going to 3d print it for a cleaner look. Fitment was great so at least it served a purpose and is useful as a backup.

You can see in the 3rd pic how I want it flush so I can still close the lid. The wires do tuck down the side of it too.

20210106_203505.jpg 20210106_203558.jpg 20210106_233729.jpg
 
OP
OP
CornishCrustyCorals

CornishCrustyCorals

Active Member
View Badges
Joined
Dec 15, 2020
Messages
168
Reaction score
179
Location
Cornwall
Rating - 0%
0   0   0
So a little more progress.
I have made most of the hang on the back drain
20210111_172534.jpg 20210111_172557.jpg
one piece folded a few times with a hole drilled for the drain.
sanded down all the bits now and added the sides
20210111_185058.jpg 20210111_172716.jpg
also tested the prototype syphon to see if the lid will still close and yay it does!

my 3d printed version of the syphon is done and on its way to me

image0.jpg image2.jpg image3.jpg
added a little airline section to the print so I can have an automatic turn back on for the syphon in the even of a power out going to either install it with a lift pump or a venturi connection image1.jpg
 
OP
OP
CornishCrustyCorals

CornishCrustyCorals

Active Member
View Badges
Joined
Dec 15, 2020
Messages
168
Reaction score
179
Location
Cornwall
Rating - 0%
0   0   0
So I've managed to plumb from the overflow down to the first tank but I can't use it yet as I still don't have the return pump and I haven't made up my mind on what skimmer to get. I'm thinking of a bubble magus z series as they don't need much room then I just need add some baffles and its good to go.

I added some cuc to the tank today I got 2 conchs to help keep the sandbed cleaner and 2 red leg hermits as the conchs won't go on the rocks.

IMG_20210113_181041_424.jpg IMG_20210113_180200_998.jpg
 
OP
OP
CornishCrustyCorals

CornishCrustyCorals

Active Member
View Badges
Joined
Dec 15, 2020
Messages
168
Reaction score
179
Location
Cornwall
Rating - 0%
0   0   0
OK so been working on 3d printing the complete overflow system with my friend and we have a weir, the syphon tube and the overflow box all compression fitted together which just needs printing and sending to me. Anyone with a rio tank or possibly any Juwel tank might be able to use this so once I've tested it and made sure its working I might offer them up.
20210123_153533.jpg
I've made up the plumbing from the pump and into a hang on overflow I'm going to get my friend to print some brackets to hold the pipe off the glass to stop any vibration etc. The orange part is hopefully going to work as a venturi and pull any air out of the syphon for the drain. The T piece is blocked off for now but that leaves me the option in the future to add on anything into the sump. I was going to hard plumb straight into the return pump but I figured by doing it this way it will stop any vibrations and allow easy removal of the pump from the sump.
The good thing about this whole setup is I don't have to get rid of the standard lid of the juwel tanks and it all fits through the holes they come with, and no drilling of the tank required. The only part of the stand that will be drilled is where I connect the two sump tanks together.

The acrylic sump tanks I've decided I will just be using them as templates and I will be getting a 2 tanks made professionally as I suck at it :D I will use them to test everything works before committing to a nice looking sump.

So I have also got some in tank news.
I am moving house as soon as I find a suitable place hopefully in the next month which means I am reluctant to ad anything to the tank as I don't want to loose anything in the move. So I just had 20kg of marco rock delivered.
20210121_165832.jpg
I have managed to make some nice rocks up with it by glueing them and have a nice scape I believe but its sitting in the box as I also want to start cycling this rock in a separate container before adding to the DT. All of this is kinda torture but I really need to move house and I want to do it properly.
 
Last edited:
OP
OP
CornishCrustyCorals

CornishCrustyCorals

Active Member
View Badges
Joined
Dec 15, 2020
Messages
168
Reaction score
179
Location
Cornwall
Rating - 0%
0   0   0
Another little update.
Had some salinity issues which turned out to be around 1.029 so I am slowly reducing that at the moment. I lost my very nice orange zoanthid after accidently gluing over it and it looked like it was going to make it but has pretty much melted now.
The first version of the overflow box turned out great however I've decided to add an extra drain for emergency so we went back to the drawing board with that.
So here is the first design with the single drain. It all worked well but the water got very close to the top of the box
image3 (1).jpg
This pic show how it slotted together but is not pushed in as its a compression fit and its a pain to pull apart image0 (1).jpg
So here is the new design where we increased the height of the walls 20mm and added the extra section including a wall that should match the height of the water in the tank.
006.png
Then we added a lid with built in vent holes into the little handles
001.png
Then here is a picture of how the overflow sits in 002.png
In this one you can see the little airline hose for a lift pump/venturi
003.png
Then a coulple with the weir that were working on but that still needs a little fettling.
004.png 005.png
 
OP
OP
CornishCrustyCorals

CornishCrustyCorals

Active Member
View Badges
Joined
Dec 15, 2020
Messages
168
Reaction score
179
Location
Cornwall
Rating - 0%
0   0   0
Its been a while since I updated this and I have made some progress with getting a sump in.
So after a few iterations of the overflow box I have one that is nice and silent, prime once and it keeps its syphon so no worries with power outs or feeding time.
160813748_259034252427591_2142904563961002535_n.jpg
161405333_880337302746770_1894943523604056190_n.jpg
161059814_271112037874815_4355499018343627235_n.jpg

For people with a JUWEL tank and don't want to cut the actual tank this was a great little design. It allows you to keep the original lid and it closes perfectly.
The original tank comes with a very ugly internal filter box which takes up at least 10% of the tank, if not more. This new design you can see is very small and it actually skims the surface water which the internal one was leaving a film that I could not get rid of. My surface hasn't been this clear ever. the water in the picture may look a little cloudy but that is because I just dosed Fluconazole as I have a lovely bryopsis outbreak!


The only thing I have left to do is get a few plumbing parts to bring the pipe work into the cupboard. So a couple 45s then I can re attach my manifold and get everything lined up with filter and correct chambers. The current pipework is very temporary! I have cut the pipework short temporarily and used soft hose as the main test for now was the overflow box. I decided to go against my idea of making 2 acrylic tanks connected with bulkheads because one it was slow flowing between them and two because it was asking to get blocked and flood my place. So I ordered a custom sized glass and it just looks way better.
161128814_274876614006101_5318097762968096226_n.jpg


Now the overflow box is confirmed working and flowing plenty my next job will be to pull the tank out of the cupboard and create the baffles etc I am thinking of splitting it up into filter socks, skimmer, fuge then return.
Oh and here is a pic of my tank now that it has loads more room.
160941700_438825824117137_5633311310941273314_n.jpg

I have a whole scape sat in a box which is all dry rock which I was thinking of starting to cycle in a container but I am still trying to move house so am not going to commit to that just yet. The scape I have planned fills the tank a heck of a lot more than these rocks that are in the tank. These were live rocks from a LFS and have been pretty much nothing but problems filled with every bad thing under the sun. its very tempting to start all over and move all my live stock and corals to a container then just cycle the new scape in this after cleaning this whole tank out. Unsure what to do!
 
Last edited:

Creating a strong bulwark: Did you consider floor support for your reef tank?

  • I put a major focus on floor support.

    Votes: 40 43.0%
  • I put minimal focus on floor support.

    Votes: 20 21.5%
  • I put no focus on floor support.

    Votes: 31 33.3%
  • Other.

    Votes: 2 2.2%
Back
Top