Yup, I am using a ReefMat 250. It'll hang on the side and open to the left side of the stand, which has a door so it'll be easy to work with.Are you trying to fit an actual reefmat in there? What size?
Would you hang it on the size of the sump, and then have 1-2 lines plumb into it?
If so I would be very interested in seeing pictures of your progress.
Navigation
Install the app
How to install the app on iOS
Follow along with the video below to see how to install our site as a web app on your home screen.
Note: This feature may not be available in some browsers.
More options
You are using an out of date browser. It may not display this or other websites correctly.
You should upgrade or use an alternative browser.
You should upgrade or use an alternative browser.
Roller for the Innovative Marine RFS 22
- Thread starter Slevin007
- Start date
- Tagged users None


Do you think you can fit a larger one (500+)?Yup, I am using a ReefMat 250. It'll hang on the side and open to the left side of the stand, which has a door so it'll be easy to work with.
And are you plumbing the primary and secondary lines both into it?

Yup, I am using a ReefMat 250. It'll hang on the side and open to the left side of the stand, which has a door so it'll be easy to work with.
I need to know if you do this & I will follow lol
about to buy the Reefmat 250 it sounds like,

Ok cool. So those little holes on the lid are 1” in diameter? I am planning on running UV in mine and trying to figure out how I’d plumb in
Attachments
Primary drain will be plumbed into the ReefMat, emergency drain will be plumbed directly into the sump. I suppose you could splice them together but I don't see a huge need to filter what comes down the emergency drain. Maybe that is a mistake on my part that I'll end up regretting.Do you think you can fit a larger one (500+)?
And are you plumbing the primary and secondary lines both into it?
Don't know the dimensions of the 500 but my guess is it would not fit if you still wanted a skimmer in the sump. The 250 is already a pretty tight fit.


Awesome. It’s got room for the in connector ?
Your return nozzle line is stock? Do you still have enough room with that connected ? (Like on the left side next to the sump and stand ? )
Your return nozzle line is stock? Do you still have enough room with that connected ? (Like on the left side next to the sump and stand ? )

Yes, the inlet hose is connected to the ReefMat in those pics with plenty of space to spare. The return line is on the right side of this sump/tank so no issue there. Everything past the filter sock chamber is 100% untouched and will remain so.Awesome. It’s got room for the in connector ?
Your return nozzle line is stock? Do you still have enough room with that connected ? (Like on the left side next to the sump and stand ? )
When you say : “That said, I may end up removing them anyway because diverting the drains creates a weird void in the sump that could under certain circumstances get water in it.”.I've been hacking away at my RFS-22 for the week and am getting pretty close. I ended up actually just cutting the stock plumbing so I didn't have to remove the first 2 baffles. That said, I may end up removing them anyway because diverting the drains creates a weird void in the sump that could under certain circumstances get water in it. Gonna grab the sump modification kit and give it a go.
I have a build thread I'll update when I'm done with the exact mods I made.
What do you mean exactly ? I have a rfs22 as well with im50 ext. happy I found someone that did it so I wouldn’t have to return the Reefmat!

Basically I am diverting the drains around the first 2 baffles (and the "dedicated heater chamber"), so they will remain completely empty even when the sump is filled. If the system backs up for whatever reason, the water can overflow into that compartment and basically be lost forever. I plan to remove those baffles all together so that's not an issue and I can potentially even fit a slim media reactor of some kind in there when they are gone.When you say : “That said, I may end up removing them anyway because diverting the drains creates a weird void in the sump that could under certain circumstances get water in it.”.
What do you mean exactly ? I have a rfs22 as well with im50 ext. happy I found someone that did it so I wouldn’t have to return the Reefmat!
Ohhh ok. Or maybe cover them somehow with an acrylic piece ?Basically I am diverting the drains around the first 2 baffles (and the "dedicated heater chamber"), so they will remain completely empty even when the sump is filled. If the system backs up for whatever reason, the water can overflow into that compartment and basically be lost forever. I plan to remove those baffles all together so that's not an issue and I can potentially even fit a slim media reactor of some kind in there when they are gone.
Yup that is another option, just seal it up. Personally I'm willing to put the work in to chop it up in service of more toys.Ohhh ok. Or maybe cover them somehow with an acrylic piece ?

Awesome. Are you going to use the stock mighty jet ?Yup that is another option, just seal it up. Personally I'm willing to put the work in to chop it up in service of more toys.
With a SKIL saw, which didn't actually end up being all that useful, a dremel and a lot of persistence, I got the first 2 baffles cut out. I ordered the sump modification kit, but after messing with it for a bit, I'm pretty sure these 2 baffles at least are not siliconed in, but rather solvent welded in. Not the prettiest thing in the world, but it will do the job. For now I'll keep the top of the sump intact and use this little spot for some rubble and such for copepods to use. Working on the plumbing layout now.
Attachments
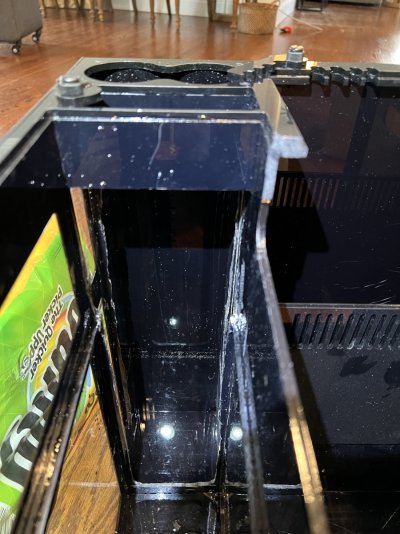
Wow looks like a pain…. wish I could rewind and do this before getting mine filled…. Probably willWith a SKIL saw, which didn't actually end up being all that useful, a dremel and a lot of persistence, I got the first 2 baffles cut out. I ordered the sump modification kit, but after messing with it for a bit, I'm pretty sure these 2 baffles at least are not siliconed in, but rather solvent welded in. Not the prettiest thing in the world, but it will do the job. For now I'll keep the top of the sump intact and use this little spot for some rubble and such for copepods to use. Working on the plumbing layout now.
Seal that area for now instead…
I’m trying to figure out easiest way to modify the stock plumbing quickly to do this

Oh yeah - it has been a total pain. I just had to painstakingly grind away at the baffles to get them as close as I could stand. If the tank is already running I would recommend just sealing it off and moving on. It's not that much extra water volume, but it does let you use the plumbing in a closer-to-stock configuration. I ended up modifying both drains but probably could have gotten away using the stock e-drain plumbing and only modifying the main drain. That said, if you are handy enough with hard-line plumbing I have seen others plumb PVC pipes directly into the ReefMat, and you could probably do that here an retain the stock plumbing/bulkheads completely. I am not, so I cut.Wow looks like a pain…. wish I could rewind and do this before getting mine filled…. Probably will
Seal that area for now instead…
I’m trying to figure out easiest way to modify the stock plumbing quickly to do this
Alright, it's finally done. Pics of the final product attached. As for the stock plumbing, I literally just hacked it off with a skil saw. For the emergency drain, I attached some leftover hose from my Infinia 165. This was ultimately unnecessary with the way I did my final modifications, but originally I was trying to go the minimally invasive route, which turned out to not really work. For the primary drain I ended up attaching the little connector RedSea sends. Originally I was planning to cement it on with PVC cement, but I am almost 100% certain that the connector is ABS, so I ended up using the provided "silicone sealant" that RedSea includes in the box. Time will tell if this will hold up. In order to get the hose to fit well, it was necessary to cut out the bits on the top panel that are originally for the stock plumbing bulkheads and the dedicated heater compartment, otherwise there was so much tension on the hose the ReefMat would not sit flush. If you're creative enough with PVC this can probably be avoided.


Wow this is great to know about it not sitting flush. If I was trying to be as least invasive as possible: Some sort of elbow outwards may work but then it’s not over the sump maybe angled a different way … I may have to cut the gate valve off and replace it to avoid cutting the bulkheads… Gotta get in there and measure… will not be able to avoid emptying the sump. Probably a good idea anyway haha.Alright, it's finally done. Pics of the final product attached. As for the stock plumbing, I literally just hacked it off with a skil saw. For the emergency drain, I attached some leftover hose from my Infinia 165. This was ultimately unnecessary with the way I did my final modifications, but originally I was trying to go the minimally invasive route, which turned out to not really work. For the primary drain I ended up attaching the little connector RedSea sends. Originally I was planning to cement it on with PVC cement, but I am almost 100% certain that the connector is ABS, so I ended up using the provided "silicone sealant" that RedSea includes in the box. Time will tell if this will hold up. In order to get the hose to fit well, it was necessary to cut out the bits on the top panel that are originally for the stock plumbing bulkheads and the dedicated heater compartment, otherwise there was so much tension on the hose the ReefMat would not sit flush. If you're creative enough with PVC this can probably be avoided.

Custom plumbing might be the way to go here honestly, that would let you get a line run directly over the ReefMat intake and position the gate valve in a more sensible place. As-is I can reach it and turn it unobstructed, and I'm able to fully work with the ReefMat, but it is tight. I would prefer it be farther up the plumbing perhaps behind the tank so it's totally out of the way.Wow this is great to know about it not sitting flush. If I was trying to be as least invasive as possible: Some sort of elbow outwards may work but then it’s not over the sump maybe angled a different way … I may have to cut the gate valve off and replace it to avoid cutting the bulkheads… Gotta get in there and measure… will not be able to avoid emptying the sump. Probably a good idea anyway haha.
Similar threads
- Replies
- 1
- Views
- 47
- Replies
- 2
- Views
- 65
- Replies
- 11
- Views
- 370
- Replies
- 10
- Views
- 91


