Stuck- am I making this harder than it has to be?

SallyWho

Well-Known Member
View Badges
Joined
Jul 20, 2017
Messages
765
Reaction score
570
Location
SW Missouri
Rating - 0%
0   0   0
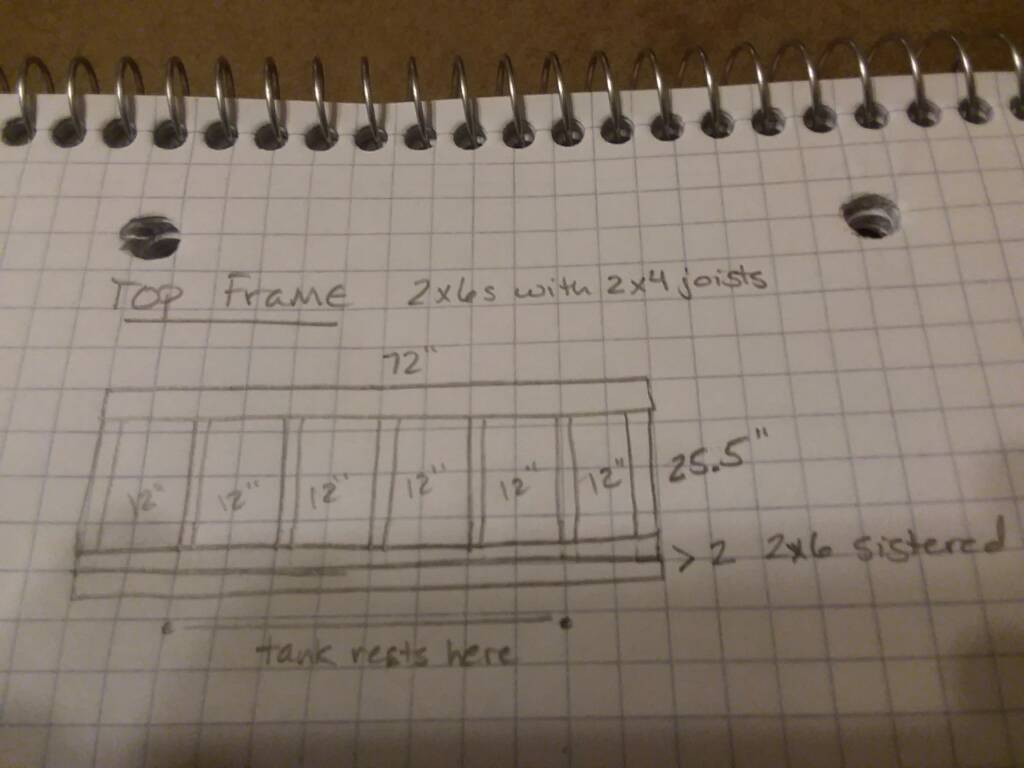
Experienced wood-working friend and I started building my stand today! YAAAY! But we hit a snag on the design and have stopped for now until I figure out what I want to do. You see, originally, I was going to sister two 2x6s on the front length of the top frame- the idea was for extra reinforcement, since the front of the tank will be sitting back a few inches and won't actually be resting on the front edge of the frame. It will have direct support under both side edges and back edge, though, and there will be a sheet of plywood between tank and stand, so it ought to be fine. As buddy and I were considering the best way to add supports, he asked if the extra 2x6 in the front is even necessary. Oh, god, is it even necessary?? If I've got a top 2x6 frame, and it's properly supported on its corners with a center brace in front, and there's going to be plywood across the top, do I really need that extra reinforcement? Can I just add the missing vertical supports and be done with it?

For those who've missed my previous threads about this, the tank is going to be 4x2x2' on a stand 6' long, 36" tall, and either 28" or 28.5" front-to-back (28" as it stands now, 29.5" if I add that second 2x6). I'm building the stand bigger than the tank because I want maximum room underneath to work in, and so that if/when I upgrade, I've already got a stand with a 72 x 28" footprint for a bigger tank. A pic of the original sketched plan, and some pics of the stand as it is today are below. Oh, and I WILL be putting in 2x4s vertically on the corners between the top and bottom frames! I'm not going to leave it as is! There's also going to be a center brace in the middle on the front and two in the back (under the edges of the tank). What I'm asking about is sistering the 2x6 on the front of the top frame.

Am I making any sense? I hope so!

20180531_083639-jpeg.758073
 
OP
OP
SallyWho

SallyWho

Well-Known Member
View Badges
Joined
Jul 20, 2017
Messages
765
Reaction score
570
Location
SW Missouri
Rating - 0%
0   0   0
Also, I am a dummy and typed all that up on my laptop, and the pics of the stand are on my phone. *shrug* Here they are!
20180605_130157.jpeg
20180605_130143.jpeg
20180605_130225.jpeg
20180605_130215.jpeg
 

WWIII

2500 Club Member
View Badges
Joined
Jan 13, 2016
Messages
3,739
Reaction score
7,701
Location
Louisville, KY
Rating - 0%
0   0   0
I would just add 2x6 supports in between top band and bottom band on all 4 corners front and sides. (8 total). That will be plenty strong enough if done correctly!
 

WWIII

2500 Club Member
View Badges
Joined
Jan 13, 2016
Messages
3,739
Reaction score
7,701
Location
Louisville, KY
Rating - 0%
0   0   0
This is a stand by fellow member @AZDesertRat from 2012 that shows how this should be done. Another support in the middle is helpful as he did on his stand. As for the double band at the top, it won't do anything really for support, so isn't needed.

Here's a pic of his stand, a good example...

frame4.jpg
 
OP
OP
SallyWho

SallyWho

Well-Known Member
View Badges
Joined
Jul 20, 2017
Messages
765
Reaction score
570
Location
SW Missouri
Rating - 0%
0   0   0
I would just add 2x6 supports in between top band and bottom band on all 4 corners front and sides. (8 total). That will be plenty strong enough if done correctly!
That was my thought! My buddy doesn't have aquariums so he doesn't understand my desire to 1000% ensure weight bearing capacity over time, stability, and weight distribution, but we both agreed that this thing is built kind of heavy!

That's nearly exactly what we're planning to do with those corners, except we'll be tapping them in vertically between the top and bottom frames, which will fill out the overhangs and make everything flush.
 

GBRsouth

Valuable Member
View Badges
Joined
Jul 9, 2017
Messages
1,279
Reaction score
3,577
Location
N.S.W. AUSTRALIA
Rating - 0%
0   0   0

WWIII

2500 Club Member
View Badges
Joined
Jan 13, 2016
Messages
3,739
Reaction score
7,701
Location
Louisville, KY
Rating - 0%
0   0   0
That was my thought! My buddy doesn't have aquariums so he doesn't understand my desire to 1000% ensure weight bearing capacity over time, stability, and weight distribution, but we both agreed that this thing is built kind of heavy!

Better safe than sorry! Water on the floor always looks like way more than it does inside the tank! :)
 
OP
OP
SallyWho

SallyWho

Well-Known Member
View Badges
Joined
Jul 20, 2017
Messages
765
Reaction score
570
Location
SW Missouri
Rating - 0%
0   0   0
@SallyWho look at the pink coloured timbers in the quoted plan. They are all you need to add to your stand and you'll be good.

Oh, good! It does indeed sound like I was overcomplicating things. Better than winging it, I suppose. Thanks, guys! I should be able to finish this out on my own- I can use my circular saw on the remaining parts. Half the reason I had help was because a miter saw makes straighter cuts, and he has a miter saw (the other half is because I barely know what I'm doing with carpentry. :p:rolleyes:).
 
OP
OP
SallyWho

SallyWho

Well-Known Member
View Badges
Joined
Jul 20, 2017
Messages
765
Reaction score
570
Location
SW Missouri
Rating - 0%
0   0   0
Better safe than sorry! Water on the floor always looks like way more than it does inside the tank! :)
It does indeed! Point of interest, I also got some of my flooring replaced today in the spot where the tank will go. :D
 

GBRsouth

Valuable Member
View Badges
Joined
Jul 9, 2017
Messages
1,279
Reaction score
3,577
Location
N.S.W. AUSTRALIA
Rating - 0%
0   0   0
Oh, good! It does indeed sound like I was overcomplicating things. Better than winging it, I suppose. Thanks, guys! I should be able to finish this out on my own- I can use my circular saw on the remaining parts. Half the reason I had help was because a miter saw makes straighter cuts, and he has a miter saw (the other half is because I barely know what I'm doing with carpentry. :p:rolleyes:).

Straight cuts will help to spread the weight load though.
 
OP
OP
SallyWho

SallyWho

Well-Known Member
View Badges
Joined
Jul 20, 2017
Messages
765
Reaction score
570
Location
SW Missouri
Rating - 0%
0   0   0
Straight cuts will help to spread the weight load though.
Yeah, but I think I can get straight enough cuts with my circular saw on these pieces at least. I was really concerned about getting uniformly straight cuts for all the main parts of the skeleton, because otherwise it'd be all wonky and out of square, so that's why I borrowed a friend and his miter saw. Since these are just support pieces that I can bang into place with a mallet if necessary, I doubt I need a surgically straight cut. I can't get too off on just 2x4s, right? :D
 

WWIII

2500 Club Member
View Badges
Joined
Jan 13, 2016
Messages
3,739
Reaction score
7,701
Location
Louisville, KY
Rating - 0%
0   0   0
Yeah, but I think I can get straight enough cuts with my circular saw on these pieces at least. I was really concerned about getting uniformly straight cuts for all the main parts of the skeleton, because otherwise it'd be all wonky and out of square, so that's why I borrowed a friend and his miter saw. Since these are just support pieces that I can bang into place with a mallet if necessary, I doubt I need a surgically straight cut. I can't get too off on just 2x4s, right? :D


You'd be surprised! I've made my fair share of cuts with a circular saw and sometimes let's just say they are less than perfect. Lol. If you don't have access to a miter saw again you can buy a speed square and mark the lines or use it as a guide. Make them nice and tight (not overly tight) and you will be good to go! You can do it, one way or another!
 

GBRsouth

Valuable Member
View Badges
Joined
Jul 9, 2017
Messages
1,279
Reaction score
3,577
Location
N.S.W. AUSTRALIA
Rating - 0%
0   0   0
One thing I missed spotting on your stand is to put cross braces top and bottom against the inside of your existing vertical posts. Those cross braces should be screwed to both your long horizontal rails and your existing vertical posts to eliminate any side sway.
 

dowsetts101

Active Member
View Badges
Joined
Apr 21, 2017
Messages
206
Reaction score
258
Location
Melbourne, Australia
Rating - 0%
0   0   0
One thing I missed spotting on your stand is to put cross braces top and bottom against the inside of your existing vertical posts. Those cross braces should be screwed to both your long horizontal rails and your existing vertical posts to eliminate any side sway.

+1 on the crossbracing (or full plywood back panel fixed off to the verticals serves the same purpose)

It’s a long stand to not have that sort of crossbracing.
 

Paul B

10K Club member
View Badges
Joined
Nov 3, 2010
Messages
18,090
Reaction score
61,681
Location
Long Island NY
Rating - 0%
0   0   0
You do not have to Sister two 2 X 6" on the front. That stand is plenty strong. I would have used 4 X 4s for the legs and galvanized lag bolts to hold it together instead of screws but that's just me. A structure is only as strong as what is holding it together and I assume you used long sheetrock screws which are not really for supporting anything and they rust very fast unless you used deck screws..
I just built my new stand for my tank move out of redwood because it doesn't warp and water doesn't affect it much. The front is double 2 X 4s and the bolts are galvanized and either bolted all the way through or lag bolts. It is also glued together with water proof glue. I tried to make it as strong as I could using the least amount of lumber. I did that because I don't like putting two pieces of wood together on a stand because when you spill water, and you will, the water will get between those pieces of wood and never come out. The 2 redwood pieces I have together on top are sealed together so water doesn't get in there.
 
OP
OP
SallyWho

SallyWho

Well-Known Member
View Badges
Joined
Jul 20, 2017
Messages
765
Reaction score
570
Location
SW Missouri
Rating - 0%
0   0   0
One thing I missed spotting on your stand is to put cross braces top and bottom against the inside of your existing vertical posts. Those cross braces should be screwed to both your long horizontal rails and your existing vertical posts to eliminate any side sway.
Um, you mean kind of like this? (Imagine that I've already added appropriate vertical supports on the sides there- I just propped some scrap boards up to take the picture) This is the short side of the stand. The stand will be wrapped/skinned in plywood, if that makes a difference. Though I may leave the back open for air circulation. Might be worth mentioning that the left side is going to have my control panel.
20180606_085649.jpeg


I assume you used long sheetrock screws which are not really for supporting anything and they rust very fast unless you used deck screws
I used 3" deck screws, so I at least got that right!
 

Redleg

Valuable Member
View Badges
Joined
Feb 23, 2018
Messages
1,061
Reaction score
602
Rating - 0%
0   0   0
Glad to see your skipping that extra 2×6. It would have made skinning your stand much more challenging to say the least. Since you're going to be applying a skin to it you won't need any cross bracing. Did you plan for the thickness of your plywood skin in your overall dimensions? 3/4" plywood will add 1 1/2" to your overall length and depth assuming you skin all 4 sides.
 

GBRsouth

Valuable Member
View Badges
Joined
Jul 9, 2017
Messages
1,279
Reaction score
3,577
Location
N.S.W. AUSTRALIA
Rating - 0%
0   0   0
Thanks a lot guys ! So here's the framework following rocket engineer's plan and king of DIY .

Do you think it's strong enough without skins to hold a 48 inch x 36 inch x 20 inch tank ?

Am novice at stand building so appreciate your inputs .

IMG_2919.JPG


IMG_2920.JPG


Should I put a couple of 2x4s cut at 45 at the back to make a small triangle whichever will act as sway braces ?

IMG_2921.JPG


Regards,
Abhishek

Um, you mean kind of like this? (Imagine that I've already added appropriate vertical supports on the sides there- I just propped some scrap boards up to take the picture) This is the short side of the stand. The stand will be wrapped/skinned in plywood, if that makes a difference. Though I may leave the back open for air circulation. Might be worth mentioning that the left side is going to have my control panel.

Look at the cross braces against the vertical posts, top and bottom, in the first two photos I quoted above from Abhishek.
 
OP
OP
SallyWho

SallyWho

Well-Known Member
View Badges
Joined
Jul 20, 2017
Messages
765
Reaction score
570
Location
SW Missouri
Rating - 0%
0   0   0
Look at the cross braces against the vertical posts, top and bottom, in the first two photos I quoted above from Abhishek.
Oh, you mean the vertical supports/center braces? Yeah, I'm going to put some of those in- one in the center front, and two in the back underneath where the tank will go.

Did you plan for the thickness of your plywood skin in your overall dimensions?
Yup, sure did! It'll still fit through my door! Although I'll be moving it inside once the skeleton is done and the top layer of plywood and floor of the sump area are done, anyway. I can then take my time skinning it to my liking once it's inside.
 

High pressure shells: Do you look for signs of stress in the invertebrates in your reef tank?

  • I regularly look for signs of invertebrate stress in my reef tank.

    Votes: 42 32.6%
  • I occasionally look for signs of invertebrate stress in my reef tank.

    Votes: 29 22.5%
  • I rarely look for signs of invertebrate stress in my reef tank.

    Votes: 25 19.4%
  • I never look for signs of invertebrate stress in my reef tank.

    Votes: 33 25.6%
  • Other.

    Votes: 0 0.0%
Back
Top