unbearable gurgling

narkotix

New Member
View Badges
Joined
Sep 3, 2018
Messages
20
Reaction score
21
Rating - 0%
0   0   0
Hi All,

Newbie poster here - I acquired a tank a while ago and was advised to do the plumbing in a particular way but I`m finding that the drains are making extreme gurgling noises (i think its the siphon/air). Is there anything that could be suggested to fix this? I've tried to regulate the valves I installed on the returns and drains but i have issues with maintaining the water level and it making noises again. Could anyone suggest an easy way to fix this?

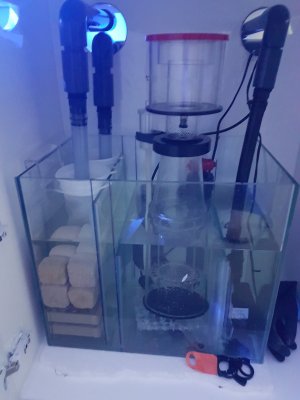
I should add that both drains (left and right) are right into the sump water/sock (i.e. it goes right to the bottom of the sump - i will take a photo to illustrate tonight and upload).

I've been told perhaps drilling a hole in each of the drains at the top and inserting a tube might help with air? (i was thinking a sprinkler tap with a small tube coming out of it to regulate airflow?)

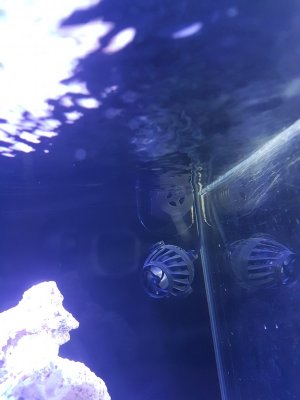
20191020_155423[1].jpg 20191020_155402[1].jpg
 
Last edited:

Whipples

Well-Known Member
View Badges
Joined
Sep 23, 2016
Messages
664
Reaction score
641
Rating - 0%
0   0   0
Can you post a picture of what the drain looks like inside the display tank? That will help as it looks like a herbie drain, but would like to confirm.

As for the drain in the sump, it can be a few simple things such as you suggested with the airline, but knowing how the display drains is crucial.
 

flsalty

Valuable Member
View Badges
Joined
Aug 14, 2017
Messages
1,233
Reaction score
1,743
Rating - 0%
0   0   0
Are the tops of those 90s coming out the back above the water line at all times? You may have to swap those out for tee fittings

I would like to see the drain from the inside as well. I suspect you just have what amounts to two dursos.
 
OP
OP
N

narkotix

New Member
View Badges
Joined
Sep 3, 2018
Messages
20
Reaction score
21
Rating - 0%
0   0   0
Hi gents

Thanks for replying - its this style of drain. Ive tried adjusting the flow so water is above but its difficult to maintain

Ive also included a picture of the sump

20191120_185123.jpg 15742381156542013863494.jpg
 

homer1475

Figuring out the hobby one coral at a time.
View Badges
Joined
Apr 24, 2018
Messages
11,799
Reaction score
18,825
Location
Way upstate NY
Rating - 0%
0   0   0
So when we ask for pics of the drain lines in the tank, we get a pic of the sump?

My first suggestion(other then we need to see a pic of the drains in the tank!) is how far under water do those drains go in the sump? The only need to be like 1 or 2 inches below the water line. All those elbows don't help the situation either.

And why are the drains on 2 opposite ends of the tank? I'm thinking just from looking at the plumbing, this tank was designed for a durso with 2 returns on opposite ends of the tank. I think the OP has plumbed the 2 returns into dual durso's with a single return.
 
OP
OP
N

narkotix

New Member
View Badges
Joined
Sep 3, 2018
Messages
20
Reaction score
21
Rating - 0%
0   0   0
So when we ask for pics of the drain lines in the tank, we get a pic of the sump?

My first suggestion(other then we need to see a pic of the drains in the tank!) is how far under water do those drains go in the sump? The only need to be like 1 or 2 inches below the water line. All those elbows don't help the situation either.

And why are the drains on 2 opposite ends of the tank? I'm thinking just from looking at the plumbing, this tank was designed for a durso with 2 returns on opposite ends of the tank. I think the OP has plumbed the 2 returns into dual durso's with a single return.

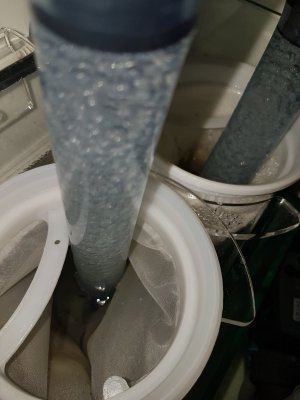
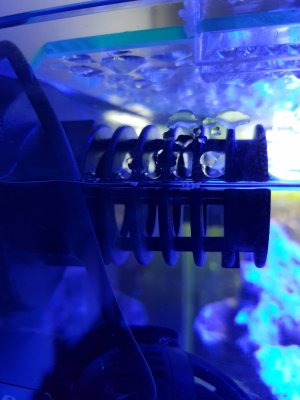
First picture is of the right hand drain line, left is the same. I`ll upload a better pic (give me a minute). The drain lines are 70% submerged, 30% unsubmerged.

The drains go right to the bottom of the sump (which i suspected is probably too long so I will definately shorten them to a couple inches below the waterline.

Originally the plumbing that came with the sump was a similar setup, with the only difference being that both drains went to a single pipe in the sump (it joined outside on the back and then went on an angle into the sump). It also had a durso? (like an air vent thing at the top of the tank). It unfortunately leaked so I was told to build it this way by a LFS.

20191120_202303.jpg 20191120_201947.jpg
 
Last edited:

Whipples

Well-Known Member
View Badges
Joined
Sep 23, 2016
Messages
664
Reaction score
641
Rating - 0%
0   0   0
Unfortunately with the drains exposed like that within the display there is only so much you can do about the noise. They won't be able to clear trapped air as they are always letting air in. is there any way without it being too intrusive to run an elbow into an elbow to get the drain below the water level in the display? that can go a long way but may be difficult to restart when you do a water change. Otherwise you could look to see if there is an overflow box that you can mount or get made to fit your plumbing.
 

Peace River

Thrive Master
View Badges
Joined
Apr 29, 2014
Messages
21,517
Reaction score
164,618
Location
USA
Rating - 100%
1   0   0
Other than getting a custom made overflow, you may consider drilling a 1/4” hole in the top of each of the 90 degree elbows (the highest ones on the outside of the tank).
 

K7BMG

Valuable Member
View Badges
Joined
Mar 13, 2018
Messages
1,981
Reaction score
1,898
Rating - 0%
0   0   0
Aquarium-Plumbing2.jpg

This is what you will have to create. This drawing is not how you will set it up, because your drains go through the back of the tank not the bottom.

This shows the idea of how to.

You will not need to replace the external 90 at the top with a T, just leave the existing 90.
Your tank glass will be vertical between the two 90's

I bought a tank that was plumbed this way, did not like it but made it work.
one line was the drain the other line the emergency to prevent overflow.

For the main drain put a 90 inside the tank with the strainer attached facing down, drill a hole in the top of the internal 90. NOT THE EXTERNAL 90.

The second drain (emergency overflow) you must turn the 90 facing up just above the natural water line but not above the top of the tank. do not drill a hole in this 90.This drain will always be dry unless there is a problem. Strainer optional.

The emergency drain valve should be wide open always.
The actual drain valve start at 1/2 open and adjust from there.

My other suggestion is to lower your drain valves if you wind up reworking the plumbing. That's not a good location to achieve a full function syphon.
 
OP
OP
N

narkotix

New Member
View Badges
Joined
Sep 3, 2018
Messages
20
Reaction score
21
Rating - 0%
0   0   0
Unfortunately with the drains exposed like that within the display there is only so much you can do about the noise. They won't be able to clear trapped air as they are always letting air in. is there any way without it being too intrusive to run an elbow into an elbow to get the drain below the water level in the display? that can go a long way but may be difficult to restart when you do a water change. Otherwise you could look to see if there is an overflow box that you can mount or get made to fit your plumbing.

It might be - I can twist off that drain, put a T piece or elbow and then put the guard under water with a vent up top? (sorta like how it used to be)
 
OP
OP
N

narkotix

New Member
View Badges
Joined
Sep 3, 2018
Messages
20
Reaction score
21
Rating - 0%
0   0   0
Other than getting a custom made overflow, you may consider drilling a 1/4” hole in the top of each of the 90 degree elbows (the highest ones on the outside of the tank).

I was ultimately thinking doing that and gluing a valve with a hose pipe peeking up which would then closely emulate what it used to be like
 
OP
OP
N

narkotix

New Member
View Badges
Joined
Sep 3, 2018
Messages
20
Reaction score
21
Rating - 0%
0   0   0
Aquarium-Plumbing2.jpg

This is what you will have to create. This drawing is not how you will set it up, because your drains go through the back of the tank not the bottom.

This shows the idea of how to.

You will not need to replace the external 90 at the top with a T, just leave the existing 90.
Your tank glass will be vertical between the two 90's

I bought a tank that was plumbed this way, did not like it but made it work.
one line was the drain the other line the emergency to prevent overflow.

For the main drain put a 90 inside the tank with the strainer attached facing down, drill a hole in the top of the internal 90. NOT THE EXTERNAL 90.

The second drain (emergency overflow) you must turn the 90 facing up just above the natural water line but not above the top of the tank. do not drill a hole in this 90.This drain will always be dry unless there is a problem. Strainer optional.

The emergency drain valve should be wide open always.
The actual drain valve start at 1/2 open and adjust from there.

My other suggestion is to lower your drain valves if you wind up reworking the plumbing. That's not a good location to achieve a full function syphon.

Got it - I think that might work and I`ll head over to the LFS to buy an elbows and T piece.

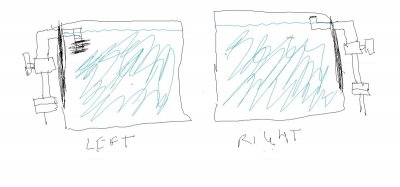
I've attached a crude illustration to reflect. I was thinking instead of the elbow for the left side, I would put a T piece, insert the strainer at the bottom and fabricate a cap with a hole (so it gives me the ability to clean easier).

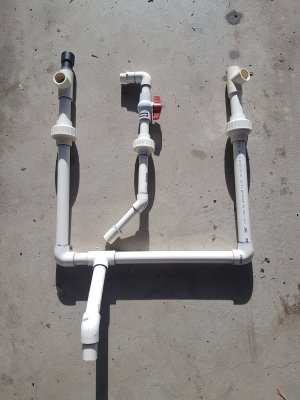
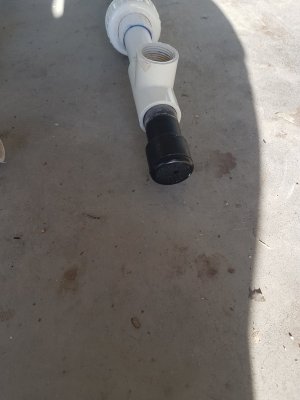
I've also attached pics of the original plumbing which i can revert to at worst case...Its missing the cap on one of the drains but I have it somewhere.

pic.jpg 20191121_074059.jpg 20191121_074109.jpg
 

Peace River

Thrive Master
View Badges
Joined
Apr 29, 2014
Messages
21,517
Reaction score
164,618
Location
USA
Rating - 100%
1   0   0
I was ultimately thinking doing that and gluing a valve with a hose pipe peeking up which would then closely emulate what it used to be like

Several options to move forward. When I had this type of system several years ago I just added a short piece of 1/4" airline tube in the 1/4" hole that would be drilled in the top of the elbow. Good luck with whatever direction you go!
 

K7BMG

Valuable Member
View Badges
Joined
Mar 13, 2018
Messages
1,981
Reaction score
1,898
Rating - 0%
0   0   0
Yes your crude drawings as you refer will work very well.
No need for a T. actually no glue is needed on the inside parts of the tank.
Dry fitted PVC and fittings will work, there is no pressure on drain lines.
This way they can be removed and cleaned as needed.

To make it silent the hole in the 90 must be under the water line. Its purpose is to allow the air to escape so it will syphon quicker.
If the hole can allow air you will have a sucking sound, and it will put micro-bubbles into the sump, and it will take longer for the line to get to full syphon.
 

K7BMG

Valuable Member
View Badges
Joined
Mar 13, 2018
Messages
1,981
Reaction score
1,898
Rating - 0%
0   0   0
Sorry I took a closer look at the pictures and no matter, this set up has two problems that I can see.

#1 The drain lines were drilled so high in the back of the tank that your water level will have to be right at the verge of overflowing the rim of the tank.

#2 That high also prevents the emergency drain to be used as I described to you, as the upward 90 will be higher than the rim of the tank rendering it useless.

You may want to consider doing some research and build a shadow overfill type box.
Click Here

In the YouTube search box type in
Durso
Animal overflow
Bean animal overflow
 
OP
OP
N

narkotix

New Member
View Badges
Joined
Sep 3, 2018
Messages
20
Reaction score
21
Rating - 0%
0   0   0
Sorry I took a closer look at the pictures and no matter, this set up has two problems that I can see.

#1 The drain lines were drilled so high in the back of the tank that your water level will have to be right at the verge of overflowing the rim of the tank.

#2 That high also prevents the emergency drain to be used as I described to you, as the upward 90 will be higher than the rim of the tank rendering it useless.

You may want to consider doing some research and build a shadow overfill type box.
Click Here

In the YouTube search box type in
Durso
Animal overflow
Bean animal overflow

The original piping seems to be a variant on an external Durso. I tried it once and it leaked via a seal on the outlet on the tank (which has since been remediated). I think i might revert to that as an experiment and if it quietens down ill remediate my current piping with that (i like the grey look :)).

Unfortunately i`m in Australia so a lot of the overflow/overfill over-the-counter options are non existant as most people buy red sea or aquaone tanks with everything in them.

Re waterline its still pretty high and I think even if I did have a 90 bending upwards it would still be a couple of cm's below the actual waterline...
 

K7BMG

Valuable Member
View Badges
Joined
Mar 13, 2018
Messages
1,981
Reaction score
1,898
Rating - 0%
0   0   0
Yes its very hard to tell in the pictures how everything is placed.
You don't have to buy a system as you can build one.
I am sure a visit to your local Bunnings or other hardware store will yeald you everything you could want.

I was just recommending the YouTube videos for learning and understanding of the various drains. You can modify yours using any of the methods.
I will be interested to see the final outcome and will follow along on your progress.
 
OP
OP
N

narkotix

New Member
View Badges
Joined
Sep 3, 2018
Messages
20
Reaction score
21
Rating - 0%
0   0   0
Yes its very hard to tell in the pictures how everything is placed.
You don't have to buy a system as you can build one.
I am sure a visit to your local Bunnings or other hardware store will yeald you everything you could want.

I was just recommending the YouTube videos for learning and understanding of the various drains. You can modify yours using any of the methods.
I will be interested to see the final outcome and will follow along on your progress.

Thank you - I`m going to consult with a local tank builder as well (who supposedly built the original tank) but I`ll keep you updated. Hopefully the original piping will fix the noise but if not ill drain the tank and keep my blocks alive in a bucket (the rock in the tank is dead so i've put in blocks from an established tank purchased from a LFS) and then go back to the drawing board - i've found an internal overflow template which i might be able to use.
 
OP
OP
N

narkotix

New Member
View Badges
Joined
Sep 3, 2018
Messages
20
Reaction score
21
Rating - 0%
0   0   0
Hi all,

Just a quick update. I fixed the problem with an external durso (emulating the original build) which worked well (much quieter) but in my stupidity in trying to fix the thing i cracked the glass near the return hole. I didn't notice it for a week until salt creep started to set in to an odd pattern (I noticed it Saturday morning). In the end I purchased another tank (and much bigger sump) with an internal overflow and spent all day and night modifying my very expensive stand and setting up the tank for the next day. All good in the end (even with the loss of internal space due to the overflow) and it is very quiet. I don't need an external refugium with a larger sump and my return pump is now silent.

An expensive weekend but I have a very understanding wife/chief financial officer :)

I`m going to fix the glass on the older tank with a new panel and will use it as my "holiday" tank with a HOB style overflow (not worried about floods as it will be in a garage at my parents house for when the fish need to be babysat! for a month)
 

Algae invading algae: Have you had unwanted algae in your good macroalgae?

  • I regularly have unwanted algae in my macroalgae.

    Votes: 39 34.2%
  • I occasionally have unwanted algae in my macroalgae.

    Votes: 23 20.2%
  • I rarely have unwanted algae in my macroalgae.

    Votes: 9 7.9%
  • I never have unwanted algae in my macroalgae.

    Votes: 8 7.0%
  • I don’t have macroalgae.

    Votes: 31 27.2%
  • Other.

    Votes: 4 3.5%
Back
Top