What size lumber to be used on stand?

BContos

Active Member
View Badges
Joined
Jan 3, 2022
Messages
283
Reaction score
142
Location
Texas
Rating - 0%
0   0   0
Hey guys!

Will be upgrading my 70 gallon DT to 150 gallon DT (60L X 24W X 24H) and trying to come up with a plan to build the wooden stand.

Bare with me- I have little knowledge in carpentry and will be having my husband build it but want to make sure we are using strong enough lumber.

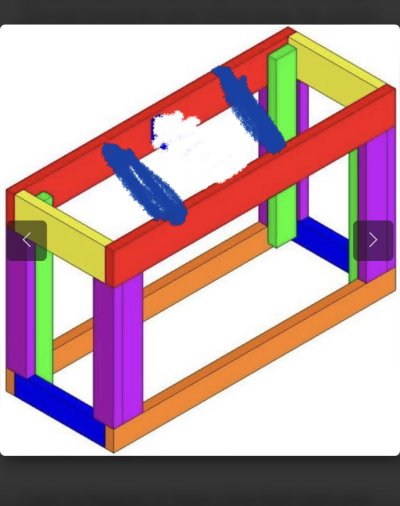
Would using 4X4's as the posts, 2X4's (or 2X6's) as the braces work? We are having a internal overflow centered in the back of the tank- how many cross braces do I need? I am assuming I do not need to have a solid wood counter-top and bracing works?

Anything special to take note of I need to do?
 

redfishbluefish

Stay Positive, Stay Productive
View Badges
Joined
Mar 22, 2012
Messages
11,706
Reaction score
25,731
Location
Sayreville, NJ
Rating - 0%
0   0   0
Don't use 4x4. If interested in a dimensional lumber stand, I'd suggest @RocketEngineer 's design....proven and used by many. The general rule is all 2x4's up to four foot long; 2x6 top frame for over 4 foot long. No center brace needed. Here's the plan:

Stand.JPG


I just so happen to have a five foot tank and here's the raw stand for my tank. I topped it with 3/4 plywood and I think 3/8 plywood skin.

OurStand.jpg
 

areefer01

2500 Club Member
View Badges
Joined
Jun 28, 2021
Messages
2,670
Reaction score
2,727
Location
Ca
Rating - 0%
0   0   0
You will want to use 2 x 4. Thread below on Rocket Engineer's stand that everyone uses. Tried and true. If the link gets removed do a search on DIY Stands Template and Calculator RocketEngineer. Best stand out there.


workhz

Valuable Member
View Badges
Joined
Apr 23, 2021
Messages
1,169
Reaction score
1,324
Location
nova
Rating - 0%
0   0   0
Not sure if anyone has addressed this, but on the top beams, do you go crown up or down? You could go crown up, and sand flat or assume the tank will press everything down or crown down and shim? Regardless, get really straight pieces of wood for the top and make sure you don't have pressure points.
 

RedoubtReef

Valuable Member
View Badges
Joined
Jul 4, 2016
Messages
1,176
Reaction score
1,248
Location
The Redoubt
Rating - 0%
0   0   0
Depending on how it's built and how much room you need under the stand, you could build it with just plywood and maybe some 2x2 framing. Take a look at how commercial stands are built and maybe design something from there. There are no 2x4s or even 2x2s for that matter in any of them. Most are MDF panels and cam lock fittings with a few dowels to line things up.
 

Lost in the Sauce

BANGERANG!!!!
View Badges
Joined
Feb 10, 2021
Messages
18,889
Reaction score
91,538
Location
Southern California
Rating - 0%
0   0   0
Don't use 4x4. If interested in a dimensional lumber stand, I'd suggest @RocketEngineer 's design....proven and used by many. The general rule is all 2x4's up to four foot long; 2x6 top frame for over 4 foot long. No center brace needed. Here's the plan:

Stand.JPG


I just so happen to have a five foot tank and here's the raw stand for my tank. I topped it with 3/4 plywood and I think 3/8 plywood skin.

OurStand.jpg
This is the way.

OP If your husband is more of a visual type, Joe DIY on YouTube does a step-by-step build for this exact style. This stand seriously can be built by anyone with a very small set of tools on hand. Circular saw, drill, tape measure. That's IT. Its also very strong. You can even skin it with plywood and add doors like I did.
PXL_20220825_024510217.jpg
 
OP
OP
BContos

BContos

Active Member
View Badges
Joined
Jan 3, 2022
Messages
283
Reaction score
142
Location
Texas
Rating - 0%
0   0   0
Don't use 4x4. If interested in a dimensional lumber stand, I'd suggest @RocketEngineer 's design....proven and used by many. The general rule is all 2x4's up to four foot long; 2x6 top frame for over 4 foot long. No center brace needed. Here's the plan:

Stand.JPG


I just so happen to have a five foot tank and here's the raw stand for my tank. I topped it with 3/4 plywood and I think 3/8 plywood skin.

OurStand.jpg

Okay so to clarify to make sure I understand because its a 5 foot tank-

Orange- 2X4
Blue- 2X4
Purple-2X4
Red- 2X6
Yellow- 2X6

I may have completely misunderstood! I am not good with this stuff lol

We will probably have one center brace on each side instead of one in the middle like the picture above since that would probably make plumbing hard for the internal overflow.

Thank yall for helping I really appreciate it!!
 

Lost in the Sauce

BANGERANG!!!!
View Badges
Joined
Feb 10, 2021
Messages
18,889
Reaction score
91,538
Location
Southern California
Rating - 0%
0   0   0
Okay so to clarify to make sure I understand because its a 5 foot tank-

Orange- 2X4
Blue- 2X4
Purple-2X4
Red- 2X6
Yellow- 2X6

I may have completely misunderstood! I am not good with this stuff lol

We will probably have one center brace on each side instead of one in the middle like the picture above since that would probably make plumbing hard for the internal overflow.

Thank yall for helping I really appreciate it!!
That's correct. Red and yellow are both 2x6s in that diagram . If you were going to bypass the center brace, Do two instead 1/3 from each end.

Here's a video being done with 2x4s
 

RiptideAquaculture

10K Club member
View Badges
Joined
Aug 5, 2021
Messages
10,479
Reaction score
16,135
Location
Florida
Rating - 100%
10   0   0
Don't use 4x4. If interested in a dimensional lumber stand, I'd suggest @RocketEngineer 's design....proven and used by many. The general rule is all 2x4's up to four foot long; 2x6 top frame for over 4 foot long. No center brace needed. Here's the plan:

Stand.JPG


I just so happen to have a five foot tank and here's the raw stand for my tank. I topped it with 3/4 plywood and I think 3/8 plywood skin.

OurStand.jpg
top notch design!
Meme Reaction GIF
 
OP
OP
BContos

BContos

Active Member
View Badges
Joined
Jan 3, 2022
Messages
283
Reaction score
142
Location
Texas
Rating - 0%
0   0   0
That's correct. Red and yellow are both 2x6s in that diagram . If you were going to bypass the center brace, Do two instead 1/3 from each end.

Here's a video being done with 2x4s

Like this correct?
 

Attachments

  • CFC9CFF4-ABDA-467F-90E5-C9D44598B65C.jpeg
    CFC9CFF4-ABDA-467F-90E5-C9D44598B65C.jpeg
    103.2 KB · Views: 44

H2OhWhoa

New Member
View Badges
Joined
Jul 3, 2022
Messages
14
Reaction score
2
Location
Hudson Valley, NY
Rating - 0%
0   0   0
This is the way.

OP If your husband is more of a visual type, Joe DIY on YouTube does a step-by-step build for this exact style. This stand seriously can be built by anyone with a very small set of tools on hand. Circular saw, drill, tape measure. That's IT. Its also very strong. You can even skin it with plywood and add doors like I did.
PXL_20220825_024510217.jpg
This is beautiful! I feel like no one goes into how to add the doors. Yes, the box is relatively easy, but to get that finished look I'm not finding a lot of advice. Do you have any tips or advice for how to get a really finished look? Was it tricky adding the doors? Did you buy those doors somewhereor make them? I see most people add moulding towards the top of the stand, like a crown moulding, then also around the bottom, and also at the corners (where the front meets the sides). Yours looks really tight, neat, and tidy without!
 

Lost in the Sauce

BANGERANG!!!!
View Badges
Joined
Feb 10, 2021
Messages
18,889
Reaction score
91,538
Location
Southern California
Rating - 0%
0   0   0
This is beautiful! I feel like no one goes into how to add the doors. Yes, the box is relatively easy, but to get that finished look I'm not finding a lot of advice. Do you have any tips or advice for how to get a really finished look? Was it tricky adding the doors? Did you buy those doors somewhereor make them? I see most people add moulding towards the top of the stand, like a crown moulding, then also around the bottom, and also at the corners (where the front meets the sides). Yours looks really tight, neat, and tidy without!
Thank you for the compliments.

I designed my kitchen in CAD including the door style which is a moulded take on shaker.

Outsourced the kitchen to the pros, but I built the doors to match the cabinet doors.

So to make this style of stand look finished, it needs to be skinned in my opinion. I skinned mine with cabinet grade plywood, used Bondo for all gaps and filling and sanded flat up to 180 before painting.

The new skin is essentially a cabinet face frame and you can buy cabinet hinges that attach to the face frame to mount the doors to.
 

H2OhWhoa

New Member
View Badges
Joined
Jul 3, 2022
Messages
14
Reaction score
2
Location
Hudson Valley, NY
Rating - 0%
0   0   0
Thank you for the compliments.

I designed my kitchen in CAD including the door style which is a moulded take on shaker.

Outsourced the kitchen to the pros, but I built the doors to match the cabinet doors.

So to make this style of stand look finished, it needs to be skinned in my opinion. I skinned mine with cabinet grade plywood, used Bondo for all gaps and filling and sanded flat up to 180 before painting.

The new skin is essentially a cabinet face frame and you can buy cabinet hinges that attach to the face frame to mount the doors to.
Ok, so add a piece of cabinet grade plywood to the front and then 1 each to the sides. Have to first cut out holes for the cabinet door openings. If I'm going 72" i imagine 2 holes so that there's a vertical piece of the plywood in the center of the frame to attach the middle doors too.

Then Bondo (not caulk) the seams. Then paint. Then add the cabinet doors with hinges.

It does not sound that hard when I hear you summarize it!
 

Lost in the Sauce

BANGERANG!!!!
View Badges
Joined
Feb 10, 2021
Messages
18,889
Reaction score
91,538
Location
Southern California
Rating - 0%
0   0   0
Ok, so add a piece of cabinet grade plywood to the front and then 1 each to the sides. Have to first cut out holes for the cabinet door openings. If I'm going 72" i imagine 2 holes so that there's a vertical piece of the plywood in the center of the frame to attach the middle doors too.

Then Bondo (not caulk) the seams. Then paint. Then add the cabinet doors with hinges.

It does not sound that hard when I hear you summarize it!
It really is about that simple.

How are you planning on building/buying the doors?

If you are planning on buying them (HD and Lowes both sell cabinet doors in different sizes) I would identity the size you want First, then cut your openings to match. I went with 1/2" overlay on all sides, 3/4" overlay on the hinge side+ 1/8" gap.
 

RedoubtReef

Valuable Member
View Badges
Joined
Jul 4, 2016
Messages
1,176
Reaction score
1,248
Location
The Redoubt
Rating - 0%
0   0   0
On the plywood, just because it is 'cabinet' grade', the quality can vary. I recently built a stand from 2 sheets of 'cabinet grade' rustic Hickory. The veneer on the pieces from one of those sheets began to peel off the substrate as I was getting ready to stain. The vendor was really great about it and replaced the plywood with 2 new sheets of a higher quality marine plywood. The lesson here is do not go cheap on the plywood especially if you are planning on using stain. Much of the plywood around these days is Chicomm junk.
 

Reefing threads: Do you wear gear from reef brands?

  • I wear reef gear everywhere.

    Votes: 17 13.6%
  • I wear reef gear primarily at fish events and my LFS.

    Votes: 9 7.2%
  • I wear reef gear primarily for water changes and tank maintenance.

    Votes: 1 0.8%
  • I wear reef gear primarily to relax where I live.

    Votes: 19 15.2%
  • I don’t wear gear from reef brands.

    Votes: 70 56.0%
  • Other.

    Votes: 9 7.2%
Back
Top