well I actually built this tank months ago. However times have been busy, and I didnt have all the time in the world to document it, so I will include as many pictures as I have. If anyone has questions about something or a process that wasnt documented w/ pics just post it up and I will try my best to answer it. So I will post a few things each day, instead of post overload all at once.

Navigation
Install the app
How to install the app on iOS
Follow along with the video below to see how to install our site as a web app on your home screen.
Note: This feature may not be available in some browsers.
More options
You are using an out of date browser. It may not display this or other websites correctly.
You should upgrade or use an alternative browser.
You should upgrade or use an alternative browser.
220 build Foam and rock aquascaping w/ tons of corals
- Thread starter exoticcoralfrags
- Start date
- Tagged users None


OP
OP
First off let me say, I looked for a reef ready tank for months. I wanted either a 180 or 220, but didnt want the overflows in the corners that you could see directly into. Not that those tanks arent great or you cant cover the overflow w/ something, but both sides are viewable. one is viewable from my entry way, and the other side is viewable from my main hallway, and I just didnt want to be staring into an overflow each time I walked by. So I had to drive 3 hours away to find the tank I wanted in Dallas.
Then started the planning. I wanted to add a few outlets to the existing wall. I wanted to tile where the new tank would go, and most of all tons of research on the Foam and Rock construction. I have alwasy wanted to create shapes that arent possible by just stacking rock. spiraling ledges and huge pillars. I also wanted to create a rock wall on the back side, w/ ledges and a big cave. I looked into the drilling and pinning of rocks. Some people use 3/8" acrylic rod, or plastic all thread, I have even seen PVC being used. I think they all have their place in aquascaping, but not a perfect fit for every single structure. Not to mention I learned from experience that acrylic and plastic rod bend and are too flexible for my taste, and drilling for PVC, you might as well be setting up an oil rig w/ the size drill bit you have to use, and you have to be some type of freaking ninja to not crumble every single rock you drill w/ the gigantic drill bit you have to use.
So it seamed that the Foam and Rock technique would be most appealing, however is it safe for corals fish and inverts???????? I watched a few build threads for months just to see if something would leach into the water after time making things unstable. However few of these build threadds I was watching had alot of coral. That was the one problem, I have an over abundance lol, "like that is ever a problem when you are an addict"
Keep following this post, and in the end result you can see how corals, fish, and inverts fare using this technique.
OP
OP
Prep work
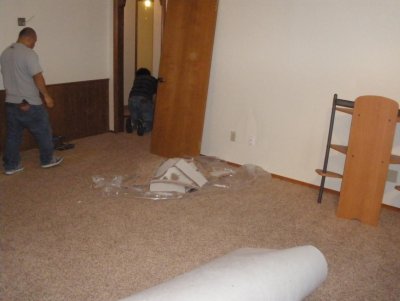
So the tank ended up sitting in the garage for months, while I planned and did the prep work. :cry:
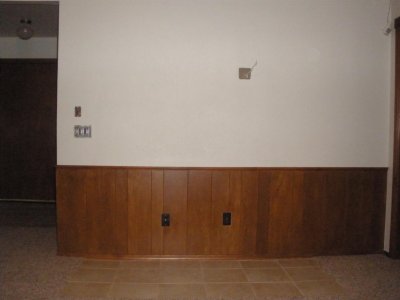
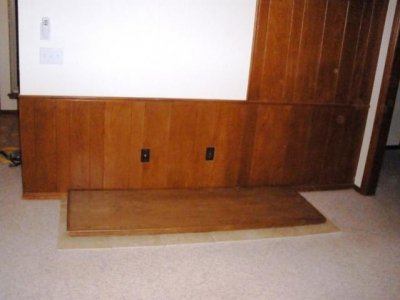
I had to tear out a wooden panle off the wall where the tank would go, it stuck out like a sore thumb and I ave no clue what its purpose was since it wasnt very attractive.
then I had to repair some drywall where it was, texture, add a few outlets, and paint to match.
So the tank ended up sitting in the garage for months, while I planned and did the prep work. :cry:
I had to tear out a wooden panle off the wall where the tank would go, it stuck out like a sore thumb and I ave no clue what its purpose was since it wasnt very attractive.
then I had to repair some drywall where it was, texture, add a few outlets, and paint to match.
Attachments

Ok, I am following lol.
OP
OP
OP
OP
Foam Aquascaping
OK, so let me say how disappointed I am. I had taken about 100 pics of the foam and rock aquascaping process, however after I took all those pics I filled up my 1gb SD card, so I had to purchase another to shoot corals. Now I cant find that SD to save my life!!!!!
that is so upsetting, I wanted to document it in a build thread so bad. However I have a few basic pics from a foam build I did for someone that I will include. Plus The 220 is becoming 2 small and it may end up being a show display in a shop
If that all takes place I will be doing a new build thread on a custom tank, more to come on that topic.

OP
OP
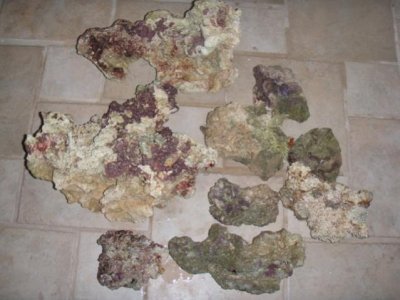
So it all begins w/ rock. you want to pick your pieces based on shape and over all appeal. I like to make crazy structures that you are unable to do by just drilling and pinning rock. I like giant structures, w/ giant ledges and arches. Literally impossible to tackle until Pond foam and fiberglass resin were introduced into Aquascaping.
Attachments
revhtree
Owner Administrator
View Badges
Staff member
Super Moderator
Reef Squad
Partner Member 2024
Excellence Award
RGB
Photo of the Month
Article Contributor
R2R TV Featured
Hospitality Award
Article Administrator
Black Friday Sponsor
Partner Sponsor 2023
Industry Professional
My Aquarium Showcase
- Joined
- May 8, 2006
- Messages
- 47,866
- Reaction score
- 88,080
I am following as well!
OP
OP
Copyright infringement!!!! LOL
So, since I cant find the photos of the build I did on the 220, and wanted to give a few step by step pics and pointers, I will use some pics from Daniels bowfront build I took while I was building his rock wall and foam and rock structures. I hope we can still be friends Daniel! LOL
So the first thing I like to do Is make an outline of the actual inside dimensions of the aquarium, including overflows using painters tape. This gives you the idea of how it will look sitting in the tank. Trust me, building a heavy rock structure, then carrying it inside the house multiple hundreds of times while dropping sand all over the tile and carpet does NOT make the wife a happy camper. So keeping the mess in the garage is totally necessary
Attachments

OP
OP
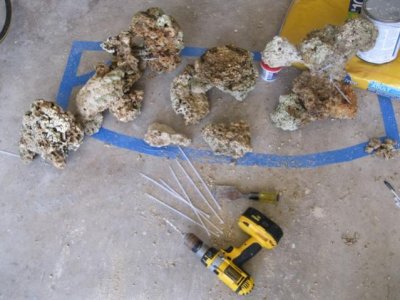
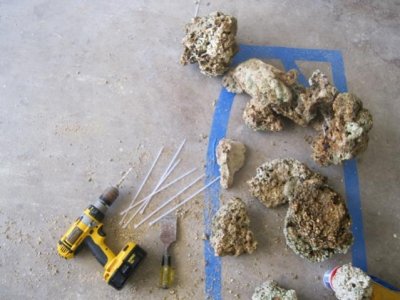
step 2
the next step is figuring out what configuration you want your final structures to end up looking like. I am not real creative so this is my most time consuming step. I stack them, then sit on a bucket looking at it for an hour, then restack it and so on lol.
Once you have an idea of how you want the base of the structures to be, then you drill tiny pilot holes, just big enough for Zip ties. The idea is to hold the rocks in place any way necessary just long enough for the pond foam to set up. I use anything and everything that is at my disposal Keep in mind you cant build the entire vertical structure at once. You have to build the base and keep working your way up.
so after you have drilled your pilot holes for the zip ties to hold the rocks together temporarily, set the rock out in the sun to dry for a day or 2. I suggest drilling the rock while its wet. it drills much easier than dry rock and a lot less crumbling and breaking. The drilling is a fine art, not too much pressure, and dont drill where there is a fault line of sorts where an entire third of the rock will instantly break cleanly off. I have used every type of drill bit imagineable. and the best in my oppinion for this is the Dewalt drill bits w/ the pilot starting tip.
the next step is figuring out what configuration you want your final structures to end up looking like. I am not real creative so this is my most time consuming step. I stack them, then sit on a bucket looking at it for an hour, then restack it and so on lol.
Once you have an idea of how you want the base of the structures to be, then you drill tiny pilot holes, just big enough for Zip ties. The idea is to hold the rocks in place any way necessary just long enough for the pond foam to set up. I use anything and everything that is at my disposal
Keep in mind you cant build the entire vertical structure at once. You have to build the base and keep working your way up.so after you have drilled your pilot holes for the zip ties to hold the rocks together temporarily, set the rock out in the sun to dry for a day or 2. I suggest drilling the rock while its wet. it drills much easier than dry rock and a lot less crumbling and breaking. The drilling is a fine art, not too much pressure, and dont drill where there is a fault line of sorts where an entire third of the rock will instantly break cleanly off. I have used every type of drill bit imagineable. and the best in my oppinion for this is the Dewalt drill bits w/ the pilot starting tip.
OP
OP
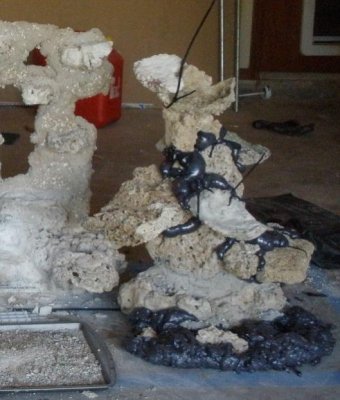
Step 3
Next is the foaming portion. Again I cant document this perfectly the way I want. This picture is of the right pillar in my 220, and it is already halfway constructed. Hopefully you can get the point, but if there are any questions, shoot.
I like to stack the dry rock in the precise way I drilled it. Then zip tie it together. you may have to add something additional to help support the heavy rocks, paint cans, bags of dog food lol, etc. the point is to brace the 2 pieces of rock together in a tight fit, so you can put the foam in the gaps, just long enough for it to set up. Most of the time about 6 hours later the foam will be hardened, and it is strong enough to hold the rocks in place. in some cases w/ super heavy rocks leave the dog food bag there until you throw resin on it, then it is definetely strong enough.
the other pic is of daniels build, I just had to verify that dog food bags and paint cans really are useable and make you feel like MacGyver when its all said and done LOL
Attachments

So, since I cant find the photos of the build I did on the 220, and wanted to give a few step by step pics and pointers, I will use some pics from Daniels bowfront build I took while I was building his rock wall and foam and rock structures. I hope we can still be friends Daniel! LOL
So the first thing I like to do Is make an outline of the actual inside dimensions of the aquarium, including overflows using painters tape. This gives you the idea of how it will look sitting in the tank. Trust me, building a heavy rock structure, then carrying it inside the house multiple hundreds of times while dropping sand all over the tile and carpet does NOT make the wife a happy camper. So keeping the mess in the garage is totally necessary
No worries, it will just cost you two custom made sumps from Regal Plastics.

I have seen this tank in person. The shelves he made for coral are really cool!
Above is my rock wall on a 38g cube. I have used more rock than foam so I don't have to worry about it floating. I have ripped the smooth surface of the foam with needle-nose plyers leaving a rough/irregular surface (middle photo). I then epoxy and sand the foam for the finished product in the 3rd photo. I have used the foam rock to hide 2 pvc pipes (one hooked up to a pump to drain water directly into a bathroom sink drain) and the second is an additional return used to return water to display tank from GFO/Carbon reactors AND to add new salt water from a pump in garage for water changes. I want to hide as much as I can.

Not sure if you are asking me or Exoticcoralfrags. But I used the sugar size aragonite substrate. I think it conforms to the base rock and foam better. I have recently read on ReefCentral of another "foam rock wall" builder whose tank crashed after 4 years. He said his foam was saturated with water and was not sure if it contributed to his crash. As a result, I have tried to coat all foam with 2-3 coats of epoxy to try and seal the foam from absorbing water. I have done this both front and back and whereever I could see any foam. Hoping this will do the job.
Similar threads
- Replies
- 21
- Views
- 485
- Replies
- 29
- Views
- 336
-
- Poll
- Replies
- 36
- Views
- 1,256
New Posts
-
California Dry Rock Drygoods Aquascaped rock structures
- Latest: WrasseyReefer
-

-
 AIO Build steveschuergers 90 gallon Goni heavy mixed reef.
- Latest: Reefing_addiction
-


