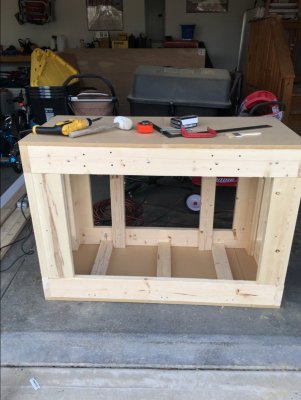
So this is my first saltwater tank. I built the stand to accommodate a 40breeder DIY sump. I wasn’t satisfied with limiting my sump size to the footprint of the display tank. Also the quality of the commercially available ones in my lfs seemed questionable. Any suggestions and constructive criticism are welcome. I had no input as to the color. I can forward comments on to my wife.
Got started like like every other build on YouTube

Because I wanted unobstructed access to the sump I opted for 2x6s and because I’m nervous I laminated two together in the front with lag bolts. (the rear has two supports)

Continued to add 2x6s for corner support as well as 2x4s for support in the rear and the top was made ready but not permanently added yet for access issues as I continue

Let’s make sure this thing fits

The floor and top were secured in place
At this point the framing is mostly done. I then added a top to bottom interior partition on the left using 1/4 inch plywood This will serve as a controller cabinet. At the same time I added the paneling and trim the outside

Cut the door openings

Added framing to the portions of the paneling I cut out and added hardware to make doors.


Painted the inside with a white enamel and caulked the joints to create a water tight seal (coat#1)

(Coat#2)

Painted and caulked the outside

Managed to move it inside (kinda heavy) and put the tank on top

Hey it fits!

Light it up with a led shop light from the local hardware store

Started on my rockscape. I’d like to add one or two more smaller pieces but this is the basic idea

Baffles are going in now.

Installing the baffles was trickier than I expected and to be honest I should have put more time into that process. I have one more to install as soon as I can remove the dvds.
Added
That’s where I stand currently (sorry bad pun). Tank is drilled for an eshopps overflow box and a 3/4 inch return which are in place. I will plumb it next once the silicone on the baffles sets up. It’s been a slow process but I’m enjoying it. I just wish the cash flow could support my desire to get water in it faster. Oh well, I will update as I go. Thanks

Got started like like every other build on YouTube
Because I wanted unobstructed access to the sump I opted for 2x6s and because I’m nervous I laminated two together in the front with lag bolts. (the rear has two supports)
Continued to add 2x6s for corner support as well as 2x4s for support in the rear and the top was made ready but not permanently added yet for access issues as I continue
Let’s make sure this thing fits
The floor and top were secured in place

At this point the framing is mostly done. I then added a top to bottom interior partition on the left using 1/4 inch plywood This will serve as a controller cabinet. At the same time I added the paneling and trim the outside
Cut the door openings
Added framing to the portions of the paneling I cut out and added hardware to make doors.
Painted the inside with a white enamel and caulked the joints to create a water tight seal (coat#1)
(Coat#2)
Painted and caulked the outside
Managed to move it inside (kinda heavy) and put the tank on top
Hey it fits!
Light it up with a led shop light from the local hardware store
Started on my rockscape. I’d like to add one or two more smaller pieces but this is the basic idea
Baffles are going in now.
Installing the baffles was trickier than I expected and to be honest I should have put more time into that process. I have one more to install as soon as I can remove the dvds.
Added
That’s where I stand currently (sorry bad pun). Tank is drilled for an eshopps overflow box and a 3/4 inch return which are in place. I will plumb it next once the silicone on the baffles sets up. It’s been a slow process but I’m enjoying it. I just wish the cash flow could support my desire to get water in it faster. Oh well, I will update as I go. Thanks


