Alaskans Big System Build in detail

Captcrunch8181

Community Member
View Badges
Joined
Jan 31, 2021
Messages
36
Reaction score
36
Location
Kenai
Rating - 0%
0   0   0

🧵 Post #1 – Starting the Journey​


📅 Project Kickoff​


Hey Reef2Reef!


After years of planning and obsessing over reef gear, I’m finally kicking off the dream build — a 210-gallon peninsula-style SPS tank, packed with automation, Hydros control, and custom features from the ground up.


This thread will document the full journey: from modifying the tank and plumbing in the overflow, building the oak stand and cabinetry, wiring up my Kraken and IV testers, and eventually stocking with high-end coral and fish. I hope this helps others planning a big build like mine!


🧱 Tank Specs​


  • Display Tank: 210-gallon Aqueon (peninsula layout – 72” x 24” x 29”)
  • Overflow: Fiji Cube LoPro External Overflow Box (mounted on the side panel)
  • Lighting: 4x Ecotech Radion XR30 G3
  • Return Pumps: Ecotech Vectra L2 & S2 (alternating tide flow)
  • Controller System: Hydros Kraken, X4, Launch, IV Testers
  • Power Backup: Kraken + Ecotech Battery Backup
  • Filtration: Red Sea 900 Skimmer, Red Sea 1200 Filter Roller, UV planned, possible ozone
  • Mixing Station: 200G RODI + 200G Saltwater (fully automated)


🛠️ Installing the Side Overflow (Fiji Cube LoPro)​


Since this is a peninsula tank, I mounted the Fiji Cube LoPro Overflow on the side panel (closest to the wall). That gives the display a true walkaround look while keeping the plumbing hidden from view.


Why I chose the Fiji Cube LoPro:​


  • Super slim inside the tank (clean look from all angles)
  • Great flow rating (up to 1600 GPH)
  • Bean Animal compatible
  • Perfect for side-mounted peninsula setups


🔍 Drilling the Side Panel (Tempered Glass Check)​


Before drilling, I made sure the glass was not tempered using a trick many reefers swear by:


✅ I used polarized sunglasses and the LCD screen on my phone to check for stress patterns. If the panel had been tempered, I would’ve seen checkerboarding or black spots — but the side panel came back clean.


Once confirmed, I:


  • Measured the overflow placement
  • Marked and taped off the drill locations
  • Used a 60mm diamond bit and water for cooling
  • Took it slow and steady for a clean cut

💡 Tip: If you’re nervous about drilling, test on scrap glass or watch Fiji Cube’s install videos. Prep is everything!


🔧 Why I Drilled Before Building the Stand​


Before building the stand or cabinetry, I decided to drill the tank — and here’s why:


💡 “If the glass cracked or shattered during drilling, I didn’t want to be out the cost and time of building a custom stand for a ruined tank.”


This gave me peace of mind and let me move forward confidently with the rest of the build.


✅ Success!​


All three holes drilled safely with no cracks or stress marks. The Fiji Cube LoPro overflow box fit perfectly and aligned clean. This step was a huge relief and now I know the tank is solid and ready for plumbing.


📸 Pics of the drilling process below!


📸 Drilling the Overflow – Photo Recap​


Here’s a quick visual look at how it all went down:


🛠️ Cutting into the Frame Trim​


![Insert Image 1: Cutting the trim with oscillating tool]
Before drilling, I used an oscillating tool to remove a section of the black trim so the bulkheads would seat flush.
Measure twice, cut once.


🕳️ Triple Hole Success​


![Insert Image 2: Holes drilled clean through]
All three holes came out super clean! I used a 60mm diamond hole saw and kept a steady water stream for cooling.


💬 Pro Tip: I drilled sideways (with the tank on its side) so the water could rinse away the glass dust. That keeps the hole saw from clogging, binding, or cracking the glass — something a lot of folks miss when drilling vertically. It worked great.


🧱 Fiji Cube LoPro Overflow Installed​


![Insert Image 3: Dry fit of overflow box]
Final dry fit — the overflow box is mounted, level, and ready for plumbing. The wide design and triple drains will be perfect for a Bean Animal system.


Let me know what you think! Up next: plumbing, the stand build, and wiring up the Hydros system 🔧⚡

20250413_153911.jpg 20250413_155146.jpg 20250413_154327.jpg
 

Gumbies R Us

God, Bouldering, and Reefing
View Badges
Joined
Nov 10, 2022
Messages
28,984
Reaction score
51,383
Location
North Georgia
Rating - 0%
0   0   0
Thanks for providing details and photos of how you are doing your tank! This can be very beneficial to others who want a similar tank!
 
OP
OP
Captcrunch8181

Captcrunch8181

Community Member
View Badges
Joined
Jan 31, 2021
Messages
36
Reaction score
36
Location
Kenai
Rating - 0%
0   0   0

🧵 Post #2 – Building the Cabinet Base​


📅 Stand Construction Begins


Now that the overflow is drilled and the tank is ready, it’s time to start on the stand — and I’m doing it a little differently than most. I’ve built stands like this before, but I don’t think I’ve seen many reefers build them quite this way.


I’m using 3/4" hardwood oak plywood and solid oak for a clean, furniture-grade look that will match the rest of my space.


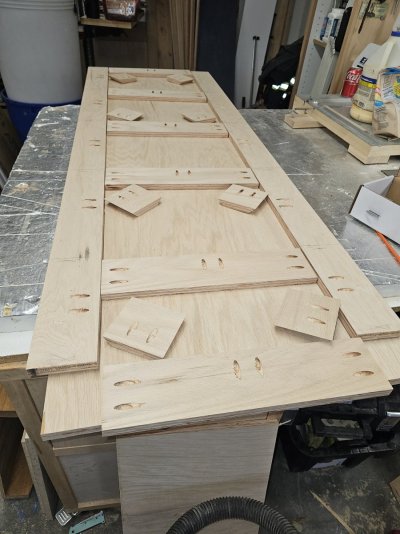
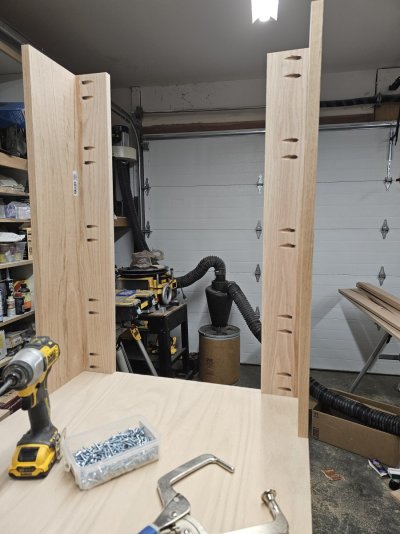
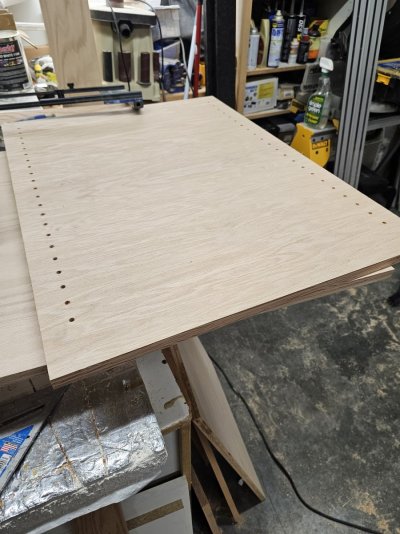
🔨 Stand Design Overview​


Just like kitchen cabinets, I build a recessed toe-kick base for comfort and aesthetics. That means the base is smaller than the main body of the stand — recessed 3” in from each side and 4” tall to give your toes space when standing close to the tank. It also gives a nice “floating” look once finished.


The tank is a peninsula, so I extended the base longer on the wall side to cover the overflow and plumbing for a cleaner presentation from all viewing angles.


📏 Sizing & Layout​


Here’s how I calculated and cut the base:


  • Tank Dimensions: 72" long × 24-1/2" wide
  • Base Plate: 80" long × 24-3/4" wide (added 1/8" on each side for wiggle room)
  • Base Recess: 3" inset on all sides
  • Wall-Side Extension: extra 8" to hide overflow and plumbing

Base Frame Cuts:​


  • 2x Rails: 4" × 74"
  • 6x Stringers: 4" × 18-3/4"


🧰 Assembly​


I used:


  • Pocket hole screws (with a Kreg Jig)
  • Titebond III wood glue for strength and moisture resistance

I assembled the frame first, then drilled pocket holes to attach the base plate (which the cabinet will sit on). Everything went together solid and square, and I’m super happy with how it turned out so far.


That’s where I wrapped up for the night — next step will be building the cabinet box itself and framing out the peninsula display.


📐 Once the cabinet is done, I’ll post a full cut list of all plywood and solid oak parts I used. Hopefully it’ll help someone else build something similar!
 
OP
OP
Captcrunch8181

Captcrunch8181

Community Member
View Badges
Joined
Jan 31, 2021
Messages
36
Reaction score
36
Location
Kenai
Rating - 0%
0   0   0
here is a few pics to help visualize what I am talking about.
 

Attachments

  • 20250416_175419.jpg
    20250416_175419.jpg
    207.5 KB · Views: 44
  • 20250416_181202.jpg
    20250416_181202.jpg
    207.2 KB · Views: 45
  • 20250416_191803.jpg
    20250416_191803.jpg
    253.7 KB · Views: 37
  • 20250417_190016.jpg
    20250417_190016.jpg
    191.1 KB · Views: 53
  • 20250417_190008.jpg
    20250417_190008.jpg
    232.6 KB · Views: 45
OP
OP
Captcrunch8181

Captcrunch8181

Community Member
View Badges
Joined
Jan 31, 2021
Messages
36
Reaction score
36
Location
Kenai
Rating - 0%
0   0   0

🧵 Post #3 – Planning the Cabinet Interior: Electrical & Dosing Compartments​


📅 Thinking Ahead


Hey everyone!
Tonight I got a lot of planning done, and some building too. I spent time looking at all my components and figuring out the best way to layout the interior of the cabinet to make things clean, functional, and future-proof. My main priority with this build is to keep electrical gear safely away from water while still making it easy to access and service.


⚡ Electrical Compartment – Near the Wall​


In my last build, I put the electrical section on the side farthest from the wall — which seemed smart at the time. But when I started routing wires back up to the tank (which sits closest to the wall due to overflow/piping), the wire runs were longer than ideal.


This time, I’m building a dedicated electrical cabinet at the back corner, near the wall, with its own door. This keeps power and controllers close to the plumbing and overflow while isolating it from the sump area.


💉 Dosing + Hydros Compartment – Opposite Side​


On the opposite end (furthest from the wall), I built a second compartment that will be used for dosing pumps, dosing containers, and likely my Hydros IV. I’m also planning to install a Hydros X10 here.


This will:


  • Keep dosing gear out of the sump space
  • Make container swaps easier
  • Look much cleaner overall

I think this separation of spaces is going to be a huge upgrade in usability.


🧱 Cabinet Structure & Support​


Some people might worry that the 3" overhang on the stand (due to the recessed toe-kick design) might weaken the structure. But here’s how I thought through it:


Looking from the top down, the back wall and sides of each compartment create a strong C-channel. This distributes the load over the full base plate, which is more than capable of supporting the tank’s weight. I'm confident this will hold up long term.


Once again, I’m using pocket hole screws and Titebond III wood glue. I’ve always found pocket holes to be great for pulling joints tight while the glue sets — and the strength is impressive if everything is clamped properly.


🧰 Adjustable Shelving Trick​


I used a Rockler shelf drill jig to pre-drill holes for adjustable shelves in the dosing compartment. These jigs are super slick and give you that clean, pro-built cabinet look. Just a few tips:


  • Drill before gluing/assembly — I forgot this once and had to drill one side after assembly (it still works, but spacing was slightly off).
  • Label the top/bottom of each panel — to keep all your holes aligned.
  • Drill the back panel too if the compartment is small — it gives the shelves extra support.

I’ve built dozens of cabinets and have still made the mistake of flipping a side panel upside down before final assembly. Always double-check — because you don’t want tilted shelves after it’s all glued and screwed.


📸 I’ll have photos of both compartments in the next post, along with how the cabinet frame is shaping up. Thanks again for following along — more to come soon!
 

Attachments

  • 20250418_181204.jpg
    20250418_181204.jpg
    188.8 KB · Views: 38
  • 20250418_182623.jpg
    20250418_182623.jpg
    177.6 KB · Views: 37
  • 20250418_182638.jpg
    20250418_182638.jpg
    219.6 KB · Views: 41
  • 20250418_183954.jpg
    20250418_183954.jpg
    282.7 KB · Views: 37
  • 20250418_190425.jpg
    20250418_190425.jpg
    235.8 KB · Views: 39
  • 20250418_191122.jpg
    20250418_191122.jpg
    218.1 KB · Views: 37
  • 20250418_192014.jpg
    20250418_192014.jpg
    194.5 KB · Views: 36
  • 20250418_200204.jpg
    20250418_200204.jpg
    209.2 KB · Views: 32
  • 20250418_200216.jpg
    20250418_200216.jpg
    214.1 KB · Views: 43
OP
OP
Captcrunch8181

Captcrunch8181

Community Member
View Badges
Joined
Jan 31, 2021
Messages
36
Reaction score
36
Location
Kenai
Rating - 0%
0   0   0

🧵 Post #4 – Main Support Walls & Electrical Layout​


📅 Today’s Progress


What’s up reefers,
Today I made some big moves toward finishing the main support structure of the stand. This section will carry most of the tank’s weight and also house the majority of the electrical systems — so clean layout and long-term planning are key here.


⚡ Dry Electrical Compartment & Controllers​


One of the goals I’ve had from the start is keeping all electrical components dry and organized. My last setup wasn’t great in that department — wires everywhere, power bricks stacked in corners — and I’m determined to do better this time.


For this build, I’m designing a dedicated dry cabinet inside the stand that will be specifically for electrical gear. This area will eventually house:


  • A custom controllers (to mount all Hydros, Redsea and Ecotech components)
  • Ventilation fan (to pull hot air out)
  • Space for clean wiring and future upgrades

The controller board will allow me to hide wires as much as possible, while also keeping things accessible for maintenance. I want this thing to look sharp when the doors are open, not like a spaghetti factory exploded in there.


🧠 Thoughts on Hydros Gear​


Most of my system is running on Hydros, which I’ve used in the past and been pretty happy with.


That said, if you’ve ever tried to mount Hydros controllers cleanly, you know the struggle. Every port is on the front face — no side or bottom ports — which makes cable management a bit of a pain.


I love the look of the Hydros modules — clear casings, indicator lights, rugged feel — but I wish they’d think more about wiring layout for clean installs. Still, I’ll do the best with what I’ve got and make it work.


🔌 The Kraken: Goodbye Power Bricks​


Super excited to integrate the Hydros Kraken in this system. If you’re not familiar, the Kraken is a massive industrial DC power supply that replaces the need for dozens of AC-to-DC bricks.


On a build this size, traditional power bricks can overrun your outlets and create heat and mess. With the Kraken, I can:


  • Power most of my equipment directly
  • Save tons of outlet space on my XP8
  • Cut down heat, clutter, and failure points

This thing is a game-changer for large reef systems.


🪚 Building the Wall Side of the Stand​


Today I cut the three main plywood panels that will form the wall-facing side of my peninsula stand. Just like before, I used:


  • ¾” hardwood oak plywood
  • Pocket hole screws + Titebond III wood glue
  • Kreg jig for all pocket holes

🛠️ Tip: I always try to drill pocket holes on the hidden sides of panels. If they’ll be visible, Kreg makes wood filler plugs you can glue in and sand flush for a cleaner look.


Before assembling the panels, I cut out openings for piping and wiring. Trust me, it’s way easier to make these cuts before things are glued up. Saves a lot of frustration down the road.


💨 Planning Ventilation​


I’m also planning to install a cooling fan to vent warm air from the electrical cabinet. Even with passive ventilation, things can get toasty when you start stacking up equipment — especially with enclosed cabinetry.


🧱 That’s a Wrap for Today​


That’s as far as I got tonight. The foundation is starting to come together, and I’m pumped to keep rolling.


Thanks for following along — and if you have questions about the build, fire away!
 
OP
OP
Captcrunch8181

Captcrunch8181

Community Member
View Badges
Joined
Jan 31, 2021
Messages
36
Reaction score
36
Location
Kenai
Rating - 0%
0   0   0
🧱 Post #5 – Cabinet Walls Up & Controller Board Prep

Happy Easter (and shoutout to all the candy-fueled DIYers out there)!
Today I made some solid progress on the stand — even if it didn’t look like a ton got done, it was a bunch of important stuff.


---

🧰 Gluing & Pocket-Screwing the Vertical Walls

First job of the day was locking the vertical plywood carcass panels down to the cabinet base. This is a step where taking your time really pays off.

Here’s a trick I use:
I place the vertical panels where they’ll go, then lightly trace the outlines in pencil. That way, I know exactly where to apply the glue without making a mess.

Once the glue’s down, I align the panels to the pencil lines, clamp them in place, and drive the pocket screws. A heads up — pocket hole screws can pull the parts out of alignment if you’re not careful. Go slow, use clamps, and double-check everything as you go.

Pro tip:
There are two types of pocket hole screws — one for hardwoods and one for softwoods/plywood. Make sure you’re using the right ones for the job, or you risk splitting or weakening the joint.

When your cuts are square and straight, the cabinet will start to self-align as you fasten everything. That satisfying “click” into place is always a good sign.


---

🔩 Front Rails & Electric Compartment Work

Next, I moved on to cutting and pocket-screwing the top and bottom front rails in place. Once those were in, I shifted my attention to the rear electrical cabinet.

For this section, I cut a full plywood filler panel, then marked and cut out an opening for what will be my controller board.

The plan is to use a black acrylic sheet as the mounting surface for all my Hydros gear. I think it’ll look super clean, modern, and it’ll be easy to wipe down if things get salty (which we all know they eventually do).

To get the acrylic to sit flush, I used a step router bit with a bearing to cut a ¼" recessed notch around the opening. The sheet should slide right in and sit clean with the wood — no lip, no gaps.


---

☠️ Easter Candy Slowed Me Down

I’ll admit, progress wasn’t lightning fast today. I definitely underestimated how long some of these cuts and measurements would take — or maybe it was all the Easter candy I was snacking on while working. Either way, we’re moving forward and the stand is really starting to take shape.

Thanks for tagging along!
Next up: finishing out the support structure, starting the shelf layout, and maybe test-fitting the controller board.


20250420_180429.jpg 20250420_175325.jpg 20250420_180204.jpg 20250420_160727.jpg 20250420_155933.jpg 20250420_160737.jpg
 
Last edited:
OP
OP
Captcrunch8181

Captcrunch8181

Community Member
View Badges
Joined
Jan 31, 2021
Messages
36
Reaction score
36
Location
Kenai
Rating - 0%
0   0   0

🧵 Post #6 – Building and Installing the Face Frames​


Today I started work on the face frames for the stand. First step was cutting all the vertical and horizontal pieces to size. I always lay them out face down, using the best-looking sides, and I mark the backs so I don’t lose track of their orientation during assembly.


Once everything was laid out, I marked where each pocket hole needed to go and drilled them using my Kreg jig. A good trick when assembling the face frame is to clamp the pieces flat to the bench while joining them — this keeps the joints flush and square as you screw them together. I used Titebond III for all the glue joints.


With the face frame fully assembled on the bench, I glued and screwed it to the main cabinet body. If everything is cut accurately, the frame should come together square. One side of mine came out nearly perfect — the other was off by about 1/16", so I adjusted my screw order to help pull it into alignment. A good tip: if something’s slightly off, start by screwing the gap together first, then use the remaining screws to help "twist" things square.


I got both ends done and framed out. Each side will eventually have three cabinet doors, but I’m designing it with removable vertical center dividers so I can easily slide the sump in or out later on. If you're building similar, don’t glue those center pieces — just screw them in so you can take them out when needed.


🧼 One more tip: as soon as you glue and screw a joint, wipe off the glue immediately to prevent staining the wood. I also like to hit it with a DA sander right away. The fine sawdust mixes with any remaining glue and fills in the joint nicely for a cleaner finish.


That's it for today — slow and steady progress, but the cabinet is really starting to take shape!
 

Attachments

  • 20250425_174246.jpg
    20250425_174246.jpg
    319.3 KB · Views: 34
  • 20250425_174104.jpg
    20250425_174104.jpg
    194.3 KB · Views: 37
  • 20250425_174254.jpg
    20250425_174254.jpg
    227.9 KB · Views: 39
  • 20250425_174351.jpg
    20250425_174351.jpg
    234 KB · Views: 36
  • 20250425_174608.jpg
    20250425_174608.jpg
    239.5 KB · Views: 39
  • 20250425_190657.jpg
    20250425_190657.jpg
    225.5 KB · Views: 36
  • 20250425_190705.jpg
    20250425_190705.jpg
    193.8 KB · Views: 38
OP
OP
Captcrunch8181

Captcrunch8181

Community Member
View Badges
Joined
Jan 31, 2021
Messages
36
Reaction score
36
Location
Kenai
Rating - 0%
0   0   0
Jeeze nice craftsmanship. You make furniture for a living?
No just for myself. I love building stuff and I decided along time ago, if your going to build something you better make it better than something you can buy. This is not my 1st aquarium stand. I built a few with soft woods and cheaper materials and they work but the older I get the more I would rather save some up some money and use hardwood and it will last my lifetime.
 
OP
OP
Captcrunch8181

Captcrunch8181

Community Member
View Badges
Joined
Jan 31, 2021
Messages
36
Reaction score
36
Location
Kenai
Rating - 0%
0   0   0
Post #7


Today I started working on the panel that will hold all the controllers. Earlier, I had already used a router to cut a recess where this panel will mount. So today, I cut a piece of 1/4" black acrylic sheet to size and rounded off the corners with a sander to get a nice fit. Once the panel fit properly into the cabinet, I started the next challenge — a game of "controller Jenga."


I laid out all the controllers where I thought I wanted them, made centerlines, and marked their positions. To cut the holes, I used a Shaper CNC router, but you could also do this by making router templates and using a flush-trim bit with a bearing. I started by cutting some practice holes in scrap wood to double-check my sizing before committing to the real panel.


When I was ready, I cut out each hole carefully, planning the order so the router always had enough material to sit flat on while working. I finished all the cutouts for the Hydros controllers, and it looks like everything else will fit nicely too.


The Ecotech and Inkbird controllers will have to mount on the top of the panel because of their odd shapes. For the Red Sea skimmer controller, I plan to flush-mount it by cutting a hole — but since it has square corners, I'll need to file those out by hand for a perfect fit.


The last two things to mount will be the small battery backup gauges, which will simply display the digital voltage of the backup batteries.


It’s really starting to come together now! Thanks for following along!

20250427_144121.jpg 20250427_155437.jpg 20250420_180412.jpg 20250427_165707.jpg 20250427_160649.jpg
 

dangles

Valuable Member
View Badges
Joined
Sep 22, 2022
Messages
1,810
Reaction score
2,338
Location
Ohio
Rating - 100%
3   0   0
Tagging along. Such outstanding craftsmanship! I can’t wait to see how this all plays out! Building a reef is fun, but I think building the system and infrastructure for the reef can be just as fun… or more fun!

The “mount from behind” idea for the Hydros stuff is genius. One of the reasons I’m reluctant to go Hydros is how all the cable connectors stick out of the devices at 90° to the surface. I hate how they did that. But that’s a great idea to mitigate that!
 
OP
OP
Captcrunch8181

Captcrunch8181

Community Member
View Badges
Joined
Jan 31, 2021
Messages
36
Reaction score
36
Location
Kenai
Rating - 0%
0   0   0
Tagging along. Such outstanding craftsmanship! I can’t wait to see how this all plays out! Building a reef is fun, but I think building the system and infrastructure for the reef can be just as fun… or more fun!

The “mount from behind” idea for the Hydros stuff is genius. One of the reasons I’m reluctant to go Hydros is how all the cable connectors stick out of the devices at 90° to the surface. I hate how they did that. But that’s a great idea to mitigate that!
thanks I am working on making the mounts for the hydro boxes tonight. I am enjoying the build alot. its taking a while this go around. I am really trying to get a system that works well for a long run.
 
OP
OP
Captcrunch8181

Captcrunch8181

Community Member
View Badges
Joined
Jan 31, 2021
Messages
36
Reaction score
36
Location
Kenai
Rating - 0%
0   0   0
It's going to look pretty good. I hate everything about the way the wires have to run. This is the cleanest way I can figure out.
 

Attachments

  • 20250503_143212.jpg
    20250503_143212.jpg
    192.2 KB · Views: 35
  • 20250503_142827.jpg
    20250503_142827.jpg
    238.1 KB · Views: 38

TOP 10 Trending Threads

WHAT AMOUNT OF LIVE ROCK AND SAND SHOULD BE PRIORITIZED FOR OPTIMAL BIODIVERSITY/FILTRATION?

  • 100% live rock + bagged sand

    Votes: 38 27.3%
  • 100% dry rock + 100% live sand

    Votes: 47 33.8%
  • 50/50 live/dry rock, 50/50 live/bagged sand

    Votes: 30 21.6%
  • 75% live rock, 25% live sand

    Votes: 14 10.1%
  • 25% live rock, 75% live sand

    Votes: 10 7.2%
Back
Top