AlexGs 4200 Gallon Display + 2100 gallon fish room? --- New House = New Build

OP
OP
AlexG

AlexG

Valuable Member
View Badges
Joined
Jun 20, 2013
Messages
2,112
Reaction score
4,898
Location
Illinois
Rating - 0%
0   0   0
Small update

Second coat of pond shield is complete for the canopy. I figure after a few touch up the canopy waterproofing is completed.

20220817_201521.jpg
20220817_201519.jpg
20220817_201510.jpg
 
OP
OP
AlexG

AlexG

Valuable Member
View Badges
Joined
Jun 20, 2013
Messages
2,112
Reaction score
4,898
Location
Illinois
Rating - 0%
0   0   0
Small Update

The second layer of fiberglass is on the aquarium bottom which concludes the majority of the fiberglass work on this build. The second layer of fiberglass is woven cloth and for the most part turned out good. I had a few small bubbles that I needed to grind out but no need for any patches as the bubbles were all small and were mostly in areas of fiberglass overlap. I sanded the entire aquarium bottom lightly with 40grit sand paper to rough the surface up for pond shield epoxy. I also drilled out all the fiberglass covering the holes on the 24' & 30' beams for cross braces. I am going to be doing a final inspection on the bottom aquarium brace beam to make sure its flat for the glass sealing surface. I have had a few areas on the bottom aquarium brace beam where fiberglass resin was uneven and needed to be ground flat. So its important to do a through inspection to make sure this beam is as straight as possible. Once that is completed along with another bottom inspection I am going to do a final cleaning with the vacuum before wiping down the surface with alcohol then I will start applying pond shield epoxy to the bottom of the aquarium.

20220821_214303.jpg
20220821_214310.jpg
20220821_214329.jpg
20220821_214332.jpg
 

dca22anderson

Valuable Member
View Badges
Joined
Dec 17, 2008
Messages
1,870
Reaction score
9,443
Location
Utah
Rating - 0%
0   0   0
Small Update

The second layer of fiberglass is on the aquarium bottom which concludes the majority of the fiberglass work on this build. The second layer of fiberglass is woven cloth and for the most part turned out good. I had a few small bubbles that I needed to grind out but no need for any patches as the bubbles were all small and were mostly in areas of fiberglass overlap. I sanded the entire aquarium bottom lightly with 40grit sand paper to rough the surface up for pond shield epoxy. I also drilled out all the fiberglass covering the holes on the 24' & 30' beams for cross braces. I am going to be doing a final inspection on the bottom aquarium brace beam to make sure its flat for the glass sealing surface. I have had a few areas on the bottom aquarium brace beam where fiberglass resin was uneven and needed to be ground flat. So its important to do a through inspection to make sure this beam is as straight as possible. Once that is completed along with another bottom inspection I am going to do a final cleaning with the vacuum before wiping down the surface with alcohol then I will start applying pond shield epoxy to the bottom of the aquarium.

20220821_214303.jpg
20220821_214310.jpg
20220821_214329.jpg
20220821_214332.jpg
Looks AMAZING!! Hows your glass search coming along?
 
OP
OP
AlexG

AlexG

Valuable Member
View Badges
Joined
Jun 20, 2013
Messages
2,112
Reaction score
4,898
Location
Illinois
Rating - 0%
0   0   0
Update time

Lots of pond shield epoxy work ongoing. The aquarium bottom, bottom seal beam, and all top aquarium brace breams have at least two coats of pond shield epoxy applied. After the first two coats I have gone through and completed a touch up round of epoxy to add thickness to the bottom coats. I believe one more touch up round will be needed but over all everything turned out great. Of course I have been sick all week so work has been halted until I am well again but it won't be long before I can say waterproofing is completed.
20220825_155311.jpg
20220825_155323.jpg
20220825_182527.jpg
20220825_182532.jpg
20220830_061602.jpg
20220830_174751.jpg
20220902_164754.jpg
20220903_104303.jpg
20220905_105409.jpg
 
OP
OP
AlexG

AlexG

Valuable Member
View Badges
Joined
Jun 20, 2013
Messages
2,112
Reaction score
4,898
Location
Illinois
Rating - 0%
0   0   0
Wanted to share some good news. I am happy to report that I am getting close to beating the Zinc issues in the running system. The only change to the system is adding BRS high capacity GFO to a reactor. No water changes or other additives for removing metals are in the system. Zinc dropped from 38ug/L to 22ug/L or 43% with GFO in use for 26 days. I am planning to change out the GFO and complete a 25% water change then and I believe I will have this issue resolved in another month. Based on actions taken over the last few months appears the travertine tiles I used to line the bottom of my 400 and 700 were the zinc source as they were removed in May 2022. After a 25% water change in August 2022 zinc levels dropped ~25% so at that point zinc levels were stabilized between May and August. GFO was in place for 26 days before another ICP test was sent out and with a 43% reduction in that time I would say the GFO is showing promising results.

Main Display_B-oGnevy_22_9_14_.png
 
OP
OP
AlexG

AlexG

Valuable Member
View Badges
Joined
Jun 20, 2013
Messages
2,112
Reaction score
4,898
Location
Illinois
Rating - 0%
0   0   0
Just got the top brace beams fitted tonight with new support braces attached to the canopy columns. It's important to point out the too brace beams will be fully held by the seal to the glass but support braces hold the beams at the proper height for glass installation and will remain in place even though these braces have little structural value. I figure the waterproofing is 90+% completed.
20220920_195729.jpg
20220920_195802.jpg
 

dca22anderson

Valuable Member
View Badges
Joined
Dec 17, 2008
Messages
1,870
Reaction score
9,443
Location
Utah
Rating - 0%
0   0   0
Just got the top brace beams fitted tonight with new support braces attached to the canopy columns. It's important to point out the too brace beams will be fully held by the seal to the glass but support braces hold the beams at the proper height for glass installation and will remain in place even though these braces have little structural value. I figure the waterproofing is 90+% completed.
20220920_195729.jpg
20220920_195802.jpg
That smile Alex... that's a smile of a job well done!! Great work buddy!! Can't wait to see that glass go in soon!! You are so close!!
 

slythy

Well-Known Member
View Badges
Joined
Aug 3, 2021
Messages
699
Reaction score
619
Location
USA
Rating - 100%
1   0   0
Man I must say I love builds like this but they do give me anxiety haha. It looks like its going to be amazing when done. I think anything over my 180 (fw) is daunting!

cant wait to see how it turns out!!!!
 
OP
OP
AlexG

AlexG

Valuable Member
View Badges
Joined
Jun 20, 2013
Messages
2,112
Reaction score
4,898
Location
Illinois
Rating - 0%
0   0   0
That smile Alex... that's a smile of a job well done!! Great work buddy!! Can't wait to see that glass go in soon!! You are so close!!

Thanks Dave. I am going to get the measurements for the glass together in the next day or two so I can start getting quotes.
 
OP
OP
AlexG

AlexG

Valuable Member
View Badges
Joined
Jun 20, 2013
Messages
2,112
Reaction score
4,898
Location
Illinois
Rating - 0%
0   0   0
New DIY project underway. This is just phase 1 of the project. Ventilation project that is not specifically for humidity mitigation although it will help with humidity mitigation.

20220921_194248.jpg
20220921_194239.jpg
 

flagg37

Custom stair builder - TreeofLifeStairs.com
View Badges
Joined
May 28, 2016
Messages
950
Reaction score
1,119
Location
Denver area
Rating - 0%
0   0   0
Man I must say I love builds like this but they do give me anxiety haha. It looks like its going to be amazing when done. I think anything over my 180 (fw) is daunting!

cant wait to see how it turns out!!!!
If I’m honest, I have some anxiety over if I’ll still want this tank after decades. With these sized tanks, you can’t just decide to sell all your stuff and move on. It takes some major commitment.
 
OP
OP
AlexG

AlexG

Valuable Member
View Badges
Joined
Jun 20, 2013
Messages
2,112
Reaction score
4,898
Location
Illinois
Rating - 0%
0   0   0
If I’m honest, I have some anxiety over if I’ll still want this tank after decades. With these sized tanks, you can’t just decide to sell all your stuff and move on. It takes some major commitment.
I figure I get one shot at this world and I am going to make the best of it. I have already considered teardown in my design and while it would not be easy it would be possible to salvage most of the aquarium system to move. Having torn down and moved my 1600 gallon aquarium system and started over it is possible just lots of work. I would likely sell off just about all the livestock as I tried to keep too much through the move and lost a bunch of it.
 

Blue Tang Clan

Active Member
View Badges
Joined
Nov 14, 2017
Messages
468
Reaction score
839
Location
Maryland
Rating - 100%
2   0   0
I figure I get one shot at this world and I am going to make the best of it. I have already considered teardown in my design and while it would not be easy it would be possible to salvage most of the aquarium system to move. Having torn down and moved my 1600 gallon aquarium system and started over it is possible just lots of work. I would likely sell off just about all the livestock as I tried to keep too much through the move and lost a bunch of it.

Absolutely. If things change, we all adapt. Regret is far worse!
 
OP
OP
AlexG

AlexG

Valuable Member
View Badges
Joined
Jun 20, 2013
Messages
2,112
Reaction score
4,898
Location
Illinois
Rating - 0%
0   0   0
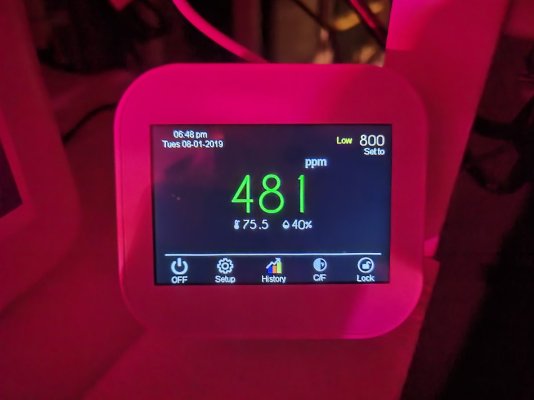
New DIY project I wanted to share DIY HRV(Heat Recovery vent). I will be making a video about this DIY project but wanted to share the progress. As the build progresses when I finished up the fiberglass work I no longer needed to use my two 4" inline duct fans for ventilation of vapors so it was time to get them to work as HRV ventilation. I have been monitoring CO2 levels in my basement not long after my system went online as I wanted to raise the pH in the aquarium system via kalkwasser and CO2 reduction. When I started monitoring CO2 levels they were in the 1000ppm range in the fish room. I started opening windows on the main floor of the house in the morning and evening this summer when it cooled off. Opening windows would get CO2 levels in the fish room down into the 650-700ppm range on a good day but they bounced back once the windows were closed. I considered my options for air exchange and an HRV/ERV were both good choices however these were not cheap options with larger units in the $800-$1500+ range. I started reading how these units work and the differences between an HRV and ERV. After I learned how these units work I decided an HRV would work best for my needs as humidity exchange was not as big of a concern since I have a whole house dehumidifier in the fish room for humidity control. An HRV is a simple device as it can be summed up as a heat exchanger with two ventilation fans: One to exhaust inside air outside and the other pulls outside air into the house) I started to ask myself why does this cost so much? I bet I could build one of these cheaper than a commercial version and it would also be a fun challenge to see if could do it. I have some picture below of HRV box through its construction stages. I started the HRV up last night and it is working. I have to do more testing and work out any bugs in the system then permanently install the HRV. CO2 levels have dropped from over 1000ppm to the 450-600ppm range. Once I get the air balanced properly in the room I will continue to take CO2 measurements. my pH has been rising but I am due for a pH probe calibration so I will post pH results after the HRV has been running for a couple of weeks. Feel free to fire away with questions.

20220926_075336.jpg

20220924_151432.jpg

20220925_232859.jpg

20220926_190736.jpg
20220926_190726.jpg
20220927_204401.jpg
 

iReefer12

Well-Known Member
View Badges
Joined
Apr 22, 2012
Messages
809
Reaction score
700
Location
Boulder, CO
Rating - 100%
1   0   0
just read your whole thread. Amazing build Alex. Excited to see the display come to life.

More photos on the HRV, that’s genius. Still not sure what makes it a HRV and not an ERV :thinking-face:
 

Creating a strong bulwark: Did you consider floor support for your reef tank?

  • I put a major focus on floor support.

    Votes: 49 42.6%
  • I put minimal focus on floor support.

    Votes: 24 20.9%
  • I put no focus on floor support.

    Votes: 39 33.9%
  • Other.

    Votes: 3 2.6%
Back
Top