Blake's 125g mixed reef build

Gobi-Wan

Active Member
View Badges
Joined
Jun 4, 2018
Messages
435
Reaction score
371
Location
St. Louis area, Illinois
Rating - 0%
0   0   0
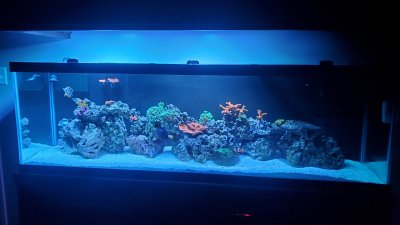
Hi everyone. I am most of the way through building a 125 setup and figured I should finally start a build thread. I have been in the hobby coming up on 3 years, and my 75g setup is going to get upgraded.

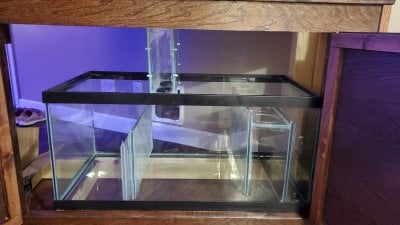
The aquarium- standard 125 from petsmart. Couldn't find a better deal on one without a stand, so I sold the junk particleboard stand as a TV stand lol. I drilled the aquarium and installed 2 eclipse M overflows. (2 x 1" drains each) I love the minimal clean boxes inside the tank and this is my biggest regret from my 75g build on which I have a siphon overflow.

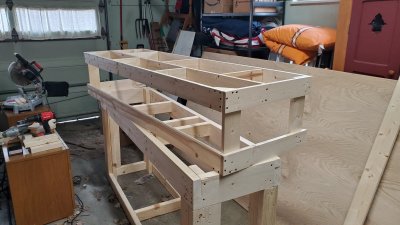
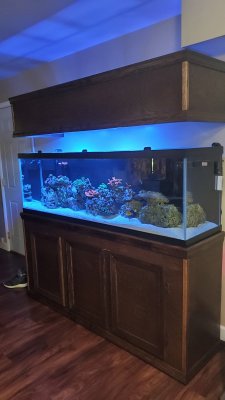
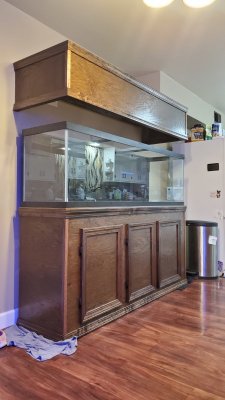
The stand- 3 years of shoulda' woulda' coulda' has lead to what I hope will keep me satisfied for the foreseeable future.

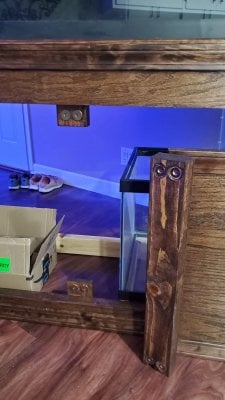
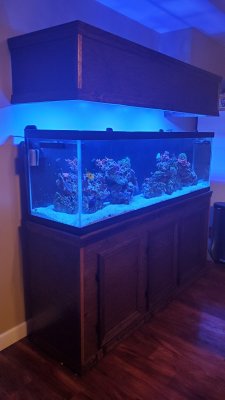
I used the popular @RocketEngineer design for the stand and dressed it the best I could with my barely-adequate woodworking skills. I also wanted 3 doors but didn't want to burn the "open front stand" bridge, so I created a false magnetic support that the center door hinges from. It worked out really well I think, except the 4 incredibly strong magnets I used make the 2x4 more difficult to remove than I anticipated. I doubt I will need to remove it much though, since the 40b can slide in and out of the middle/right door section if I need to for some reason. It'll be a nice party trick if nothing else.

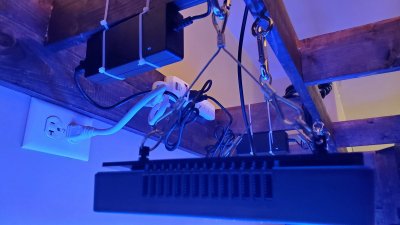
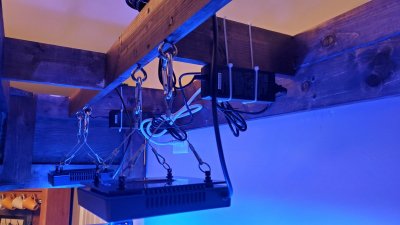
I knew I wanted a canopy and after months of internal debate I finally decided on a wall mounted floating canopy with its own outlet to house the lighting.

The lighting- since the petsmart 125 has 2 braces across the top, i wanted to go with 3 led fixtures. My 75g setup has a 300w black box that creates a shadow in the middle of the tank because of the brace. Another regret I set out to remedy with this build. So I decided on 3 AI Hydra 26s. I have some birds nests, orange digi, red monti caps, all doing OK under the black box. The most difficult thing i have is a rainbows in Spain acro, which is growing steadily over about a year but not flourishing. Hoping to get some better coloration with nicer lighting. Also hate when the timer snaps on so looking forward to ramping and spectrum control.

I installed a dedicated 20A breaker with 4 outlets behind the stand, and 2 outlets behind the canopy so no wires will hang from the lighting. (Pretty proud of myself lol) my house was built in 57 and the circuit my 75g is on is frequently overloaded by trying to run the microwave. Pathetic, I know, and probably not real safe.

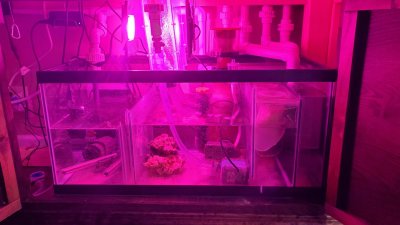
Filtration- I made a sump out of a 40 breeder, your standard fare. I built my own ATS in the 75g and had such great success i decided to create a sort of built-in ATS system this time. The acrylic box hangs from 2 screws above where a pile of rock rubble will sit on lighting grid in the sump. Hopefully this will generate copepods. I had a copepod die-off and dinoflaggelate bloom in my 75 when I allowed nutrients to go near zero, so hopefully I can avoid repeating that mistake in the future. I would like to have a mandarin eventually but I also have a 6 line already so we will see what levels of pods I can maintain in this system.

If I left anything out let me know. Today is plumbing day.
20200501_195512.jpg 15884361299365794270799894398318.jpg 20200405_154424.jpg 15884363031666769916900459313350.jpg
 
Last edited:

ndrwater

2500 Club Member
View Badges
Joined
May 7, 2015
Messages
3,880
Reaction score
8,018
Location
Anaheim, CA
Rating - 0%
0   0   0
Love the start!! Also definitely congrats on recognizing things to improve. I think you'll be much happier bin the long run!!
Definitely go into your personal account and add the link to this thread. You get the super cool "Build Thread" badge by doing so!!
Keep the updates coming!!
 
OP
OP
Gobi-Wan

Gobi-Wan

Active Member
View Badges
Joined
Jun 4, 2018
Messages
435
Reaction score
371
Location
St. Louis area, Illinois
Rating - 0%
0   0   0
Ok WAY overdue for an update. The tank is up and running! I am afraid of having regrets like I did last build, so I am tending to break down and spend a little more money on this build. I went ahead and bought 160 pounds of new sand, and really took the time to wash it out super clean. No more sandstorms from my hard working diamond goby. I made RODI directly into the aquarium, mixed am heated the saltwater in there, and the sand was clean enough that I was able to add it with basically no clouding. There was just a shade of cloudiness that went away overnight so that was a success. Then I used the water from my 75 setup to fill the new sump and threw all the livestock directly in there with a small powerhead. I also saved some buckets of the old saltwater for an assembly line type rock washing. Scrubbed in the big tub to remove some patches of hair algae that had grown in hard to reach places, then swished in cleaner water then chucked in the new setup. Ill probably rescape a little nicer later but for now I wanted to get everything transferred with as little stress as possible. So then I turned the return pump on for a minute or so, and waited 10 or 15 minutes for the water to mix, then repeated that 5 or 6 more times until I felt good about it. No science behind that just flying by the seat of my pants lol. The new water was the same temp and salinity so I wasn't too worried. Everyone survived and was out exploring the same day. The hardest part about it was catching the two firefish twice.

TLDR: success swapping fish and rocks over.

Now about the build.
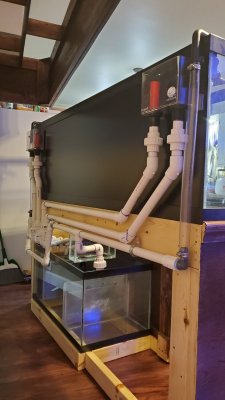
My main filtration is an algae turf scrubber I engineered into the stand. It has keyhole hanging holes and hangs from 2 screws in a cross brace. To scrub a sheet you unscrew a union and pop the acrylic case down off the screws. Then the bar lifts out. The lighting is 2 100watt equivalent... well basically pot growing lights from Amazon. They were pretty cheap but I had great success with Amazon grow lights in the 75 setup. In fact so good that I decided to just bring the same reef octo skimmer over to the 125 and I may even put it on a timer as my nitrate and phosphate tend dangerously toward zero sometimes.

Sump is a 40b from the perinneal petco sale. There is a chamber to keep the overflow lines underwater, then that overflows into 3 filter socks, then the main chamber where the skimmer and ATS are, then the reurn chamber and that's it. I have a cheap little ATO in a 5 gallon bucket that may get upgraded at some point. I use kalkwaser right now with the ATO but may need to think about some kind of dosing setup in the future as this reef has been trending toward an SPS dominant setup over the last year.

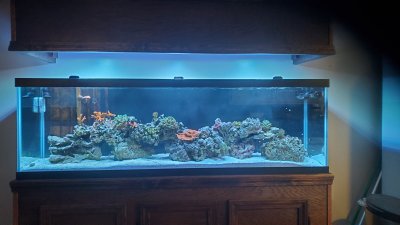
Lighting- after a lot of research, my biggest regret prevention purchase has been a set of G5 Radion XR15 Blues. Excuse the photos right now, my LFS only had 2 in stock and I'm waiting for the 3rd. I went back and forth a bunch of times, searching for used hydra 26s, used radion xr30s, and the owner of my favorite reef shop convinced me that 3 of the new xr15s would cover the 125 very well. My .an concern was the cross braces on the 125 which on my 75 setup created a terrible shadow. I was very pleased to find that with the xr15s hanging 8" above the aquarium the cross braces do not create any shadow whatsoever. Very excited about that.

20200524_193818.jpg 15904108158871793143237755957066.jpg 15904108578387220455829350773915.jpg 15904112991034461856662012272769.jpg 15904114900875116099630111364767.jpg
 
OP
OP
Gobi-Wan

Gobi-Wan

Active Member
View Badges
Joined
Jun 4, 2018
Messages
435
Reaction score
371
Location
St. Louis area, Illinois
Rating - 0%
0   0   0
Finally got the 3rd xr15. The current absence of fish is due to my tang getting what looked like velvet but I am starting to think may have just been ich. I was able to get all the fish into my old 75 set up as a hospital tank and they are all fine now. As such I decided to go ahead and wait the 76 days and go ich free hopefully from now on.

20200606_125956.jpg
 
OP
OP
Gobi-Wan

Gobi-Wan

Active Member
View Badges
Joined
Jun 4, 2018
Messages
435
Reaction score
371
Location
St. Louis area, Illinois
Rating - 0%
0   0   0
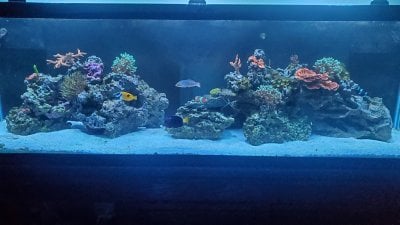
Everyone survived quarantine, except for one of my firefish that disappeared without a trace about a month in. Anyway everything is finally back together. Rescaped a couple times while the fish were out, still not sure if I'm 100% about it.

20200712_194947.jpg 15948582636658799297397342265699.jpg
 
OP
OP
Gobi-Wan

Gobi-Wan

Active Member
View Badges
Joined
Jun 4, 2018
Messages
435
Reaction score
371
Location
St. Louis area, Illinois
Rating - 0%
0   0   0
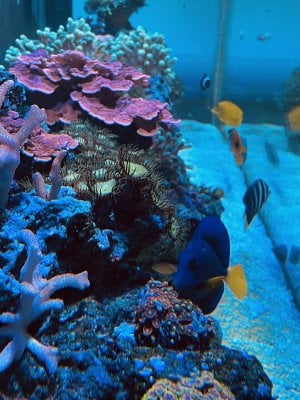
Time for another update. I succeeded in double-quarantining the remaining 2 tangs i have always wanted, and introduced without issues. They are doing fantastic. I also have an enormous amount of copepods being produced in my turf scrubber and sump, so I finally pulled the trigger on a mandarin who is doing really well and constantly eating. Rocks got rescaped before adding the tangs. Now my only ongoing issue is tuning my turf scrubber to leave a little more nutrients because some of my SPS have gotten pretty pale in the new setup with my nitrate and phosphate being near 0 all the time.
20201013_185114.jpg
 

MERKEY

Cronies
View Badges
Joined
Oct 5, 2019
Messages
9,642
Reaction score
46,634
Location
Washington
Rating - 100%
1   0   0
Just found this build and you did an amazing job with it all!!

The latest update looks wonderful!
 
Last edited:

CMMorgan

Counting my blessings...
View Badges
Joined
Oct 12, 2020
Messages
3,907
Reaction score
14,794
Location
Punta Gorda
Rating - 0%
0   0   0
Beautiful job. I have one question. With the overflows on the back and all of the plumbing against the wall... what will you do if you have a leak? It's not an option to pull the set up away from the wall. Did you do a water test before you put it in place?
Maybe that is more than one question. You have given me plenty to think about... my 127 will be here for the holidays. Thanks for the inspiration!!
 
OP
OP
Gobi-Wan

Gobi-Wan

Active Member
View Badges
Joined
Jun 4, 2018
Messages
435
Reaction score
371
Location
St. Louis area, Illinois
Rating - 0%
0   0   0
Beautiful job. I have one question. With the overflows on the back and all of the plumbing against the wall... what will you do if you have a leak? It's not an option to pull the set up away from the wall. Did you do a water test before you put it in place?
Maybe that is more than one question. You have given me plenty to think about... my 127 will be here for the holidays. Thanks for the inspiration!!
Well by trade I work with pvc every day that has to hold 100+ psi so I have a good deal of faith in my glue welds. Also I used unions on each pipe right underneath the overflows which are accessible from the sides of the tank, and unions on each discharge section which are accessible underneath the stand and made sure every non-glue connection could all be disassembled (PITA but doable) with the stand in place. I left enough of a gap to get my knuckles around the unions. I did water test it with tapwater before transferring everything into the new tank. I was pleasantly surprised that I can reach about 90% of the back with a magnetic scraper while standing on a chair with the hood removed. The part where the pipes run down i just have to clean by hand... so far i have had enough motivation to keep the back wall cleaned.. I really like the black aesthetic, i guess we will see how long my motivation overpowers laziness.. The hood is on a bracket system and is pretty light with the leds taken out. They are on carabiners. Thanks for the comment!
 

CMMorgan

Counting my blessings...
View Badges
Joined
Oct 12, 2020
Messages
3,907
Reaction score
14,794
Location
Punta Gorda
Rating - 0%
0   0   0
Well by trade I work with pvc every day that has to hold 100+ psi so I have a good deal of faith in my glue welds. Also I used unions on each pipe right underneath the overflows which are accessible from the sides of the tank, and unions on each discharge section which are accessible underneath the stand and made sure every non-glue connection could all be disassembled (PITA but doable) with the stand in place. I left enough of a gap to get my knuckles around the unions. I did water test it with tapwater before transferring everything into the new tank. I was pleasantly surprised that I can reach about 90% of the back with a magnetic scraper while standing on a chair with the hood removed. The part where the pipes run down i just have to clean by hand... so far i have had enough motivation to keep the back wall cleaned.. I really like the black aesthetic, i guess we will see how long my motivation overpowers laziness.. The hood is on a bracket system and is pretty light with the leds taken out. They are on carabiners. Thanks for the comment!
I love how your mind works. Wow... that is crazy genius level of thinking there. I'm impressed. I was wondering what your background was because your pipework is stunning.
 
OP
OP
Gobi-Wan

Gobi-Wan

Active Member
View Badges
Joined
Jun 4, 2018
Messages
435
Reaction score
371
Location
St. Louis area, Illinois
Rating - 0%
0   0   0
I love how your mind works. Wow... that is crazy genius level of thinking there. I'm impressed. I was wondering what your background was because your pipework is stunning.
Thank you again... i can't claim anything I've done is an original idea though haha.. Background is oil based enamel rolled on the outside of the glass. I think it took 4 coats. I wanted it durable. You can also use latex based if you want to be able to easily scrape it off later.
 

Being sticky and staying connected: Have you used any reef-safe glue?

  • I have used reef safe glue.

    Votes: 101 86.3%
  • I haven’t used reef safe glue, but plan to in the future.

    Votes: 8 6.8%
  • I have no interest in using reef safe glue.

    Votes: 5 4.3%
  • Other.

    Votes: 3 2.6%
Back
Top