Navigation
Install the app
How to install the app on iOS
Follow along with the video below to see how to install our site as a web app on your home screen.
Note: This feature may not be available in some browsers.
More options
You are using an out of date browser. It may not display this or other websites correctly.
You should upgrade or use an alternative browser.
You should upgrade or use an alternative browser.
Broadfield's Red Sea Reefer 450 Build - OCD Inspired... Going Back To a Reef
- Build Thread
- Thread starter Broadfield
- Start date
- Tagged users None


- Joined
- Aug 15, 2017
- Messages
- 4,523
- Reaction score
- 7,476
IMG_7964 by Toby Broadfield, on Flickr
IMG_7959 by Toby Broadfield, on Flickr
IMG_7963 by Toby Broadfield, on Flickr
IMG_7967 by Toby Broadfield, on Flickr
IMG_7969 by Toby Broadfield, on Flickr
IMG_7979 by Toby Broadfield, on Flickr
IMG_7985 by Toby Broadfield, on Flickr
IMG_7984 by Toby Broadfield, on Flickr
IMG_7986 by Toby Broadfield, on Flickr
IMG_7989 by Toby Broadfield, on Flickr
IMG_7993 by Toby Broadfield, on Flickr
I keep coming back to these pics every few months for inspiration. Awesome build.
Quick Q- what is the white channel stuff you used around the inner rim of the panels to diffuse the leds?
Cheers

Planted tank or R2R.....you are on to something great!

OP
OP
Broadfield
Red Sea Reefer Consultant... Non Affiliated
View BadgesExcellence Award
Reef Of The Month
Photo of the Month
Reef Squad Emeritus
Midwest Reefer
Anyone know what that white channel is?
Thanks
That started life as a sheet of clear 1/4" thick acrylic. I template routed it into the exact shape of the window opening, but with a 1/4" overhang. I did a 1/4" round over and then used sand paper to frost the entire thing. Frosting it helps diffuse the LED strip that is wrapped around it.
- Joined
- Aug 15, 2017
- Messages
- 4,523
- Reaction score
- 7,476
That started life as a sheet of clear 1/4" thick acrylic. I template routed it into the exact shape of the window opening, but with a 1/4" overhang. I did a 1/4" round over and then used sand paper to frost the entire thing. Frosting it helps diffuse the LED strip that is wrapped around it.
Lol, of course it’s a one of a kind custom job. I should have known better.
Thanks for the info- appreciate it.

Hey Broadfield,To be honest, I don't know for sure. Red Sea has recently changed their barbed return assembly... so it depends on which one you have. If you have the old one, then I assume it's the same as mine and you can simply use a 3/4" MPT x 1" SLIP adapter. Since the Red Sea is 25mm thread, you will need to use extra Teflon tape to insure a leak free connection. This is the reason I'm working on manufacturing an imperial version of the Red Sea coupler. For one, you will not need to try and source extra Red Sea barbed return assemblies if you want to redo the pluming on all three pipes. And two, it would be the correct thread for all of us living in an imperial supporting country.
No, it would have noise if you didn't submerge them. You can't tell anything is even coming out of them with them submerged.
Did you ever engineer the imperial version of the Red Sea Coupler?
OP
OP
Broadfield
Red Sea Reefer Consultant... Non Affiliated
View BadgesExcellence Award
Reef Of The Month
Photo of the Month
Reef Squad Emeritus
Midwest Reefer
Hey Broadfield,
Did you ever engineer the imperial version of the Red Sea Coupler?
I did not. I went through the design process with the manufacturer and they gave me a final price that was just too high. That was quite the process and I just didn't have it in me to look around at other manufactures to see if I could get the price down.

OP
OP
Broadfield
Red Sea Reefer Consultant... Non Affiliated
View BadgesExcellence Award
Reef Of The Month
Photo of the Month
Reef Squad Emeritus
Midwest Reefer

Hey Broadfield,
Did you find a new coupler that works to adapt to the Red Sea plumbing?
Thanks
Since the tank was completely drained, I wanted to come up with a different way to plumb the tank. I really wanted to put in standard bulkheads and plumb the entire overflow etc. But it just isn't feasible to safely get the Red Sea bulkhead assembly out, without cutting out the overflow and going at the bulkhead assembly from the side. I wanted to do something that the normal DIYer wouldn't be afraid to attempt. I also wanted to make sure the Red Sea standpipes would be removable for servicing, cleaning etc. So this is what I came up with:
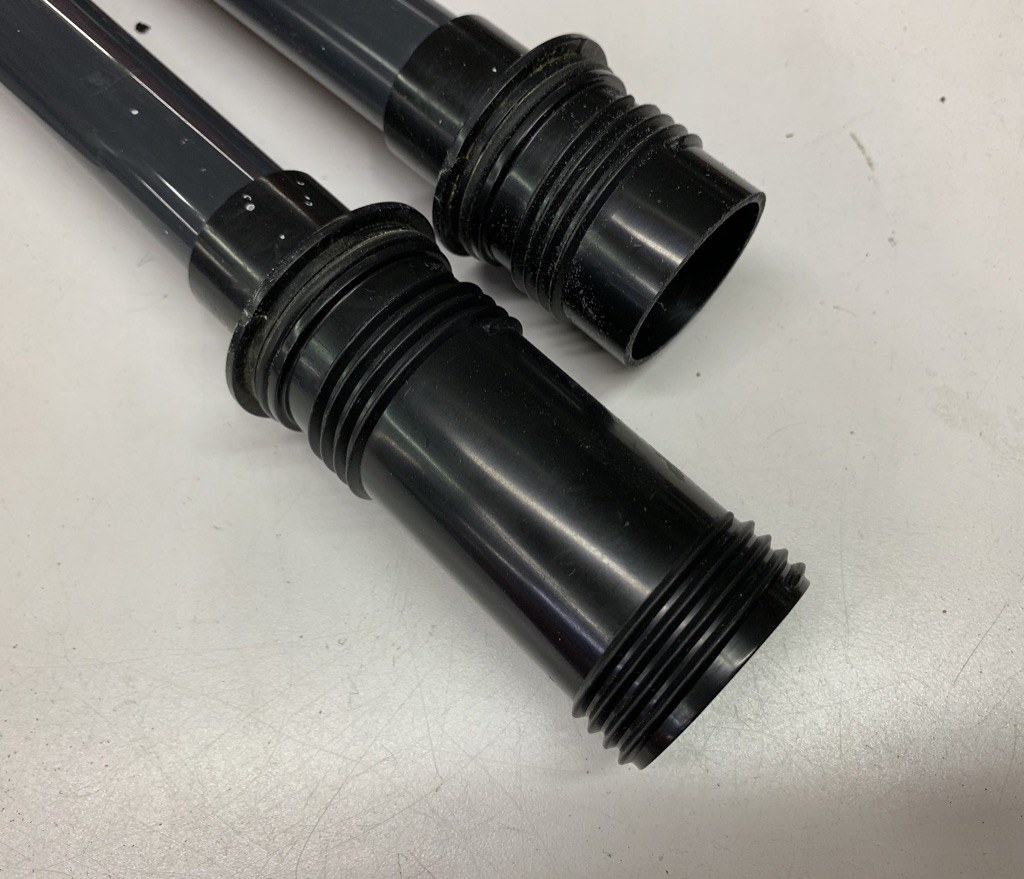
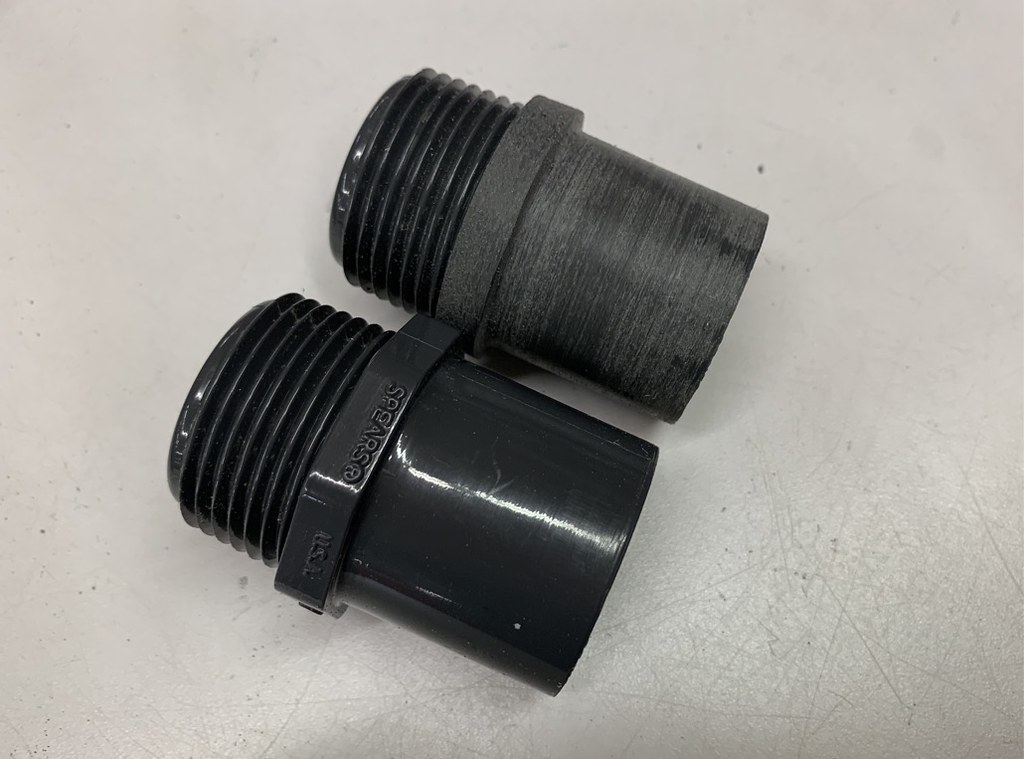
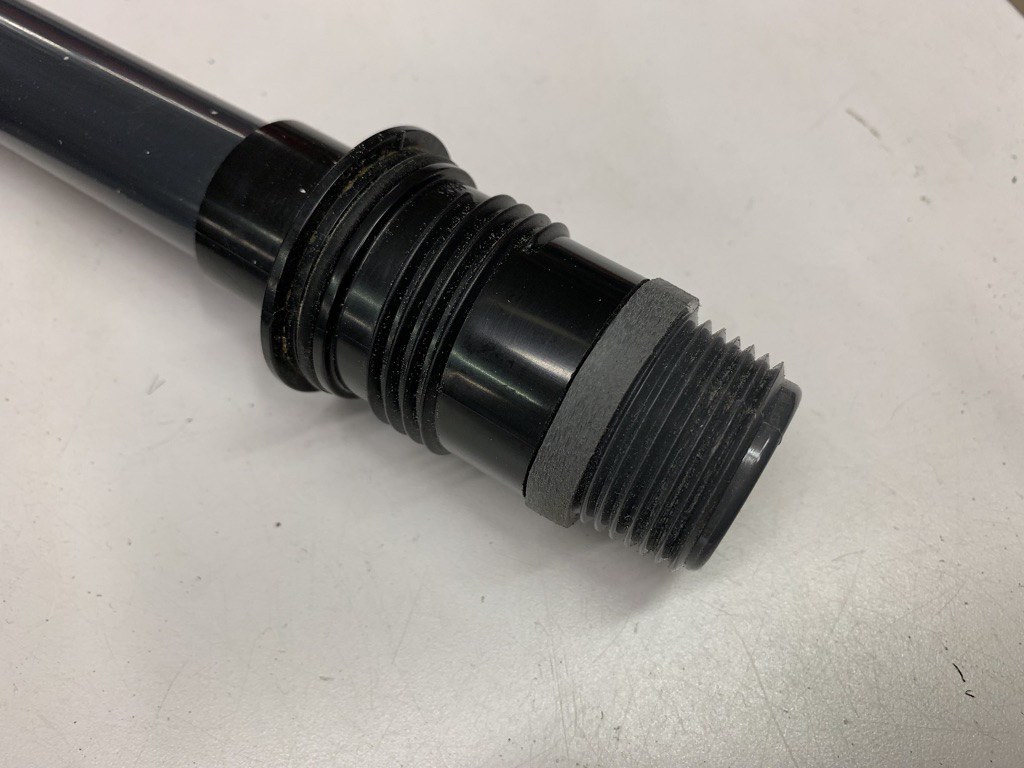
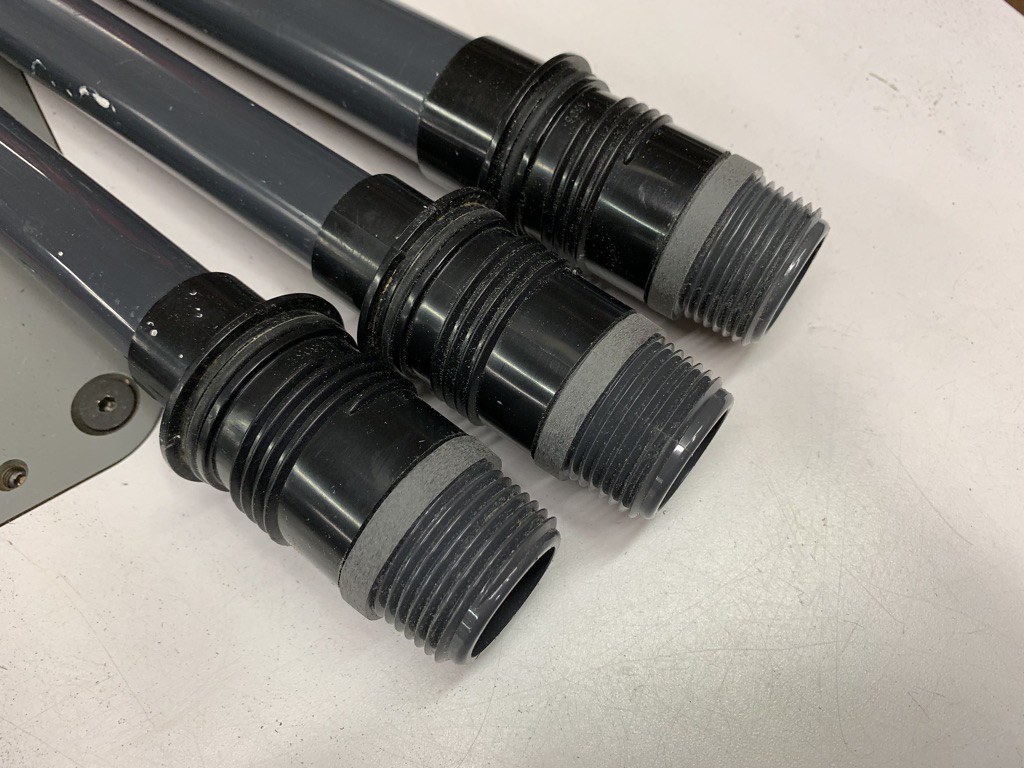


The parts are very simple:
(3) 1" Spigot Male Adapter - Spigot x MPT https://www.pvcfittingsonline.com/1-sch-80-pvc-spigot-male-adapter-spig-x-mpt-861-010.html
(3) 1" Union - SLIP x FPT https://www.pvcfittingsonline.com/1-sch-80-pvc-union-slip-x-fipt-899-010.html
I provided links because these unions actually fit. The 1" unions from BRS, for example, have too large of a diameter... so the return and emergency drain will not fit next to each other.
Then it's just a matter of cutting off the end of the Red Sea stand pipes and then sanding down the diameter of the male adapter until it slides up into the end of the freshly cut stand pipe. If you want to be able to still remove the stand pipes for whatever reason, then you will want to grind down the hexagon area on the male adapter... as seen in my images. Standard PVC cement will work to glue the adapter to the stand pipe. However, it takes longer to bond because the stand pipe isn't PVC. PVC to PVC only requires a few seconds to hold it in place. When glueing to the stand pipes, I would keep pressure on it for about 60 seconds to ensure it doesn't push out. Then just your typical Teflon tape around the 1" MPT.
That was a quick reply. I'm a little nervous about removing the stand pipes on an operational tank. It definitely makes more sense to do it before the tank is up and running. I'm going to consider it though. Thanks for taking the time to explain in detail!
- Joined
- Jul 29, 2018
- Messages
- 810
- Reaction score
- 1,163
I wanted to do something that the normal DIYer wouldn't be afraid to attempt.
I must say, you're a pretty cool guy. I'm sure people flood your inbox daily with business proposals, custom build requests, etc. It seems like your creations are guided by the philosophy that your build outs are also contributions to the hobby that belong to everyone and help us all hopefully enjoy it a little more. Cheers to you, Sir. And thank you for selfless leadership
- Joined
- Mar 22, 2019
- Messages
- 232
- Reaction score
- 289
What Size Pentair UV did you use? Looks too short to be 40W version? I've got a XL425 so 25W should be fine.As @BigMo noted, I sold my entire sump/plumbing/reactor setup, skimmer etc. I am officially done having a reef tank until further notice. I was running the Triton Method for about six months with mega success... like the best success I had ever had. Until I wasn't having success lol. Tank took a dive again and I couldn't recover it. So I tossed in the reefing towel for now. I will be back at some point... hopefully with a larger tank.
But there's no reason to let a perfectly good Reefer 450 go to waste. So I am changing it up a bit. As noted, I ditched all of the plumbing, sump, skimmer, reactors etc. I completely ripped out my Apex display and am building something new/different to house it... to match the new green theme. I'm sure some of you already know where I am going with this. Like a lot of us, I started with freshwater tanks and always loved a planted tank. But I was young and never put forth much effort into keeping a decent planted setup. Back then, Co2 injection wasn't even a thing, unless it was DIY with a 2 liter bottle lol. So I decided I wanted to get back to my roots, pun intended, and build a really killer planted tank. Reuse the 450, reuse the Apex system, reuse my DOSs and so on. I am obviously going for the green theme now instead of the old orange setup. This is what I have so far...
I will be using one of my DOS to do automatic water changes throughout the day. I will be adding black John Guest 1/4" bulkheads on the top, left side of the sump and heat bending 1/4" acrylic tubes to lead out of the bulkheads and down the left side of the sump, hugging it pretty tightly. They will drop down to a bulkhead plate that leads out the bottom of the stand and disappear into the basement. I will have additional matching hard tubes that will also lead to the basement for dosing fertilizers.
I am reusing my Giesemann Spectra and running Hamilton 6500k 250 watt bulbs. I added a Pentair UV sterilizer and fabricated a custom CO2 diffuser. The planted style I am shooting for is a combination of Dutch and Iwagumi. I have my soil and hardscape already in, but will post pictures of that later once there's some green stuff in there.
- Joined
- Nov 11, 2018
- Messages
- 462
- Reaction score
- 158
well i jist re-read back thru the first 25 pages of this threadbfor like the 10th time. lol. So freakin EPIC. great job broadfield!
i am in need of cord management 101. lol. when i look at all the pics V1 sump. V2 sump i literally see no cords. and so many of my cords are either too long or too short to route correctly.
I am currently tryung to figure out how to build the book shelf unitafter the tank has already been setup.
i am in need of cord management 101. lol. when i look at all the pics V1 sump. V2 sump i literally see no cords. and so many of my cords are either too long or too short to route correctly.
I am currently tryung to figure out how to build the book shelf unitafter the tank has already been setup.
Last edited:
Can you explain your drain to your sump? Sorry if it has been answered already, I couldn't find it.I knew that switching out sumps, plumbing etc would be stressful. So I got as much of the plumbing glued up and ready to roll ahead of time. That way my tank would be down off of life support for the least amount of time. I decided to pull the trigger Monday after work.
Before:
IMG_5972 by Toby Broadfield, on Flickr
Removed:
IMG_7676 by Toby Broadfield, on Flickr
Manifold and main piping installed:
IMG_7681 by Toby Broadfield, on Flickr
Virtually everything swapped over:
IMG_7696 by Toby Broadfield, on Flickr
I still need to do all of my accent lighting, ultra organize the cable runs etc. I'll then get some pics with my good camera. I have an acrylic shipment coming in this week, so hopefully I can get more done on the control center side.
It appears that you are using a Bean Animal. Typically I would expect all 3 to drain into the sump, but it looks like you have one going to your cluster of reactors. Which one of the drains goes to that/how are you controlling flow?

- Joined
- Feb 28, 2017
- Messages
- 1,611
- Reaction score
- 1,044
Hello from Toronto, Canada! I wish you come visit us Toby! Awesome design! I am OCD like you too but no DIY skills lol 
is elite aquatics still around? The website is not valid anymore.
are you able to list all your plumbing parts on here?
instead of using conventional reactors, I am thinking of using Nyos Torq. Any experience with it?
is elite aquatics still around? The website is not valid anymore.
are you able to list all your plumbing parts on here?
instead of using conventional reactors, I am thinking of using Nyos Torq. Any experience with it?
- Joined
- May 13, 2016
- Messages
- 534
- Reaction score
- 1,092
They are still around, contact him via facebook and he'll respondHello from Toronto, Canada! I wish you come visit us Toby! Awesome design! I am OCD like you too but no DIY skills lol
is elite aquatics still around? The website is not valid anymore.
are you able to list all your plumbing parts on here?
- Joined
- Feb 28, 2017
- Messages
- 1,611
- Reaction score
- 1,044
They are still around, contact him via facebook and he'll respond
I am not on Facebook and will never be. I guess they only deal with social media people?

- Joined
- Dec 19, 2019
- Messages
- 53
- Reaction score
- 22
i have a red sea max e170, has anyone found pipes / fittings to fit the red sea max e170 bulkhead? Ive found info on the reefer but dont know if its the same. have all the acrylic to build my sump / refugium but really need to get the plumbing squared away. ive heard the use 32 mm pipe but when measuring the plug in bulkhead looks closer to 1.75" not 1.25 (32mm) any help greatly appreciated, dont want to drain the bulkhead only to find out i need different parts. thanks for any help
I am curious to know if you ever tried it. I currently have a 450 reefer with water and was thinking of changing out my plumbing to what he did as well.That was a quick reply. I'm a little nervous about removing the stand pipes on an operational tank. It definitely makes more sense to do it before the tank is up and running. I'm going to consider it though. Thanks for taking the time to explain in detail!
Similar threads
- Replies
- 2
- Views
- 94
- Replies
- 1
- Views
- 84

New Posts
-
-
 Best reef ready tank deal of 2024 - whose looking for a new tank?
- Latest: VintageReefer
-


