Navigation
Install the app
How to install the app on iOS
Follow along with the video below to see how to install our site as a web app on your home screen.
Note: This feature may not be available in some browsers.
More options
You are using an out of date browser. It may not display this or other websites correctly.
You should upgrade or use an alternative browser.
You should upgrade or use an alternative browser.
DIY Algae Scrubber
- Thread starter Reefer5640
- Start date
- Tagged users None
That’s neat. I’m trying really hard to keep everything in tank (leak paranoia). I did look at the External reactors and they’re really promising although they all seem to be Chaeto reactors. Interesting to see if they would work as a turf scrubber.No I haven't but Diy king has a few on YouTube. Im actually in process of making a reactor algae scrubber for my waterbox20.i just need to add a pump,hose and light. Thinking on making a light box to keep the light from spill

As a humble suggestion- You could tie thin weed whacker string onto the mesh. This seems to help the algae stay rooted longer.
- Joined
- Apr 25, 2018
- Messages
- 31
- Reaction score
- 9
@damaneice if you end up making one you should post pics of your build. I’d like to see how it turned out. Wether you use the same method or not.
Here is my build:
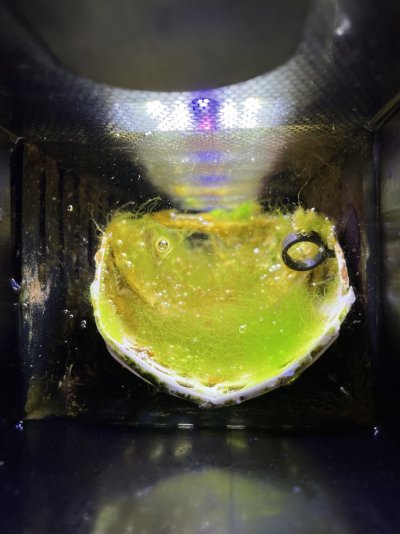
The covered the box with black corrugated plastic. I should have done a better job of cutting the plastic but it should work well enough.
Right on man! That’s awesome. Looks good. How did it go? Pretty quick and easy? Or more involved than I made it out to be?Here is my build:


The covered the box with black corrugated plastic. I should have done a better job of cutting the plastic but it should work well enough.
These are quite some diy turf scrubber. Lol.
I'll quote the great haystack. CATCH ME AT THE RED LIGHT!
lol I think my design is the best. Take it or leave it. Lol. Kachow. Lol
D
I'll quote the great haystack. CATCH ME AT THE RED LIGHT!
lol I think my design is the best. Take it or leave it. Lol. Kachow. Lol
D
If u make this. Put the union after the gate valve.
Lol.
D
Lol.
D
- Joined
- Apr 25, 2018
- Messages
- 31
- Reaction score
- 9
Right on man! That’s awesome. Looks good. How did it go? Pretty quick and easy? Or more involved than I made it out to be?
It took me longer than I thought it would. But that is normal for me when it comes to DIY projects. I think it turned out pretty good.
Yeah it looks good man!It took me longer than I thought it would. But that is normal for me when it comes to DIY projects. I think it turned out pretty good.
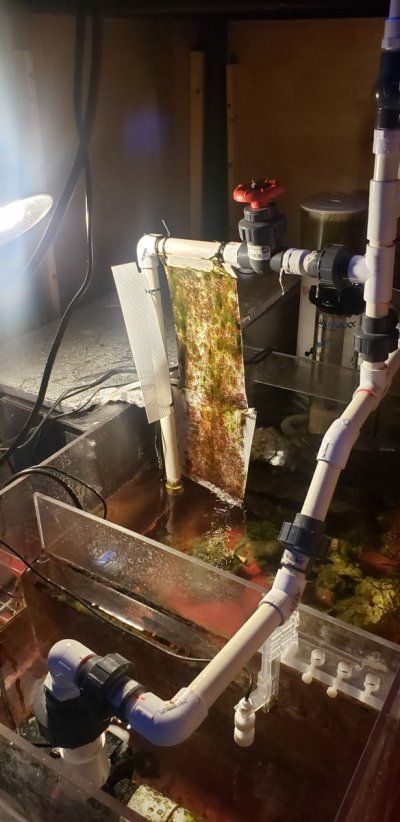
For those of you that are considering a DIY algae scrubber. Here’s my latest attempt. This ended up costing just under $100. If I had used sch40 fittings rather than sch80 I could have saved at least $20 if not more. For the base I just cut a piece of acrylic and adhered it to the bottom with Weldon 16. I drilled and tapped the holes for the lights and mounted them with nylon thumb screws. I didn’t add a valve because I’ve got a manifold off my return pump with a designated valve for the scrubber so consider that if anyone uses this part list. I can give more detail if anyone is interested in using this list of how I did certain parts. But for the most part I used a dremel to cut the container. And a tap to mount the lights with thumb screws. Those two parts were probably the only part of this project that required a little attention to detail. Aside from that, this was a super simple project that anyone could do.
Here’s the list of parts with links;
-Acrylic Container- $13
-Lights -$25 (x2)
-1/2” FNPT Lock Nut- $0.40 (x2) *The link is for a pack of 50 which is $19 for the pack. You can make these by cutting a ring off a threaded fitting if you don’t want to buy them.
Morris Products 22558 NPT Lock Nut, Nylon, 1/2" Trade Size (Pack of 50): Amazon.com: Industrial & Scientific
Morris Products 22558 NPT Lock Nut, Nylon, 1/2" Trade Size (Pack of 50): Amazon.com: Industrial & Scientificwww.amazon.com
-O-rings- $0.32 (x2) *Could cost more or less depending what size of pack you get or if you can find a couple o-rings laying around that work.
-1/2” FNPT x 1/2” FNPT schedule 80 union- $7.50 *I prefer the threaded but this is obviously preference of how it’s plumbed.
-1/2” Male Adapters- $6.35 (x3) *Way cheaper if you use schedule 40. I just prefer grey over white and didn’t want to paint the plumbing.
-1/2” slip 90- $5.05 *Again, cheaper with sch40
-1/2” Barbed x 1/2” MNPT Adapter- $0.70
-Mesh sheets- ~$2.00 (a couple medium sheets cost about $5.00)


So how much is a unit shipped to Florida? Looks great! Good job!
I’m sorry man I just don’t have the time. I’m working a ton of hours lately. But if you decide to build one and you have any questions let me know I’m happy to help from that perspective.So how much is a unit shipped to Florida? Looks great! Good job!
Tank water is fed through one side across the top and trickles down the screen. It then floods out through the bottom/side back to the sump. The third outlet is just a secondary drain incase the primary drain gets clogged. The lights are primarily red spectrums used to promote plant growth. Hope that helps. I’m sure there’s a better way to explain it.Being unfamiliar with this, could you please describe the function? Especially the need for 3 pipes. I think I grasped the concept You are using UV lights correct?
@Reefer5640 do you know, when using TWO lights, is it possible to cut the plugs off, and wire both lights to one plug? i.e., it looks like the plug reduces it to 12W. So if you wired both lights to the same plug, would it work?
Also, dumb question, but I'm assuming the incoming water pipe across the type just has a bunch of holes drilled in in a straight line, for the water to trickle through?
Also, dumb question, but I'm assuming the incoming water pipe across the type just has a bunch of holes drilled in in a straight line, for the water to trickle through?
Last edited:
Sorry for the delayed response. Been super busy at work. You would need a power supply rated to run both lights but you could do it. The power supply it comes with is 24v, 2 amps/12watts which is technically undersized as is since the LED’s are 0.5watts and there’s 40 of them which equals 20watts. So technically you could get more out of them by by getting a bigger power supply. As long as it’s a 24v power supply and the amp rating is higher than 4 amps (which would be two of the original power supplies) you should be good. the lights will only draw what they need as far as amps are concerned. Voltage is what matters as far as ruining the lights goes. If I was going to do that I’d probably go with something like this (I’m pretty sure they are 5.5mm barrel connectors on the ends but I’d have to check to be certain.@Reefer5640 do you know, when using TWO lights, is it possible to cut the plugs off, and wire both lights to one plug? i.e., it looks like the plug reduces it to 12W. So if you wired both lights to the same plug, would it work?
Also, dumb question, but I'm assuming the incoming water pipe across the type just has a bunch of holes drilled in in a straight line, for the water to trickle through?
As for the pipe across the top, I cut a slit down the pipe the length of the screen. Then you slide the screen into the cut and zip tie it in place.
Sorry for the delayed response. Been super busy at work. You would need a power supply rated to run both lights but you could do it. The power supply it comes with is 24v, 2 amps/12watts which is technically undersized as is since the LED’s are 0.5watts and there’s 40 of them which equals 20watts. So technically you could get more out of them by by getting a bigger power supply. As long as it’s a 24v power supply and the amp rating is higher than 4 amps (which would be two of the original power supplies) you should be good. the lights will only draw what they need as far as amps are concerned. Voltage is what matters as far as ruining the lights goes. If I was going to do that I’d probably go with something like this (I’m pretty sure they are 5.5mm barrel connectors on the ends but I’d have to check to be certain.
As for the pipe across the top, I cut a slit down the pipe the length of the screen. Then you slide the screen into the cut and zip tie it in place.
Thank you. The images didn't come through. Do you have a link to what you were recommending?
How did you cut a slot in the pvc? That seems very tricky. Multi-tool or something? The idea makes sense, because that would force all the water to start down the screen immediately.
Weird they are showing up when I look at this post. They are links. Let’s see if this works.Thank you. The images didn't come through. Do you have a link to what you were recommending?
How did you cut a slot in the pvc? That seems very tricky. Multi-tool or something? The idea makes sense, because that would force all the water to start down the screen immediately.
Attachments
Weird they are showing up when I look at this post. They are links. Let’s see if this works.
Nope, just a blank page. Definitely not a url or anything.
Similar threads
- Replies
- 8
- Views
- 243
- Replies
- 1
- Views
- 65
- Replies
- 1
- Views
- 60


