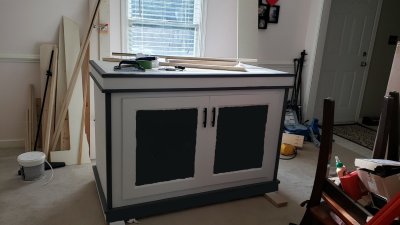
DIY Stand

OP
OP
AbjectMaelstroM

AbjectMaelstroM

Valuable Member
View Badges
Joined
Jul 21, 2019
Messages
1,527
Reaction score
1,811
Location
RVA
Rating - 100%
1   0   0
Got some help dragging the 150lb beast outside, busted out the ol Wagner sprayer and put down two coats of Killz 2 primer.

20190830_154655.jpg


20190830_154650.jpg


20190830_154707.jpg


Went back, filled in some nail holes, sanded and one more coat of primer. Also got a coat of primer on the doors.

Went and grabbed two rattle cans of appliance epoxy paint for the inside... Not enough. Got about 2/3rds done, so I'll grab 2 more cans tomorrow to finish the job.

Hoping the weather holds for one more day so I can knock this out and call it done.
 
OP
OP
AbjectMaelstroM

AbjectMaelstroM

Valuable Member
View Badges
Joined
Jul 21, 2019
Messages
1,527
Reaction score
1,811
Location
RVA
Rating - 100%
1   0   0
Well, this portion of the tank build is nearing completion. Got the paint down yesterday and pretty happy with the results. Just have to go back and touch up places where the brush slipped and some tape bleedthrough.

20190901_090732.jpg


Debating whether or not to paint the bottom base the same gray as the trim or leave it white. How about the door shakers (inside square portion)?
 

Red_Beard

Valuable Member
View Badges
Joined
Feb 17, 2019
Messages
1,220
Reaction score
1,490
Location
Utah
Rating - 0%
0   0   0
Tape bleed is the worst! That is a very good looking stand, the dark trim really makes the profile pop, looks awesome!

IMO the bottom would look good dark but looks good as is too. Not sure on the shakers though, but I guess that depends on the tone you are going for. As is the dark makes it pop light, but with that much more dark the majority color on the front will be dark. That would switch the overall tone to dark. But, the white would really highlight and accentuate the dark well.

If you are undecided rip your picture into photoshop or Microsoft paint and draw the shakers dark that would give you a visual at least.
 
OP
OP
AbjectMaelstroM

AbjectMaelstroM

Valuable Member
View Badges
Joined
Jul 21, 2019
Messages
1,527
Reaction score
1,811
Location
RVA
Rating - 100%
1   0   0
Hope you don't mind, i took a few liberties with your picture. it is a little quick and dirty (my one year old was sitting with me saying "buttons" and pushing everything she could find) I think it looks pretty good both ways

20190901_090732.jpg

HAHAH that's great. I'll show it to the "boss" tomorrow, see what she thinks.

I think I'm sold on the gray bottom section. The shakers I'm gonna need a second opinion. Info think white will stand out more against the dark background as the wall below the chair rail is dark gray. I'll post some pics tomorrow.
 
Last edited:
OP
OP
AbjectMaelstroM

AbjectMaelstroM

Valuable Member
View Badges
Joined
Jul 21, 2019
Messages
1,527
Reaction score
1,811
Location
RVA
Rating - 100%
1   0   0
Looks great!

Thanks! One step closer to having a reef tank. :cool:

Still need to seal the rest of the seams in the sumo area. Ran out of silicone 3/4 way through. Seems to be a pattern haha. Thought about buttoning up the rest of the back, but I think I'll leave 1/2 of it open, for plumbing and getting some air.
 

Deviant Nation

Community Member
View Badges
Joined
Jun 28, 2019
Messages
31
Reaction score
36
Rating - 0%
0   0   0
Looks really good as is!!! If you really want to add some more dark I would paint the outside trim of the doors dark and leave the center of the doors white. That way it is dark trim, white behind the doors, dark door trim, white center of doors. Either way looks awesome!
 
OP
OP
AbjectMaelstroM

AbjectMaelstroM

Valuable Member
View Badges
Joined
Jul 21, 2019
Messages
1,527
Reaction score
1,811
Location
RVA
Rating - 100%
1   0   0
Just moved it to the final location and I think I'm going to keep it the way it is as it is a good balance between blending and standing out.... If that makes sense.
20190902_075658.jpg


20190902_075653.jpg


Plan to build "matching" enclosure(s) for a 32 gallon BRUTE(s) on either side. At the very least 1 BRUTE enclosure (left side, closes to the kitchen for sink/water line access) for RODI water, debating whether to reserve the right side for the electronics enclosure/panel that will handle the ReefPi, outlets, pump/light controls. Or if I can find another spot for the electronics, I may do a 2nd BRUTE enclosure for saltwater mix, however, I don't particularly see a need for a permanent spot for saltwater bin as I will not be running an auto-WC station and will likely just wheel it out when I need to mix up a batch. Plus, the weight is really starting to add up (tank, sump, BRUTES, stand); the location of the tank runs ALONG 2 beams so I'll be putting in a 4x4 reinforcement beam supported by 2 jack posts in the crawl space, each one is rated for 18k lb.

What do ya'll think?
 
Last edited:
OP
OP
AbjectMaelstroM

AbjectMaelstroM

Valuable Member
View Badges
Joined
Jul 21, 2019
Messages
1,527
Reaction score
1,811
Location
RVA
Rating - 100%
1   0   0
The stand is gorgeous. How did you attach the panels? Did you recess the screws and fill the holes? Or is the trim hiding the screws?

Thanks!

The 3/4 ply panels are attached to the fame with 1 1/2 inch deck screws. I then routed the edges of the panel with a flush bit to the inner frame.

As for the screw holes, some I filled with wood filler and sanded; but majority of them are on the perimiter of the panels and are covered by trim.
 

reefiniteasy

Check me out on IG!
View Badges
Joined
Jun 6, 2018
Messages
2,347
Reaction score
5,335
Location
Orlando, FL
Rating - 0%
0   0   0
I have to build a stand for our 75 gallon bearded dragon habitat. All of my aquarium stands are raw wood and not paneled. But they are in my classroom and it doesn’t matter what they look like. But for this stand, it needs to look like furniture. Did you take 1/8” off all 4 sides of the 2x4 lumber?
 
OP
OP
AbjectMaelstroM

AbjectMaelstroM

Valuable Member
View Badges
Joined
Jul 21, 2019
Messages
1,527
Reaction score
1,811
Location
RVA
Rating - 100%
1   0   0
I have to build a stand for our 75 gallon bearded dragon habitat. All of my aquarium stands are raw wood and not paneled. But they are in my classroom and it doesn’t matter what they look like. But for this stand, it needs to look like furniture. Did you take 1/8” off all 4 sides of the 2x4 lumber?

Yeah, all the 2x4s and all the 2x6s. 2x6 were actually pretty dang true. The 2x4s got better, but not 100% true.

If I were to do it again, I'd probably just go all 2x6, at least for the top and bottom frames and keep 2x4s for the vertical supports.

Or better yet, 8020 aluminum extrusions haha.
 

don_chuwish

Smells something fishy
View Badges
Joined
Mar 21, 2012
Messages
3,013
Reaction score
3,386
Location
A better place
Rating - 0%
0   0   0
Very nice work! I have that same 'table saw jointer' jig - useful when something is REALLY crooked or just too large for the jointer. Truing up the 2x lumber is a critical step.
 

Dierks

Valuable Member
View Badges
Joined
May 3, 2018
Messages
1,601
Reaction score
3,274
Rating - 0%
0   0   0
Great Looking stand, will be following along with your build. I can appreciate nice craftsmanship. Keep up the good work Sir!
 

don_chuwish

Smells something fishy
View Badges
Joined
Mar 21, 2012
Messages
3,013
Reaction score
3,386
Location
A better place
Rating - 0%
0   0   0
Very nice work! I have that same 'table saw jointer' jig - useful when something is REALLY crooked or just too large for the jointer. Truing up the 2x lumber is a critical step.

Just thought of another useful technique that is easy enough with short pieces of 2x - just do multiple 'shaving' passes on alternating sides until they're both perfect and parallel. Then square cut the ends to final length. When I did my stand I was so much happier with the rounded edges gone.
The plywood adds a LOT of strength so there's no harm in shaving down the lumber. In fact the corners would be fine with just a single 2x3 - but it's easier to assemble with 2x4 and pocket screws.
 

Rock solid aquascape: Does the weight of the rocks in your aquascape matter?

  • The weight of the rocks is a key factor.

    Votes: 10 8.8%
  • The weight of the rocks is one of many factors.

    Votes: 42 36.8%
  • The weight of the rocks is a minor factor.

    Votes: 34 29.8%
  • The weight of the rocks is not a factor.

    Votes: 27 23.7%
  • Other.

    Votes: 1 0.9%
Back
Top