Jason Scalise

Active Member
View Badges
Joined
Apr 13, 2019
Messages
265
Reaction score
221
Location
Phoenix, AZ
Rating - 0%
0   0   0
Hello,

I have had a few ask me to share my build as it may give ideas to others.
Happy to but I should stress this is my first reef tank....and first build.

I have certainly learned along the way and it took me a while to "complete" as I only had a couple hours here and there...and on only a few weekends here and there.

Goal was/is to establish a SPS tank.

It has been just over a year since filling with water....and I appreciate amalgamating many good ideas posted here and on various sites to help me with this build.
I had some bright ideas of my own which in some cases were total failures and others continue to work well.

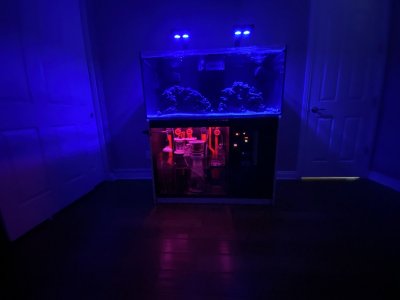
The display and stand and sump are a RedSea Reefer 425XL
Therefore DT volume is 88g and total volume with sump is 112g

Sump
Stock RedSea 24gSump
However, I do not use the supplied ATO tank. Different solution. (See below).

Lighting
2 AI Hydra 26 LED lights that come with the 425XL Reefer
Controlled using AI mobile app

Plumbing
All customized and used very little RedSea components.
Nothing against the RedSea components...I just wanted a certain look/layout/functionality.

Control
Neptune Apex Controller
Various Neptune modules (EB832, FMM, 1Link)

Wet Items
Neptune COR 20 return pump
Nyos 160 skimmer
2 AquaMaxx XS fluidized reactors inline with manifold
Aqua UV 25 Watt Sterilizer (independent submersible pump)
Custom ATO setup that runs through the Neptune controllers (gravity fed to sump)
1 Neptune DOS to perform AWC daily (about .4% total volume/day)
1 Neptune DOS to perform 2-part dosing
(both DOS units in garage and out of the way and out of earshot)
Pair of Neptune Wav powerheads...currently both mounted on back wall

Refugium
Custom built DIY to fit in return chamber of stock Reefer sump (see below).
Independent submersible pump
Refugium light = pendant light (amazon) with Luxbird 8w refugium LED bulb (amazon)

Mixing station in garage
BRS 75g/d 4-stage RO/DI unit
1 65g RO/DI reservoir
1 65g NSW reservoir
Plumbed directly to sump through wall for ATO and AWC purposes.

Current Livestock (I prefer smaller fish and like inverts)
2 zebra barred gobies
1 fire fish goby
1 Coris wrasse
1 Tomiyama Shrimp Goby
1 pistol shrimp
2 camelback shrimp
1 banded coral shrimp
1 sally lightfoot crab
2 pitho crabs
Various members of CUC

IMG_0454.JPG


IMG_0448.JPG


(more building info pending).

IMG_0454.JPG
 
Last edited:
OP
OP
J

Jason Scalise

Active Member
View Badges
Joined
Apr 13, 2019
Messages
265
Reaction score
221
Location
Phoenix, AZ
Rating - 0%
0   0   0
Mixing Station: Automation of ATO and AWC

As part of the overall goal, it was important to me to have as automated as possible for things like water changes and ATO. So I wanted to have a set of reservoirs that would supply ATO water and NSW...but I also wanted them out of the way and out of earshot.

I posted this previously in response to a specific request...but to keep with the flow here, reposting within this build thread.

I have a line that goes from my RO/DI reservoir (65g) in the garage and directly into the sump for ATO purposes. In other words, my 65g reservoir IS my ATO reservoir in addition to being part of my mixing station in the garage.

Here is what I did to keep it automated and safe with redundancies. Perhaps you may find parts of this useful:

Tank is 112g total volume (RedSea 425XL Reefer)

My mixing station is in my garage. Two 65g reservoirs.
RODI water on the left and NSW on the right.
I also do automatic water changes with the dosing pump on the top.
About .5g per day....so the NSW could last me several months if needed.
75g/day RO/DI unit is obvious on the left.
The two Neptune Dosing units run the AWC and my 2 part dosing (different thread if people are interested).
Note the 2-part reagents beneath the reservoirs.
All of this is in the garage to 1) keep it out of the way and clean and 2) I can't stand the dosing unit noise.
Reservoirs are about 15-20 feet away from the DT.

Screen Shot 2019-12-27 at 5.42.13 PM-2.jpg


IMG_0413.jpeg


For the RODI reservoir, I have easy access split to allow RODI water whenever needed (on the left) and then a line to my sump for the ATO function (on the right).
IMG_0409.jpeg
Standard 3/4" hose Y-split and hose connector. And a 1/4" RODI tubing quick connector threaded into that.
IMG_0410.jpeg


This provides the ATO function and is gravity fed to the sump. No pump required as gravity and just the column pressure from the 65g reservoir is more than enough.

This line (along with AWC lines and dosing lines) then go through the wall (using PVC pipe as a conduit through the dray wall) into the room opposite the wall where the display tank is.
Screen Shot 2019-12-27 at 5.51.25 PM-2.jpg


Some cotton stuffing into the tube to prevent critters being interested in taking an air conditioned vacation in the house.
IMG_0412.jpeg


As the lines pass inside, they enter the house in a closet and then from there, into the room with the display tank. I found this cord-hiding conduit at HomeDepot (white rectangle above base board). Has adhesive backing. Helps cords and 1/4" lines stay hidden and organized.


This is about as clean as it gets despite having a dozen cords and lines traversing to the tank.
IMG_0415.jpeg


IMG_0416.jpeg


IMG_0491.JPG


At the end of this ATO line is a float valve positioned in the sump. As water evaporates, it automatically performs the ATO function per normal. I live in the desert so this time of year, I get nearly 2 gallons of evaporation/day.

IMG_0417.jpeg


Now, I know you are saying..."Just one measly float valve between you and a 65g disaster in your house?!!"
NO. I thought of that too.

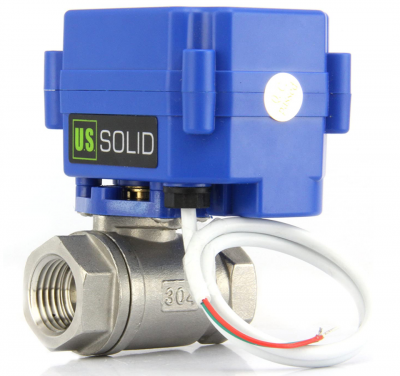
My redundancy is a powered ball valve that is between the reservoir and the ball valve.
[ATTACH type="full" width="297px" alt="A picture containing sitting, blue, small, table

Description automatically generated"]1675904[/ATTACH]

There is a little motor in the blue box which switches the ball valve from open to closed and vice versa. I like this option better than a standard solenoid because most solenoids need to remain energized to remain open. As such, they become warm (sometimes hot) and can fail in the stuck-on or stuck-off position. Given that > 99% of the time I want the valve open, that means >99% of the time it would need to be energized (I.e. powered). Not ideal.
However, this type of ball valve does not draw power in EITHER on or off status...just as it moves from one to the other. (see below)
So I found this ball valve on Amazon. ()
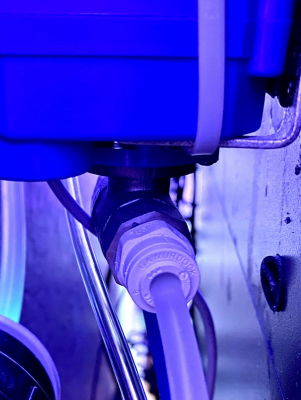
1594590176907.png


Has 1/4" threads allowing me to use the quick connect 1/4" tubing adaptors (I love those).


1594590268600.png

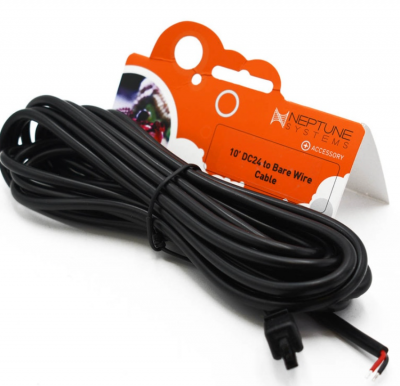
The wires on the valve were then connected to Neptune's "DC24 to bare wire accessory cable"
1594590291383.png


This was then connected to my FMM module in my system.


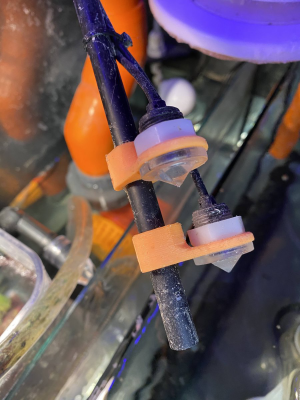
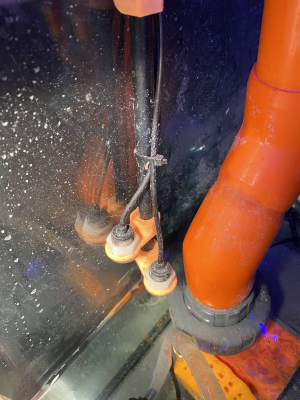
Also connected to the FMM were a pair of extra optical sensors that I had. I changed their orientation to mount "looking down" instead of horizontally and mounted on this low profile 3D printed plastic mount that Printed Reefing Solutions created for me (thank you!). The even did orange/black to match my plumbing. nice!

(here it is pulled out so you can see their orientation) 1594590317851.png


1594590338475.png
(back in their installed position just above the sump water line)


In this way, should the water level in the sump rise above my threshold (e.g. the ATO float valve fails open and RODI water comes cascading into the sump), this will quickly trigger the first (lowest) optical sensor to actuate the motorized ball valve to close. The upper sensor does the same thing and is a redundancy to the lower sensor....should it fail.
BTW....if an optical sensor is triggered (I.e. rising water for a different reason) it is programmed to shut down other components too (e.g. return pump, etc. Just additional programming).

The nice thing about the ball valve is that it draws no power in EITHER the open or closed position. It only draws power when the servo is asked to move the valve from open-to-closed or from closed-to-open.

A few simple lines of Apex code later (If 'optical' on then 'valve' off, etc....), and it works perfectly.
One could use float switches instead of the optical sensors and they would work fine to I suspect. But I had these handy.

Anyhow, it has been a year and I have been very happy with this. Not one leak; not one accident; super reliable....and I have never had to top off the system or anything inside the cabinet manually.... ever. Salinity has been rock solid and super consistent, in case you were wondering.

I do standard, simple maintenance of the float valve to make sure salt/crud are not in the way but beyond that, its awesome.


(more info pending)
 
Last edited:
OP
OP
J

Jason Scalise

Active Member
View Badges
Joined
Apr 13, 2019
Messages
265
Reaction score
221
Location
Phoenix, AZ
Rating - 0%
0   0   0
Plumbing

I wanted to have a clean look and one that give me extra room in an otherwise limited space. Getting rid of the supplied ATO reservoir in the sump helped.

I chose to have all the valves be gate valves. I removed the dials and primed/painted them orange to be in keeping with the plumbing (I know...I am just that way).
IMG_0466.JPG


I also exchanged out the RedSea DT outflow diaphragm valve with a gate valve to add more fine control and responsiveness. Others have done this too. Wont claim this as my idea.


Blue ¼” line on the back wall is the incoming NSW during AWC.
Screen Shot 2020-07-12 at 2.49.55 PM.png

Old saltwater is removed from the black ¼” line that is zip-tied to the orange pipe downspout that feeds the sump on the far right. Hard to see here....but that is the point.
Screen Shot 2020-07-12 at 2.51.36 PM.png


Currently set to change out a little less than 0.5% total volume per day. This might even be overkill for now. But that is how it is set.

Because of the physical size of the UV sterilizers that I thought would be appropriate...it would cram the cabinet/sump space from my point of view. Therefore, I planned to put the UV unit outside of the cabinet but still in a way that was hidden. (next post).


I also wanted the ability to have reactors. I chose these two extra small aquamaxx reactors as I planned to run both GFO and carbon here. As it turns out, I only run carbon and the second reactor is dormant at the moment.
Screen Shot 2020-07-12 at 2.54.00 PM.png
 
OP
OP
J

Jason Scalise

Active Member
View Badges
Joined
Apr 13, 2019
Messages
265
Reaction score
221
Location
Phoenix, AZ
Rating - 0%
0   0   0
UV sterilizer

I chose the Aqua UV 25W unit.
Like all sterilizers of this power, it is sizeable. I did not want to cram it into the under-cabinet space. Seemed like a nightmare to get to, service, etc. Therefore, I chose to mount it to the wall behind the cabinet. It is out of the way and easy to service as needed. A few simple PCV pipe brackets (about $0.35 at Lowes) were all that was needed to secure it and the power supply to the wall.
IMG_0490.JPG

IMG_0489.JPG

Water flow is from an independent and variable submersible pump in the sump that is rated up to 435GPH.
 
OP
OP
J

Jason Scalise

Active Member
View Badges
Joined
Apr 13, 2019
Messages
265
Reaction score
221
Location
Phoenix, AZ
Rating - 0%
0   0   0
Control Units

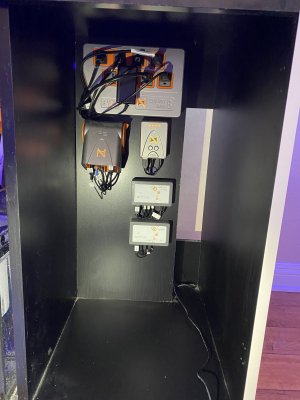
It was important to me to have the controllers mounted with a clean look, for easy access BUT also have all of the wires out of sight and organized. I cant stand a rat’s nest of wires. Makes me mental.

So, I mounted the Neptune components on this board. Black shelving from local hardware store and cut down to size with chop saw. Then fixed in place with a few screws.
img_0469-jpg.1675948


Easy to remove 2 screws and the whole control board comes out. On the back of the board I have mounted the various power supply ‘bricks’.

I purposefully left the right side open so as to have easy access as, again....as a 1st build...i was not sure what mistakes I would make and need to un-make. I felt this gave me a good balance of a clean look but also flexibility of changes on the fly.
IMG_0470.JPG


This space should be more than fine for a Triton unit should I choose to go that route. For now, not considering that as reagents are a bit hard to come by. Also, things are pretty right now as is.
IMG_0486.JPG


IMG_0469.JPG
 
OP
OP
J

Jason Scalise

Active Member
View Badges
Joined
Apr 13, 2019
Messages
265
Reaction score
221
Location
Phoenix, AZ
Rating - 0%
0   0   0
Refugium

I installed this about 3 months ago as I wanted to see how this would work and how it would add some additional nutrient control.

I wanted it out of the way and also something modular such that if I did not like how it was performing, I could remove it easily.

I decided to go with a container set up and found this talk food container online and commenced with the DIY project.
OXO Good Grips POP Container - Airtight Food Storage - 6.0 Qt (amazon.com)
1594591351103.png

Removed it today to clean. Lots of coraline growing on the sides.
Plumbed a bulkhead on one side for an outlet that simply spills back into the return chamber.
IMG_0460.JPG

IMG_0462.JPG

It fits perfectly in the return chamber of the RedSea425xl sump.

I then used a separate powerhead pump to pump water into it.
IMG_0463.JPG


A bulkhead then returns water to the chamber.
Black tubing to keep algae growth to minimum
IMG_0465.JPG


In the refugium I have rubble, macro algae (but not right now because I am depleting Phos too quickly).
IMG_0504.jpg


I also fabricated a simple amphipod “hotel” which sits at the bottom. This thing is REALLY productive and was about $0.35 worth of material from Lowes. Corregated plastic.
.
IMG_0495.JPG


Lighting for the fuge is with a simple pendant gooseneck lamp and a Luxbird 8w refugium LED bulb. Both from amazon and all in....very economical. Again, I was not sure my fuge would be a long-term player in my set up, so I wanted to go with the “let’s see” approach. The light is controlled from Neptune settings.
1594591846917.png

1594591858594.png


I even have one of my zebra barred gobies in here for now has it was acting strangely. Just sitting on the bottom and looking a lot like sally lightfoot food (from Sally's point of view). I took him out to vacation in the fuge. He has perked up and perhaps he was getting bullied and needed a rest.

I have noticed an immediate drop in nitrates with this fuge (working well I guess). However, my nutrients starting to drop too low, so I reduced the photo period and removed the macroalgae.

Like I said, work in progress and we will see.
 
OP
OP
J

Jason Scalise

Active Member
View Badges
Joined
Apr 13, 2019
Messages
265
Reaction score
221
Location
Phoenix, AZ
Rating - 0%
0   0   0
Struggling (again) with keeping my Neptune salinity (conductivity) probe stable. Was working fine (for a couple months) until yesterday.
Lots of calibration with proper technique.
Now after multiple calibrations, it either reads 2.6 or 57.8.

salinity check with Milwaukee optical analyzer remains at 1.026 (SG).
Probably easier just to use that.

I do however like having a continuous conductivity probe....to watch for changes in trends. For instance, I recently forgot to re-open my ATO valve after some routine maintenance and remembered when the I saw the salinity creep up the next day due to evaporation.

I know others have had issues with the Neptune probe as well.
 
OP
OP
J

Jason Scalise

Active Member
View Badges
Joined
Apr 13, 2019
Messages
265
Reaction score
221
Location
Phoenix, AZ
Rating - 0%
0   0   0
Quick update on AWC system thoughts....

I took heed of a recent discussion about potential problems with AWC setups. That is, clogging over time of the 1/4" lines coming from the NSW reservoirs....and more so with certain salt mixes that are prone to sediments.

see previous discussion here for further info

Such blockages could lead to old salt water extraction with no NSW addition....but being replaced instead with ATO RODI water.


In my case...
I had some sediment (not major) in the bottom of my 65g NSW reservoir and decided to do an acid flush.
Acid in my case was a gallon of vinegar. very cost effective.
I pulled it through the AWC lines (both NSW and OSW) and had it discharge into a waste bucket.
I did not want to change out my lines as it is rather a long run, snaked through walls, etc, etc.

After loading the lines with vinegar (pH is about 2.5 which I figured was low enough), I let them sit for 30-60 min. Flushed a bit more and let sit again. Plenty of crud coming out. see video link below.
Given the narrow diameter of 1/4" RODI lines, it would not take much of a piece of sediment to foul things.

Here is the link:


I than hooked up each run to a garden hose using a standard pushlock-hose RODI adapter so that I could put sufficient pressure through the line to dislodge any other bits...and flush our the vinegar.

Then blew air through the lines to void them.

I took the opportunity to clean out, acid wash, and power wash the NSW reservoir too. Might as well start fresh....

Although I have been using Tropic Marine Pro for about 3 months now (and love it) I still had the old sediment from prior/other products. But no more sediment now. Completely clean now and reservoir looks pristine.

Thanks to those who posted this issue before as I think it was a valuable maintenance item for my case.
 

DukeSilver

Community Member
View Badges
Joined
Jul 27, 2020
Messages
29
Reaction score
18
Location
Pawnee
Rating - 0%
0   0   0
May I ask what fittings you used to start your new downpipe and overflow from the existing red sea downpipe and overflow?
 
OP
OP
J

Jason Scalise

Active Member
View Badges
Joined
Apr 13, 2019
Messages
265
Reaction score
221
Location
Phoenix, AZ
Rating - 0%
0   0   0
May I ask what fittings you used to start your new downpipe and overflow from the existing red sea downpipe and overflow?


here is a better picture.
IMG_5759.JPG


On the right side is the main down flow...and on the left is the overflow.

I used the Red Sea Part # 42221 and removed (unthreaded) the threaded tubing connector from its body.

Screen Shot 2020-08-05 at 9.47.39 AM.png


Then, for the right side (main down return to sump), I threaded in a 3/4" x 1" Sch 40 PVC Reducing Male Adapter.
Used a very healthy amount (10-15 turns?) of good quality sealing teflon thread tape as the 3/4" threads are not not exactly the same as the metric threads on the Red Sea stuff (as you probably know). The tape makes up the difference quite well. Blue Monster brand is readily available at most Home Depot style stores and seems to work well. Not one leak ever.

(That said, you CAN over do it on the tape and overstuff it which would cause a crack in the black plastic...so when completed, scrutinize it before proceeding.)

I then glued the 1" down pipe and gate valve into that set up.

On the emergency overflow side (left), the downpipe is 3/4" instead of 1" (3/4" x 3/4" Sch 40 PVC Reducing Male Adapter)...as I deemed that not critical for diameter and it gave me more room. But same concept and steps.

Note: because the gate valve needs to line up properly when all installed and be facing the front. Make sure you don't glue it all together and THEN try to thread it....as it won't line up properly.)

Oh....and the PVC Reducing Male Adapters from the hardware store don't come in orange, of course. I spray painted those to match the orange PVC pipes. Just because. You can see I spray painted the wheel of the gate valve too...as a bit has come off if you look close.
 

DukeSilver

Community Member
View Badges
Joined
Jul 27, 2020
Messages
29
Reaction score
18
Location
Pawnee
Rating - 0%
0   0   0
Thanks for the detailed response, you helped me in more ways than one. I was looking at 3/4 pvc and 3/4 gate valve for the main downflow. Your manifold looks great and the pictures have helped me visualize a setup alot

here is a better picture.
IMG_5759.JPG


On the right side is the main down flow...and on the left is the overflow.

I used the Red Sea Part # 42221 and removed (unthreaded) the threaded tubing connector from its body.

Screen Shot 2020-08-05 at 9.47.39 AM.png


Then, for the right side (main down return to sump), I threaded in a 3/4" x 1" Sch 40 PVC Reducing Male Adapter.
Used a very healthy amount (10-15 turns?) of good quality sealing teflon thread tape as the 3/4" threads are not not exactly the same as the metric threads on the Red Sea stuff (as you probably know). The tape makes up the difference quite well. Blue Monster brand is readily available at most Home Depot style stores and seems to work well. Not one leak ever.

(That said, you CAN over do it on the tape and overstuff it which would cause a crack in the black plastic...so when completed, scrutinize it before proceeding.)

I then glued the 1" down pipe and gate valve into that set up.

On the emergency overflow side (left), the downpipe is 3/4" instead of 1" (3/4" x 3/4" Sch 40 PVC Reducing Male Adapter)...as I deemed that not critical for diameter and it gave me more room. But same concept and steps.

Note: because the gate valve needs to line up properly when all installed and be facing the front. Make sure you don't glue it all together and THEN try to thread it....as it won't line up properly.)

Oh....and the PVC Reducing Male Adapters from the hardware store don't come in orange, of course. I spray painted those to match the orange PVC pipes. Just because. You can see I spray painted the wheel of the gate valve too...as a bit has come off if you look close.
 

Michael Rossi

Active Member
View Badges
Joined
Jun 16, 2020
Messages
148
Reaction score
89
Location
New Jersey
Rating - 0%
0   0   0
I decided to go with a container set up and found this talk food container online and commenced with the DIY project.
OXO Good Grips POP Container - Airtight Food Storage - 6.0 Qt (amazon.com)
This is a great idea. I've been researching cryptic zones and may use something like this to give it a try.
 
OP
OP
J

Jason Scalise

Active Member
View Badges
Joined
Apr 13, 2019
Messages
265
Reaction score
221
Location
Phoenix, AZ
Rating - 0%
0   0   0
no problem, happy to help.
it gets bulky with the PVC and fittings so watch what the things like valves and unions have enough clearance with the back wall of the tank stand. On paper they always do but for the real thing, sometimes you get surprised (don't ask how I know ;)).
 
OP
OP
J

Jason Scalise

Active Member
View Badges
Joined
Apr 13, 2019
Messages
265
Reaction score
221
Location
Phoenix, AZ
Rating - 0%
0   0   0
This is a great idea. I've been researching cryptic zones and may use something like this to give it a try.

Thanks.
I wanted something that....if it did not work out...I could pull out easily and go a different direction. This clearly fits into that category.
Case in point, it is still set up and has rubble in the bottom and a few hermits and a DIY pod-breeder. The pods are going nuts and find their way into the DT.

However, I took out macro algae as I was/am getting too low on nutrients. So I don't really need the refugium at the moment to be honest....other than it is additional filtration and a home for pods (which is nice). I now only run the fuge-lamp abut 2-3 hours/day...just to keep some photons going in there for the pods and general microfauna goodness. (not sure that is even necessary to be honest). But if/when I get my nutrients too high, will add back the macro.

I have been having to dose both Phos and Nitrogen every day to keep up.
 

Billldg

My Gem Tang Is Watching You
View Badges
Joined
May 14, 2018
Messages
17,478
Reaction score
121,885
Location
Georgia
Rating - 0%
0   0   0
Tank is really looking good. Look forward to seeing you add some SPS.
 
OP
OP
J

Jason Scalise

Active Member
View Badges
Joined
Apr 13, 2019
Messages
265
Reaction score
221
Location
Phoenix, AZ
Rating - 0%
0   0   0
Tank is really looking good. Look forward to seeing you add some SPS.

thanks for the nice comment. appreciated.
I have a few SPS frags in now but having mixed results.
for instance, some montipora's are doing ok (great PE but not growing much) where as some bird nest types have not made it.
(no signs of pests, btw)

I do have reasonable coraline growth, however....so that is encouraging.

I am resisting all efforts to make rapid changes, of course.
nutrients are in a good spot:
PO4 - 0.05
NO3 - 2ppm
Alk - 8.3dKh
Ca - 450ppm
Mag - 1500ppm
salinity - 1.026 SG

and as I said, I have to does both PO4 and NO3 daily otherwise they bottom out.
I turned off my skimmer a week ago to try to catch up.

I know it could be much worse....just trying to keep stable without obsessing over numbers.
 

Billldg

My Gem Tang Is Watching You
View Badges
Joined
May 14, 2018
Messages
17,478
Reaction score
121,885
Location
Georgia
Rating - 0%
0   0   0
Your parameters look good to me. I learned, after I did a total tear down and reboot of my 120, with the exception of the rock, that patience and tank maturity is KEY. The reason I have learned this and pass it on is that my 120 was up for a year and then crashed due to Dinos, I removed all water and sand from tank and added new sand and water. I had SPS in the tank before and they really didn't do much, now remember that. Roughly 5 months after my rebuild I added SPS and they simply took off. That's when I learned what tank maturity is. The rock roughly had 1 year 5 months of bacteria on it and thus the tank matured and the SPS took off. The moral of this story is to have patience, your tank will start to show the signs you want, just don't start to tinker with it while its trying to mature. As hard as it will be for me, on my next/current tank build I plan on having patience and, yes I plan on cheating a little, lol, adding live rock to the tank and sump to seed the Marco Rock I plan on using for the scape. Oh, and when I had several high end SPS frags growing like crazy, I added a birdsnest and it went POOF, go figure, lol!!!
 
OP
OP
J

Jason Scalise

Active Member
View Badges
Joined
Apr 13, 2019
Messages
265
Reaction score
221
Location
Phoenix, AZ
Rating - 0%
0   0   0
Thanks for the insights.
similar experience here: 1 year in and i had a Dino explosion. Although i did not have much growing in the tank at the time, it was effectively a crash.
I am post-crash now so to speak and under control from what I can tell. So I am considering it a “new” tank in many ways.
Thanks.
 

Johnsoto25

Community Member
View Badges
Joined
Jul 6, 2020
Messages
26
Reaction score
8
Location
Quincy
Rating - 0%
0   0   0
UV sterilizer

I chose the Aqua UV 25W unit.
Like all sterilizers of this power, it is sizeable. I did not want to cram it into the under-cabinet space. Seemed like a nightmare to get to, service, etc. Therefore, I chose to mount it to the wall behind the cabinet. It is out of the way and easy to service as needed. A few simple PCV pipe brackets (about $0.35 at Lowes) were all that was needed to secure it and the power supply to the wall.
IMG_0490.JPG

IMG_0489.JPG

Water flow is from an independent and variable submersible pump in the sump that is rated up to 435GPH.
what kind of adapter is that on the UV to small tubing??
 

Clear reef vision: How do you clean the inside of the glass on your aquarium?

  • Razor blade

    Votes: 146 61.1%
  • Plastic scraper

    Votes: 66 27.6%
  • Clean-up crew

    Votes: 84 35.1%
  • Magic eraser

    Votes: 42 17.6%
  • Other

    Votes: 65 27.2%
Back
Top