IM 30G L Build

Free Phyto Promo
Spend $39+ → free 16oz Phyto · Use code FREEPHYTO at checkout · $16.99 value · Densest 6-species blend · Free shipping on every order · 100% live arrival guaranteed Spend $39+ → free 16oz Phyto · Use code FREEPHYTO at checkout · $16.99 value · Densest 6-species blend · Free shipping on every order · 100% live arrival guaranteed
Shop Now Code: FREEPHYTO
OP
OP
CodyRVA

CodyRVA

2500 Club Member
View Badges
Joined
Nov 12, 2015
Messages
2,594
Reaction score
1,629
Location
Wilmington, NC
Rating - 0%
0   0   0
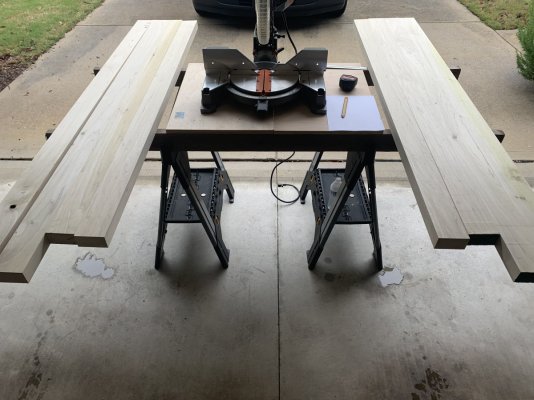
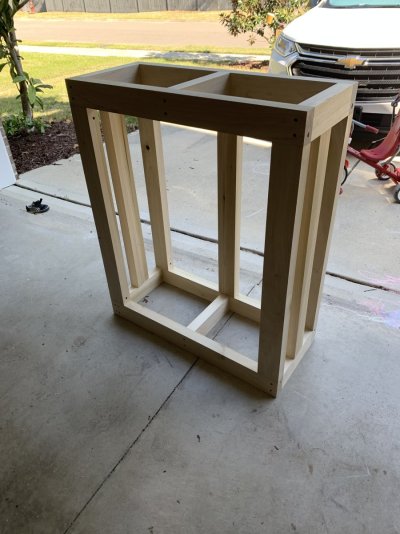
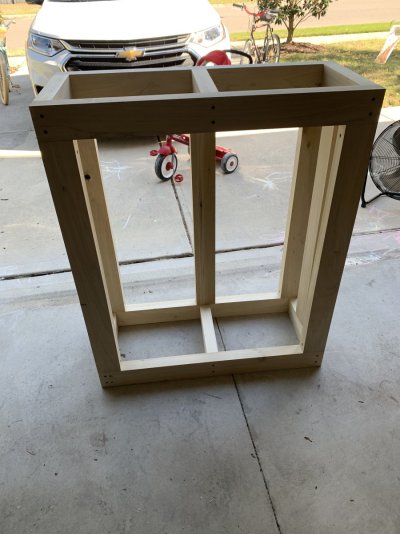
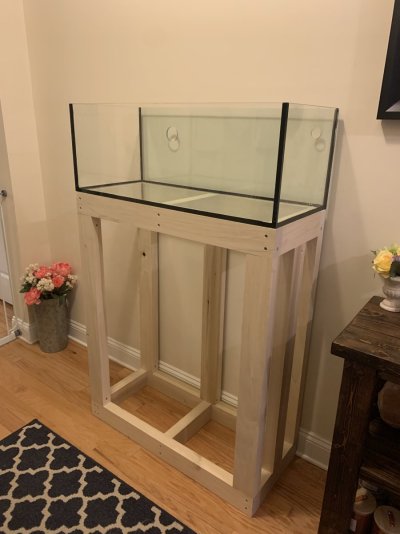
Stand build underway, so far so good. I sourced my wood from a local mill (poplar). I built 2 stands before with big box store lumber and after using legit square lumber, I’ll never go back!
 

Attachments

  • IMG_1640.jpeg
    IMG_1640.jpeg
    186.9 KB · Views: 124
  • IMG_1646.jpeg
    IMG_1646.jpeg
    328.6 KB · Views: 100
  • IMG_1647.jpeg
    IMG_1647.jpeg
    237.2 KB · Views: 112
OP
OP
CodyRVA

CodyRVA

2500 Club Member
View Badges
Joined
Nov 12, 2015
Messages
2,594
Reaction score
1,629
Location
Wilmington, NC
Rating - 0%
0   0   0
Alright, finally getting around to providing an update on the build. The stand is taking way longer than I expected, finding little time to devote to it. Finally in the final stages though. I just need to finish the drawer. I plan to create a front panel to access the sump, but I can work on that while the tank is cycling.

I ran into some trouble with my original 10G sump. It's simply too small. The excess water that will drain from the display to the sump during a power outtage exceeded the negative/available space in the sump. This is in part due to the skimmer I bought, it requires 8-10 inches of water and it's eating up a lot of space. Fortunately, Petsmart has 20G tall tanks on sale. It's a tight fit, but it should work. I plan on sectioning off a chamber at the end of the sump as my ATO. Next steps are to mock up some cardboard baffles for the sump design, hopefully mirroring the plan from the 10G design, ordering the acrylic baffles and finishing the drawer so I can start plumbing. Most of my plumbing parts have already been delivered, no doubt I missed something though.
 

Attachments

  • IMG_5193.jpg
    IMG_5193.jpg
    130.1 KB · Views: 56
OP
OP
CodyRVA

CodyRVA

2500 Club Member
View Badges
Joined
Nov 12, 2015
Messages
2,594
Reaction score
1,629
Location
Wilmington, NC
Rating - 0%
0   0   0
I’ll add details later, quick update.
 

Attachments

  • IMG_5398.jpeg
    IMG_5398.jpeg
    185.2 KB · Views: 45
  • IMG_5512.jpeg
    IMG_5512.jpeg
    175.8 KB · Views: 40
  • IMG_5527.jpeg
    IMG_5527.jpeg
    245.8 KB · Views: 36
  • IMG_5525.jpeg
    IMG_5525.jpeg
    78.8 KB · Views: 31
  • IMG_5523.jpeg
    IMG_5523.jpeg
    235 KB · Views: 33
  • IMG_5526.jpeg
    IMG_5526.jpeg
    98.6 KB · Views: 40
  • IMG_5530.jpeg
    IMG_5530.jpeg
    184.1 KB · Views: 43
OP
OP
CodyRVA

CodyRVA

2500 Club Member
View Badges
Joined
Nov 12, 2015
Messages
2,594
Reaction score
1,629
Location
Wilmington, NC
Rating - 0%
0   0   0
Sump done, had to modify the stand a bit to fit the larger sump dimensions. Drawer and knobs installed. Plumbing is almost done, couple fixes are pending. Knobs for the main panel have been sourced, just need to get the panel itself, which will likely be acrylic. Next step is to finish & fix the plumbing, then water test.
 

Attachments

  • IMG_5707.jpeg
    IMG_5707.jpeg
    133.3 KB · Views: 34
  • IMG_5708.jpeg
    IMG_5708.jpeg
    50.2 KB · Views: 43
  • IMG_5749.jpeg
    IMG_5749.jpeg
    68.2 KB · Views: 33
  • IMG_5754.jpeg
    IMG_5754.jpeg
    174.5 KB · Views: 42
  • IMG_5755.jpeg
    IMG_5755.jpeg
    155.5 KB · Views: 44
  • IMG_5653.jpeg
    IMG_5653.jpeg
    187.5 KB · Views: 39
  • IMG_5644.jpeg
    IMG_5644.jpeg
    122.1 KB · Views: 34
  • 76435656001__E799A673-E774-4CA7-B473-C0745DC696F1.jpeg
    76435656001__E799A673-E774-4CA7-B473-C0745DC696F1.jpeg
    208.7 KB · Views: 38
  • IMG_5641.jpeg
    IMG_5641.jpeg
    145.2 KB · Views: 33
  • IMG_5640.jpeg
    IMG_5640.jpeg
    153.3 KB · Views: 42
  • IMG_5638.jpeg
    IMG_5638.jpeg
    177.9 KB · Views: 36
  • IMG_5634.jpeg
    IMG_5634.jpeg
    84 KB · Views: 41
OP
OP
CodyRVA

CodyRVA

2500 Club Member
View Badges
Joined
Nov 12, 2015
Messages
2,594
Reaction score
1,629
Location
Wilmington, NC
Rating - 0%
0   0   0
Water test is under way. Had an issue right away with the seals and the overflow box, the painted back of the tank was preventing a seal. The box itself is also a tad off flush due to the limited space and uniseals I installed, hopefully cleaning off the paint fixed the issue, otherwise I’m gonna have to cut my plumbing.

There’s a mountain of noise too. A YouTube post added a tip for this overflow box to add a 45 to the primary drain and that solved that noise. But, the noise going into my sump is very loud due to the use of the media cup. Not sure how I’m gonna fix this yet… open to suggestions! 😅
 

Attachments

  • IMG_6052.jpeg
    IMG_6052.jpeg
    194 KB · Views: 37
  • IMG_6055.jpeg
    IMG_6055.jpeg
    169.5 KB · Views: 34
  • IMG_6056.jpeg
    IMG_6056.jpeg
    136.7 KB · Views: 35
  • IMG_6057.jpeg
    IMG_6057.jpeg
    142.6 KB · Views: 37
  • IMG_6058.jpeg
    IMG_6058.jpeg
    121.2 KB · Views: 32
  • IMG_6059.jpeg
    IMG_6059.jpeg
    155.5 KB · Views: 40
  • IMG_6060.jpeg
    IMG_6060.jpeg
    148.9 KB · Views: 38
OP
OP
CodyRVA

CodyRVA

2500 Club Member
View Badges
Joined
Nov 12, 2015
Messages
2,594
Reaction score
1,629
Location
Wilmington, NC
Rating - 0%
0   0   0
Update: still cycling, of course. Dosing ammonia every few days. Using an old bottle that seemingly has lost its potency, the bottle is probably 10 years old at this point. But, dosing every other day seems to be doing the trick. Still reading 0 ppm on nitrite and nitrate.
 

Attachments

  • IMG_6506.jpeg
    IMG_6506.jpeg
    174.8 KB · Views: 45

Tahoe61

10K Club member
View Badges
Joined
Mar 2, 2012
Messages
17,948
Reaction score
21,589
Location
AZ
Rating - 0%
0   0   0
Update: still cycling, of course. Dosing ammonia every few days. Using an old bottle that seemingly has lost its potency, the bottle is probably 10 years old at this point. But, dosing every other day seems to be doing the trick. Still reading 0 ppm on nitrite and nitrate.
I had a bottle of Ammonium Chloride that was only 3 months old and the Ammonium had evaporated. I bought Ammonium Bicarbonate and made up a batch.
I had no idea that Ammonium doesn't last very long.
 
OP
OP
CodyRVA

CodyRVA

2500 Club Member
View Badges
Joined
Nov 12, 2015
Messages
2,594
Reaction score
1,629
Location
Wilmington, NC
Rating - 0%
0   0   0
Quick chemistry update... This comes after a heavy dose of potentially old Ammonia. I can confirm the ammonia I'm using is a bottle from Ace Hardware and again, it's at least 10 years old, containing 10% Ammonium Hydroxide. In the past 1-2 caps spiked the ammonia levels and the cycle was full steam ahead. I've dosed probably 10 caps into this system so far and it finally seems like we're there.

PH: 7.9
Ammonia: 1.0 ppm
Nitrite: 1.0 ppm
Nitrate: Did not test
 
OP
OP
CodyRVA

CodyRVA

2500 Club Member
View Badges
Joined
Nov 12, 2015
Messages
2,594
Reaction score
1,629
Location
Wilmington, NC
Rating - 0%
0   0   0
Electrical organization, probably temporary, but good enough for now.
 

Attachments

  • IMG_6516.jpeg
    IMG_6516.jpeg
    141.4 KB · Views: 32
  • IMG_6517.jpeg
    IMG_6517.jpeg
    160.9 KB · Views: 42
OP
OP
CodyRVA

CodyRVA

2500 Club Member
View Badges
Joined
Nov 12, 2015
Messages
2,594
Reaction score
1,629
Location
Wilmington, NC
Rating - 0%
0   0   0
I was having issues with my gate valve, thread here. Specifically, it was very hard to adjust and super sensitive. I originally plumbed my primary return to drop into a media basket, but it looks like I'm going with almost no filter media on this build. By removing the basket and extending the primary return into the water, the gate valve adjustments have improved. It is still fairly sensitive which is odd, but it's definitely better.

I also removed the manifold I originally built. It was clunky, in the way and simply not necessary. What I was gaining by not needing an extra pump for a reactor, I was giving up in space and ease of access for my entire pump. Simply put, not worth it. I probably won't put another manifold on a system unless I have a dedicated fish room and an over sized sump seated a distance away from the display. Sucks that I essentially burned money on plumbing parts, but I was able to rebuild the return with leftovers so no additional parts were needed.
 

Attachments

  • Sump.jpg
    Sump.jpg
    151.8 KB · Views: 35
OP
OP
CodyRVA

CodyRVA

2500 Club Member
View Badges
Joined
Nov 12, 2015
Messages
2,594
Reaction score
1,629
Location
Wilmington, NC
Rating - 0%
0   0   0
Picked up a Royal gramma and a pair of lightning maroon clowns. Also got my reactor and skimmer going.
 

Attachments

  • IMG_7134.jpeg
    IMG_7134.jpeg
    257.6 KB · Views: 32
  • IMG_7135.jpeg
    IMG_7135.jpeg
    270.3 KB · Views: 34
  • IMG_7133.jpeg
    IMG_7133.jpeg
    242.3 KB · Views: 28
  • IMG_7136.jpeg
    IMG_7136.jpeg
    157.7 KB · Views: 45

TOP 10 Trending Threads

WHAT AMOUNT OF LIVE ROCK AND SAND SHOULD BE PRIORITIZED FOR OPTIMAL BIODIVERSITY/FILTRATION?

  • 100% live rock + bagged sand

    Votes: 38 26.0%
  • 100% dry rock + 100% live sand

    Votes: 48 32.9%
  • 50/50 live/dry rock, 50/50 live/bagged sand

    Votes: 34 23.3%
  • 75% live rock, 25% live sand

    Votes: 15 10.3%
  • 25% live rock, 75% live sand

    Votes: 11 7.5%
Back
Top