It's jojo's diy acrylic cube tank

its.jojo

Community Member
View Badges
Joined
Jul 1, 2019
Messages
73
Reaction score
120
Rating - 0%
0   0   0
Hey ya'll, I'm Joseph. I've had a diy acrylic system up and running for the past 18 months or so. Currently its a 24X36X16 rimless. I do love it but its bowing out on the edges so I've I've decided to upgrade my system and use a eurobrace this time around.

The plan is to build an acrylic cube with dimensions around 36"X36"X24 tall.

First I'll weld the stand up then size the tank to fit just right. Pictures attached show material and beginnings of the stand construction.

IMG_2379.jpg
IMG_2384.jpg
IMG_2386.jpg
IMG_2388.jpg
IMG_2390.jpg
IMG_2393.jpg
IMG_2394.jpg
IMG_2397.jpg
IMG_2398.jpg
IMG_2399.jpg
 

sstanley223

Active Member
View Badges
Joined
Jan 7, 2018
Messages
311
Reaction score
465
Location
North Aurora Illinois
Rating - 0%
0   0   0
Hey ya'll, I'm Joseph. I've had a diy acrylic system up and running for the past 18 months or so. Currently its a 24X36X16 rimless. I do love it but its bowing out on the edges so I've I've decided to upgrade my system and use a eurobrace this time around.

The plan is to build an acrylic cube with dimensions around 36"X36"X24 tall.

First I'll weld the stand up then size the tank to fit just right. Pictures attached show material and beginnings of the stand construction.

IMG_2379.jpg
IMG_2384.jpg
IMG_2386.jpg
IMG_2388.jpg
IMG_2390.jpg
IMG_2393.jpg
IMG_2394.jpg
IMG_2397.jpg
IMG_2398.jpg
IMG_2399.jpg
Sweet! I'm into the steel too! Watching!
 
OP
OP
its.jojo

its.jojo

Community Member
View Badges
Joined
Jul 1, 2019
Messages
73
Reaction score
120
Rating - 0%
0   0   0
With the side assemblies created and welds ground, its time to attach the beams that connect the two assemblies.

I only have one picture available at the moment. Plus I'll add that not everything went according to plan at this stage. I'll dig up some more photos later and explain the mishap.

IMG_2400.jpg
 
OP
OP
its.jojo

its.jojo

Community Member
View Badges
Joined
Jul 1, 2019
Messages
73
Reaction score
120
Rating - 0%
0   0   0
Here's more pictures of progress. Working my way around attaching the rest of the cross beams to one of the side assemblies.
IMG_3531.jpg


I was doing my best to square everything up using the aluminum framing square.
IMG_3532.jpg


Tack everything into place.
IMG_3533.jpg


IMG_3534.jpg


Moved the unit to the floor to begin to attach the other side assembly.
IMG_3535.jpg


IMG_3536.jpg
 
OP
OP
its.jojo

its.jojo

Community Member
View Badges
Joined
Jul 1, 2019
Messages
73
Reaction score
120
Rating - 0%
0   0   0
I never put in the detail of the stand material thickness: it's 3/16".

I plan on not placing any vertical bracing in the stand besides the 4 legs. I think the 3/16" steel should be strong enough across the span of 37" on all four sides.

Here's some pictures of my best welder. It also happens to be my only welder. :p
IMG_3557.jpg
IMG_3559.jpg


The trouble, with this welder is it's a little under powered for 3/16" thick steel. So I attempted to pre-heat my welds with the torch for better penetration. I believe the resulting welds are gonna work
 
OP
OP
its.jojo

its.jojo

Community Member
View Badges
Joined
Jul 1, 2019
Messages
73
Reaction score
120
Rating - 0%
0   0   0
Back to the the welding of the second side assembly.
IMG_3537.jpg


Getting all the way to the last beam and I noticed it's not aligned.
IMG_3538.jpg


So the thought was to grind down some of the welds on the top assembly (not shown in picture) and use the pipe clamp to force it back into alignment. Then tack it in place and fix it.
IMG_3541.jpg


IMG_3542.jpg


IMG_3543.jpg


IMG_3544.jpg
 
OP
OP
its.jojo

its.jojo

Community Member
View Badges
Joined
Jul 1, 2019
Messages
73
Reaction score
120
Rating - 0%
0   0   0
With those welds fixed I welded in a center brace on the top and bottom. But can’t find progress pics of that work.

So here’s pictures of the next steps (paint).


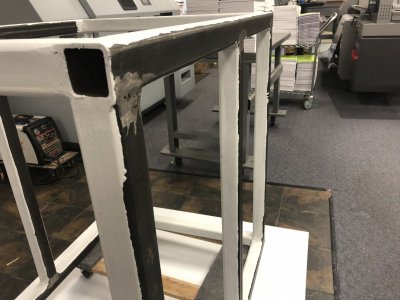
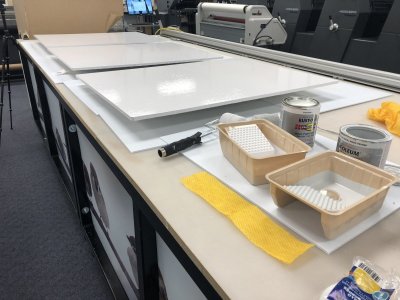
I decided to paint and not powder coat. Hopefully that decision won’t come back to bite me in the future. Rustoleum clean metal primer for first coat and gloss white for two final coats.
93367F68-8ED9-4316-803C-B4C6442DDC80.jpeg


I do printing for a living so most of the work now is being done at my shop. There’s lots of space and supplies too. Here’s a pic of the metal roller cleaner (MRC) that I used to wipe off the steel before applying the paint.
12C74621-0D1B-4B0B-BFCA-54174A5EF3B0.jpeg


Primer on all sides except the bottom. So now it’s flipped to finish it.
35A18C87-610B-45B1-A7CA-657C554B7156.jpeg

E243E439-BD9E-4656-BA65-C2969FA13984.jpeg
01F53AA7-FB89-4DA8-B10E-94A067BBF393.jpeg
B18D2851-059F-430B-9E68-F0B223DFF2A5.jpeg
C8616D23-1335-4DE9-831B-4EB46C769CC7.jpeg
 
OP
OP
its.jojo

its.jojo

Community Member
View Badges
Joined
Jul 1, 2019
Messages
73
Reaction score
120
Rating - 0%
0   0   0
I purchased a 4x8 sheet of birch plywood and cut it into a couple pieces that fit the top of the stand. I painted them the same paint as the rest of the stand. After painting a couple coats, I stuck the two pieces together with double stick tape (no pictures of that part of the work)

44D4C6AE-8198-4537-8907-D0E03874D241.jpeg


5717E960-2EEE-4459-81D3-33FCD6EFBC6C.jpeg


46E89FAA-13A8-4C88-AD87-0472F34D4DD0.jpeg


54BB205B-A030-4C81-AE66-34A0E0249BFA.jpeg
 
OP
OP
its.jojo

its.jojo

Community Member
View Badges
Joined
Jul 1, 2019
Messages
73
Reaction score
120
Rating - 0%
0   0   0
I purchased one more piece of 4’x8’ plywood. This time it’s to build the doors.

I hope to mount the doors flush with magnet push latches so they are completely and easily removable.

But first they need to be cut and painted.
D6305689-ADE2-4BF3-B845-92454C875135.jpeg


I marked the lines with a t-square.
2DFF3A2E-D61B-49C4-B579-EC3404AFEBAE.jpeg


Cutting in the morning before work.
63371446-5AA1-4EB6-8B5C-B0EB30E06140.jpeg


And before coffee. :)
058FA6C9-34AD-4E9F-BE4D-63D85A2E4411.jpeg


Gearing up for paint.
416C809E-170B-44BD-8C75-CF91817B52A4.jpeg


991F6ED2-FF11-458B-A792-33536E912D00.jpeg


A2896ECD-8559-436F-A7B0-77CA3D032121.jpeg


Gloss white like the rest of the stand.
You might also notice that I cut the corners at an angle to make room for the welds on the stand.
5AB2432C-4DAE-43C3-9CBD-C72C1DA6FA9D.jpeg
2C267145-A16A-4A1F-ABA8-D60A6551D48D.jpeg
 
OP
OP
its.jojo

its.jojo

Community Member
View Badges
Joined
Jul 1, 2019
Messages
73
Reaction score
120
Rating - 0%
0   0   0
Now for the bottom plate that holds the sump. Scrap piece of treated plywood. And scrap piece of pvc rigid foam (so I don’t have to paint anymore. Lol)

97DAA038-344B-4E8C-BABD-770C2CC0B08D.jpeg


7E6B9DDC-8654-4DE6-AF0B-9AA9AE99CB8C.jpeg


0043F3BC-7FFB-46B7-8F18-33598349025F.jpeg


CA6E2077-E4A4-43B3-B121-BD4F20F68AC8.jpeg


4D0C4E64-7622-451B-9E1C-5347DF81DEEC.jpeg


CDAB03AC-0D5B-474F-AA99-28434DFCC775.jpeg


C5EB540B-A3E9-4FEC-B64B-184165F341C7.jpeg
 

Reefing threads: Do you wear gear from reef brands?

  • I wear reef gear everywhere.

    Votes: 16 16.7%
  • I wear reef gear primarily at fish events and my LFS.

    Votes: 5 5.2%
  • I wear reef gear primarily for water changes and tank maintenance.

    Votes: 0 0.0%
  • I wear reef gear primarily to relax where I live.

    Votes: 17 17.7%
  • I don’t wear gear from reef brands.

    Votes: 50 52.1%
  • Other.

    Votes: 8 8.3%
Back
Top