- Joined
- Apr 28, 2018
- Messages
- 13
- Reaction score
- 44
Hi folks,
I wanted to share my experience in case it can assist anyone else that is about to give an NSA (negative space aquascape) a try. I really enjoyed the process and results, but BRS wasn't kidding when they said its a time commitment.
BRS of course has a great video on this if you haven't watched it yet.
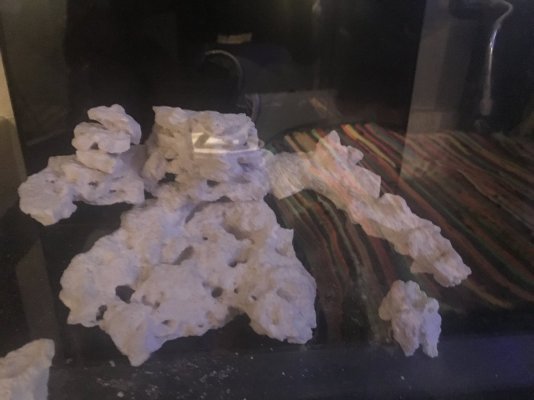
I completed my NSA over 3 days for a Red Sea 170 (35g) display.
Supplies,
Tips and lessons learned,
Give yourself a large chunk of uninterrupted time to get started. I would suggest 3 hours at least. I found that starting was the hardest part as there are infinite combinations and finding your initial shape can take a lot of consideration.
Expect your base to evolve and change as your structure develops. Use flat pieces for the base. Once you have your structure built out more, you will see where you want to add more to the base to provide support to prevent tipping over from the weight of the upper structure.
When joining flat pieces to create large base structures, ensure there is no debris under either piece when gluing them together.
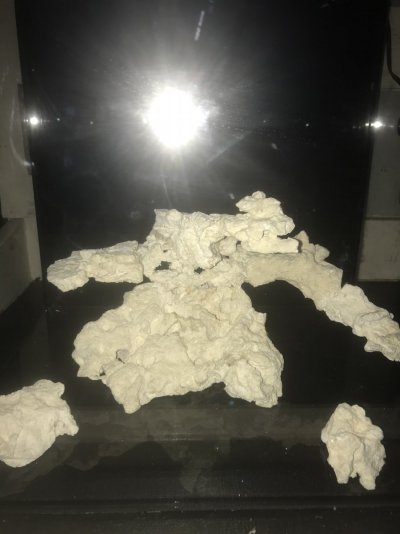
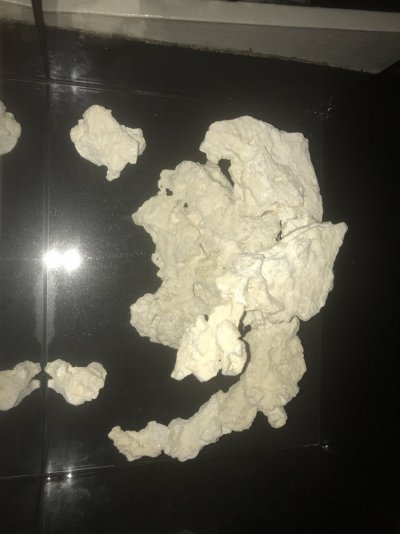
Always review the structure from all sides. Its very easy to keep adding pieces to a structure that looks amazing from the front, only to realize you built what looks like a pole from the side.
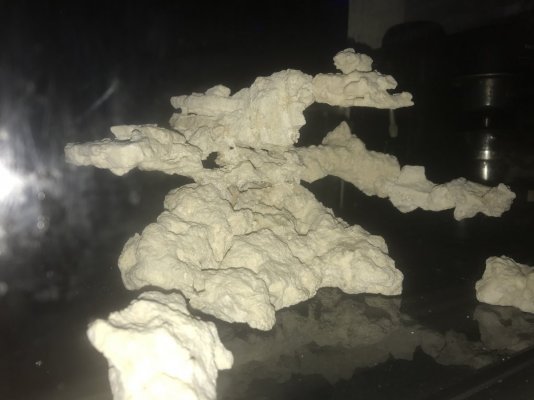
Be aware of which surfaces have access to the overhead light. Look at your structure from the top down and ensure light is hitting areas you want coral to grow.
Simply shatter some larger pieces into many small pieces. It is hard to chisel a specific shape, so just break them apart and discover interesting new shapes.
A few shelf pieces are nice to have (I had 3 medium pieces). I broke mine down into smaller shelf pieces that I combined into new shapes. You can also break them between the layers to create thinner shelf pieces.
Don’t try to finish in a day. I worked on the structure over 3 days. Each day I returned, I saw new opportunities to expand the structure or add little details.
Use crushed Marco rock in place of sand for a perfect match.
You likely want your structures to visually overlap when placed next to each other, appearing as one large, intertwined structure. Be sure they don’t overlap in such a way they can’t be dropped in the tank next to each other when walls are present.
Mark off the dimensions of your tank on the work surface and ideally build a PVC frame to represent the extents.
Leave room for a glass cleaner to slide down the walls of the tank without bumping the structure. The little branches higher up on the structure can sometimes reach too far.
Leave room above the structure for corals to grow without breaking the water surface.
Consider using all of those left over scraps for the perfect frag mount to match your tank.
I only used the one bottle of super glue, however it became very difficult to squeeze more out after about half the bottle was used. Get a second bottle if building anything bigger than this and consider a second regardless to make your life easier.
I could not find thin super glue to build up sand (crushed rock) on the surface as the BRS NSA video describes. However, using the thin mortar, I believe I still managed to hide the seams well and the surfaces appear to blend nicely.
I tried using a pastry sleeve to inject the mortar into the rocks, but it continued to harden to fast to be useful and I could not effectively get through a sleeve using the thickness of mortar I found most effective. I continued to just apply with my fingers (gloved) and coffee sticks.
I did try sand as well to hide mortar and seams, but found it didn't stick as well as the crush rock and did not blend as nicely. However, this is absolutely an option that can work good enough if crushing rock is not an option.
Lay towels or some protective material over all top edges of the tank when placing these heavy structures in the aquarium. It’s very easy to bump the lip or wall as you get them positioned.
Thanks for reading. I hope that can help someone just starting. I appreciate everything I have learned on these forums.


I wanted to share my experience in case it can assist anyone else that is about to give an NSA (negative space aquascape) a try. I really enjoyed the process and results, but BRS wasn't kidding when they said its a time commitment.
BRS of course has a great video on this if you haven't watched it yet.
I completed my NSA over 3 days for a Red Sea 170 (35g) display.
Supplies,
- Hammer And Chisel
- BRS 10 OZ. BOTTLE BRS EXTRA THICK GEL SUPER GLUE
- BRS INSTA-SET SUPER GLUE ACCELERATOR
- BSI Bob Smith 152 Insta Set Accelerator, 8 Oz. For Refills (Amazon), you only need the one sprayer bottle.
- BRS E-MARCO-400 AQUASCAPING MORTAR COMPLETE KIT - GREY
- Coffee sticks
- Rubber gloves (20+)
- Gallon Zip locks (3)
- ½ in. PVC pipe for frame
- Paper bowls for mixing mortar
- Tape for marking tank size
- Cheap, small paint brush to apply thin mortar (2)
- 38lbs of rock from local Reef store (35g tank, there was left over)
- 4 flat bases
- 3 medium shelves
- The rest was just random shapes I broke up
- Mark out dimensions of tank on a flat working surface that is as close to aquarium height as possible since this is how you will most often see it.
- Determine foundation with flat cut Marco rocks. You may need to glue some together. I suggest reserving a piece to glue on later and provide support that may not be obvious until much later.
- Break up some of the larger rocks to give yourself a starting set of interesting shapes.
- Find your design by holding up pieces and looking for the characteristics you are after. Consider,
- Starting off center on a base piece
- Long branching arms
- Stepping down of layers
- Interesting angles (avoid just vertical and flat shelves, unless that is the specific design you are after)
- Overlaps between structures
- Minimal contact points with the ground
- Caves and hiding places
- Avoid repetitive patterns
- Consider design principles like the rule of thirds
- Glue in place with super glue and set quickly with the BSI Insta-set
- Once you have a core structure you are happy with, stop. Do not cement yet and return the next day. You need fresh eyes to see issues or find new opportunities.
- You will have a lot of rock chips from breaking down the material. Put them in a zip lock and smash them to dust with your hammer. The zip lock will be quickly destroyed, but helps keep little chips from flying around. Spread the contents out on a flat surface and continue to break down any remaining chips.
- Review your work and consider if you have all the design elements you wanted. If not, just super glue those on now before starting to mortar.
- Add the Marco mortar to lock your design in place. You can add the thin second layer for holding sand immediately, no need to wait for this to dry.
- Now create a very thin mortar using extra liquid. Paint this onto the mortar you just applied and cover it in the Marco rock dust. Do one area at a time (dries fast) and work bottom up, to avoid dust on areas you have not painted with mortar yet.
- Let it rest overnight.
- Now that you have a strong base to build on, do you see additions such as,
- Extending branches
- Adding little shelves off the sides to hold frags or break up areas that appear too smooth.
- Repeat the steps above to continue to refine your design as you see fit and are happy with the results.
- Share your results.
Tips and lessons learned,
Give yourself a large chunk of uninterrupted time to get started. I would suggest 3 hours at least. I found that starting was the hardest part as there are infinite combinations and finding your initial shape can take a lot of consideration.
Expect your base to evolve and change as your structure develops. Use flat pieces for the base. Once you have your structure built out more, you will see where you want to add more to the base to provide support to prevent tipping over from the weight of the upper structure.
When joining flat pieces to create large base structures, ensure there is no debris under either piece when gluing them together.
Always review the structure from all sides. Its very easy to keep adding pieces to a structure that looks amazing from the front, only to realize you built what looks like a pole from the side.
Be aware of which surfaces have access to the overhead light. Look at your structure from the top down and ensure light is hitting areas you want coral to grow.
Simply shatter some larger pieces into many small pieces. It is hard to chisel a specific shape, so just break them apart and discover interesting new shapes.
A few shelf pieces are nice to have (I had 3 medium pieces). I broke mine down into smaller shelf pieces that I combined into new shapes. You can also break them between the layers to create thinner shelf pieces.
Don’t try to finish in a day. I worked on the structure over 3 days. Each day I returned, I saw new opportunities to expand the structure or add little details.
Use crushed Marco rock in place of sand for a perfect match.
You likely want your structures to visually overlap when placed next to each other, appearing as one large, intertwined structure. Be sure they don’t overlap in such a way they can’t be dropped in the tank next to each other when walls are present.
Mark off the dimensions of your tank on the work surface and ideally build a PVC frame to represent the extents.
Leave room for a glass cleaner to slide down the walls of the tank without bumping the structure. The little branches higher up on the structure can sometimes reach too far.
Leave room above the structure for corals to grow without breaking the water surface.
Consider using all of those left over scraps for the perfect frag mount to match your tank.
I only used the one bottle of super glue, however it became very difficult to squeeze more out after about half the bottle was used. Get a second bottle if building anything bigger than this and consider a second regardless to make your life easier.
I could not find thin super glue to build up sand (crushed rock) on the surface as the BRS NSA video describes. However, using the thin mortar, I believe I still managed to hide the seams well and the surfaces appear to blend nicely.
I tried using a pastry sleeve to inject the mortar into the rocks, but it continued to harden to fast to be useful and I could not effectively get through a sleeve using the thickness of mortar I found most effective. I continued to just apply with my fingers (gloved) and coffee sticks.
I did try sand as well to hide mortar and seams, but found it didn't stick as well as the crush rock and did not blend as nicely. However, this is absolutely an option that can work good enough if crushing rock is not an option.
Lay towels or some protective material over all top edges of the tank when placing these heavy structures in the aquarium. It’s very easy to bump the lip or wall as you get them positioned.
Thanks for reading. I hope that can help someone just starting. I appreciate everything I have learned on these forums.