My High Energy Rainbow Garden - Niji No Niwa

naterealbig

pea brain
View Badges
Joined
Sep 1, 2018
Messages
1,965
Reaction score
2,585
Location
Winter Garden
Rating - 100%
1   0   0
Hi everyone, I'd like to share with you my first post and build thread for my latest reef concept. Something that will set this system apart is that there will be as much (if not more) attention placed on the asthetics outside of the main display as within it.

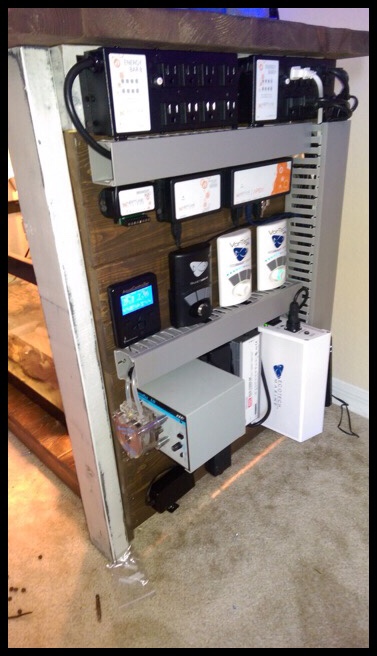
Focus will be placed on redundancy, proven methods, and a simple approach.

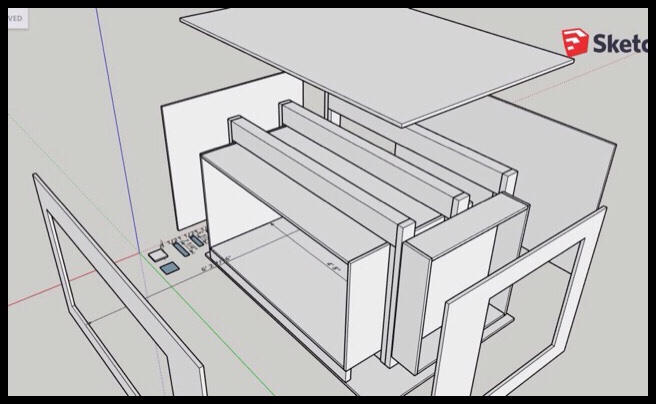
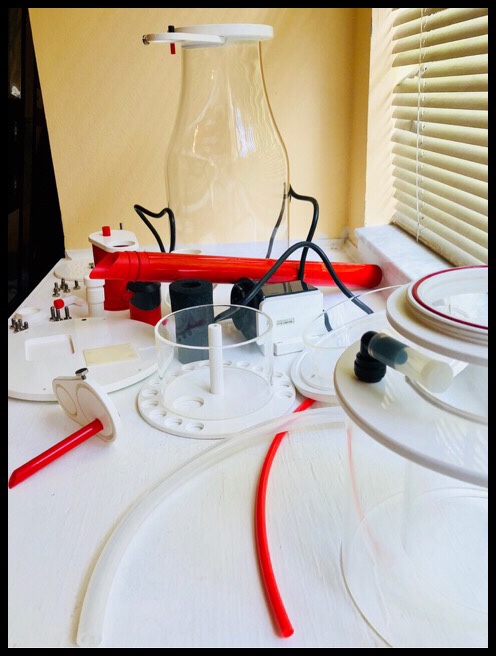
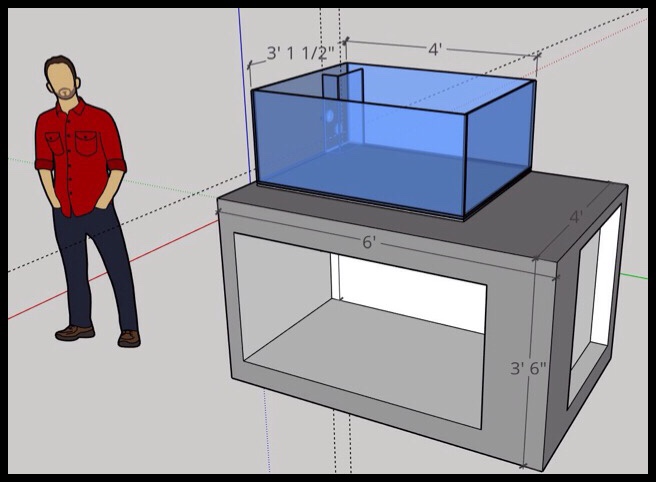
The display will be 48"x38"x20" high, and will boast an oversized open stand, large sump, large skimmer, large refugium, dual AC return pumps, halides, and some really cool plumbing. Didn't think we could make plumbing cool? Stay tuned!!

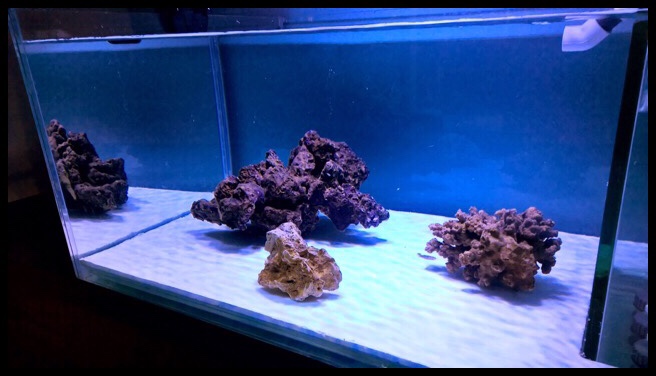
For inhabitants, the corals will be predominately SPS mixed, with a large bio load of fish to include two shoals,and a centerpiece angelfish.

I hope you will share with me your thoughts and knowledge, and also help keep me from making any mistakes!

This is all for now. I will update with pics and info as I have it. Enjoy, and join in.


8d6b4ccbce5013eb220f6ca62bcccf7e.jpg
 
Last edited:
OP
OP
naterealbig

naterealbig

pea brain
View Badges
Joined
Sep 1, 2018
Messages
1,965
Reaction score
2,585
Location
Winter Garden
Rating - 100%
1   0   0
Nice plan! Welcome to R2R!

Welcome to R2R! Look forward to all the things to come with this build.

Thank you for the welcome and kind words. Will have some updates on stand plans and equipment coming soon!.

One of the things I did not mention in my first post is that we will be focused on an open minimalistic rock scape in the display. The pic of my avatar is the scape I used in my last build - and is indicative of the coming layout for Niji.
 
OP
OP
naterealbig

naterealbig

pea brain
View Badges
Joined
Sep 1, 2018
Messages
1,965
Reaction score
2,585
Location
Winter Garden
Rating - 100%
1   0   0
Here are the internal plans for the stand. I will use 4x6 lumber for support directly under the tank. This will allow me keep the stand brace free.

d21069f432fab18557b0aedbd07d33b4.jpg


b62dc5cdd406f54d85477d9a792709b5.jpg


I will use panduit to conceal wiring inside and outside of the stand. All electrical equipment will be mounted externally in the recess on the right hand side of the stand. This will prevent corrosion, and premature failure due to salt creep and water splash. It will also allow for easy access when adjustment or maintenance is needed. Below is a picture of the externally mounted equipment on my last system.

be2a5e4999f1fb96c8fb896d78940094.jpg


As mentioned,rock work will be minimal, and focus will be placed on negative space. There will be several benefits to this, including room for coral to grow and fish to swim, along with an asthetic component that can only be found with a well laid out aquascape. Below is the aquascape used on my last system. This build will be similar, while only using 3 to 4 pieces of carefully picked rock.

49143113ff6c9fb653e8268a869398b4.jpg
 
Last edited:
OP
OP
naterealbig

naterealbig

pea brain
View Badges
Joined
Sep 1, 2018
Messages
1,965
Reaction score
2,585
Location
Winter Garden
Rating - 100%
1   0   0
I ordered the display and sump last Friday. It will probably take about 3 weeks to build, and another 3 weeks to cure, so about a month and a half before before we can get it wet. This is good because I can take time to plan the details and get things ready.

One of the tasks I will complete is disassembling, inspecting,and testing all of my equipment. This ensures everything is working properly and maybe even more importantly, I get to learn how it works. I am a mechanical engineer, and also an artist. To me the technology and biology is just as interesting as the the beauty of the finished product we are trying to achieve.

I will be using a Vertex 200i as the main means of mechanical filtration for Niji. I have disassembled the unit and wiped it down to remove any left over oil and chemicals. This will speed up the break in period. Before I reassemble, I will lubricate all accessible o-rings and hose connections with a light coat of PTFE. This will prevent seizing of components and will increase the life of the o-rings.

f3a67808ed7249cf1485e735db46b51c.jpg
 
Last edited:

rockskimmerflow

Well-Known Member
View Badges
Joined
Aug 21, 2013
Messages
620
Reaction score
632
Location
Socal
Rating - 0%
0   0   0
Unless they've changed the pump on the 200i to a lower power unit, expect a nightmare of a time tuning it in. Basically it's such a monster of a pump that no amount of air restriction or vice versa will prevent it from easily overflowing the cup since it's constantly going to overwhelm that size of skimmer body with air or water flow. Best tip I can give you is to use a fairly restrictive suction strainer on the inlet of the pump to hinder it's performance. I've had to literally reduce the overall turnover through the skimmer body by about 50 percent of it's stock flow rate just to get it to be tunable with the wedge pipe adjustment. Otherwise, you'll struggle to keep it from overflowing even with the wedge pipe at 100 percent open. Good luck with the unit. The build quality is phenomal, just too strong of a pump for the size of skimmer body IMO. If you get it dialed in I'm sure it will be a monster of a skimmate producer for you.
 
OP
OP
naterealbig

naterealbig

pea brain
View Badges
Joined
Sep 1, 2018
Messages
1,965
Reaction score
2,585
Location
Winter Garden
Rating - 100%
1   0   0
Unless they've changed the pump on the 200i to a lower power unit, expect a nightmare of a time tuning it in.......

Thank you for this feedback!

Tonight I finished greasing the o-rings and reassembled the skimmer. Followed the instructions for initial wipe down and installation. I filled up a 20 gallon container with water I pulled from the live rock and fish quarantine tanks for a test.

Wanted to get an idea of worst case scenario, so placed skimmer in 9 in of water and let let her rip. Letting the skimmer run full blast with maximum air input yielded an air-water interface level just below the collection cup threads. Adjusting the shroud nozzle outwards resulted in a lower interface level, and raising the skimmer higher in the water produced a similar but more dramatic result.

0a225c7db24c2f8435c67023874562b9.jpg


I tried testing the air flow through the venturi, but it pegged the meter I have high at 50 scfh (~1400 lph) which was to be expected. I have an appropriate Dwyer air flow meter on its way, and will be installed permanently as part of the aquarium monitoring and adjustment system.

dea8be3324edd1dbe0f6af796a657be4.jpg


I will allow the skimmer to run in this bin until the aquarium is set up. This should eliminate the normal break in period.

So far the skimmer is performing beautifully, and complimenting the build quality nicely. It is very,very quiet. I will post updates to any issues I experience.
 
Last edited:
OP
OP
naterealbig

naterealbig

pea brain
View Badges
Joined
Sep 1, 2018
Messages
1,965
Reaction score
2,585
Location
Winter Garden
Rating - 100%
1   0   0
A note on cycling, and a shoutout to John Coppolino......

A huge shoutout is in order for John Coppolino for graciously sharing with me, perhaps one of a reef system's most important components: biological filtration. John sent me a package including rock and sand directly from his breathtaking display. The rock was infused with sponge and growth, and filled with animals.

17a6354e64bd90ed4cb3362953010047.jpg


14d537a0837062f00988891438c2f197.jpg


This rock and sand that you see below has been cultivating in this 20 long for several month now, and sand from this tank has been used to seed my two other cycling bins. Initial cycles were started with a large piece of fish food, and will be maintained utilizing Dr. Tim's ammonia product.

20c5d3eb3c2b740768dff470c0861982.jpg


b77773ea21af75e896a066d79bc685ee.jpg


713d3b1c9245ee160453c674bdf7331f.jpg


Ammonia will be raised in each bin to 2 ppm. Ammonia testing will be completed once every day, and ammonia will be dosed again to a level of 2ppm once the initial level reaches zero. This dosing method will be sustained until the rock is added to the display.

Below are some pics of the large pieces of rock I will be using. I will utilize approximately 50lb of the rock in the pictures - about 4 to 5 pieces. I'm cycling all of it currently, so I have the flexibility to pick the perfect pieces for the scape when I'm ready.

4760536596c767efd3204ccd26aaa61a.jpg


457a949f75c4786204b4e4bc31dc4e46.jpg
 
Last edited:

rockskimmerflow

Well-Known Member
View Badges
Joined
Aug 21, 2013
Messages
620
Reaction score
632
Location
Socal
Rating - 0%
0   0   0
Thank you for this feedback!

Tonight I finished greasing the o-rings and reassembled the skimmer. Followed the instructions for initial wipe down and installation. I filled up a 20 gallon container with water I pulled from the live rock and fish quarantine tanks for a test.

Wanted to get an idea of worst case scenario, so placed skimmer in 9 in of water and let let her rip. Letting the skimmer run full blast with maximum air input yielded an air-water interface level just below the collection cup threads. Adjusting the shroud nozzle outwards resulted in a lower interface level, and raising the skimmer higher in the water produced a similar but more dramatic result.

945ba55999d78036448535ab2ce93775.jpg


I tried testing the air flow through the venturi, but it pegged the meter I have high at 50 scfh (~1400 lph) which was to be expected. I have an appropriate Dwyer air flow meter on its way, and will be installed permanently as part of the aquarium monitoring and adjustment system.

abbd0e591f180afd224a1fba22e52bfc.jpg


I will allow the skimmer to run in this bin until the aquarium is set up. This should eliminate the normal break in period.

So far the skimmer is performing beautifully, and complimenting the build quality nicely. It is very,very quiet. I will post updates to any issues I experience.

Looking good! The model I've worked with is more than 2 years old. Ran it in 5 inches of water all the way up to 8 inches when testing. It was seeded well and there was no amount of air adjustment or pump volute screw adjustment that prevented it from overflowing for days straight even with the outlet pipe full open. I suspect your unit has an updated pump - specifically I suspect the impeller has been improved. I own another large askoll pump powered skimmer from a different brand that has a very different impeller and volute design and has never seemed to have the propensity to pull as much water flow as the vertex did even with the air wide open. It's a nice feature that you'll have the airflow meter inline as it probably gives you a bit of restriction in and of itself -which is not at all a bad thing given how strong that pump is. It's a beast of a skimmer in terms of build quality and once it's dialed in on the display system I have no doubt you'll see great results.
 
OP
OP
naterealbig

naterealbig

pea brain
View Badges
Joined
Sep 1, 2018
Messages
1,965
Reaction score
2,585
Location
Winter Garden
Rating - 100%
1   0   0
Looking good! The model I've worked with is more than 2 years old. Ran it in 5 inches of water all the way up to 8 inches.....

To your point I had read reviews that stated similar experiences to the one you had described. These reviews (and admittedly, the sexy red and white) is actually something that attracted me to this skimmer. The idea of starting with "too much" and having to dial back is the ideal situation for me, as I have owned skimmers that simply would not draw the air or water I wanted despite modification.

To easily remedy the issue with too much air/water draw, the pin wheel can simply be sanded down (effectively achieving a similar result to restricting the inlet/outlet of the skimmer pump). I was prepared to do this. [emoji375][emoji373]

Based on what you are saying, it is likely that the pump and/or impeller has been updated. Out of curiosity, do you still have this skimmer?. I'm curious to compare pump models and impeller design. It may be a particularly good data point for anyone else considering purchase.

Here is the skimmer this morning....

5d21974b9b296267029c01a5bb8c6478.jpg
 
Last edited:

rockskimmerflow

Well-Known Member
View Badges
Joined
Aug 21, 2013
Messages
620
Reaction score
632
Location
Socal
Rating - 0%
0   0   0
To your point I had read reviews that stated similar experiences to the one you had described. These reviews (and admittedly, the sexy red and white) is actually something that attracted me to this skimmer. The idea of starting with "too much" and having to dial back is the ideal situation for me, as I have owned skimmers that simply would not draw the air or water I wanted despite modification.

To easily remedy the issue with too much air/water draw, the pin wheel can simply be sanded down (effectively achieving a similar result to restricting the inlet/outlet of the skimmer pump). I was prepared to do this. [emoji375][emoji373]

Based on what you are saying, it is likely that the pump and/or impeller has been updated. Out of curiosity, do you still have this skimmer?. I'm curious to compare pump models and impeller design. It may be a particularly good data point for anyone else considering purchase.

Here is the skimmer this morning....

5d21974b9b296267029c01a5bb8c6478.jpg
I do have it. It came off a client system after a couple years and got replaced with a much simpler and more effect Tunze model skimmer. Have gotten it dialed in using a modified intake strainer. I would shudder to think of you modifying the impeller by 'shaving' it down etc. Seems really risky in terms of adversely impacting the bubble size and at worst affecting the rotor assembly balance and causing premature bearing wear. Did you have any photos of your impeller assembly? I can plug mine into a wattage/current draw meter and give you the numbers when I run it with air full open, strainer restriction removed, and the volute screwed all the way in at a set water level. If you have the ability to test yours at the same settings then we can compare data. Perhaps they will yield some differences in power consumption - which would indicate a distinction between the two pumps.
 
OP
OP
naterealbig

naterealbig

pea brain
View Badges
Joined
Sep 1, 2018
Messages
1,965
Reaction score
2,585
Location
Winter Garden
Rating - 100%
1   0   0
I would shudder to think of you modifying the impeller by 'shaving' it down etc. Seems really risky in terms of adversely impacting the bubble size and at worst affecting the rotor assembly balance and causing premature bearing wear.

It may be, but I would be surprised to know that altering the flow rate through the pump wouldn't have similarly detrimental effects to the pump, bearing wear, or bubble size. I have done it before with no immediate or noticeable effect to the skimmers efficacy, but I also do not have any long term results on this particular modification. So, my initial observation could be way off-base.

Did you have any photos of your impeller assembly? I can plug mine into a wattage/current draw meter and give you the numbers when I run it with air full open, strainer restriction removed, and the volute screwed all the way in at a set water level. If you have the ability to test yours at the same settings then we can compare data. Perhaps they will yield some differences in power consumption - which would indicate a distinction between the two pumps.

I don't have any pictures ready at the moment, but could easily snap some off. Also, I received my Dwyer air flow meter yesterday, but I do not have the necessary fittings to connect it to the skimmer's air intake. I'll try to get some shots tonight of the pump body (hopefully indicating model, current, etc) and the impeller. I could also take some shots of my Kilo-Watt meter with the skimmer connected. I'll post as soon as I have some data available.

Thank you for the engaging discussion!
 
OP
OP
naterealbig

naterealbig

pea brain
View Badges
Joined
Sep 1, 2018
Messages
1,965
Reaction score
2,585
Location
Winter Garden
Rating - 100%
1   0   0
I was able to gather 2 data points last night. One was the data label for the pump, although it is Vertex brand labeling, so perhaps not much can be garnered from that.

The other (and perhaps more useful) data point was wattage draw with no air or volute restriction. For this, the volute nozzle was fully inserted into the volute. I still need fittings for my flow meter, and once I have them I can post more detailed results.

a8ba4daa6ec3e9b510dc68e77d682d3c.jpg


685062cf99ff155af21144797e857b8e.jpg
 
OP
OP
naterealbig

naterealbig

pea brain
View Badges
Joined
Sep 1, 2018
Messages
1,965
Reaction score
2,585
Location
Winter Garden
Rating - 100%
1   0   0
Return Pumps:

For return pumps I will be using two, Sicce Syncra Pro models, at 1500 gph each.

Why two?

One of the key concepts of the Niji system is reliability, achieved through redundancy and proven equipment. There is simply nothing more reliable for return flow than AC synchronous pumps. Well, except for two AC synchronous pumps. [emoji4]

Why not DC?

I have owned DC pumps and I loved the controlability and programming points. I purchased an Ecotech Vectra L1 when they first came out, and I absolutely loved it. In fact, when I took my last tank down I gave it to my brother and it is still running on his 120.

While I loved this pump (and will always be an Ecotech fanboy) I did not however want to mess with the additional potential failure point of a pump controller.

The Syncra's have been disassembled, greased, and flow and noise tested. These puppies move a ton of water, and are near silent.

8ccdee522e73c21f87061983d7179ed6.jpg
 
Last edited:

rockskimmerflow

Well-Known Member
View Badges
Joined
Aug 21, 2013
Messages
620
Reaction score
632
Location
Socal
Rating - 0%
0   0   0
I was able to gather 2 data points last night. One was the data label for the pump, although it is Vertex brand labeling, so perhaps not much can be garnered from that.

The other (and perhaps more useful) data point was wattage draw with no air or volute restriction. For this, the volute nozzle was fully inserted into the volute. I still need fittings for my flow meter, and once I have them I can post more detailed results.

a8ba4daa6ec3e9b510dc68e77d682d3c.jpg


685062cf99ff155af21144797e857b8e.jpg
Perfect! That is the same label mine has, but of course as you mention, there may very well be revisions not reflected on the label.

I will report back on my omega 200 power consumption tonight. Both at wide open, then with my inlet restrictor in place and tuned to ideal operating foam height. If you can see what yours is pulling power wise at its ideal operating settings maybe we can yield some other data.

Also great choice on a pair of simple AC motor pumps. Reliability is paramount in my system designs too. I personally would have run 2x fluval SP4 simple because I prefer their bearing and rotor assembly design over the sicce pro (Quiet One) models. And also since they're made by askoll who makes your skimmers motor block just for consistency to please my ocd lol. I suspect you'll have no trouble with the sicces though as they're also a well proven motor block.
 
OP
OP
naterealbig

naterealbig

pea brain
View Badges
Joined
Sep 1, 2018
Messages
1,965
Reaction score
2,585
Location
Winter Garden
Rating - 100%
1   0   0
I will report back on my omega 200 power consumption tonight. Both at wide open, then with my inlet restrictor in place and tuned to ideal operating foam height. If you can see what yours is pulling power wise at its ideal operating settings maybe we can yield some other data.

Yes, I agree. Let me know the height of the air-water interface, and I will test at that setting. Do you restrict air inlet at all?. Mine actually came with a valve for it. Although I have always found that air restriction increases water level inside the skimmer, due to the resultant increased water flow rate.

Also great choice on a pair of simple AC motor pumps. Reliability is paramount in my system designs too. I personally would have run 2x fluval SP4 simple because I prefer their bearing and rotor assembly design over the sicce pro (Quiet One) models. And also since they're made by askoll who makes your skimmers motor block just for consistency to please my ocd lol. I suspect you'll have no trouble with the sicces though as they're also a well proven motor block.

Thank you! The Fluval pumps were my first choice actually. None of the three places I was purchasing my equipment (during the Memorial day sales) from sold them. And I definitely relate to the OCD tendencies..... Actually, now that you mention it, I will probably ruminate about my return pump choice for the next couple weeks! [emoji12]. I do feel confident with respect to the Sicce's reliability and noise level, -and- I have already purchased schedule 80 PVC fittings for them to accommodate the hard plumbing. Let's see how it goes.....
 

rockskimmerflow

Well-Known Member
View Badges
Joined
Aug 21, 2013
Messages
620
Reaction score
632
Location
Socal
Rating - 0%
0   0   0
Yes, I agree. Let me know the height of the air-water interface, and I will test at that setting. Do you restrict air inlet at all?. Mine actually came with a valve for it. Although I have always found that air restriction increases water level inside the skimmer, due to the resultant increased water flow rate.


Thank you! The Fluval pumps were my first choice actually. None of the three places I was purchasing my equipment (during the Memorial day sales) from sold them. And I definitely relate to the OCD tendencies..... Actually, now that you mention it, I will probably ruminate about my return pump choice for the next couple weeks! [emoji12]. I do feel confident with respect to the Sicce's reliability and noise level, -and- I have already purchased schedule 80 PVC fittings for them to accommodate the hard plumbing. Let's see how it goes.....

Ok so here is my testing results. Water level skimmer is sitting in is 6.5 inches in all tests.

Test 1: Skimmer at operating settings(for me) =Foam rising from start of threaded neck connection, liquid interface stops there and foam lift takes over with the large bubbles breaking halfway up the visible part of the neck inside the cup. Inlet restricted heavily with a modified intake strainer over the fully screwed in white volute adjuster. Air line adjustment gate valve is in place and restricted to about 30 to 40 percent open (impossible to tell for sure but irrelevant since it's simply what it takes to get the skimmer balance with the given water flow). Standpipe is at the 45 percent mark, roughly.

Watts: 35.2, amps 0.82, PF: 0.35 (just gross lol), VA 97.0


Test 2: Skimmer cup off (it will literally blow the lid off if I don't just remove the cup at wide open everything) Standpipe at 100 percent open. Air adjustment gate valve 100 percent open. inlet strainer removed and white volute adjuster still screwed all the way in.

Watts: 53.2, amps .86, PF: 0.54 (more inline with spec of askoll block), VA 97.5, Overflow rate... massive lol

So yeah if you're skimmer in roughly 6 to 7 inches of water at wide open everything and doesn't pull 53 watts or thereabouts, we have a pretty big difference in what the pumps want to do. Now, the more I've thought about it the more I've realized it may not be a mod to the pump or impeller spec at all... it might be that vertex simply optimized some of the volute components or other tertiary parts they spec and machine in-house since those are probably the cheapest pieces to R/D and make on the fly updates to.

In any case, I'm glad your unit doesn't seem to suffer from overpowered pump syndrome and is working optimally. The fact that mine requires so much volute and air restriction just to be workable with the standpipe actually functioning as a means to control water level in the skimmer body and the pump still pulls 35 watts is pretty gnarly. I have a bubble magus curve 7 next to it in the sump that looks like a child's toy in comparison and pulls about 14 watts. The funny thing is they produce almost exactly proportional levels of skimmate to their relative body sizes and pump draws. Basically they are about the same efficiency per watt in my applications and looking at the design of the two, it's pretty clear that bubble magus used a lot of influence from the vertex omega line. Edit: just for a laugh I looked at the bubble magus pump power factor (PF) - this is stock with no mods by me to any functional part of the skimmer, just adjusted the standpipe to the right level once it was plugged in - It's PF is 0.20.... Just lol that's incredible to me how low it is.


And, yeah, hate to be that guy making you question the return pumps haha. You'll be fine with the sicce's IMO. I've just had a few clients in the past who'd had various quietone's in the 1000gph range which suffered issues with the front bearings sticking on power off restarts if even a tiny piece of grit got into them. Otherwise strong, quiet pumps for the dollar. The askoll blocks and rotors have that shrouded front bearing with the volute pressure driven cooling duct and bearing flush slot built into the rotor well. Just a really well thought out and optimized design for a balance of efficiency and decent ruggedness for the type of pump it is. Best place to get fluval stuff is amazon actually. It's very hard to beat amazon's prices even buying wholesale once you factor in the tax and extra hassle. I think Hagen just has a really good deal selling direct through amazon so it makes it hard to beat them from any of the other aquarium retailers. Probably why you don't usually see the fluvals go on sale at your usual online aquarium retail suspects.
 
Last edited:

Creating a strong bulwark: Did you consider floor support for your reef tank?

  • I put a major focus on floor support.

    Votes: 49 41.9%
  • I put minimal focus on floor support.

    Votes: 24 20.5%
  • I put no focus on floor support.

    Votes: 41 35.0%
  • Other.

    Votes: 3 2.6%
Back
Top