My Red Sea Reefer Build Thread

RJinPV

Active Member
View Badges
Joined
Jan 19, 2014
Messages
415
Reaction score
321
Location
Palos Verdes, California
Rating - 0%
0   0   0
I thought I would start a build thread for my new Red Sea Reefer 350. I have had freshwater aquariums since I was a kid. About 7 years ago I decided to try a reef tank. I was a complete newbie and didn't have the benefit of R2R or other sources. My local fish store sold me a 55 acrylic gallon with a sump and basic gear. I have upgraded stuff along the way but I couldn't get away from two basic things that made me eventually hate that tank: 1) It's acrylic and it's nearly impossible to keep it free from the coralline algae without tons of work or scratching the heck out of it. 2) it was too small and I placed the rocks too close to the sides which prevented me from cleaning the sides or vacuum the sand everywhere except the front.

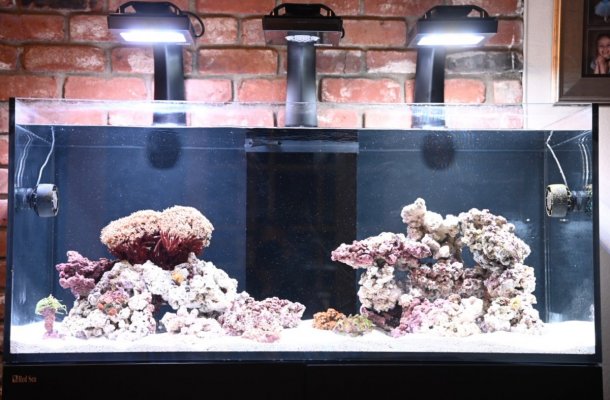
Needless to say, if you don't like something you start to neglect it. It stops being a hobby and becomes work. I considered just dropping the hobby and saving all that electricity and water. But I decided to make a better tank using the resources and knowledge I have learned over the last few years. Even more, I bought a 40 gallon AIO to replace my frag tank. Doubling down! The first picture is the acrylic tank I started with. The second is the Innovative Marine 40 gallon Fusion AIO. The third is the Reefer 350 with live rock that I am staging for the aquascape.

My Goal is a mixed SPS/LPS reef with enough PAR for high light species such as clams

Here's the list of gear:
- Red Sea Reefer
- Sicce Syncra SDC 6.0 DC return pump. Haven't run it yet. Hoping it's very quiet.
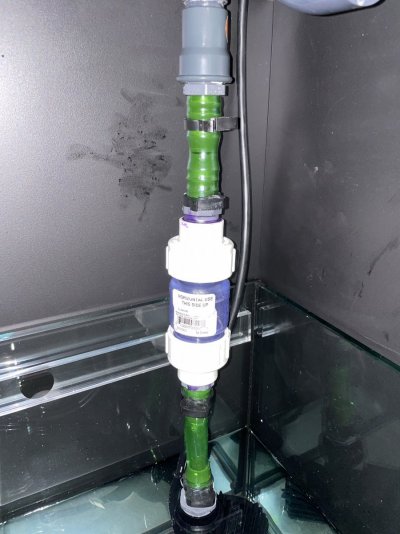
- Octo Classic 110INT Skimmer "upgraded" with a Varios 2S DC pump. "Upgraded" is in quotes because the Varios 2S is so powerful that I have to set it on the lowest setting or the skimmer will overflow. Therefore, I don't get the control I was hoping for. Sticking with the stock pump would have been smarter. Its running on my old tank and since I started it a month ago the nitrates have dropped. It seems to be skimming much better than the old EShopps Skimmer
- 4 Radions: 2 Radion XR15 G4s I bought used few years back, and 2 more new XR15 G5s. I chose this set up based on the BRS video that is linked to their XR15 page discussing coverage and PAR. I didn't think 2 G4s would be enough.
- 2 Nero 5 pumps and 2 Tunze 6055 pumps
- XP Aqua Duetto ATO. I've had this running on the old tank for 2 years and it works great.
- 3 part dosing pump for the Tropic Marin balling system. This has also been running on the old tank for a few years and the levels have been steady.
- DDO Jumpstart mesh cover. The Red Sea covers get bad reviews. Thanks to a link in R2R I found the DDO cover. I like it because the aluminum frame has a lip that sits on top of the glass instead of inside the glass. It is still low profile and adds some protection from water splashing out like the cover that came with the Innovative Marine 40 gal.

My Plan:
- Frag corals from the old tank and life boat them in the 40 gallon ATO that has been running for months with live biofilter media from the frag tank.
- Take rock from the old tank and add it to the new live rock for the Reefer 350 aquacape.
- Biofilter media running in the old sump and move it to the new sump.
- Leave the livestock in the old tank until the Reefer 350 is running.

Questions:
1) How fast can I move the livestock?
2) How do I "frag" my 2 bubble tip anemones and 3 rock flower anemones? I'm thinking of breaking the rocks they are on with a chisel because I have no idea how to get them to release on their own.
3) Should I transfer my undersized chiller, buy an adequate chiller, or skip a chiller all together? My house rarely gets over ~82 deg F
IMG_1321.JPG
IMG_1325.JPG
IMG_1315.JPG
 

bbPhoenix777

Active Member
View Badges
Joined
Jun 25, 2021
Messages
336
Reaction score
384
Location
phoenix
Rating - 0%
0   0   0
Just getting my 108 gl setup. Went with the coral care (second light for the right side on the way). Calling it my Euro tank thanks to the Philips lights. Looking forward to moving the 30 gallon to get some stretching room...and the reef chaser's powder blue tang!
1635919197800.png
 

Lavey29

10K Club member
View Badges
Joined
Apr 29, 2021
Messages
11,146
Reaction score
11,726
Location
United States
Rating - 0%
0   0   0
Looks like the start of a nice upgrade. I have the XL300 so one size down from yours. I use 2 Radions Xr15 pro and it is more then enough light. I run them at 40% intensity. I went with a Clearview lid also. They custom make them for your tank and light mount configuration.
 
OP
OP
RJinPV

RJinPV

Active Member
View Badges
Joined
Jan 19, 2014
Messages
415
Reaction score
321
Location
Palos Verdes, California
Rating - 0%
0   0   0
I've been concentrating on making progress. Sorry about not posting updates. The aqua scaping is now done, lights are installed (though not to my original plan), pumps and heaters are transferred. Today I moved some of the frags from the old tank into the Reefer 350. The next few posts will breakdown how I approached each step.
 
OP
OP
RJinPV

RJinPV

Active Member
View Badges
Joined
Jan 19, 2014
Messages
415
Reaction score
321
Location
Palos Verdes, California
Rating - 0%
0   0   0
Plumbing and sump:
I'm using the stock plumbing. I put a check valve in line with the return plumbing. One modification I made was to replace the stock fitting ~1/2" hose fitting with a 3/4" hose fitting. I wanted to minimize restrictions in the return line. Their supplied hose will stretch to fit if you heat the end in a cup of near boiling water before putting it onto the fitting.

One thing I am puzzled about is my skimmer. It is a Classic Reef Octopus 110 INT with a Varios 2 DC pump upgrade. It is over flowing at the lowest pump setting. It ran fine in the old aquarium with a sump depth of 8.5". Here the sump depth is lower but I still can't get it to stop overflowing. I tried putting the stock AC pump back in but that didn't help. I'm hoping that as I load livestock into the tank the skimmer will start working. Otherwise I'll have to figure something else out.

Balancing flow: It has been tricky getting the flow from the return pump to balance with the valve setting. It seems I have to adjust the stock return valve very morning to get it right. I have learned that small adjustments are needed with decent wait times in between to get it to settle. I wonder if it gets better as the aquarium runs or if there is a better way altogether.

ATO: I decided to run with the stock ATO float valve. It does not seem to allow adjustability in the return pump chamber. The float valve maintains a return chamber depth of just under 6". The other quirk is the valve was leaking. So I added some silicone grease to the valve's o-ring. By the way, Red Sea's documentation is utterly worthless.
 

Attachments

  • Sump.JPG
    Sump.JPG
    236.9 KB · Views: 54
  • Return Plumbing.JPG
    Return Plumbing.JPG
    191.7 KB · Views: 47
OP
OP
RJinPV

RJinPV

Active Member
View Badges
Joined
Jan 19, 2014
Messages
415
Reaction score
321
Location
Palos Verdes, California
Rating - 0%
0   0   0
Chiller cabinet: My plan is to allow enough room in the chiller cabinet to contain a chiller, an dosing pump and reservoir, and all of the electronics. I'll have eleven DC pump power bricks: (return pump, skimmer pump, 4 powerheads, 4 lights, doser). Where do I put them all, along with the controls? I decide to line the ceiling and rear portion with 2' wide strips of industrial velcro. I used white so I could see it. Bond a strip to the brick and you can stick them to the ceiling or walls and they will stay put. A bunch of velcro cord wraps a maybe I can keep this cabinet from becoming a rat's nest. I don't want to have a separate electronics cabinet. Take a look at the photos. Alternative idea or thoughts are welcome.

Cabinet Organization.JPG Power pack velcro.JPG IMG_1374.JPG
 
OP
OP
RJinPV

RJinPV

Active Member
View Badges
Joined
Jan 19, 2014
Messages
415
Reaction score
321
Location
Palos Verdes, California
Rating - 0%
0   0   0
Lighting: My plan was to use two G4 XR15 Pros and two G5 XR15 Pros. I didn't want to have 4 mounts so I used aluminum C channel to make a structure that the lights could be attached to along with the RMS light adapter. Therefore, one mount could support 2 lights. You need to buy a bunch of M5 screws to put it all together. The first picture shows one pair of lights connected to the adapter. When I mounted it to the mount I started to have reservations about the weight. The 2 light assembly weighs almost 6 pounds. Therefore I decided to start with just 3 lights with 3 mounts and not push it. Why 4 lights? I based that on the BRS video. You can see the video on their XR15 page. The last picture is today's current state. The next thing I need to do is add 2 more powerheads. I'm considering 2 Nero 3's or 2 Tunze 6055's. I want to mount them so there is circulation along the back wall. After that there is transferring the fish, the rock flower anemones, the chiller and the pellet reactor.

Lights Doubled.JPG Aluminum Channel.jpg Screen Shot 2021-10-30 at 11.14.20 PM.png Current state.jpg
 
OP
OP
RJinPV

RJinPV

Active Member
View Badges
Joined
Jan 19, 2014
Messages
415
Reaction score
321
Location
Palos Verdes, California
Rating - 0%
0   0   0
Aquascaping: I forgot to cover this earlier. I used live rock bought from some LFS along with rock from my existing aquarium. I bonded the pieces under water using super glue and epoxy. I would glue the pieces initially with super glue, then reinforce with epoxy. Done this way the bonds work, but they are not bullet proof. Epoxy underwater never really sticks to the rock very well. For my next effort I think i'll try to be patient, use dry rock, and wait longer for the nitrogen cycle to start.

The left side is structured like a volcano with an open ring at the top. It forms a perfect holder for my organ pipe coral. I wanted the right side to be taller with a ledge to balance toward the middle of the tank. Finally I wanted some islands to put invasive corals so I could limit their range. I left room all the way around so I could clean the glass. Finally, I made the structures on a bare bottom then added a thin sand bed.

How do I like it? Honestly, it looks like a cliche pile of rocks. Especially after I added the pipe organ coral on the left. I'm going to have to make some additions. Does anyone have any suggestions to improve it (short of a complete teardown). Here's a better picture corrected for color balance.
 

Attachments

  • _RZ72391.jpg
    _RZ72391.jpg
    179.4 KB · Views: 42
OP
OP
RJinPV

RJinPV

Active Member
View Badges
Joined
Jan 19, 2014
Messages
415
Reaction score
321
Location
Palos Verdes, California
Rating - 0%
0   0   0
Looks like the start of a nice upgrade. I have the XL300 so one size down from yours. I use 2 Radions Xr15 pro and it is more then enough light. I run them at 40% intensity. I went with a Clearview lid also. They custom make them for your tank and light mount configuration.
I was concerned that 2 XR15 Pros would not be enough for high PAR demand livestock. I would like to get a clam at some point, along with some acros. What kind of coral do your 2 XR15s support?
 
OP
OP
RJinPV

RJinPV

Active Member
View Badges
Joined
Jan 19, 2014
Messages
415
Reaction score
321
Location
Palos Verdes, California
Rating - 0%
0   0   0
Aquascaping Take 2: I did 3 things to improve the design. 1) I added a rock on the right to complete the "amphitheater" design and now there is a line the eye can follow from the foreground rock to the right and up to the top. It also closes the side a bit so the fish have a more cozy hiding place. 2) I moved rock in front of the left pile to the left so that it makes contact with the left pile. It allows the baby rock flower anemone a path to move to the larger pile, it opens the cave access a bit, and it forms a visual line that complements to changes on the right pile. 3) finally I made a arch out of rock pieces I bonded together. I originally wanted it to complete the arc to the top of the right rock pile. It looked a little artificial and in the process of making changes to it some pieces broke off. So I put it back in the tank and realized it looks like a natural arc that has a missing section broken off.

Now I like it.

Before image
_RZ72391.jpeg


Final image after the changes:
_RZ72399.jpeg
 
OP
OP
RJinPV

RJinPV

Active Member
View Badges
Joined
Jan 19, 2014
Messages
415
Reaction score
321
Location
Palos Verdes, California
Rating - 0%
0   0   0
I have moved the chiller and dosing setup to the new tank and successfully transferred all of the corals and fish that I chose to keep. I donated a number of mushroom frags and zoa rocks to my local fish store. None of the LFS's around me wanted to give a store credit, but I did get some free water and a dozen snails for them. Here are some of the closing details:

The skimmer is finally breaking in. I have marine pure in the sump which I am trying for the first time. Even though I don't think I'll need it I decided to move the unsized chiller and plumb it in. The glass tank is running very close to ambient to temperature, unlike the acrylic tank it replaces, and my house rarely gets over 80 deg F. Next summer I'll find out it I have to upgrade. If I do then I'll have to get a thin profile dosing reservoir.
Cabinet.JPG


The velcro system on the back wall and ceiling is working very well. The cabinet is holding everything and it's not a complete rat's nest.
Chiller cabinet closeup.JPG


I'm using velcro tie wraps to hold cables and drip hoses up.
velcro ato.JPG


I really like the Jumpguard cover because it has a lip that covers the entire edge and not just a few tabs. The look is very low profile
Jumpguard closeup.JPG
 
OP
OP
RJinPV

RJinPV

Active Member
View Badges
Joined
Jan 19, 2014
Messages
415
Reaction score
321
Location
Palos Verdes, California
Rating - 0%
0   0   0
I wound up breaking up the rocks my anemones were on. I tried the sponge and tube method posted in the clownfish/anemone forum, but after 24 hours I gave up and got the hammer and chisel out. It's risky. 2 anemones broke off with heir foot attached to 2 separate pieces and I was afraid their foot was damaged. One RBTA came completely free from the rock and I bought that one was a goner. But they all made it. I even found 2 baby rock rose anemones. Here are the live stock photos:
right rockpile.JPG
Rockrose closeup.JPG
RBTA Closeup.JPG
Pipe organ closeup.JPG
arch closeup.JPG
 

Fusion in reefing: How do you feel about grafted corals?

  • I strongly prefer grafted corals and I seek them out to put in my tank.

    Votes: 3 4.8%
  • I find grafted corals appealing and would be open to having them in my tank.

    Votes: 37 59.7%
  • I am indifferent about grafted corals and am not enthusiastic about having them in my tank.

    Votes: 16 25.8%
  • I have reservations about grafted corals and would generally avoid having them in my tank.

    Votes: 5 8.1%
  • I have a negative perception and would avoid having grafted corals in my tank.

    Votes: 1 1.6%
Back
Top