Everything must come to an end and this is the final new tank tank build my wife and I will ever do again. As we approach retirement, we wanted to use everything we learned throughout our years and build that final dream tank replacing one of the 4 we have with this new build.
I been waiting a while to post this, as we been working with our local LFS who will assisting on the swap out along with contractors and vendors. The plan is we are replacing a 120 Gallon tank with a 310 Gallon tank in the same location. The tank being replaced is 7 years old, full of coral and life. The LFS will be taking the tank, all equipment supporting the tank along with the live rock and coral, but all inhabitants of the tank will remain with us.
With that all said let's go down the equipment list, with a full swap out of the tank we budgeted this tank setup for $25,000 not accounting for engineering cost and contractor cost.
| Equipment Description | Manufacture | Additional Info |
| Tank | Planet Aquarium | 96x30x25 |
| Cabinet | Planet Aquarium | |
We went with a Planet Aquarium setup for this tank because it was what our LFS primary manufacturer they use for tanks. We are doing an external overflow (Tideline 20) with two returns lines. We wanted an external overflow on the tank as all our other tanks are internal overflows and we have learned it much easier to do flow on a tank when your overflows are not protruding off the back walls. This new tank will be Starfire front glass, and black background.
I need to stress that I believe that size does matter and a wider tank over the length is a better option. All of our tanks are the standard 18" wide and even thou we love the tanks and the initial rock scaping where we left room for us to clean them in the beginning as taught us it only a matter of time it will not. I understand I will have the same issue with 30" but I feel I will have more time to allow the coral to grow out and provide the occupants of the tank more room to move.
Last, we are not going with a canopy on this setup. Even thou I could add actuators to the canopy like I have done on other tanks we have decided on a open concept over the tank for cleaning and picture taking. We are working with a local acrylic shop who is working on shades for the lights for the tank, and a local metal fabrication shop who working on the flip away custom light rail that I provided the design on.
| Equipment Description | Manufacture | Additional Info |
| Sump | Royal Exclusiv Fleece Dreambox | 60x23x15 |
| Return Pump | Red Dragon® 5 ECO 130 Watt | Qty 2 |
| Skimmer | Bubbleking Double Cone 200 + RD3 | We went with a lower skimmer size per Royal Exclusiv recommendation due to fleece roller. |
| Media Reactor | Patronenfilter 125mm 3.0 Double | |
We did an exhaustive look at multiple sumps manufactures, and fleece roller products and we landed on these three as our final choices. MRC, Synergy Reef Systems with Dual ClariSea SK-5000, and the Royal Exclusive Dreambox.
We were heavily leaning with the Synergy Reef Sump with the SK-5000 but started to see videos and reports of users on how to change the fleece and we started to get concerned. Most of the time is looked like you needed to remove the unit from the sump. Even thou not a big deal or deal breaker because of the integration with the Synergy reef sump we decided to pass.
MRC design was excellent, but what concerned me was that the Ifilter seemed to be an addon and the final size would made it difficult for me to keep the unit under the tank.
Advance Acrylics was contacted for a custom sump but after posts here on Reef2Reef and Facebook reviews they were removed from our selection list as the quality of the product seems to be lacking.
We finally decided to go with Royal Exclusiv because we have had great success on there pumps, and skimmers which are on our existing tanks. We also liked how it was all integrated together and not piece’s part. We also liked the overall construction and reviews of users who owned the DreamBox. It is true you are paying for that, and some may argue it just PVC but we felt your getting what you pay for.
I know some are going to ask why not filter socks. It is true we have them installed on the other tanks, but it is about convenience of not having to pull the socks out every 3-4 days and the dirty looks from the wife when I use the washer machine. I also was also not pulling them out every 3-4 days but once a week, which as we know can cause spikes in No3 with the breakdown of detritus in the socks. Our global plan is the other 3 tanks will have the filter socks removed and replaced with filter rollers in the near future.
We also went with dual return pumps due to the size of the tank. This allowed for additional redundancy in the event one pump fails and to have the ability to lower the flow of both return pumps for not just noise but support even a lower flow for the UV.
| Equipment Description | Manufacture | Additional Info |
| Flow | | |
| MP60QD | EcoTech | Qty 3 |
| MP40QD | EcoTech | Qty 2 |
We will have specifics on where we plan to place these within the tank, but it was an obvious decision. Some will ask why we did not go with a closed loop loop, and we thought about it, but were concerned that it could introduce another area for a potential leak down the road.
We have had great success with the EcoTech and use them on all of our tanks, the low-profile great flow and flexibility in programing made it an obvious choice for us.
| Equipment Description | Manufacture | Additional Info |
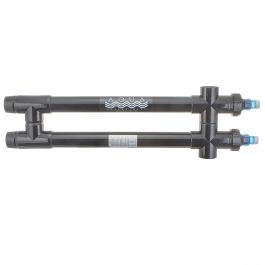
| UV | Aqua Ultraviolet | 80 Watt |
UV was a must on the tank and we UV on all of our tanks. We used quite a few different UV manufacturers but have had great success with Aqua. We went with the non-wiper version as we have had problems with the wiper one leaking after some time. This is going to be installed on the back of the tank stand and be utilized by one of the return pumps. The flow will be low enough to sterilize anything that passes through it.
| Equipment Description | Manufacture | Additional Info |
| Controller | GHL | Profilux 4 |
Since moving to GHL nearly 5 years ago I have not looked back. And this tank will be no exception in the use of GHL. I have zero issues connecting to it remotely while away. It is true I will need a windows desktop to upgrade the firmware but I knew this going in when I did my initial switch out so it no surprise for me. The stability and reliability I have had with the controllers since the swap out has been excellent and want to continue the track record on this tank. I plan to do YouTube videos on the entire setup and installation of the controller including how to upgrade.
| Equipment Description | Manufacture | Additional Info |
| Lighting | GHL | Qty 4 LX7206 |
| PLM-PWC | GHL | Expansion Card to Control the lights by the P4 Controller. |
We have had great success growing coral with the LX7206 so doing it on this tank was an easy choice. We will pull the lighting schedule off the existing tank and use it for this one. We are working on a custom flip rail system and custom hoods for the lights. This will be our first time controlling the lights thought the P4 as all our other systems we left the light control be done by the Master light. It been a set and forget on the lights and we plan to do the same this time around unless acclimating coral in the tank.
| Equipment Description | Manufacture | Additional Info |
| Water Changing/ATO | | |
| Maxi Doser | GHL | Qty 2 Maxi 2.0 |
I have 2 Spare Maxi and will use these both for Water Changes, and ATO for this tank. We have these running on all of our other tanks and they are great work horse doser. They will be stand alone configuration with the sensors plugged directly into them as they will be in the basement of the house. When the new Maxi 2.1 comes out I will replace the Maxi 2.0 when they no longer work or when I can not get replacement parts.
| Equipment Description | Manufacture | Additional Info |
| Alkalinity Testing | GHL | KH Director + Doser 2.1 |
| Ca, Mg, K, and NO testing | GHL | ION Director + Doser 2.1 |
I have had great success with both units, and I still have the Trident and Apex running on another tank side by side with the ION and KH director. Due to this success, I have had using them on the other tanks I plan to continue to use them on the new tank. They kept the existing tanks stable by automatically adjusting the dosing based on the needs of the tank. This will be the first time thou we install and configure them on a new tank, so it will be interesting to see what they record as the tank matures over the years.
| Equipment Description | Manufacture | Additional Info |
| Doser | GHL | Doser 2.1 |
| ATI Essential Pro | ATI | |
| ATI Nutrition | ATI | |
This was a toughest decision, as I am a big AquaForest user. I love the product but have had a hard time getting it in the recent year to the point of utter frustration. It either out of stock, or delayed and when it is in stock, I have to order in bulk and store it. I have also had a heck of a time getting the salt. I really do not want to have to deal with this on the new tank which is larger and will consume even more of the product. So we decided to go in a different direction on this tank and I hope not to regret this decision.
This tank will also have an Avast Marine Ozone Reactor added to it, a CO2 Scrubber and tablet which will be connected to the controller for control and tank display of current readings.
Plan to see a lot of pictures, video’s and most of all the actual swap out . I am expecting to make a few mistakes, water on the floor and a big mess but the wife said you can do it, which is ½ the battle