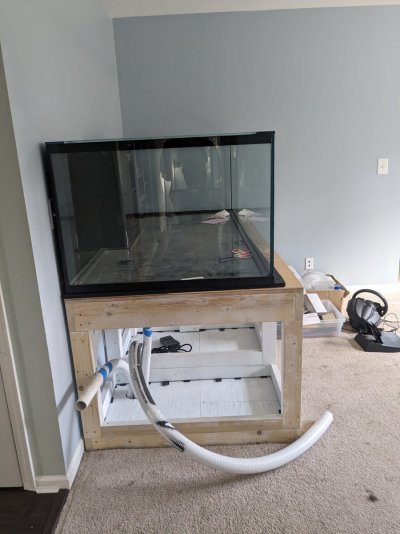
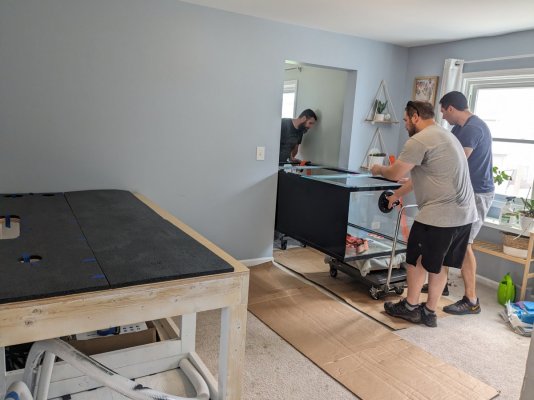
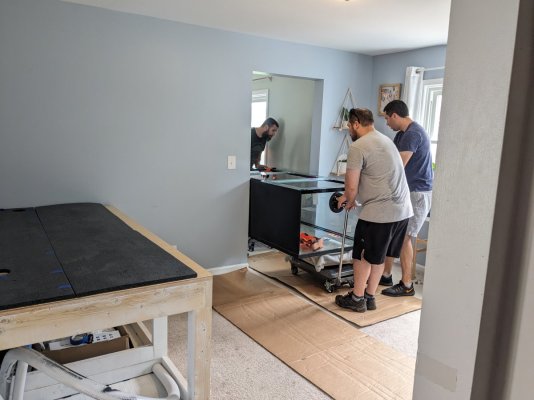
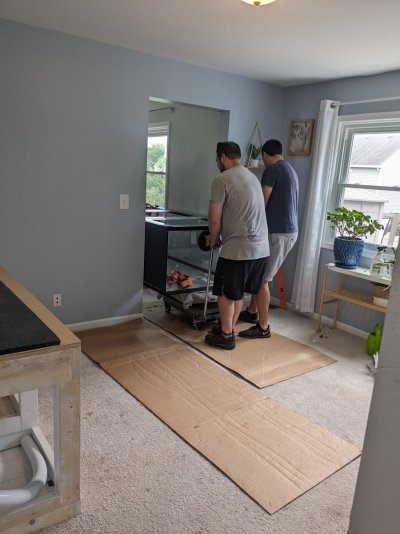
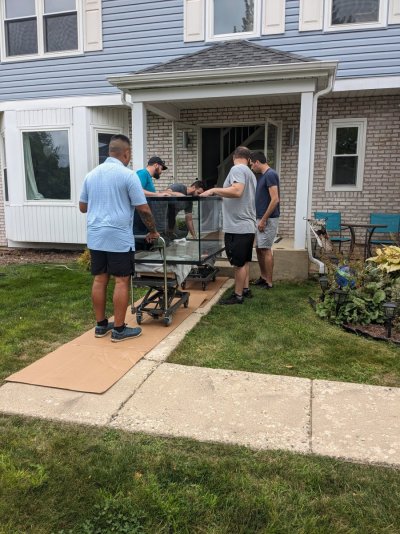
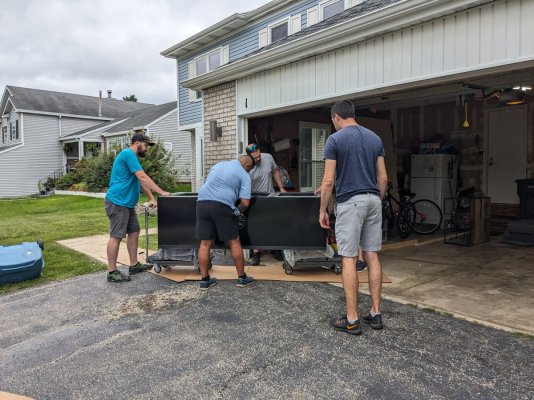
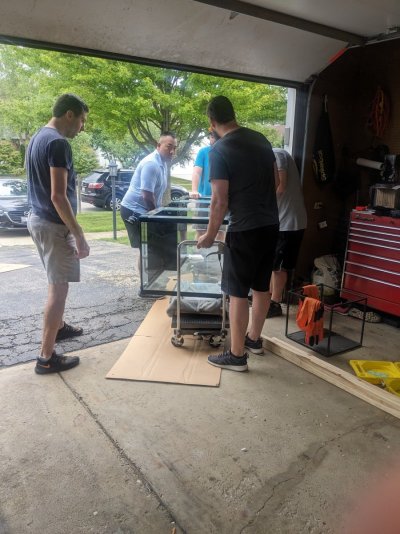
Pat's 340 Reef Build

1000rrstunna

Active Member
View Badges
Joined
Jul 19, 2013
Messages
225
Reaction score
177
Location
chicago il
Rating - 100%
1   0   0
I’m located in willowbrook il and starting a 300 plus build in my basement I’m finishing… who are you gonna order the tank from ? I’m thinking custom aquariums I like the display tank at gingerbreads it’s nice quality and they are semi reasonable and the aluminum frame makes a lighter glass tank
 
OP
OP
P

pmcmahon

Community Member
View Badges
Joined
Jan 17, 2021
Messages
38
Reaction score
11
Location
Streamwood
Rating - 0%
0   0   0
I’m located in willowbrook il and starting a 300 plus build in my basement I’m finishing… who are you gonna order the tank from ? I’m thinking custom aquariums I like the display tank at gingerbreads it’s nice quality and they are semi reasonable and the aluminum frame makes a lighter glass tank
I talked quite a bit with custom aquariums and they were a top contender for me while ordering the tank. I think their build quality looked great. It came down to two factors for me. I wasn't sure I wanted a framed tank since I hadn't decided at the time if I was going to put a canopy on top of the tank to cover the upper frame. This was a relatively minor consideration because I've had framed tanks in the past and it hasn't bothered me much.

The more important factor for me was their lack of options for overflow styles. I wasn't a fan of their overflow system. They also have an option for a Stealth box overflow but because of the flow I wanted circulating between the display and the sump I would have needed to add two stealth boxes. This pushed up their cost a bit compared to competitors for an overflow that ultimately wasn't really what I wanted.

I also worked with Waterbox. I loved the look of their tanks and got great reviews for build quality, fit and finish. I started moving forward and even paid the drawing fee with them and ended up canceling. The process was annoying because their reps weren't responsive and with every modification they would continue to jack up the cost. They were already the highest quote I was considering and after what seemed like minor changes it increased the price over 30%.

In the end, I went with Glass Cages. They are widely sold as the "middle ground" tank but they were responsive, easy to work with, reasonably priced and still able to make a custom overflow and euro bracing for me. They are at the very least worth getting a quote from. I'll update the thread on how the tank looks once I get it.
 

1000rrstunna

Active Member
View Badges
Joined
Jul 19, 2013
Messages
225
Reaction score
177
Location
chicago il
Rating - 100%
1   0   0
I talked quite a bit with custom aquariums and they were a top contender for me while ordering the tank. I think their build quality looked great. It came down to two factors for me. I wasn't sure I wanted a framed tank since I hadn't decided at the time if I was going to put a canopy on top of the tank to cover the upper frame. This was a relatively minor consideration because I've had framed tanks in the past and it hasn't bothered me much.

The more important factor for me was their lack of options for overflow styles. I wasn't a fan of their overflow system. They also have an option for a Stealth box overflow but because of the flow I wanted circulating between the display and the sump I would have needed to add two stealth boxes. This pushed up their cost a bit compared to competitors for an overflow that ultimately wasn't really what I wanted.

I also worked with Waterbox. I loved the look of their tanks and got great reviews for build quality, fit and finish. I started moving forward and even paid the drawing fee with them and ended up canceling. The process was annoying because their reps weren't responsive and with every modification they would continue to jack up the cost. They were already the highest quote I was considering and after what seemed like minor changes it increased the price over 30%.

In the end, I went with Glass Cages. They are widely sold as the "middle ground" tank but they were responsive, easy to work with, reasonably priced and still able to make a custom overflow and euro bracing for me. They are at the very least worth getting a quote from. I'll update the thread on how the tank looks once I get it.


dude 100% the overflow options suck this is why im spec'ing holes and not using that crap they sell.. i'd rather have a custom overflow made based on my drawing. Their prices are reasonable though and the framework is light and strong so I will deal with it... Other places use a billion pounds of glass braces making it way too heavy or they use steel for the frames which I wont use.

some peoples prices are also way out of control and arent good with customer service.
 
OP
OP
P

pmcmahon

Community Member
View Badges
Joined
Jan 17, 2021
Messages
38
Reaction score
11
Location
Streamwood
Rating - 0%
0   0   0
dude 100% the overflow options suck this is why im spec'ing holes and not using that crap they sell.. i'd rather have a custom overflow made based on my drawing. Their prices are reasonable though and the framework is light and strong so I will deal with it... Other places use a billion pounds of glass braces making it way too heavy or they use steel for the frames which I wont use.

some peoples prices are also way out of control and arent good with customer service.
Yeah I was close to doing the same actually. I do really like their frame design.

I know what you mean about some people's prices. I got a quote from reefsavvy after watching a bunch of BRS TV youtube videos. I knew they were more on the high end of tanks but I figured it might be worth it since this is already going to be an expensive project and I really liked their ghost overflow system. the cost was out of this world. Multiple times the next most expensive quote.
 
OP
OP
P

pmcmahon

Community Member
View Badges
Joined
Jan 17, 2021
Messages
38
Reaction score
11
Location
Streamwood
Rating - 0%
0   0   0
I had some time to sit down and get my stand designed this weekend. 2x6 on the top frame. The rest is 2x4. The outside will be Maple that I just put a clear coat on. I'm not sure what to paint the structure with to keep it from absorbing moisture. I'll have to dig into that a bit. I also want to add in some shelves behind the middle door to store some of the basics and cleaning tools. Hopefully, I'll have a little motivation to do that later today.


Stand 1.jpg
Stand 2.jpg
 
OP
OP
P

pmcmahon

Community Member
View Badges
Joined
Jan 17, 2021
Messages
38
Reaction score
11
Location
Streamwood
Rating - 0%
0   0   0
There is still not a whole lot to report. I changed out the tank for my pods tonight. I like seeing it when the water is clean and before I add the phyto because you can see how many there are and how active the colony is. I took a short video just for fun. My phone doesn't take great macro video so please excuse the quality.

In other news, I had made a note when I started cycling the sump tanks to keep track of when the month or so cycle was done. Turns out that was started in May of 2022. It was a bit of a facepalm moment when I realized it's been almost a year and I still don't have things up and running. Life has been a bit hectic recently so it's been a much slower start than I was hoping for. Oh well.
 

Attachments

  • PXL_20230427_010321782.mp4
    11.9 MB
OP
OP
P

pmcmahon

Community Member
View Badges
Joined
Jan 17, 2021
Messages
38
Reaction score
11
Location
Streamwood
Rating - 0%
0   0   0
So I've been really bad about updating this thread. There was a long wait for the tank to be finished at the manufacturer.

So I didn't get a ton of pictures while I was working on the stand frame but I got a few. I went over to a friend's shop who has a planer and jointer and milled down all the dimensional lumber. This was probably unnecessary but it made construction easier and give me better confidence I'd be getting really good contact for all the glue joints. They are all glued together as well as screwed. Getting all the lumber square also helped a lot to keep the stand square and the top flat.

I built the top frame and bottom frame first as individual sub-assemblies. Then I glued and screwed the legs board together and let them dry. I started building the stand upside down because that way the plywood that would be under the tank stayed flat and everything was built up from there. Plywood, then the top frame, legs, and lastly the bottom frame. The last steps are shown in the pictures.
 

Attachments

  • PXL_20230619_215921761.jpg
    PXL_20230619_215921761.jpg
    235.6 KB · Views: 20
  • PXL_20230619_215912501.jpg
    PXL_20230619_215912501.jpg
    224.4 KB · Views: 23
  • PXL_20230619_215847773.jpg
    PXL_20230619_215847773.jpg
    226.7 KB · Views: 22
OP
OP
P

pmcmahon

Community Member
View Badges
Joined
Jan 17, 2021
Messages
38
Reaction score
11
Location
Streamwood
Rating - 0%
0   0   0
Once I had completed the frame stand. I primed everything roughly to try and give the wood some protection from moisture or leaks. This seems overkill since I'll never have a leak ever ever ever.... please master of the universe don't let me have any leaks. I got the frame into the house and tore up the carpet under the stand. We want to replace the carpet eventually and the tank manufacturer doesn't recommend putting a tank like this on the carpet unless you pull it up first and level the subfloor underneath and then put it back. That didn't really seem sensible. I also primed the subfloor under the tank with an oil-based primer. Once that was all complete I used composite shims every couple of inches along the stand to level the whole thing and make sure it distributes the load evenly. I borrowed a laser level that really helped a lot in this case so I could make sure the tank stand was level front to back and left to right within about 1/32" give or take.

While that was all happening the tank got delivered!
 

Attachments

  • PXL_20230917_212748768.jpg
    PXL_20230917_212748768.jpg
    168.5 KB · Views: 21
  • PXL_20230917_212802658.jpg
    PXL_20230917_212802658.jpg
    149.2 KB · Views: 29
  • PXL_20230917_212822691.jpg
    PXL_20230917_212822691.jpg
    247 KB · Views: 21
  • PXL_20230630_183850550.jpg
    PXL_20230630_183850550.jpg
    241.3 KB · Views: 26
OP
OP
P

pmcmahon

Community Member
View Badges
Joined
Jan 17, 2021
Messages
38
Reaction score
11
Location
Streamwood
Rating - 0%
0   0   0
Next up, the great fish tank moving day arrives. This is a glass tank so it is heavy AF. The manufacturer told me it's a bit over 500lbs. My anxiety was max strength about this move. I called a couple of local moving companies but it's over the weight limit of what a lot of companies will consider. The lowest quote I could find was almost $800 to get the tank on the stand. So I decided I would need to get it done myself. Luckily I have an amazing group of friends and family that were able to help me. I spent a while planning out the move because any mistakes could be ... very expensive. I rented lifting jack tables, suction cup handles, and my buddy had a couple of lift straps. We were able to get it done over a couple of hours. Pictures really don't do this tank justice. It's a monster and I'm getting excited now.
 

Attachments

  • PXL_20230826_193922562.jpg
    PXL_20230826_193922562.jpg
    140.3 KB · Views: 24
  • PXL_20230826_193912607.jpg
    PXL_20230826_193912607.jpg
    160.5 KB · Views: 20
  • PXL_20230826_165710241.jpg
    PXL_20230826_165710241.jpg
    153.5 KB · Views: 24
  • PXL_20230826_165707157.jpg
    PXL_20230826_165707157.jpg
    142.3 KB · Views: 27
  • PXL_20230826_165701217.jpg
    PXL_20230826_165701217.jpg
    171.2 KB · Views: 23
  • PXL_20230826_164049337.jpg
    PXL_20230826_164049337.jpg
    161.5 KB · Views: 20
  • PXL_20230826_160228161.jpg
    PXL_20230826_160228161.jpg
    196.5 KB · Views: 21
  • PXL_20230826_160124006.jpg
    PXL_20230826_160124006.jpg
    299.8 KB · Views: 25
  • PXL_20230826_154348444.jpg
    PXL_20230826_154348444.jpg
    299.5 KB · Views: 21
  • PXL_20230826_154340539.MP.jpg
    PXL_20230826_154340539.MP.jpg
    333.9 KB · Views: 19
  • PXL_20230826_153331629.jpg
    PXL_20230826_153331629.jpg
    248 KB · Views: 16
  • PXL_20230826_153354040.jpg
    PXL_20230826_153354040.jpg
    306.8 KB · Views: 20
OP
OP
P

pmcmahon

Community Member
View Badges
Joined
Jan 17, 2021
Messages
38
Reaction score
11
Location
Streamwood
Rating - 0%
0   0   0
So this is a flurry of posts that kind of happened over the course of a couple of months. Just pretend you are binging a netflix series.

While all the stand and tank stuff was happening I took my phyto and pod culture journey to the next level. I had been culturing a fairly generic "green water" phyto that started from a mixed culture and who knows what it was by the time I got ahold of it. This served as good practice for getting my feet under me and learning how to culture. However, I found some pod species didn't take very well to the green water (I suspect it was just nano left) and at the same time, I wasn't being very careful about keeping things clean and separate. The tig pods got into my other pod cultures and clearly were starting to take over. I dumped all the pod cultures besides the tig's into my sump since it was only a matter of time before the tig's just eliminated them.

I switched my phyto to two different single species cultures. Tetracelmis and Isochrysis. These are widely considered the best for raising pods right now and have a really great nutritional profile. I've had good luck with Tetra but Iso is a fickle beast. Keeping things clean is critical to be even remotely successful with Iso. I've got a stable culture right now that does all right but I'm already concerned there are a few extra contaminations in the Iso. I've ordered new starters and got cultures running of Tig, Apocalypse, and Tisbee pods. The apocalypse and Tisee seem to be doing better on my new phyto cultures. The hope is to be able to get high-density cultures running by the time I'm ready to fill the tank. I want to be able to continuously dose all 3 pods into the display tank for at least the first few months. The sumps have been running for over a year but I'll still need the pods to help me stabilize the display and fight back the worst of the ugly phase. Hot tip, bourbon really helps in culturing phyto.

I have a UV chamber and alcohol spray that I'm using to try and keep the cultures sterile but I still think I have quite a bit of learning to do there.
 

Attachments

  • PXL_20230813_230740699.jpg
    PXL_20230813_230740699.jpg
    248.2 KB · Views: 17
  • PXL_20230818_005320016.mp4
    78.5 MB
  • PXL_20230901_021415011.jpg
    PXL_20230901_021415011.jpg
    231 KB · Views: 22
OP
OP
P

pmcmahon

Community Member
View Badges
Joined
Jan 17, 2021
Messages
38
Reaction score
11
Location
Streamwood
Rating - 0%
0   0   0
Ok, last post spam for the day. I started working through the plumbing and it's been a bit of a bear so far. I got my overflow top side done. There are two pressure lines on the left and right. Each pipe has two outputs with lockline nozzles for a total of 4 that I can direct to try and manage surface turbulence and avoid dead spots. The center three pipes are the bean animal system drains. Left to right, durso overflow, emergency line, main siphon. They are a bit high right now but I'll dial that in once I start testing the tank with water. The acrylic overflow cover is removed right now but it wall have the traditional black cover with overflow teeth at the top.

The tank will also have a closed-loop flow system. The pressure lines I'll need to wait to put them together until I start the rock aquascaping so I can hide them within the rock work. There is one suction line that gets split between two sicce 7 pumps. I wanted to make sure that the suction line minimized the amount of pressure loss but it also needed to have a strainer so I didn't suck up any snails or large debris. I custom made an oversized strainer out of 1 1/2 PVC on my table saw. This worked out surprisingly well. I cut a wood block with dimensions that matched the outer diameter of the pipe. I then taped it to the end of the pipe and it acted as a jig to make four cuts each 90 degrees from each other. I used the fence on my table saw to move 1/4" each step down. Lastly, I set the depth on the saw to cut most of the way through the pipe leaving just enough between the 4 cuts to support the structure of the pipe.

I'll try and do a bit better about updating this thread but I'll likely fail miserably. The next steps are to finish the plumbing below the tank and the sumps down in the basement. After that it's onto aquascaping the rocks!!
 

Attachments

  • PXL_20230917_194701196.jpg
    PXL_20230917_194701196.jpg
    164.2 KB · Views: 19
  • PXL_20230917_194413850.jpg
    PXL_20230917_194413850.jpg
    317.1 KB · Views: 19
  • PXL_20230917_183304040.jpg
    PXL_20230917_183304040.jpg
    182.6 KB · Views: 20

Creating a strong bulwark: Did you consider floor support for your reef tank?

  • I put a major focus on floor support.

    Votes: 39 43.3%
  • I put minimal focus on floor support.

    Votes: 20 22.2%
  • I put no focus on floor support.

    Votes: 29 32.2%
  • Other.

    Votes: 2 2.2%
Back
Top