



Planet 400G Overhang Reef

Still waiting on VHO bulbs to show up to mount those endcaps and wire everything up. I did get a new wiring harness for the VHOs, the wire casings were a little crispy on the harness that came with the 660. Amazingly Coralvue still had some for sale. IMG_7442.jpeg

Had to do some digging to find the wiring diagram on a 2 bulb configuration (this post is from 2016 lol).
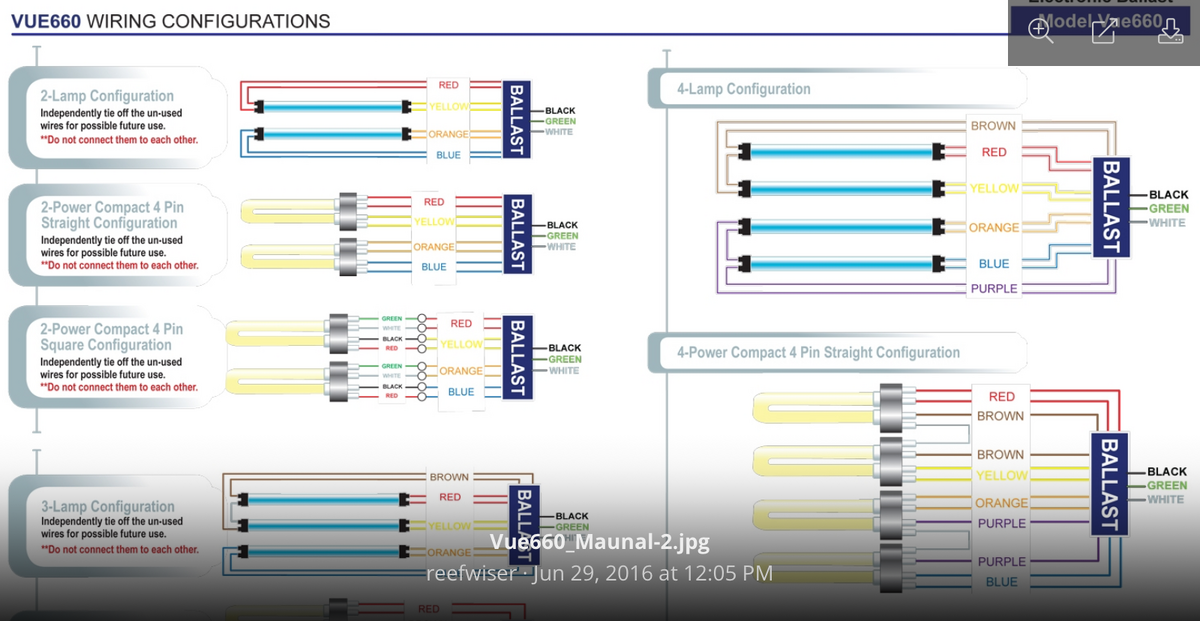
1779585422066.png


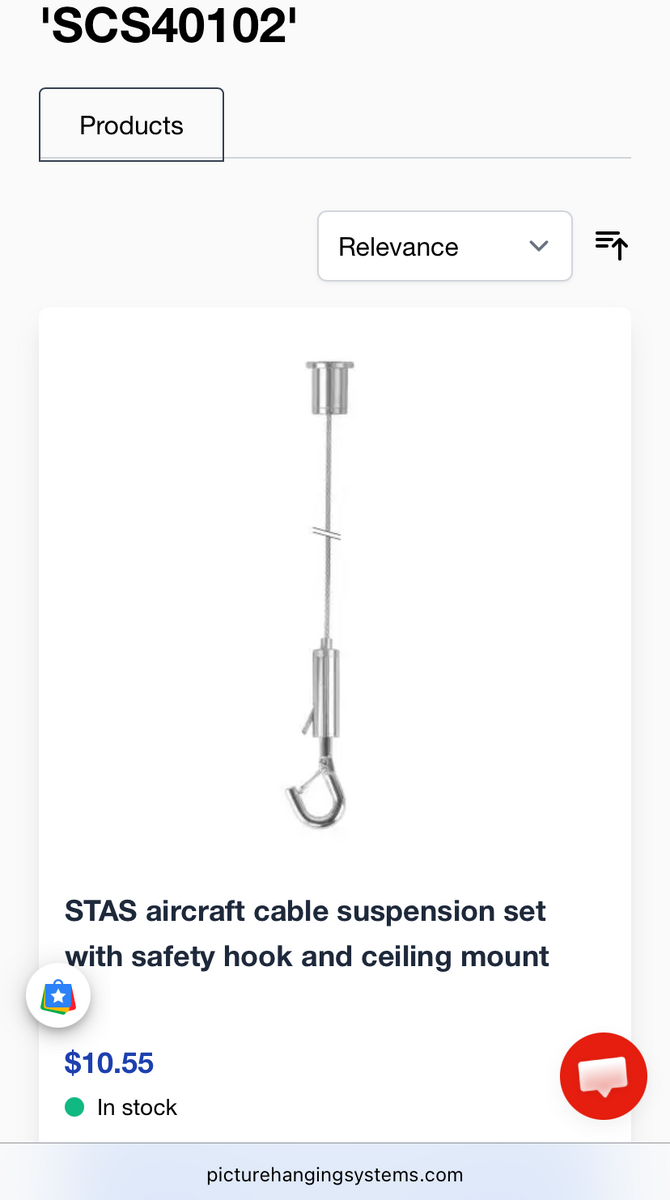
I did order these cable hanging systems for the canopy rated at 25kg each.
1779501829485.png


Not sure I trust toggle bolts to handle 50lbs, so have something in the works to bolt to the studs.

I did get some work done on the canopy earlier today. Am going to use a TV mount on the wall side of the tank. So I got some insert nuts / threaded countersink bushings into the canopy that line up with some holes I drilled into the frame of the TV mount.


IMG_7441.jpeg

Drilling the holes for the bushings was a bit tedious, the first bit I tried was a little small and I couldn’t get it to sit flush. But it will be hidden under the mount and the rest went in fine. Here’s the trick I used to get the holes drilled to depth. Fancy. IMG_7437.jpeg

It’s sorta at the phase in the project where I am getting nickeled and dimes to death on incidentals. But that’s how it goes.
 
Last edited:
It will become apparent later, but this piece of wood was the start of my primary reef structure - the unsupported overhang. During the build, it was screwed down flush to the plywood deck I used to build the rock structures on top of.


IMG_7340.jpeg

The first couple rocks looked like this - built around the piece of wood

1777209057543.jpeg


IMG_7216.jpeg

This was continued progression upward of the overhang and getting a sense check of proportions.

1777213537208.jpeg


I briefly toyed with flipping the order of the structures.
1777213637157.jpeg


But decided against it and kept building the overhang.

1777217779804.jpeg


Here felt like the angle was a bit severe so adjusted (coke can for scale😅)
1777213880035.jpeg


Top down view at this stage.

1777213926554.jpeg

1777213953098.jpeg


Other side, some odd protrusions didn’t quite look right.
1777214190563.jpeg
1777213830924.jpeg

Final product:


IMG_7319.jpeg IMG_7320.jpeg IMG_7321.jpeg IMG_7322.jpeg IMG_7323.jpeg

1777215572668.jpeg

1777215668100.jpeg


I wanted the overhang structure to be the dominant feature but initially it was about the same height of the arch. So you might notice the wood platform now under the base of the bigger structure to lift it up a bit. Turns out that greatly complicated the engineering of the anchor of the structure, but give me a little more height without having to build the structure ever longer. So if this build succeeds or fails, it will be on what comes next!
wow Love the detail you are providing for the form. I have never seen a hanging reef before, well done in a tank. This is super cool.

After everything drys are you going to be able to move the wooden blocks?
 
wow Love the detail you are providing for the form. I have never seen a hanging reef before, well done in a tank. This is super cool.

After everything drys are you going to be able to move the wooden blocks?
Thank you! And yes the wooden block was only a template / stand in piece for the PVC that will be part of the permanent structure. Basically I used wood so I could drill and do whatever I needed to do to work out the cantilevering and building the overhang - it was always temporary. Then I transferred the holes in the wood block of the final fiberglass rod positions to the PVC block.

We will see if I am successful - there is a much less good plan B if it fails spectacularly 😅
 
I worked entirely too long on Memorial day on the wiring up of the canopy. But the good news is it’s 90% done. All that’s missing is to drill the holes for the VHOs and to screw in the standoffs - I went ahead and ran the wires to be close enough for final positioning. And I need the VHOs to get here before mounting the endcaps - I don't trust stated measurements or my skills to try and work ahead. Thankfully everything worked on first try!

They all work I promise, just need to let the tubes get warmed up.

IMG_7451.jpeg

Here’s how I mounted the ballasts and ran the conduit for the wiring. IMG_7452.jpeg

And when I was going through my electrical supplies I found a brand new in box extra Icecap 660 sitting in a storage tote (don’t tell my wife!). Receipt was still in the box! Check the date….. IMG_7449.jpeg
 
I worked entirely too long on Memorial day on the wiring up of the canopy. But the good news is it’s 90% done. All that’s missing is to drill the holes for the VHOs and to screw in the standoffs - I went ahead and ran the wires to be close enough for final positioning. And I need the VHOs to get here before mounting the endcaps - I don't trust stated measurements or my skills to try and work ahead. Thankfully everything worked on first try!

They all work I promise, just need to let the tubes get warmed up.

IMG_7451.jpeg

Here’s how I mounted the ballasts and ran the conduit for the wiring. IMG_7452.jpeg

And when I was going through my electrical supplies I found a brand new in box extra Icecap 660 sitting in a storage tote (don’t tell my wife!). Receipt was still in the box! Check the date….. IMG_7449.jpeg
Just a heads up if I were you I would redact last 4 of your card and expiration date. Apologize if you don’t care. Great looking build!
 
Some minor updates:

Champion lighting said UVL will have the VHO bulbs back in stock second week of June so that’s nice.

Today’s project was to rivet two 39W reflectors together for the whole length needed for 80W T5s. Wasn’t too bad to snap them together.

IMG_7460.jpeg IMG_7461.jpeg

Something I noticed:

This fixture is throwing off a noticeable amount of heat being in a much smaller room now. And it only had the T5s on for a short time. Might have to think about a mini split type situation to keep that room from baking.
 
Last edited:
Weekend project:

I had a fiberglass tank from old build that I figure will be needed in the transfer of everything. Problem is the hole I drilled in the bottom wouldn’t allow for a schedule 80 bulkhead to make a seal due to too much flex. So that needed patched with the bulkhead moved to a sidewall.

I didn’t take any before pics of the underside of the tank.

Underside
IMG_7464.jpeg

Inside before fiberglass sheet and fiberglass. IMG_7465.jpeg IMG_7466.jpeg

After pouring the resin and drilling the new bulkhead. IMG_7472.jpeg

I used standard 3M bondo from any big box store and added some leftover carbon black pigment I had around. Have never worked with fiberglass resin before, was stupid easy!

IMG_7467.jpeg

https://www.homedepot.com/p/Bondo-1-qt-All-Purpose-Fiberglass-Resin-20122/202077790
 
This fixture is throwing off a noticeable amount of heat being in a much smaller room now. And it only had the T5s on for a short time. Might have to think about a mini split type situation to keep that room from baking.

Does anyone have any experience installing a mini split or a humidistat controlled by a fan? I am not against putting a vent in the wall of the room and going one way or the other to help control temp and humidity

I keep the fan on my house AC always running and haven’t had humidity or temp issues on my 235G. But this is a much bigger tank in a much smaller room, can’t imagine I won’t need a more active solution. Which in my mind is either sending warm air out of the house from the room and let the central system keep up or add more active cooling.
 
Last edited:
This is the old tank, but finished QTing a female pink margin fairy wrasse and a Maculiceps tang. They are in the acclimation box for now, but I got a kick out of the pink margin male eyeballing his new girlfriend.

 
Some more progress on lighting. Got my third Reefi in a couple weeks ago and built an aluminum cradle that will sit in the track. It’s simply angle aluminum held together with pop rivets. I really like the flexibility of being able to slide them around to where give the best coverage. Below is how it all works together.
IMG_7496.jpeg


One downside is the track itself needed some height ground down to allow the power supply cord to not interfere with the track. So some angle grinder work like below for each of the three lights.

IMG_7497.jpeg

Was looking through my existing Reefi’s light program and saw I am only running them at a little more than 50%. These lights are absurdly strong - love them!
1781014758472.png


I can’t find any old school GE 6500k 80W T5s anywhere so will likely bump up the whites to balance these out. My current system mixes this Reefi program with a 10K 250W metal halide and two each of 54W ATI blue plus and GE6500k / ATI Coral Plus.

@oreo54 Do you have any recommendations for how to tweak the Reefi channels to give me more of the full spectrum wavelengths if my T5s on this new setup are just ATI actinic / ATI Blue Plus?
 
Some more progress on lighting. Got my third Reefi in a couple weeks ago and built an aluminum cradle that will sit in the track. It’s simply angle aluminum held together with pop rivets. I really like the flexibility of being able to slide them around to where give the best coverage. Below is how it all works together.
IMG_7496.jpeg


One downside is the track itself needed some height ground down to allow the power supply cord to not interfere with the track. So some angle grinder work like below for each of the three lights.

IMG_7497.jpeg

Was looking through my existing Reefi’s light program and saw I am only running them at a little more than 50%. These lights are absurdly strong - love them!
1781014758472.png


I can’t find any old school GE 6500k 80W T5s anywhere so will likely bump up the whites to balance these out. My current system mixes this Reefi program with a 10K 250W metal halide and two each of 54W ATI blue plus and GE6500k / ATI Coral Plus.

@oreo54 Do you have any recommendations for how to tweak the Reefi channels to give me more of the full spectrum wavelengths if my T5s on this new setup are just ATI actinic / ATI Blue Plus?
First ..oops see they have only 1.
https://www.lightbulbs.com/product/...I966kvLxbiMZiY8Db0oG9sItnbBfKonRoCNAMQAvD_BwE
865 is 80 cri 6500k
Want to have fun try to find 965's ( 90cri 6500k )

If you want more white balance just add what you don't have (or very little of)


A bunch of lime, pc amber and warm white to taste.
If it gets too purple toned for you , cut amber and ww
, use cool white.


You know there are a billion ways to go...
 
Last edited:
First ..oops see they have only 1.


You know there are a billion ways to go...
Yup, they were who I called first!

And no kidding there’s a million ways to go!! That’s why I pinged you - needed someone to narrow it down for me 😅😅😅.

Thank you my friend.
 
Yup, they were who I called first!

And no kidding there’s a million ways to go!! That’s why I pinged you - needed someone to narrow it down for me 😅😅😅.

Thank you my friend.
I can only guesstimate a bit. Let me know your observations.. good or bad.

Spectrums and eyeballs don't always agree.
 
Not much going on these days with the build. VHO bulbs are delayed by UVL (again) to Champion so can’t finish the canopy. I did start the drain plumbing in the basement but am holding that update for an entire MEP section with all that work.

So probably the most significant thing happening is the cooking of the rock. This is 50G of tank water in a 100G rubber made tank when I did a water change a week ago. Next week I will add another 40 and fully get it wet. IMG_7531.jpeg


The rock got a Muriatic acid bath before I started building so I was a little surprised when I did a phosphate reading on the water. IMG_7532.jpeg

The tank runs 0.00 to 0.08 with 0.03-0.04 as the common result I get back. So the rock is definitely leaching PO4.and I am glad I started the process to keep this out of the tank.

And this is after two random doses of LaCl to bind phosphate over the last few days. The new plan is to start dosing Ammonium Bicarbonate to get a little more balance of nutrients going for bacteria to fix my problem. My tanks are always nitrate limited so am not totally surprised by this.
 
....and you all probably thought this build was dead. But nope! Just on an intermittent hiatus. I have an arrival date the new tank end of October/early November so over the last couple months I have mostly been focusing on the MEP side of the build.

On mechanical updates, the efforts in this area have been about getting supports under the floor joists installed. The room the tank will be sitting is over the small crawlspace section in the basement, so it was pretty easy to get in there and put some jacks and support beams in.

First step was to pull back the vapor barrier and put down some paver base - and then a support cement block on top. So four of these were put down and leveled.
1789423810660.jpeg


Next step was to assemble two 2 x 8 x 96 boards and laminate them together. Some glue and carriage bolts held these together.
1789423860333.jpeg


Getting the jack posts wrangled in place was a pain, but luckily I had two helpers over to keep everything lined up and square while I attached the beams to the bottom of the joists and the support jacks.

1789413157955.jpeg


Next step was to get the plumbing sorted. The primary issue was that there are a couple steel beams running down the basement that required the plumbing to be ran around. I am running a 1 1/2 emergency drain with two 1" drains that will be tuned Bean Animal style. The majority of the plumbing is hard PVC that switches to spa flex at each end.


Luckily the first length was parallel to the joist and fairly easy to get put in. My main concern is if I have enough drop to make sure gravity does its thing. The rise on the plumbing is roughly 1/2 per foot over an 8 foot span. I wouldn't trust it for solids, but fingers crossed it is okay for liquids only. I am certainly no plumber, but I think it should be fine. At the far end the 1 1/2 section is all done to run through the floor above but not the two 1" sections (but more on that later).

IMG_0045.jpeg

This part was 80% of the irritation to get right. So not only did I need to drop the plumbing 90 degrees vertically around the steel beam, but I also needed to turn it another 90 to change direction toward the sump. I was really concerned about too tight of turns making the plumbing tricky to get to flow when power cycling the return pump (water changes, storms, etc) so I took some care to not just run 90 degree elbows everywhere.

I ran the 1 1/2 drain first settled on one sweep elbow for the vertical turn and two 45s for the rest. You will see down the line in the pic below that 4-5 feet after the last 45 elbow is a 22.5 degree elbow needed to drop the plumbing down toward the sump. The straight section is also dropped about 1/2" each foot like the parallel joist run.

The 1 1/2" drain was irritating enough to get right that I cheated on the two 1" drains by using a 2 foot section of spa flex to help me get the angle exactly like I needed. It would have probably taken another 2-3 precisely measured elbows to accomplish this with all hard plumbing. No regrets here.

IMG_0044.jpeg

Mounting this section ALSO took mounting plywood to a cement pillar with tap cons and building a box that would let me run these pipes parallel to the cement pillar. You can see that here:
IMG_0051.jpeg


The last part I plumbed was the section that ran from the union up to the floor above that transitions to soft plumbing (you can see the black spa flex for one of the 1" lines below. I bought a few extra matching unions so if I need to rebuild this section for any reason it's an easy switch out for the female side of the union.
IMG_0047.jpeg

Here you can see the topside view of the plumbing:

1789422834385.jpeg
The 1 1/2 hasn't been transitioned to soft plumbing yet - the plan is the glue this in later but you get the idea.

That picture is ALSO the electrical update 😅 Over the summer I had two 20A circuits added. One upstairs in the wall behind the tank (pictured above) and another down in the basement by the sump. I paid for that work, I didn't trust myself to split out the breakers and also sleep easy the house wouldn't burn down.

This is a fish tax. Was feeding the tank a while ago and had my male black leopard take a leap out the tank. I get to see his colors flash in front of the female all the time but was still surprised he was so vibrant out of the water. Don't worry, he's fine (if a bit over dramatic). But don't tell me black leopards don't give other flashy names like bipartus and kuiteri a run for their money!


1789413430826.jpeg
 
Last edited:

TOP 10 Trending Threads

WHEN BUYING EQUIPMENT YOUR REEF WILL DEPEND ON, WHAT MATTERS MOST TO YOU?

  • Long-term reports from other reefers

    Votes: 8 53.3%
  • My own past experience with the brand

    Votes: 2 13.3%
  • A simple design I can understand and maintain

    Votes: 1 6.7%
  • Warranty and responsive customer support

    Votes: 1 6.7%
  • Independent testing or detailed reviews

    Votes: 2 13.3%
  • Advice from an LFS or reefer I personally trust

    Votes: 0 0.0%
  • Being able to keep a spare or build in redundancy

    Votes: 1 6.7%
  • Something else? Tell us in the comments

    Votes: 0 0.0%
Back
Top
Home
Post thread…
Market
What's new











