Tank Build in slow motion...

Echale3

Community Member
View Badges
Joined
Apr 4, 2023
Messages
39
Reaction score
47
Location
Roanoke
Rating - 0%
0   0   0
My wife scored a 125 gallon tank that's 72" wide, 24" tall, and 18" deep.

So far, I've built a stand for it. I overbuilt it in terms of strength, it's a combo of 2x6 and 2x4 lumber, screwed and glued, with a bottom shelf. Since we have a basement, and our house is older, I installed a beam of three 8 foot 2x6s supported by two jackposts in the basement under the tank.

I've tested the tank, and it doesn't leak, which is good. When we got it, there was a ton of silicone at every joint, so I cleaned all that up, made a proper bead of silicone at every joint, et voila, it looks better than it did and holds water.

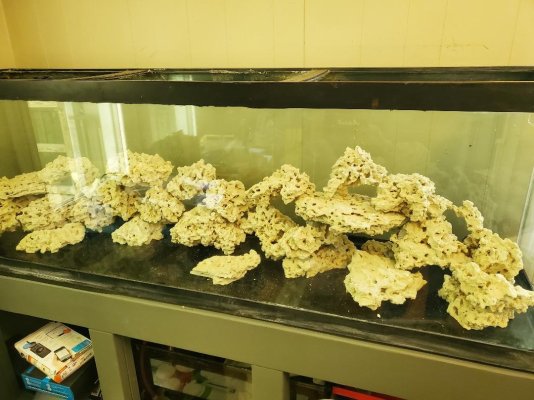
I'm currently building an aquascape of Marco Rock, making lots of small arches and grottoes for fish and leaving plenty of spots for coral. My wife and I really like zoanthids and other soft corals. We have a sump, protein skimmer, pump, HOB overflow (didn't know whether the tank glass was tempered or not, so we didn't want to risk it), all the plumbing supplies including backflow preventers and unions, aragonite sand, powerheads, Tunze Osmolater ATO, etc.

We pretty much have everything needed to get the tank put together and start cycling.

Anyway, here's a pic of the tank with most of the Marco Rock installed. I'm using superglue and the Marco Rock cement to hold it all together.

More to come later....
tank 02.jpeg
 

aws2266

Active Member
View Badges
Joined
Jul 21, 2021
Messages
353
Reaction score
657
Location
Dayton
Rating - 0%
0   0   0
Nice stand, I'm in awe of people with skills that can do that. I did manage to reinforce my floor though, and went pretty much the same route you did. Did you get pics of your reinforcement? Would love to see exactly how it's set up. I just bought a 125g that is going on the other side of my dining room so I'll need to reinforce that part as well. Here's what I did for my 120g.

https://www.reef2reef.com/threads/diy-reinforced-floor.868355/

Gonna follow your thread. Maybe I'll get a few ideas for mine. Not planning on getting it wet until mid-June. A few things that need to happen before then. One of them is staining my stand black. I need to start documenting that here. Anyway, Happy Reefing, and I'll be following along.
 
OP
OP
E

Echale3

Community Member
View Badges
Joined
Apr 4, 2023
Messages
39
Reaction score
47
Location
Roanoke
Rating - 0%
0   0   0
"Nice stand, I'm in awe of people with skills that can do that. I did manage to reinforce my floor though, and went pretty much the same route you did. Did you get pics of your reinforcement? Would love to see exactly how it's set up..."

Here's how I reinforced the floor underneath the tank. It's just three 2x8s ganged together by screws and supported by jack posts -- nothing unusual there. I have our tank along an outside wall running perpendicular to the floor joists as opposed to your setup. From what I saw in the pix in your thread, it looks to me like you'll be supported well enough, although I'd personally have bridged the span between the load bearing joists with triple-ganged 2x8s as opposed to the aluminum bars.

What's the dimensions of your tank? Any particular reason you chose to span only two joists instead of three with each of the aluminum bars? Is the wall behind the jack posts load-bearing or is it just a standard 16" on-center stud wall?

20230513_162753[1].jpg
 
OP
OP
E

Echale3

Community Member
View Badges
Joined
Apr 4, 2023
Messages
39
Reaction score
47
Location
Roanoke
Rating - 0%
0   0   0
Update on the tank -- I have the rock aquascape in the tank and glued up securely, the light fixtures mounted, the decorative backing that my wife and I chose taped onto the back wall of the tank, the sump under the tank, HOB overflow mounted, 600W heater in the sump and a Finnex temperature controller mounted on the side of the tank base, a Reef Breeders 1600 GPH DC pump mounted externally to the sump, the DC controller mounted on the side of the tank base, a Curve 5 skimmer in the sump, the intake/output plumbing done in Schedule 80 PVC with unions for ease of adjustment as necessary, a backflow preventer plumbed in, and the hard lines supported by pipe clamps screwed to the tank base.

I just got a few hurried pix taken yesterday, I'll get more detail shots and post them later. I decided I didn't like the look of the inflow line rising way above the tank rim so I ordered a few more fittings from Lowes and I'll revise it this weekend to more closely follow the tank contours.
20230514_174611[1].jpg
20230514_174637[1].jpg


Still lots to do before I start putting water in and start cycling the tank.
 

Gumbies R Us

Another Fish in the Sea
View Badges
Joined
Nov 10, 2022
Messages
9,850
Reaction score
18,923
Location
North Georgia
Rating - 0%
0   0   0
Update on the tank -- I have the rock aquascape in the tank and glued up securely, the light fixtures mounted, the decorative backing that my wife and I chose taped onto the back wall of the tank, the sump under the tank, HOB overflow mounted, 600W heater in the sump and a Finnex temperature controller mounted on the side of the tank base, a Reef Breeders 1600 GPH DC pump mounted externally to the sump, the DC controller mounted on the side of the tank base, a Curve 5 skimmer in the sump, the intake/output plumbing done in Schedule 80 PVC with unions for ease of adjustment as necessary, a backflow preventer plumbed in, and the hard lines supported by pipe clamps screwed to the tank base.

I just got a few hurried pix taken yesterday, I'll get more detail shots and post them later. I decided I didn't like the look of the inflow line rising way above the tank rim so I ordered a few more fittings from Lowes and I'll revise it this weekend to more closely follow the tank contours.
20230514_174611[1].jpg
20230514_174637[1].jpg


Still lots to do before I start putting water in and start cycling the tank.
Great looking aquascape!!
 

aws2266

Active Member
View Badges
Joined
Jul 21, 2021
Messages
353
Reaction score
657
Location
Dayton
Rating - 0%
0   0   0
Here's how I reinforced the floor underneath the tank. It's just three 2x8s ganged together by screws and supported by jack posts -- nothing unusual there. I have our tank along an outside wall running perpendicular to the floor joists as opposed to your setup. From what I saw in the pix in your thread, it looks to me like you'll be supported well enough, although I'd personally have bridged the span between the load bearing joists with triple-ganged 2x8s as opposed to the aluminum bars.

What's the dimensions of your tank? Any particular reason you chose to span only two joists instead of three with each of the aluminum bars? Is the wall behind the jack posts load-bearing or is it just a standard 16" on-center stud wall?

20230513_162753[1].jpg

Looks good. This is the route I'm going on my new tank only I think we're going to use a standard 4x4, may change my mind on that. I really haven't looked at the placement yet, the tank is going to run parallel with the joists, so I'll place support at each end of the tank covering a few joists.

As for my 120g, the dimensions are 48x24x24. We only had so much of the good aluminum so we chose those two joists. The wall is concrete and part of the tank is over the wall so we really didn't need to go out that far either.
 
OP
OP
E

Echale3

Community Member
View Badges
Joined
Apr 4, 2023
Messages
39
Reaction score
47
Location
Roanoke
Rating - 0%
0   0   0
Looks good. This is the route I'm going on my new tank only I think we're going to use a standard 4x4, may change my mind on that. I really haven't looked at the placement yet, the tank is going to run parallel with the joists, so I'll place support at each end of the tank covering a few joists.

As for my 120g, the dimensions are 48x24x24. We only had so much of the good aluminum so we chose those two joists. The wall is concrete and part of the tank is over the wall so we really didn't need to go out that far either.

Just pulling a SWAG, I'd say that you're more than adequately supported, then. For your new tank you can look up deflection parameters for PAR lumber online. With a good 4x4 to span the gaps you should be OK.

When I built my tank base, I estimated the weight of my tank, the weight of rock going in, the weight of sand going in, the weight of the water at full capacity (not considering the volume of water reduced by the presence of rock and sand as I felt better overestimating than underestimating total weight), weight of the sump, etc. I significantly overbuilt the tank stand -- by my calculations it should be able to support at least 5 times the weight of the tank with everything in it. I could have gone with a less stout build, I suppose, but I wanted to make sure I had seriously ample safety margins in the build. Wood's not all that expensive anyway, so why not err on the side of caution. I could easily have just done legs at all 4 corners and a center support and been plenty strong rather than have the extra middle support legs and been plenty safe.

Were I to build it again, I'd just do legs at all 4 corners, one leg in the center, and made the base about 8" taller than it currently is.
 
OP
OP
E

Echale3

Community Member
View Badges
Joined
Apr 4, 2023
Messages
39
Reaction score
47
Location
Roanoke
Rating - 0%
0   0   0
Well, work proceeds apace, sort of.... This week I didn't get much done except to order some parts to make a few changes that I thought were necessary after looking at what I'd built.

Changes made and why:

==> I added two more unions, one on the overflow side and one on the return side,
==> I revised the height of the return pipe going over the top of the tank, and
==> I added a valve on the return side between the pump and the elbow turning upwards along the side of the tank.

The valve I added will allow me to drain the return side into a bucket if I ever need to dismantle that side for cleaning or revision (yeah, it's white schedule 40 stuff, I couldn't find a grey Schedule 80 valve to use).

The union I added on the outlet side was at the top so that if I ever needed to change anything out on that side it'd be easier.

The union I added on the overflow side was between the splitter emptying into the filter socks and the elbow where the pipe turns up and attaches to the bulkhead of the overflow. Originally I just had one union on that side, it was below the overflow bulkhead, just above the elbow that turns under the base of the tank. Just having that one union made it tricky to get the splitter in place, it's pretty tight space-wise under the tank.

Today I washed the aragonite sand and my wife and I dumped about 60 pounds in the tank. It was pretty messy, and I'll need to rinse it off some of the aquascape rocks where it landed, but it'll do for now.

So, all the plumbing is done to my satisfaction (no idea whether it leaks or not, keep your fingers crossed!), the aquascape is looking good, the sand is washed and in the tank, the lighting is up, the sump is set up, I hooked up the aqualifter to the HOB overflow to make it able to restart itself after a power outage, and now, it's time to set up the RO/DI system I got from BRS and start making water. I got a 150 gallon/day RO/DI system, bought a special 32 gallon trash can just to keep water in, and I also snagged a small pump and hose to pump the water out of the trash can and into the tank. With any luck I'll have the tank filled in the next few days and be ready to start cycling the tank.

Here's a few pix I took. Not great pix, mind you, especially the one trying to show the newly installed overflow union where my finger got in the way, just something to document what I've been doing.

20230520_125212.jpg
20230520_125222.jpg
20230520_125319.jpg
20230520_125331.jpg
20230520_125338.jpg
20230520_125353.jpg
20230520_125256.jpg
 
OP
OP
E

Echale3

Community Member
View Badges
Joined
Apr 4, 2023
Messages
39
Reaction score
47
Location
Roanoke
Rating - 0%
0   0   0
Last night we removed the filter socks, got the tank and sump filled up with RO/DI water, adjusted the salinity to 1.025, got the powerheads going, and fired up the return pump and the airlifter.

The CPR Aquatics HOB overflow has a Stockman type standpipe and it was surging pretty bad, so I fiddled with the pump flow settings and got it balanced out. The return pump is only running at about half it's throughput, any faster and the overflow keeps doing the "toilet flushing" thing. The Stockman pipe has pretty narrow slits in it for water to flow through, which I think could potentially be problematic if they ever got clogged with algae or detritus, plus the opening size limits the max flow rate, hence the surging. Rather than bung up the existing Stockman pipe I'm going to make one that has plenty of large openings so it won't possibly clog and the max flow will be higher than it currently is now.

I dosed the tank with Dr. Tim's One and Only, and it's time to start getting it cycled. That, and I need to neaten up all the electrical cables, too, it's a bit of a mess under there...


20230521_193424[1].jpg
20230521_193449[1].jpg
 

More than just hot air: Is there a Pufferfish in your aquarium?

  • There is currently a pufferfish in my aquarium.

    Votes: 30 18.2%
  • There is not currently a pufferfish in my aquarium, but I have kept one in the past.

    Votes: 27 16.4%
  • There has never been a pufferfish in my aquarium, but I plan to keep one in the future.

    Votes: 31 18.8%
  • I have no plans to keep a pufferfish in my aquarium.

    Votes: 69 41.8%
  • Other.

    Votes: 8 4.8%
Back
Top