The Kitchen

Battlecorals

Aquaculturist
View Badges
Joined
Oct 15, 2009
Messages
6,940
Reaction score
16,169
Location
Wisconsin
Rating - 100%
2   0   0
IMG_2260-1.jpg


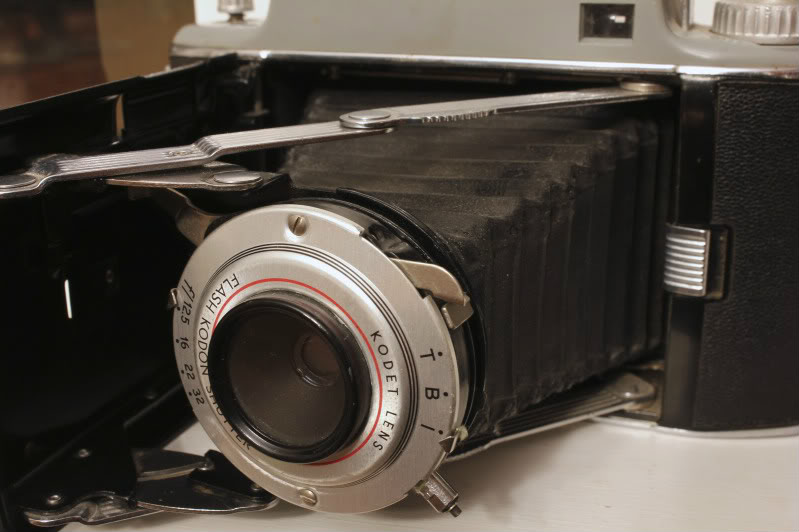
A small portion of the lens is in focus. It's not tack sharp, but it's in focus and that's a huge first step. The exposure on the metal is good and the blown highlights are kept to an absolute minimum, which is not alway easy to do. Beyond that, the image needs some help.

Since you're showing more than just the lens and the immediate area around it, the framing/cropping is much too tight. It's not giving the protrusions from the lens body any room to breathe and overall the shot is visually uncomfortable. The tight framing is also causing problems elsewhere. It puts metal parts at the top, left, and bottom of the left-hand-side of the image at the edges. Since those parts are almost as bright as the lens, the eye jumps to them to see what's going on with those elements.

Because you have such an extreme difference in exposure value between the metal and the black body, and your DOF is so shallow, the metal parts that are dominating the image end up framing an out of focus area of visual mush to the left of the lens. I want there to be some defined features in that little cave, but they're not there. Also competing for attention are the highlights on the bellows at the top. They don't contribute anything, but they're bright so my eye naturally wants to explore them.

The end result is that I can't enjoy what should be a pleasing image of a vintage camera.

To improve this, re-shoot with much more depth of field, back up to give the camera some room in the frame, bounce some light into that cave so we can see some detail, and work to eliminate distracting elements at the edges.

Gary


Wow. I really appreciate you taking the time to do that. I'd love to give it another try.

I confess I felt the tightness in this one too.

I have never posted a pic other than coral let alone have one critiqued by someone who really knows what they are talking about.

I'll work on it and get another up here.

Thanks again.
 

-Logzor

2500 Club Member
View Badges
Joined
Mar 16, 2011
Messages
2,565
Reaction score
320
Location
United States
Rating - 0%
0   0   0
Here is a shot of two of my good friends. Taken spontaneously while at the Cincinnati Zoo. I would like to do more spontaneous photography like this because I get surprises when I load them onto the computer screen. When taking the shot I had no idea my friend Elliott (BAND t-shirt) was giving me a strange look.

What can I do to have good spontaneous shots? Would you improve this one in any way? How can I position myself for better shots of people in fairly close proximity?

randomshot_01_by_Logzor.jpg
 
Last edited:

akabryanhall

2500 Club Member
View Badges
Joined
Jun 17, 2009
Messages
2,925
Reaction score
182
Rating - 0%
0   0   0
Took this with my iPhone, I love the colors on it and it looks stunning on my phone screen, it wasn't till I blew it up that I noticed the blur. The HDR app I used was not as accurate as I had hoped. No critique necessary..
e88fc86b.jpg
 

Battlecorals

Aquaculturist
View Badges
Joined
Oct 15, 2009
Messages
6,940
Reaction score
16,169
Location
Wisconsin
Rating - 100%
2   0   0
OK here is my Kodak tourist II once again. I spent more time exploring what the camera settings can accomplish. I also had a better notion of what I was trying to capture. The upper trim got a little to bright. I did catch that, just a little too late.

Maybe this one will be just a little bit easier on your eyes?

trimBOgood.jpg
 

butts182

Valuable Member
View Badges
Joined
Feb 2, 2010
Messages
1,165
Reaction score
100
Location
Juno Beach, FL
Rating - 0%
0   0   0
How about this one Gary? My fiance took this is the FL Keys last year. Also, what camera and lenses do you use yourself?
Thanks.
boatstoleft-template.jpg
 
OP
OP
gparr

gparr

Waterbox Keeper
View Badges
Joined
Aug 3, 2008
Messages
2,137
Reaction score
19
Location
NW Chicago Suburbs
Rating - 0%
0   0   0
randomshot_01_by_Logzor.jpg


This is really nothing more than a snapshot that captures a moment but doesn't tell us anything. The main person is centered in the frame (not good) and is reacting to or interacting with something, but we have no idea what that is and don't really have any way of guessing. The blown sky and all of the people in the background are very distracting.

I'm not particularly skilled at the kind of photography you suggest you would like to do, though I've done quite a bit of it because it's a nice diversion from my usual subjects. I've had the most success with this type of photography by using a longer lens, 100 mm or longer (but not a big lens that draws attention to you), which allows me to be at a decent distance from the subject. The long lens allows you to capture people doing things normally without them knowing you are taking the pictures, i.e., stealth photography. The image below of a girl and her dog at a parade, though a bit old, is still one of my favorites.

There is a whole group of photographers who have the personality and skill to walk up to complete strangers, interact with them, and create captivating posed images that really connect the viewer with the subject. I'm envious of that ability. It makes for some great photography, but I can't do it well. The best at this type of "street photography" is the old master Henri Cartier-Bresson.

Gary

girldog.jpg
 
OP
OP
gparr

gparr

Waterbox Keeper
View Badges
Joined
Aug 3, 2008
Messages
2,137
Reaction score
19
Location
NW Chicago Suburbs
Rating - 0%
0   0   0
trimBOgood.jpg


The overall execution is much better in this image and the subject is much more comfortable in the frame. I still think there is a better composition. What bothers me about this one is that you have the metal at the top, one of the brightest areas of the image, drawing the eye out of the frame. Try other compositions to see if you find something that is stronger/better.
Gary
 
OP
OP
gparr

gparr

Waterbox Keeper
View Badges
Joined
Aug 3, 2008
Messages
2,137
Reaction score
19
Location
NW Chicago Suburbs
Rating - 0%
0   0   0
boatstoleft-template.jpg


I use Canon gear. A couple of my lenses are Sigma EX. The rest are Canon L.

It's a very nice image. The water mark is a bit too much and really affects the viewing, but that's a choice made by the photographer.

The scene is to die for because so much can be done with it. Exposure was handled well, as is DOF. Unless it's a strict reflection shot, I'm not a big fan of landscapes in which the horizon line splits the frame. I think it makes for a very static image. Decide what you want to emphasize, sky or water, and move the horizon line up or down to approximately a third of the frame. The other thing that bothers me about this image is the boats. They're pointing to the left and sending the eye out of the image. I would like to see them on the right side, leading the eye into the image. That aside, it's a pleasing image with some beautiful colors and lighting.
Gary
 

KLR

5000 Club Member
View Badges
Joined
Apr 10, 2010
Messages
6,603
Reaction score
44
Location
Williamston,NC
Rating - 0%
0   0   0
This picture was my first attempt at long exposure photography, I think I set at shutter for 1 minute. But I do not remember what I had the ISO, aperture, and brightness set at. It was taken with a tripod as well.

I like this kind of photography but would like some tips on drawing the best colors and lighting out of the pictured subject(s), pre-photoshop.

This picture became a little blurry after I resized it:sad:

LongExposure.jpg
 
Last edited:

Dave3112

2500 Club Member
View Badges
Joined
Dec 1, 2009
Messages
2,574
Reaction score
40
Location
Athens,AL
Rating - 0%
0   0   0
This one is from a work trip to Hawaii last year. I was just starting out in photography but I liked the way this one came out.

hawaii20100483.jpg
 
OP
OP
gparr

gparr

Waterbox Keeper
View Badges
Joined
Aug 3, 2008
Messages
2,137
Reaction score
19
Location
NW Chicago Suburbs
Rating - 0%
0   0   0
LongExposure.jpg


A tripod is essential for this type of shooting. I also prefer to use a remote release. Make sure your camera battery is fully charged when you start. Long exposures tend to suck up battery power. I always use a low ISO setting with the camera on the Bulb setting. There is a lot of trial and error with this type of shooting but, for the most part, the basic principles of photography still apply. The most frustrating part is stray light. Be prepared to have a shot ruined because a car turns and illuminates your subject, someone turns a light on or off, or any number of random things that can change the overall scene illumination.

If the sky is involved, shooting just after sunset will give you that deep blue/purple sky that you achieved in this shot. It's much more appealing than black. When doing city skylines at night, it helps to do them on clear nights. If it's cloudy, the lights from the city reflect off of the clouds and create a muddy sky that, at least for me, ruins the photo.

Like any type of photography, nighttime photography takes practice and the willingness to go out when most people are getting ready for bed.

Gary
 
OP
OP
gparr

gparr

Waterbox Keeper
View Badges
Joined
Aug 3, 2008
Messages
2,137
Reaction score
19
Location
NW Chicago Suburbs
Rating - 0%
0   0   0
hawaii20100483.jpg


Nice lighting on this one and a beautiful scene. That sky is superb. From a landscape perspective you did a nice job of including a strong foreground element (in this case the heavy, dark rock) that provides depth to the image. The rock contrasts nicely with the delicate colors in the water and sky.

Your horizon line needs to be leveled. As previously mentioned, in general, I'm not a big fan of splitting the frame with the horizon. I think it makes a rather static image. That's easily fixed in this image.

The selling point for this image is the sky and water so you want to make it dominate the frame, with the rock providing the necessary foreground anchor function. You don't need as much rock as you're showing and, beyond a small amount, it's really not contributing to the image. Try cropping to just below the outcropping on the right so that water fills the lower right corner. This will move the horizon line lower in the frame and you'll then begin to see that the water and very strong sky start to dominate the image with just enough rock to provide a foreground anchor.

Gary
 

KLR

5000 Club Member
View Badges
Joined
Apr 10, 2010
Messages
6,603
Reaction score
44
Location
Williamston,NC
Rating - 0%
0   0   0
LongExposure.jpg


A tripod is essential for this type of shooting. I also prefer to use a remote release. Make sure your camera battery is fully charged when you start. Long exposures tend to suck up battery power. I always use a low ISO setting with the camera on the Bulb setting. There is a lot of trial and error with this type of shooting but, for the most part, the basic principles of photography still apply. The most frustrating part is stray light. Be prepared to have a shot ruined because a car turns and illuminates your subject, someone turns a light on or off, or any number of random things that can change the overall scene illumination.

If the sky is involved, shooting just after sunset will give you that deep blue/purple sky that you achieved in this shot. It's much more appealing than black. When doing city skylines at night, it helps to do them on clear nights. If it's cloudy, the lights from the city reflect off of the clouds and create a muddy sky that, at least for me, ruins the photo.

Like any type of photography, nighttime photography takes practice and the willingness to go out when most people are getting ready for bed.

Gary

Ok, thanks for the informative reply! I wish I lived close to a city so I could take pictures of it.
 

KLR

5000 Club Member
View Badges
Joined
Apr 10, 2010
Messages
6,603
Reaction score
44
Location
Williamston,NC
Rating - 0%
0   0   0
Here is one I took almost 2 years ago with an SLR...I wish I had a DSLR at the time..
moon.jpg
 

Dave3112

2500 Club Member
View Badges
Joined
Dec 1, 2009
Messages
2,574
Reaction score
40
Location
Athens,AL
Rating - 0%
0   0   0
I tried to straighten the horizon but I think I keep overshooting it. LOL. With the angle of the shore in the foreground it's hard for me to get it right. But I did crop it and I like it much better. Thank you for your critiques, Gary! I value your opinion very much!

edited.jpg
 

Dave3112

2500 Club Member
View Badges
Joined
Dec 1, 2009
Messages
2,574
Reaction score
40
Location
Athens,AL
Rating - 0%
0   0   0
I also like this one. I just took this one on another work trip in Germany. It was about mid-day and very bright so I was surprised that it came out as well as it did.

_MG_0130_0876.jpg
 
OP
OP
gparr

gparr

Waterbox Keeper
View Badges
Joined
Aug 3, 2008
Messages
2,137
Reaction score
19
Location
NW Chicago Suburbs
Rating - 0%
0   0   0
Dave,
Glad to help. Here's my shot at adjusting the photo. I'm limited in that I have to work with the posted jpg. You can get much more out of the original. I leveled the horizon, cropped it, and made some minor curves adjustments to bring out more color and detail.
Gary

dave3112test.jpg


hawaii20100483.jpg
 
OP
OP
gparr

gparr

Waterbox Keeper
View Badges
Joined
Aug 3, 2008
Messages
2,137
Reaction score
19
Location
NW Chicago Suburbs
Rating - 0%
0   0   0
Leveling Horizons: If you have Photoshop (I assume you can do the same with Elements), the quickest way to level a horizon or waterline is to use the Ruler Tool. It's behind the eyedropper tool, two tools above the magnification tool.

Choose the Ruler Tool. Click on the horizon line at the left side of the image. Holding down the mouse button, drag the cursor across the image and click on the horizon line on the right side of the image. The line you drew should follow the horizon line. In the menu bar, choose Image, Rotate Canvas, Arbitrary. There will be a number in the Angle box and the appropriate button (CW or CCW) should be checked. Don't touch those settings. Just click on OK. Your image should automatically rotate to make the horizon level. Just crop to square the image and you're good to go. You might have to practice a little bit to get the ruler just right, but once you get it, you'll find it's quick and easy and accurate every time.
Gary
 

Dave3112

2500 Club Member
View Badges
Joined
Dec 1, 2009
Messages
2,574
Reaction score
40
Location
Athens,AL
Rating - 0%
0   0   0
Awesome!!! Thank you very much, Gary! I have elements and am thinking about upgrading to either Lightroom or CS5. But I also want to get another laptop to be able to handle all the editing.
 

Anthrax15

Active Member
View Badges
Joined
Sep 2, 2011
Messages
366
Reaction score
169
Location
Mesa, AZ
Rating - 0%
0   0   0
Before posting, please read the rules in the first entry in the thread.
Thanks,
Gary

Only been shooting for two months. Love it so far!

All shots taken with a 18-55mm Kit lens on my T3i Body. Edited in Lightroom 3

6331401784_c1d4438e7f_z.jpg
 
Last edited by a moderator:

Creating a strong bulwark: Did you consider floor support for your reef tank?

  • I put a major focus on floor support.

    Votes: 40 43.0%
  • I put minimal focus on floor support.

    Votes: 20 21.5%
  • I put no focus on floor support.

    Votes: 31 33.3%
  • Other.

    Votes: 2 2.2%
Back
Top