Urbanek's ADA Trio

urbaneks

Well-Known Member
View Badges
Joined
Feb 20, 2011
Messages
730
Reaction score
3,878
Location
Chandler, AZ
Rating - 0%
0   0   0
Introduction
My name is Brad Urbanek, I've been reef keeping just over 8 years. Like many, I've went through the progression of going bigger and bigger only now to go smaller, smaller and smaller. One thing that I learned through my last aquarium, a 250 gallon reef, is that what I love most about the hobby is just having a playground to experiment with. Having a large aquarium didn't provide me any more satisfaction than I got with my 28g Nano or my 110g Rimless. I learned that moving with a large aquarium adds an infinite amount of work and stress. Having to rely on others just to lift the aquarium is something I wanted to avoid moving forward. As I pondered these lessons, I knew that my next adventure would be with tanks that I could lift and carry on my own.

My Vision
If you've followed my last build you know that I enjoy woodworking as much as I do reef keeping. I want to use this build as an opportunity to test new skills and ultimately create a gorgeous display that is free of visible wires and plumbing. I want the system to be as clean and simple as possible while matching the flow of our new home. My options for aquarium locations are limited and when I say limited I mean I have one possible location. In this location, we already has an existing cabinet that matches our kitchen cabinets. Having this cabinet is both a blessing and a curse. A blessing in that it's there, it matches and it's one less thing to pay for. A curse in that getting it ready to support the system while keeping the doors and drawers functional will be a test.

The Plan
My plan is to install 3 smaller aquariums onto a supplemental cabinet directly on top of the existing cabinet. All three aquariums will be plumbed to a single sump giving me 3 unique ecosystems while having the benefit of an overall larger water volume. I anticipate the overall water volume will be about 60 gallons. The lighting will be concealed in a floating shelf with wires running through a conduit behind the drywall. I hope you will join me through the build process as I attempt to make my vision and plan a reality.

IMG_4442_zpsendelomh.png

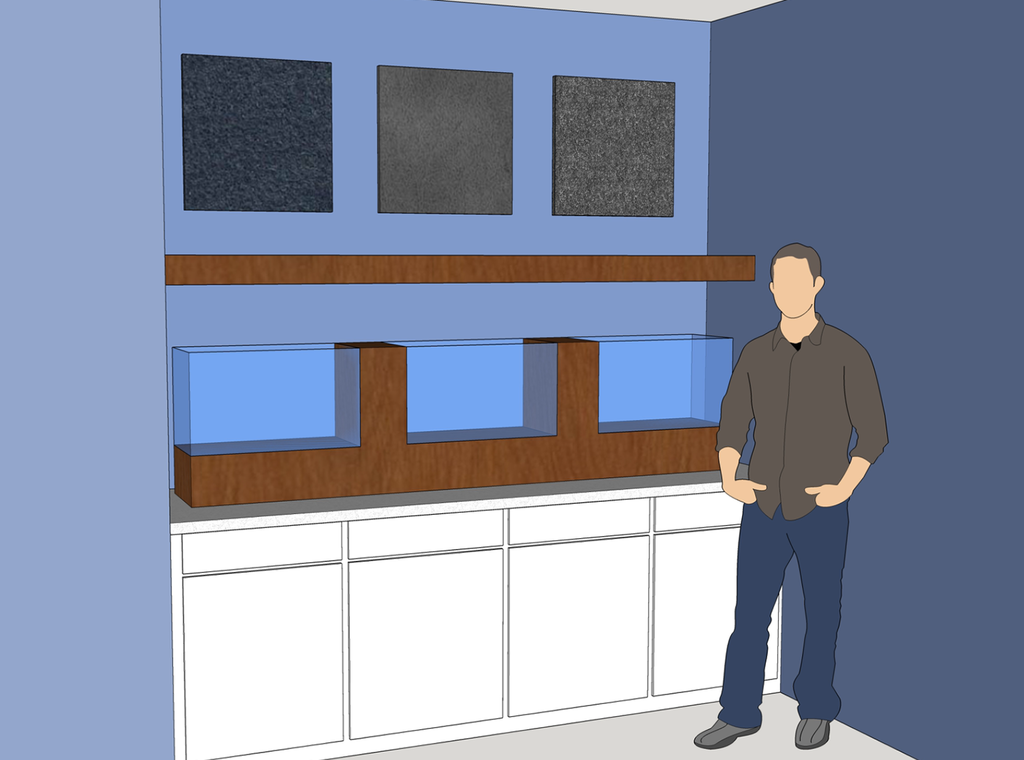
Preliminary Sketch of the Project​
 

Chrisfish

5000 Club Member
View Badges
Joined
Oct 29, 2015
Messages
7,488
Reaction score
26,844
Location
Hatteras
Rating - 0%
0   0   0
Welcome back! I was so sorry when the 365 day projected ended, your pictures and commentaries were beautiful and and really enjoyable. Looking forward to following this thread :)
 

revhtree

Owner Administrator
View Badges
Joined
May 8, 2006
Messages
47,766
Reaction score
87,225
Rating - 100%
1   0   0
Awesome! Looking forward to this!
 

Preme

Valuable Member
View Badges
Joined
Jun 27, 2016
Messages
1,317
Reaction score
1,240
Rating - 0%
0   0   0
Sounds like a cool concept! Any idea approximately how many gallons each tank will be? Will you be keeping different types of livestock in each tank too?
 
OP
OP
urbaneks

urbaneks

Well-Known Member
View Badges
Joined
Feb 20, 2011
Messages
730
Reaction score
3,878
Location
Chandler, AZ
Rating - 0%
0   0   0
Equipment Selections
What would a build thread be without an equipment list? With each product I provided a link with product details and in most cases from my place of purchase. Thanks to all of you have shown interest in the build and decided to subscribe.

Aquariums: ADA 60P - Dimension: 60x30x36cm (approx:24"x12"x14")
Overflows and Returns: Super Nano In-aNd-Out Complete System
Circulation: EcoTech Marine - VorTech MP10wQDs
Sump: Trigger Systems - Sapphire Sump 34
Return Pump: Ecotech Marine - Vectra M1
Skimmer: Deltec SC1351
Lighting: Aqua Illumination - Hydra FiftyTwo HD LED
Controller: Original APEX with 2 EB8s, WMX Controller, pH and Temp Probes (Carried over from previous two systems)
Auto Top Off: Spectrapure - Ultra-Precise Auto-Top-Off System
Dosing: Bubble Magus - TM-01 with a TM-02 Companion (Carried over from previous two systems)
Reactors: Avast Marine - Small Spyglass Reactors (Running off of Vectra M1)
Heaters: Finnex HPS Series Digital Glass Aquarium Heaters


The obligatory photo of some equipment before I get started​
 
OP
OP
urbaneks

urbaneks

Well-Known Member
View Badges
Joined
Feb 20, 2011
Messages
730
Reaction score
3,878
Location
Chandler, AZ
Rating - 0%
0   0   0
Drilling the Tanks
Right off the bat, we have a first for me, this is the first time ever drilling/cutting holes in a tank. I have to admit, I was dreading this task but for what I'm not sure. This was a very simple process. I purchased the complete drain/return kit from Glass Holes. The product came complete with instructions and their site has some great videos to reference. As I've learned over and over again, if you have the right tools for the job, it's typically easy. The overflow boxes are nice, this product is a single drain line to the sump so it a bit nosier than my silent bean animal drain on the last tank. For the size of these tanks and my space limitation in the cabinet, running 3 drains to each tank was not possible. I invited my friend Jeff over to assist. He was there to pour water as I drilled and provide moral support if I were to crack a tank. We managed not to!

I could write up a nice tutorial on how to do this but I honestly couldn't do it any better than the video that is already available on the Glass Holes site. If I had to give one piece of advice, go slow and let the drill bit do the work. You will have a tendency to want to help the bit along. If you do this, you will get some splintering as the bit breaks the back side of the glass. Here are a few photos that I snapped during the process.


Template in place, ready to drill the first return line hole


Return line drilled


Bulk head installed, template in place for drain line hole


The fruits of our labor, 6 total holes cut, 0 tanks cracked!​
 

Clayton Jessup

Valuable Member
View Badges
Joined
Apr 30, 2016
Messages
1,568
Reaction score
1,193
Location
El Paso Tx
Rating - 0%
0   0   0
I remembered I was freaking out when I was drilling my ADA 75p , but got it done just like you did. Good job keep up the good work , looking forward to this build a lot !!!
 
OP
OP
urbaneks

urbaneks

Well-Known Member
View Badges
Joined
Feb 20, 2011
Messages
730
Reaction score
3,878
Location
Chandler, AZ
Rating - 0%
0   0   0
Supplemental Cabinet Build
With the tanks drilled and painted, it's time to get on with some of the wood working. Unfortunately, I forgot to snap a few photos while I was painting the tanks. I simply taped them off and used a high quality spray paint with a primer. I love the way the paint came out.

My next project is getting the supplemental cabinet built. This purpose of this cabinet is twofold. First and foremost, it will take some of the weight of the tanks off of the base cabinet and secondly, it will serve as the skeleton to which my reclaimed wood will attach to. After talking with the base cabinet builder, the cabinet was built to withstand 400 pounds spread evenly across the top. With this in mind, the extra support I'm building in is not needed but the extra piece of mind is worth it for me. In summary, the plan is to attached some thick pieces of beam to the house studs via large 8" lag bolts. The supplemental cabinet will then be lagged to the beams thus attaching it to the house itself. Another way of thinking about this is I could remove the base cabinet and the tanks would be attached to the wall. Between the base cabinet and the supplemental cabinet attached to the house, I have plenty of structural support to hold the tanks of which will weigh about 380 lbs with water and rock. Here are a few photos of the build process.


After a trip to Home Depot and Porter Barn Wood, two of my favorite stores, I'm ready to start building. If you are looking for some inspiration, have a look at Porter Barn Wood's website. Amazing work being done by these guys.


Here is the space I will be working with. The base cabinet was installed by our home builder and was built to hold the full weight of the tanks. I will be adding support for extra piece of mind.


Here is a shot after I got the pieces of beam attached to the studs. These pieces of beam were cut from a large beam that I had from another project I did. In addition to providing extra support, the pieces were cut to keep perfect spacing between the tank and the wall.


With the support pieces in place, it's time to start framing out the supplemental cabinet. Having the right tools for the job is key. Here you see clamps and T-squares being used to make sure we stay level and square. Another tip I picked up recently is to cut the rounded edges off of 2x4s. You can see in this picture how it makes all the difference in keeping your project square.


Here is what the supplemental cabinet looks like after being built and attached to the support pieces.


A sneak peak of what the tanks look like after plumbing and painting. At the point, the upright pieces of lumber are just sitting in place as I start to scope this next part of the project.
 
OP
OP
urbaneks

urbaneks

Well-Known Member
View Badges
Joined
Feb 20, 2011
Messages
730
Reaction score
3,878
Location
Chandler, AZ
Rating - 0%
0   0   0
Painting the Glass and Installing the Returns and Overflows
I mentioned in the previous post that I forgot to take photos when I was painting the tanks. In order to prep the tanks for paint, I simply taped off all surfaces that I did not want to see paint. I'm sure any masking tape will do but I prefer and used 3M Blue Painters Tape. With the tanks taped off, I applied several light coats of spray paint. I test painted another piece of glass with a couple brands of spray paint. I found that the Rust-Oleum paint with a prime r was the ticket. If I had to give some advice on the painting, it would be to take an entire day to complete this task, don't have other tasks planned for the tanks. With a day carved out, apply a thin layer of paint, you may not get full coverage at first. Let the first layer dry for an hour or two. Come back and repeat the process applying another thin layer of paint. Avoid trying to get full coverage with each application. Repeat this process 5 or 6 times until you have completed coverage. Let the tanks dry until the next day before you move them. In the end you will have a great paint job free of runs/streaks/etc.


With the tanks painted, I'm ready to test fit them on supplemental cabinet and install the returns and overflows. Before the tanks go down, I added a foam pad under each tank. ADA has a great product for this. If you are in need of a material for under your tank check out the ADA Garden Mats, they come in several sizes. This product is the best I've seen for this application.


After the Garden Mats were in place, tanks were set in place to get a general idea. I couldn't help setting a piece of the reclaimed wood next to the cabinet to get a sense for what the finished product will look like.


Here is a photo of the tanks in place, painted with returns and overflows installed. I mentioned this in the first post but the drains and overflows came from Glass Holes. Here is a link to the exact product that I purchased. I chose this product for the size and ease of installation. I could not find another overflow and return that I could fit on a single panel of the tanks. Overall, I'm very pleased with how the paint/overflows look.
 

MaccaPopEye

Well-Known Member
View Badges
Joined
Jan 5, 2016
Messages
697
Reaction score
1,232
Rating - 0%
0   0   0
Really glad to see you back mate. Your new build is already shaping up to be stunning. Love it.
 
OP
OP
urbaneks

urbaneks

Well-Known Member
View Badges
Joined
Feb 20, 2011
Messages
730
Reaction score
3,878
Location
Chandler, AZ
Rating - 0%
0   0   0
Framing the Floating Shelf that with House the AI Hydras
With the supplemental cabinet built, tanks painted, it's time to turn my attention to the lighting solution. One of my biggest pet peeves in this hobby is visible cords and excessive light spill. While my floating shelf may not 100% fix the light spill, I know for sure that it will fix the visible wires that I've grown to dislike. I snapped several photos during the build process, here are a few that I think best illustrate the build process.

As with any project knowing what you are going to build (down to the 1/16th of an inch) before you start building is key to success. I started this project as I typically do which is building the project inside of Google Sketch Up. They key to this project was knowing exactly where I wanted the lights positioned above each tank. Once I had the center point of each Hydra, I had to know that points relationship to the corner of my existing wall. After having these two key measurements, it was just a matter of framing out the shelf to accommodate the lights.


With my plan in hand, I'm ready to start building. Step 1 was to cut the back board the length of my shelf. Step 2 was to cut the front to back supports and position them along the back board. The two end pieces are a no brainer, the rest were positioned to accommodate the Hyrda's positions above the tanks. Step 3 was to attach this completed portion to the studs. I was able to attach this portion to studs on the back wall and both side walls.


Next it's time to frame out the boards where the back of the Hyrdas will sit. Again referencing my build plan, I add these next pieces of wood for all 3 lights. You will also notice that I added 1/4" melamine inside the frame. This just finishes the inside of the light cavity and provides a lip for the lights to sit on.


The next step was to cut holes from the Hydra cords to run through and add the front board to complete the framing. Again, I used the melamine to finish the light cavity. What is not pictured here is a 2nd piece of melamine that was installed at the bottom of each cavity, this small 1/4" lip is what prevents the lights from slipping through the cavity.


It's time for a test fit. I positioned the Hydra inside the cavity so that once I skin the shelf, the heat sinks will be concealed. Here you can see what the shelf/light look like from above and below. The lip I mentioned in the section above is visible in the second photo.


Here is what the framed out shelf looks like with the tanks sitting below it. I'm happy to report that the lights are exactly where I wanted them. This was a fun sub project. I'm surprised I have not seen more shelves like this before. It's a pretty easy project and a great solution from mounting lights above a tank.
 

Algae invading algae: Have you had unwanted algae in your good macroalgae?

  • I regularly have unwanted algae in my macroalgae.

    Votes: 48 35.0%
  • I occasionally have unwanted algae in my macroalgae.

    Votes: 28 20.4%
  • I rarely have unwanted algae in my macroalgae.

    Votes: 11 8.0%
  • I never have unwanted algae in my macroalgae.

    Votes: 10 7.3%
  • I don’t have macroalgae.

    Votes: 36 26.3%
  • Other.

    Votes: 4 2.9%
Back
Top