Algae Scrubber Basics

OP
OP
Turbo's Aquatics

Turbo's Aquatics

Super Duper Member
View Badges
Joined
Jun 7, 2011
Messages
2,799
Reaction score
4,022
Location
West Des Moines, IA
Rating - 0%
0   0   0
Planning your Algae Scrubber

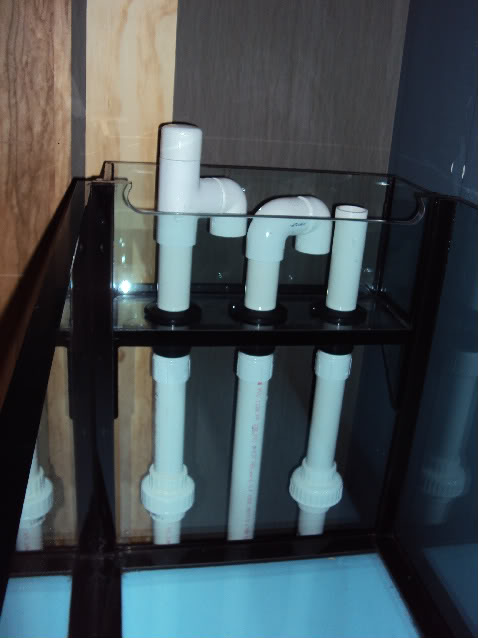
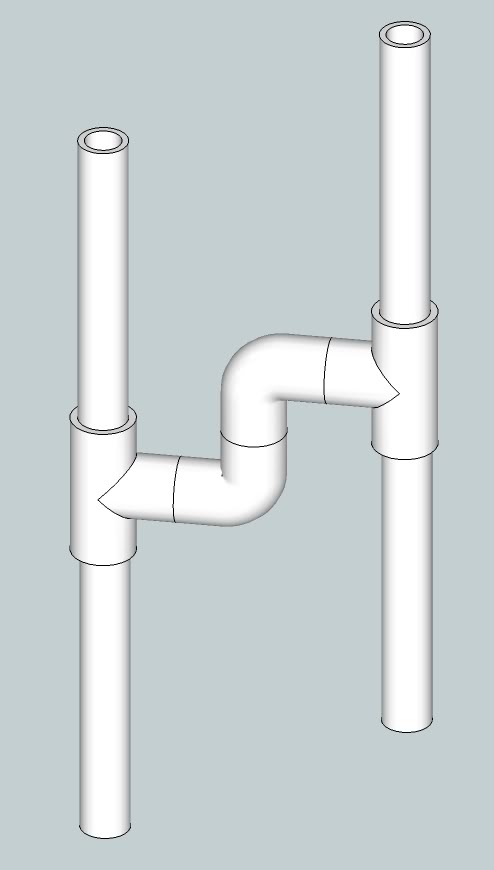
There are 2 basic ways of supplying flow to an Algae Scrubber: directly from the overflow, or from a dedicated pump.

ScreenFeed.jpg


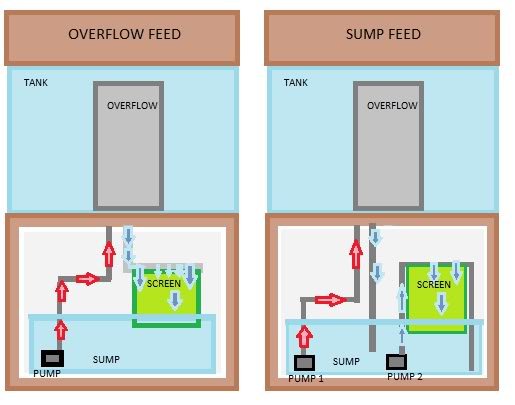
The above diagram does not illustrate the top-of-tank Algae Scrubber, which would apply to someone running a sumpless system, however this is just a modification of the pump-driven Algae Scrubber with the pump in the display tank.

The very first step you need to do before buying, measuring, or sketching up anything, is to decide how you are going to supply your Algae Scrubber, and determine what your available flow rate is.

Available Flow

In any case, you need to measure the flow rate. Do this step. It is critical. Do not, I repeat, do not calculate the flow rate based on pump curves and head-feet of pressure. This may sound like a total pain in the behind, but just trust me on this one. Would you rather go through all the effort of building an Algae Scrubber, only to have problems and find out that you didn't have as much flow as you thought you did? Believe me, I've been there.

If you've been reading this thread, you will see that at some point I started making a big deal about this. The reason is that it is a big deal and I think many people don't realize that their pump does not pump at the rated flow, and in the majority of cases, it doesn't come close to the flow calculated by using a standard head-foot calculator program or table. So I have chosen to make it the #1 priority for an Algae Scrubber design, hands down. You have to know your actual flow.

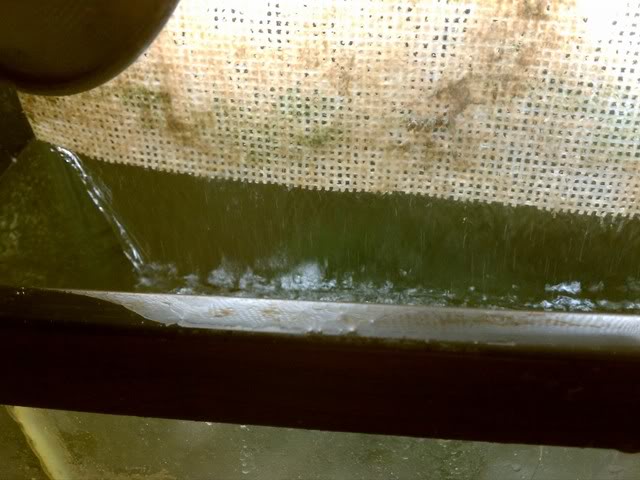
For a drain fed Algae Scrubber, fill a pitcher with the water entering the sump. You will probably need to rig up a temporary pipe or routing configuration so that you can fill the container. For a pump-fed Algae Scrubber, set up the pump in a sink filled with water to the same level as your pump will be submerged, and connect the tubing required to reach the height of the connection to the horizontal slot tube, so that you mimic as best as possible the actual conditions. Backpressure created by the slot/screen is negligible unless your flow rate significantly exceeds 35 GPH per inch of slot length.

Now that you've done all this, fill the container and record the time it takes to fill it. Do this at least a dozen times. The way I do this is by using a recording device, like a digital voice recorder, and just calling out "Go" and "Stop", then afterward, playing it back and using a stopwatch to get the time intervals. You could also have someone else run the stopwatch and write down the times. Average out the times and then figure out how many gallons per hour of flow you are actually getting. If you have multiple drains, measure and extrapolate GPH for each individually, and then add together.

For instance, if you are using a 1/2 gallon pitcher, and it takes 4.5 seconds to fill it, then you would have (0.5 gallons / 4.5 seconds) x (3600 seconds / 1 hour) which would be 400 GPH.

Don't be surprised if you have a lot less flow from your pump than you thought you had. I had less than 1/2 of what I thought it was. Head-feet calculations are usually way off, because most people don't use big enough return hose or have other restrictions in the plumbing. Some of it is inherent to reef-ready aquarium design (1" drain, 3/4" return, Danner Mag-Drive 9.5 and larger pumps need 1.5" return, see a problem?). So don't feel bad. A lot of people are in your situation, but they just don't know it.

Start with a clean pump. If your pump is not clean, soak it in vinegar for 15 minutes and scrub it good. After running an Algae Scrubber for about 4-5 months, your pump flow will drop about 15%, and by 6 months, it will have dropped by 25%, so you want to know your best-case flow and build around that. It's a lot easier to start with a throttled-back clean pump and open it a little when the flow rate decreases. Figure out your system flow rate, multiply by 80%, and that will be a good starting point. But, it's not going to kill you to start at full flow, and end up with a little less over time. You might just want to clean your pump a little more often, say every 3 months. So it's up to you. Just being aware of your system conditions puts you miles ahead.

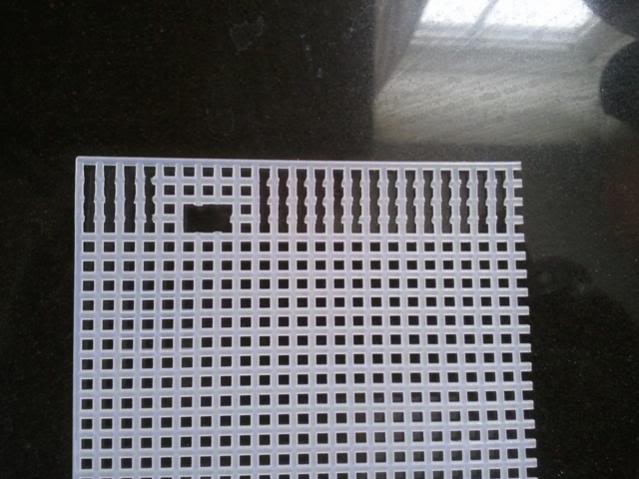
Big Basic Change #1 - Screen Size

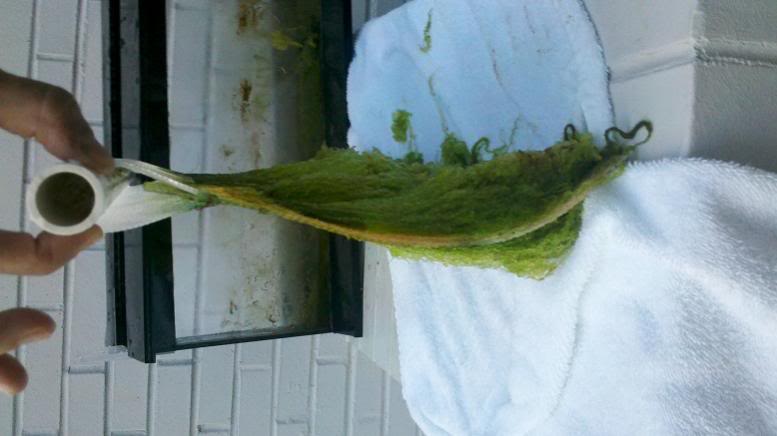
Originally, the standard method used to calculate the screen size required was based on the size of the tank. Around September 2011, that method was revised to be based on feeding amount. This is a very important change, because not only does it mean an Algae Scrubber screen is more appropriately sized, it also means you will get better growth results. As it turns out, bigger is not necessarily better when it comes to your algae screen – the algae on a screen that is too large compared to the amount being fed will become nutrient deficient over time as the algae will want to grow across the entire screen. Concentrating this algae growth down to the appropriate size in accordance with the amount fed means you will typically get more green growth, and green hair algae is what filters the best (and smells the least, I might add).

The good news here is that this means that in most cases, you can get away with a significantly smaller screen, and guesstimating your bio-load specific to your system is completely unnecessary.

Once you figure out your available flow, then it's time to figure out your optimal screen dimensions.

There are 2 ways of looking at this: square inches based on length and width dimension, and square inches based on illuminated surface area. The latter is technically more accurate, but since most people light both sides, the former is usually referenced.

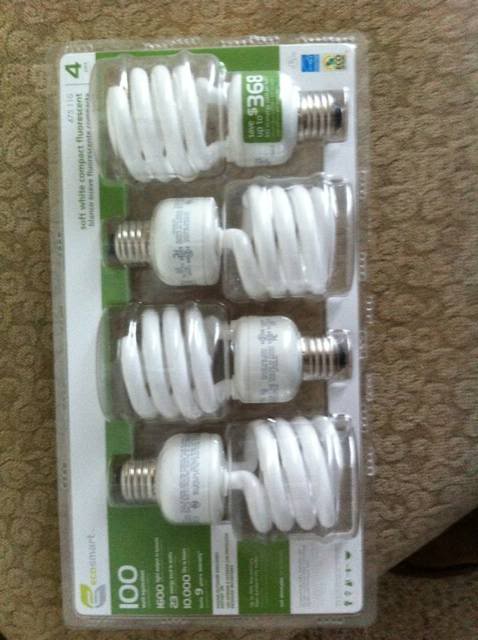
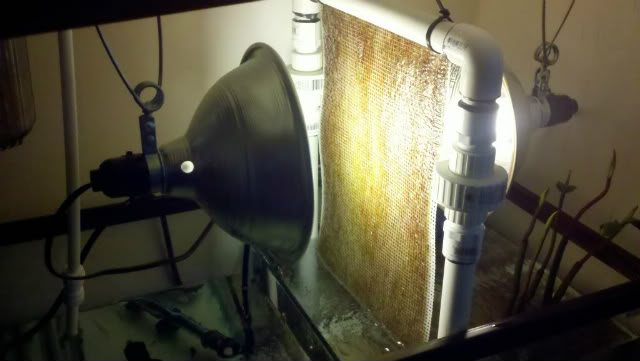
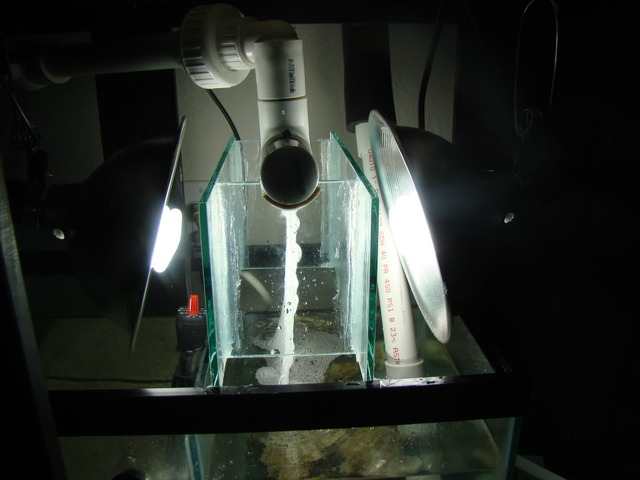
The new rule is based on cube-equivalent amount of food fed daily, regardless of how many gallons you have in the system. You need 12 square inches of screen illuminated on BOTH SIDES with a total of 12 watts of fluorescent light for 18 hours/day for each cube-equivalent fed into the system per day. That means 6 watts per side of real wattage, not equivalent wattage. LED wattage is addressed separately as it has a different set of rules.

The cube-equivalent is defined as any ONE of the following:

1 frozen cube
10 pinches of flake food
10 square inches (60 sq cm) of nori
0.1 dry ounce (2.8 grams) of pellet food
3.25 mL of liquid coral food

If you feed something else and are having a hard time determining the cube-equivalent, then take the daily amount of food, put it in a blender with some water and puree it well, then strain it using a coffee filter (or a rotifer sieve if you happen to have a spare one laying around) and pour the food into an empty Ocean Nutrition or other cube-type food tray, and you will have the cube-equivalent for that amount of food.


If you light the screen from only one side, double the dimensional measurement of the screen; light requirement is the same, it’s just all on one side.

For a non-vertical screen, double the dimensional measurement again. Any screen that is not 100% vertical is treated as a horizontal screen (even if it’s only slightly slanted). This is because of the channeling properties inherent to a slanted or horizontal screen; there is an immediate loss of efficiency when the screen is non-vertical.

So, just so we're 100% clear on this:

Vertical, lit from both sides: 12 square inches of screen material per cube of food per day, 12 watts of light split between each side.

Vertical, lit from only one side: 24 square inches of screen material per cube of food per day, 12 watts of light on one side.

Non-vertical: 48 square inches of screen material per cube of food per day. Lighting must increase by a factor of 1.5 (discussed in the lighting section). In this case, a MINIMUM of 18 watts of light is needed, preferably much, much more.
 
OP
OP
Turbo's Aquatics

Turbo's Aquatics

Super Duper Member
View Badges
Joined
Jun 7, 2011
Messages
2,799
Reaction score
4,022
Location
West Des Moines, IA
Rating - 0%
0   0   0
Screen Dimensions

So now that you know your actual flow rate AND the necessary size of your screen (dimensional area), now you are ready to figure out your dimensions.

You want the flow to be a minimum of 35 GPH per inch of screen width. You can get by with a lower flow rate, but your Algae Scrubber may not be strong enough depending on your bio-load. You can have higher flow also, which is generally not a problem as long as your screen is rough enough and you aren’t getting black slime algae (which is a sign of high nutrients, and needs more frequent cleaning until it lightens up). What you want to achieve is enough flow so that you have a full sheet of water across the screen off the bottom edge, like this:

RC_BSOD.jpg


Simply take your GPH (that you just measured) and divide by 35, and this will be your maximum screen width. Then, take that number and divide it into your total screen area to obtain the height dimension of the screen. The result is the total area of roughed-up screen that you want.

You want to add to the height dimension for the section of smooth screen that will be inserted into the slot pipe. You want to allow for the distance that the screen will be inserted into the slot pipe, plus at least 1/8" of smooth screen below the slot tube to help prevent algae growth into the slot. The total amount of smooth screen you need depends on how far you insert the screen into the slot pipe. A little extra smooth screen at the top never hurts, as it can be trimmed off later if you leave too much.

You may also want to leave smooth screen at the bottom as well. Most screens, in some form or another, will ‘dip’ into a pool of water at the bottom. This submerged area does not grow algae very well, so you can leave that smooth too.

The critical area, and the only area that contributes to scrubbing power, is the roughed-up and illuminated portion of the screen. Figure out your necessary screen dimensions, and then add the extra smooth sections to the height dimension.

If the only way you can mount your scrubber is to have it hanging in free air and high above your sump, you can leave a significant amount of smooth screen below the ‘effective’ area, or you can attach another screen to the bottom edge of the main screen. You may end up with some gooey growth on this screen though, so you should avoid it if possible (IMO).

Lighting

There are 3 basic types of light sources that people use: CFL, T5HO, and LED.

Since LED Algae Scrubbers are becoming all the rave, I have further expanded the discussion regarding LEDs. The LED based Algae Scrubber has a different set of rules to follow with respect to wattage and photoperiod, as well as a few other factors. So to avoid confusion, I kept the LED section separate and it follows the fluorescent section.

In the cases of fluorescent lighting, the optimum spectrum / light temp for growing algae is 2700K-3500K, with 2700K-3000K getting the best results.

Proper wattage of light and proper flow to the screen are the critical factors; color temperature / spectrum comes in behind those. You can use higher K ratings, but the real-world (anecdotal) evidence suggests that the optimal range for growing algae is heavy in the red spectrum. If you look at regular plant grow lights, you will find that most of them (especially LED grow lights) are very heavy in red.

Power Compact, or PC lamps, are not recommended, because they run way too hot for the amount of light you get out of them. I don't even care for them for tank lighting.

Quantity of lighting is dependent on the size of the Algae Scrubber screen (dimensional area). In general, you want 1 watt (actual, NOT “incandescent equivalent”) of light per square inch for optimal scrubbing power. You can get away with less, but I would not recommend it. You will likely experience problems at some point.

As you will notice throughout this thread, it is generally stressed to follow the minimum 1 watt per square inch guideline. This is because it solves many Algae Scrubber issues. The reason behind this is scientific. Light interacts with algae and causes N and P (and ammonia & nitrite, among other things) to be absorbed, and chlorophyll is created (among other things). The more light, the more nutrient reduction you get. There is a direct correlation between the quantity of light supplied and the amount of nutrient reduction capability.

A non-vertical Algae Scrubber requires at minimum 1.5 times the light as you would need for a comparable vertical single sided Algae Scrubber. Here is where I will switch to the total surface area method. A vertical single sided 1-cube per day Algae Scrubber would be 24 square inches, lit with 12 watts, or 0.5 watts per square inch of total surface area. A non-vertical Algae Scrubber needs to be 2x as large, or 48 square inches, and have 18 watts of light, which results in 0.375 watts per square inch. I would argue that you need at least 0.5 watts/sq in, if not a full 1.0 watt per square inch to make up for the efficiency loss factor inherent to a non-vertical Algae Scrubber because of channeling and/or water draining through the screen instead of across the algae mat. Older dump-bucket or surge style Algae Scrubbers may not have this problem, but then again, you’re only filtering when the water is moving fast, which is only periodically (again, boundary layer). I hope this convinces you not to try a non-vertical Algae Scrubber, unless you just think it would be cool.

In general, you need to run your lighting for 18 hours on, 6 hours off (see UPDATE below). All life needs downtime. Plants are no exception. They have adapted to the environment over millions of years, and as the saying goes, you can’t fool Mother Nature. So don't go thinking that you can run lights 24/7 and get 25% more algae growth, it doesn’t work that way. The lights should be run on the reverse cycle of your display tank lighting; this assists in maintaining pH at night, as well as spreads the light-induced heat load more evenly throughout the day.

You want the lights as close as possible, within reason. The effective power/intensity of light follows the inverse square law. If you move a light twice as far away, the intensity drops by a factor of 4. If you move it twice as close, you get 4x the intensity. The balance point seems to be about 4" from the screen for CFL, and about 2" with T5HO. The reason for 4" away for CFL stems from hot spot issues due to the concentrated signature of the lamp; CFLs need to be a bit further away to cover the proper area without too much intensity. T5HOs do not have this problem, as the light is very evenly spread.

As far as spacing is concerned, CFLs need to be spaced according to the allowance of the design. If you need 2 per side, just position them for the best coverage. This is really on a case-by-case basis.

The advent of the smaller, higher light screen (discussed in detail to follow) has presented an issue with respect to CFL Algae Scrubbers – how to fit all that light into an even smaller area! There is no rule saying that you cannot trim the CFL reflectors so that they can ‘cross over’ each other. I literally just thought of this as I was editing this. Think of it like when you’re watching a movie and someone is looking through binoculars – you see the “8”-on-it’s-side shaped viewing area. Just trim both reflectors where they intersect using some tin snips or a wire cutter. (Be careful of sharp edges!) You may lose a little light from one lamp that is throw to the adjacent lamp (which it can now “see”) but since we’re concentrating the screen down in size, we need acceptable losses, and this is one. There are also socket splitters that you can use so that you can put 2 CFLs into one socket. However, you lose a little more with this method because the lamps will extend out from the reflector.

As for T5HO, you generally want a lamp spacing of 2-3". For T5HO, your Algae Scrubber will generally need to be designed around the lamps and spacing. CFLs are more flexible in this respect, allowing a variety of configurations.

If you run your lighting 18 on/6 off, the lamps must be replaced every 3 months. This is not just a rule for Algae Scrubbers, you will see many people make this suggestion for refugium lighting as well. That is because there is a power drop-off and a spectrum shift that takes place over time, and when you go much past 3 months, you hit that drop-off point. We can't see the difference, but then again, we're not algae - it can. The result is that your screen will slow down growing and reduce filtration, which you do not want.

The light source needs to be positioned so that it is pointing directly at the screen material. Do not place the fixture so that it points parallel to the screen (from the ends or the top), place it so that directs the light toward the screen. Perfectly perpendicular is optimal, but if you have to point it at somewhat of an angle just to make it work, that will be fine. This is more of a concern for CFL than linear sources (T5HO), however I have seen a few T5HO build with the lamp 4 inches above the screen, shining straight down. They didn't work so well.
 
OP
OP
Turbo's Aquatics

Turbo's Aquatics

Super Duper Member
View Badges
Joined
Jun 7, 2011
Messages
2,799
Reaction score
4,022
Location
West Des Moines, IA
Rating - 0%
0   0   0
Big Basic Change #2 – Alternative High-Intensity Lighting

Around the same time that the screen sizing method was changed, another suggestion was made: you can use twice the wattage of lighting and cut the photoperiod in half. This has a couple of advantages:

The first and primary advantage is the fact that more intense light promotes greener growth faster. This is especially useful in systems that have an initially high nutrient load, or systems that are overrun with algae in the display tank. More intense light will penetrate deeper into the algae mat. In a high nutrient system, the screen tends to grow darker (brown or black). This dark growth prevents the light from reaching the ‘roots’ of the algae, which may lead to the algae detaching from the screen more easily between cleanings. In systems that have a lot of algae in the display tank, it is more difficult to establish a preferred growth location (the Algae Scrubber screen); increasing the light level on the screen can greatly assist in this battle.

The second advantage is increasing lamp life, or more accurately, increasing the time between the need for lamp changes. Since you are only running the lamps half the time, they will last twice as long. This is of course offset by the need for twice as many lamps, but if you combine the new screen sizing guideline together with the higher-light guideline, in most cases you are reducing the overall wattage requirement by half or more versus the old tank-size guideline.

The caveat to this rule is that you must keep an eye on the type of growth. You want green hair algae; anything else requires an adjustment to the ON cycle. If you are getting dark growth, then you need to increase the photoperiod. If you are getting yellow growth, you need to decrease the photoperiod. I suggest making adjustments in 1 or 2 hour increments per week until you get the desired green growth.

Also, as the lamp will eventually start to weaken, you need to pay attention to your growth. Around the 3 month point, the growth may start to get darker. If/when this occurs, you will need to start increasing hours until it grows green again. When you reach 18 hours, it's time for new bulbs. Keeping track of the “on” time that you use will greatly assist you, as you will be able to see a pattern developing. Growth can vary from week to week, but should be relatively consistent on the long term, as long as nothing else changes; changing feeding amount, rearranging the tank, adding more LR, an unknown dead fish, etc, can all affect the color of the growth. Constantly fiddling with the photoperiod should not be necessary after the Algae Scrubber is “dialed in”. You should only need to adjust upward about 1 hour per week as the lamps weaken.

NOTE: Yellow growth is a spongy, gooey type of growth that is also great at light blocking, and is a result of not enough nutrients being delivered to the screen/algae in proportion to the light provided. To resolve this, increase flow if possible, add iron, or reduce the number of hours. You can also increase feeding as long as it’s not enough to overwhelm the Algae Scrubber and cause dark growth.

T5HO Users: This rule has a little bit of a drawback to it for T5HO users. If you are using a stock fixture, this method doesn’t really apply. However, if you are getting yellow rubbery growth, you can back down the photoperiod. However, I would try trimming the screen down first. I did this and the growth got much better. I was running a 20” wide screen and after taking some PAR measurements, I realized that the light in front of the last inch of exposed lamp dropped dramatically, so I just cut that part of the screen off (actually I cut 3” off each side) since I was just getting red turf there anyways and was tired of scrubbing it off. If you are using a DIY T5HO fixture, you might be able to use narrower reflectors and squeeze another lamp in. You lose a little in reflector efficiency, but gain more in additional lamp wattage.

CFLs and Reflectors

The most common CFL used is the 23W Spiral. This is the actual wattage, not the equivalent wattage. There are a few different type of CFL lamps, and each one has a different ideal application. These are: spiral CFL, linear CFL, floodlight CFL.

A bare lamp will work without a reflector, but it will do the job much, much better with one.

Spiral CFL

CFL.jpg


The spiral CFL is definitely the most common type available and the most widely used. There are 2 ways to orient the lamp: with the end pointing at the screen or with the side facing the screen.

With the end lamp pointing at the screen, a reflector is a must-have piece of equipment. Without a reflector, a lamp pointed directly at the screen will do very little, since a small percentage of the light comes out of the end of the lamp. The cheapest, easiest, and most common reflector for this orientation is the dome-style reflector, which is available just about anywhere.

AS_scott26.jpg


This reflector provides a wide light signature, since the side light is reflected to the front. They come in several sizes, and you want the biggest reflector you can fit in the space, relative to the size of the screen, that is.

The dome reflector does the job just fine, and one of these should be used at a minimum. However, it is by no means the ‘perfect’ reflector. The reflector has a ribbed, dull surface that does a good job of diffusing the light, but it is not as efficient as a shiny, highly polished spectral reflector. Also, about 1/4 or so of the lamp (depending on the brand) sticks out past the reflector, and most of that light does not get directed toward the screen.

RC_rysher.jpg


Using several different sized round reflectors can be done also when space is a limiting factor, even though the smaller reflectors are not as effective. This is probably not an issue for very many people anymore due to the new screen sizing guidelines.

RC_thefuz.jpg


With the side of the lamp facing the screen, the reflector is usually a DIY job With a side-style orientation, more light is shed directly to the screen, but you still need to re-direct the light from the sides and back of the lamp towards the screen. There are a few fixtures that you can buy with integral reflectors, but most are very small. Most off-the-shelf light fixtures are for use in a shop or garage and have a half-round solid section, which may or may not have a reflector. If it does not, you can simply line it with aluminum foil or another highly reflective material.

The setup below uses off-the-shelf shop lights. The fixture on the left has reflective material installed.

RC_srusso2.jpg


The advantage to the side-lamp design is that since you can hang the lights from above, they generally take up less space (depending on your reflector) versus the dome reflectors.

In order to spread the light out evenly and wide (but not too wide or you’ll lose intensity at the screen), you want a wide reflector. Finding such a reflector is not easy. Since spiral CFLs can be considered a point source (more of a “blob” source, but this is for simplicity), using an HID reflector can be effective. A DIY beer can reflector can work also. Even some Mylar or aluminum foil will do the job.

UserCriskamoteOnAS-3.jpg


Searching for a flexible reflector material and making your own reflector will yield the best results. A properly made reflector for a side-lamp orientation, such as the one shown below, can direct almost 100% of the light toward the screen.

cflreflector001.jpg
 
OP
OP
Turbo's Aquatics

Turbo's Aquatics

Super Duper Member
View Badges
Joined
Jun 7, 2011
Messages
2,799
Reaction score
4,022
Location
West Des Moines, IA
Rating - 0%
0   0   0
Linear CFL

Linear CFL lamps are commonly referred to as twin, triple, or quad tube, etc. They are similar in nature to Power Compacts in that the lamp is in a “U” shape, but commonly have an integrated ballast like a CFL. They are usually higher wattage than standard CFLs, are more intense, and can run hotter. However, since they use the screw-in base just like CFLs, they are easy to use and I have recently looked at a couple of nice builds using them, so I thought it was worth adding a section covering them.

AS_Designsonline.jpg


Linear CFLs would be installed similar to the sideways spiral CFL, hanging the lamp from above. Reflectors are generally the same principle; however the source is now more linear, so your reflector in turn should follow the line of the lamp and curve around it. Here are a few of the better ideas for this that I’ve seen. One uses cut-up linear fluorescent reflectors, the other uses mirrored acrylic.

AS_RumpyRumpy-1.jpg


AS_RumpyRumpy-2.jpg


AS_Hobbyist.jpg


A reflector similar to the last one in the spiral CFL section could be done. Because the lamp profile is more linear, the reflector would be slightly different dimensions – probably more square than rectangular.

Floodlight CFL

The floodlight CFL is simply a spiral CFL enclosed in a lamp housing like you would see for a standard incandescent floodlight. They are not very efficient at spreading light when placed in close proximity to the screen, as the light is diffused at the end of the ‘bulb’ and the reflector is of a small diameter. However, they are good for use on smaller, narrower screens – ones that have one dimension less than 6 inches. They should generally not be used for primary lighting, unless you are running a small Algae Scrubber. With the new screen sizing guidelines, the use of these CFLs for quick-and-dirty builds is a little more acceptable, but they are still relatively inefficient, so you will likely need to use more wattage than you normally would.

You can see in this picture that the floodlight only provides significant light to the area directly in front of the lamp – and that’s the only place that’s going to provide adequate filtration:

RC_SSpiro.jpg


They can be useful in situations where space is highly restricted, but for larger Algae Scrubbers, more total wattage will likely be required over what would normally be needed.

UserBarbianjOnRS-1.jpg


UserBguileOnAS-1.jpg


They can also be helpful to supplement light from dome-reflector setups that just need a little more light but there’s not enough space for another dome.

One thing to remember when handling CFLs: install them gently. Most people are used to twisting in an incandescent lamp tightly. CFLs fracture easily at the base where the element (tube) meets up with the ballast. Cranking on them like causes these fractures. So if you can't grab on to the base to tighten, just get the lamp in there snug enough for the connection to be made. This goes for the lights in your house and office also - it's the #1 reason why CFLs burn out early.
 
OP
OP
Turbo's Aquatics

Turbo's Aquatics

Super Duper Member
View Badges
Joined
Jun 7, 2011
Messages
2,799
Reaction score
4,022
Location
West Des Moines, IA
Rating - 0%
0   0   0
T5HO lamps and Reflectors

T5HO lamps are inherently superior to CFLs. They spread the light out more evenly than CFLs, and they can be placed closer to the screen without overpowering the algae. Notice in this picture below how use of T5HO can result in almost perfectly even light coverage:

RC_klviper.jpg


With that factor alone, bare T5HO lamps likely fall in between bare CFL and properly reflected CFL as far as scrubbing power is concerned.

Reflected T5HO is very arguably superior to all other fluorescent lighting. However, it is more difficult to build a T5HO Algae Scrubber. You have basically 2 options.

The first is to buy and build around a stock fixture, like the Nova Extreme 1126/1127. This fixture was great because it had individual reflectors and only cost about $70 shipped, but not so great because the endcaps were cheap and would bust in shipping. However, this fixture has reportedly been discontinued. You can still find it, but for how much longer, who knows. The only other fixture that is decent that I have found is the Aquatic Life 2x24 T5HO fixture, which runs around $100.

The second is to build something upon which to mount and protect endcaps, then connect to a ballast. Also, since the reflectors are generally one of the more expensive components, enclosing the screen in an acrylic or glass box to protect them is pretty much a given.

As far as lamps go, the same rules apply. I personally use the PlantMax 3000K Red/Bloom lamp, I can get them for $5 each in packs of 8 (up from $4/ea). Here’s my Algae Scrubber, Revision #2 (which will soon be replaced with and LED Algae Scrubber)

IMG_9158.jpg


IMG_9160.jpg


IMG_9165.jpg


With a custom build, you can really use all the power of a T5HO lamp. The TEK-II reflectors from Sunlight Supply are expensive, but I have had great results. Other individual-lamp reflectors, such as Ice Caps, work very well. Stock fixtures work best when each light has an individual reflector, but just about any reflector will do better than none.

The ballast you use can also make a big difference. I recently learned that Workhorse ballasts are not that great, and that you can get a lot more out of your lamps by switching to an Ice Cap ballast. Get the right one though, or you can over-drive the lamps and quite literally cause them to explode. Not good for da reef mon.

Sunlight Supply also makes a T5HO fixture that needs no external ballast, and you can daisy-chain up to 10 of them together. However, the reflector they make for it is just plain aluminum and nowhere near as reflective as the TEK-IIs or Ice Caps, which use Anolux-MIRO IV (which is something like 96% reflective)

RC_JJOcean2.jpg


The disadvantage to T5HO is that you’re pretty much locked into a dimension that you have to build around. T5HO lamps come in standard lengths of 24”, 36”, 48”, and 72”. There are shorter lamps, such as 18”, but it’s difficult to find lamps in the right color temperature, and they’re generally much more expensive than 24” or 48” lamps (which are the cheapest T5HO sizes). This means that the dimensions of your Algae Scrubber are locked into about 20-22” in length, which is the illuminated length of the lamp (the fixture is 24”, the lamp right around 21” long). This means your flow to the screen has to be around 700-800 GPH. You can make the screen narrower, but you will end up wasting part of the lamp. The benefits of T5HO over CFL would outweigh this loss to a certain point though.

This can be overcome if you have a dedicated fish room, or enough space to make a vertical T5HO Algae Scrubber, like this:

MB_Huhhhhh.jpg


And to my knowledge, those endcaps are no longer available. Right now, is seems many companies are shifting away from T5HO and putting all their efforts into LED development. So, it’s time to roll with the punches – and they’re feather punches, as you’re about to see…
 
OP
OP
Turbo's Aquatics

Turbo's Aquatics

Super Duper Member
View Badges
Joined
Jun 7, 2011
Messages
2,799
Reaction score
4,022
Location
West Des Moines, IA
Rating - 0%
0   0   0
CURRENT LED RECOMMENDED GUIDELINE:

https://www.reef2reef.com/threads/algae-scrubber-basics.63113/page-6#post-2289114

LEDs – Why they are different


LEDs are a completely different source of light. Fluorescent, metal halide, HPS, and other HID lighting are all mercury based, and the light is shifted from the ultraviolet range into the visible range with phosphors. LEDs emit certain colors of light depending on the compounds used in the diode itself, so it is initially visible light; phosphors are then sometimes used to shift wavelength to achieve various colors.

LEDs, very recently, have proven to be highly efficient, and as more people build LED Algae Scrubbers, more information is being confirmed. There are still a few unanswered questions, but LED Algae Scrubbers so far have been shown to have a few major advantages over CFL and T5HO.

The most obvious one is lamp life - they never actually burn out (unless you drive them too hard). LEDs have what is called an L70 (or L80) rating, which is the number of hours, running at rated junction temperature, at which the total lumen output will have dropped to 70% of its original output. At this point in time, that is usually about 50,000 hours. If they are on 18 hours/day, that's about 7.6 years to L70.

However, as has been predicted, there is a big difference with LEDs when it comes to Algae Scrubbers. Since LED Algae Scrubbers ‘waste’ very little (if any) bandwidth, they are, in effect, double or better the intensity of CFL or T5HO for comparable PAR output. What this means is that you generally only need to run them half as long, or 9 hours a day (just like the double-light CFL/T5HO Algae Scrubber). Couple that with the fact that the intensity of a well built LED Algae Scrubber fixture is, on average, 1.5x the PAR of a comparable T5HO fixture (I have verified this on a Nova 1126/7 vs 50W e-Shine), LEDs are somewhere between 3 and 5 times as effective. Some DIY LED users have claimed that they have found that you can get away with 1/5 the total LEDs wattage vs. CFL or T5HO and get better results[i/]. Not only that, 50,000 hours at 9 hours/day is over 15 years to the L70 date. Some manufacturers are claiming L70 dates into the 100,000 hour range, and while that may not be proven, it’s actually highly probable the LEDs themselves will last that long (the rest of the fixture? I doubt it.)

Some possible negative factors for LEDs are the up-front initial cost, long-term phase shift, and the effect of steadily decreasing output. Phase shift is the reason that most small municipal airports are avoiding LED lighting; white LEDs are actually blue with phosphors added, and they ‘fade’ over time, and shift to blue. Runway lights are white, taxiway lights are blue, and getting them confused is bad. The LED industry is rapidly evolving, so the L70 numbers will continue to increase, cost will decrease, and issues like phase shifting will likely be improved upon. The flipside to the L70 and phase shift issues is that most people who are DIYing LED Algae Scrubber lighting will likely replace their fixture with the next best thing before this ever becomes an issue, if it even becomes an issue at all. With a stock fixture, at least those currently available at an affordable price, will probably fail for some other issue before the LEDs go bad (driver, power supply, fan, moisture problem, etc), prompting the user to replace the fixture with a better one.

LED Grow Lights for Algae Scrubbers

The LEDs that you want to use for growing algae on an Algae Scrubber are the exact fixtures that are used to grow plants. There are different plant-growth fixtures available, and some are not what you want. ‘Flowering’ lamps have a lot of variety of lamp types that you do not need.

Here’s the bottom line: you only need RED. Nothing else is really necessary. White LEDs of any kind have not proven to be highly effective, and neither are Blues (with the exception that they accompany reds in a low ratio).

The best results so far have utilized 660nm “Deep Red” LEDs; there have been far fewer attempts using 630nm Red LEDs. These wavelengths roughly correspond with the Chlorophyll A and B red peaks. Optionally, some 455nm Royal Blue LEDs can be thrown in; according to horticulturalists, and one study by NASA, this ratio is approximately 7:1 red: blue.

One Algae Scrubber user, who has made multiple LED Algae Scrubbers over the past couple years, commented that the use of only 660nm produced great growth, but with the addition of a single blue LED, that growth got ‘stronger’. The algae was more difficult to scrape from the screen, and the strands were more stringy or ribbon-like, and less hair-like. This anecdotal evidence suggests that the blue component is used supplementally in some fashion. So a little blue can’t hurt; add too many and you’re probably just wasting power.

To my knowledge, no one has tried 660s in combination with 435s (which are the corresponding “A” peaks) or 630s with 455s (“B” peaks); however I have a couple of fixtures that I had custom made just for the purpose of testing this. Eventually. Sigh.

Recently, someone told me chlorophyll utilizes the “A” band during midday sunlight, while the “B” band is utilized more in the morning and evening, when the “A” band is mostly reflected and/or absorbed by earth’s atmosphere. Anecdotal evidence seems to support this.

Here are some examples of LED fixtures people have made, and a few growth pics as well.

AS_teboLED-1.jpg


AS_teboLED-2.jpg


^^ That was how it looked at first, and below is how it looks more recently (9 days growth)

AS_teboLED-3.jpg


He stated that “due to the reduction of parameters, now my net grows quite thin, on the other hand not increased my biological load, so I assume that growth is normal”. Thin? Yes. Green? Yes. With CFL or T5HO, you would tend to get yellow growth.

AC_Ace25LED-1.jpg


AC_Ace25LED-2.jpg


^^ notice mostly shades of green. Only green.
 
Last edited:
OP
OP
Turbo's Aquatics

Turbo's Aquatics

Super Duper Member
View Badges
Joined
Jun 7, 2011
Messages
2,799
Reaction score
4,022
Location
West Des Moines, IA
Rating - 0%
0   0   0
CURRENT LED RECOMMENDED GUIDELINE:

https://www.reef2reef.com/threads/algae-scrubber-basics.63113/page-6#post-2289114

AS_MorganAtlantaLED-1.jpg


AS_MorganAtlantaLED-2.jpg


AS_MorganAtlantaLED-3.jpg


Again, patch growth, but only green.

Buy or DIY?

There is still a relative lack of selection in stock LED fixture that are satisfactory for our purposes, and an even greater lack when you’re trying to keep the cost low. So far, the only one I have come across that is even close is the 50W 4G grow light from e-Shine systems. This is a cheap fixture from China (usually between $100-$120 each, shipped) and has little track record. And like anything you buy from China, you get what you pay for, and if something goes wrong, chances are it’s easier to throw it away and buy another than to get it repaired. It does have a pair of fans on it, which means it can suck in moisture (and it’s not wet-location rated) and people have reported fan-cooled fixtures failing or the fans getting louder and louder over time (not just e-Shine fixtures, either). But, time will tell. For now, it’s what we’ve got available.

There are LED grow bars available (from China) that don’t have fans and are supposedly waterproof, but these are relatively new, and from what I’ve heard about them, they are not reliable. Also, they are generally only available in 1W arrays, and the density of LEDs is not enough. This might change in the very near future…we’ll see.

The 50W e-Shine fixtures are a tight array of 1W LEDs – 2 rows of 25 each, about 1/2” on center, 45 660nm Deep Reds and 5 455nm Royal Blues. What’s nice about this is that you can put it right up against the Algae Scrubber enclosure, within 2” of the screen, just like a T5HO. These definitely need to have acrylic or glass between them and the screen due to vent holes for airflow, and they weigh about 9 lbs each, so properly supporting them and protecting them from moisture is key to longevity.

There is a decent mathematical reasoning for going LED.

For initial cost, CFL and dome reflectors are the cheapest; clip-on dome reflectors are $10 or so each. Replacing lamps might run you as low as $10/year for a small Algae Scrubber, and as much as $30-$40 or more a year for a larger Algae Scrubber. CFL is the best low-cost alternative for the ‘cheap and easy’ build.

T5HO is more, either a stock fixture or end caps and reflectors, so your initial investment can be anywhere from $150-$220, then lamps are running currently about $5 each, and you need to replace those every 3 months or so (depending on the “on” time per day). If you have extra T5HO parts or fixtures laying around, then you could go with that. But setting aside the moisture concerns, going out and buying new for an Algae Scrubber has, IMHO, progressed past the point of diminishing returns.

Buying a pair of stock LED fixtures is going to run you $200 minimum, and could last years. Compare an Algae Scrubber using the 50W e-Shine 4G Grow bars to one using 2-lamp T5HO fixtures. Initial cost of 2 T5HO fixtures and 4 grow lamps will run you around $170-$220, and a pair of the e-shine fixtures about $220 (ballpark). T5HO lamps every 3 months will run you $20, or $80 per year. The e-Shine fixture break-even point is, at worst, just over 6 months. In the first 3 years, you can buy a pair of e-Shine fixtures for each T5HO fixture and break even. Just based on lamp replacement cost alone, the e-shine fixture only has to last 2.5 years to break even. It’s likely that a better product will be available within that time frame.

DIYing an LED array for a small Algae Scrubber might run you less than $100 and could last years as well. For the DIYer, there is a product that you can spray onto your fixture that makes it essentially waterproof. I personally don’t know much about this product but I have heard it works very well. If you feel up to building your own LED Algae Scrubber, at this point, I say knock yourself out. Just make sure you do your homework before putting pen to paper; study other designs and learn from the mistakes and successes of others.

As far as active cooling, for either a stock or DIY fixture, it would be ideal if the source of airflow to the LED fixture’s heatsink came from outside the sump or tank area. Not easy to do, and this is one inherent downfall of the LED Algae Scrubber.

3W versus 1W

With an Algae Scrubber, the goal is even coverage. CFLs have a bit of a problem in this regard, unless you use a good reflector. T5HO has few issues due to the linear nature. LEDs have an inherent issue with spotting.

One thing that is important to point is that 3 x 1W chips will put out more lumens than one 3W chip. Why? Because as technology has progressed, marketing has stuck itself in the mud. A 1W chip does not pull 1W and a 3W chip does not pull 3W. Some may argue this based on measured current and voltage drop, and I don’t want to get really technical here because by the time I post this, it will have all changed again (LOL).

3W chips need to be appropriately spaced and distanced from the screen to avoid spotlighting. The distance from the screen is the biggest downfall. You can put diffusion grating in front of the LEDs to help distribute the light better, but that also tends to cut down the intensity. Not much, but we’re going for best bang for the buck here. Lenses should be completely avoided (they only make spotting and burning worse). Most DIYers prefer 3W LEDs. Just space them out so that you get as even coverage as possible. The consensus seems to be that you need 1/3 to 1/4 the total wattage of 3W chips as you would fluorescent lamps for the appropriately sized Algae Scrubber. As previously mentioned, some even claim 1/5 the wattage.

I’ve been researching a bit on how many 3W LEDs you need to use. The general consensus at this point seems to be that you need one 3W LED on each side for every 15-20 square inches of screen. Going with the new feeding-based sizing guidelines, it seems that a simple technique would be to use one 3W LED on each side for every 12 square inches. So a 2-cube/day Algae Scrubber would need 4 3W LEDs, two on each side. Distance from the screen is something that depends on some factors, such as how hard the LEDs are being driven and how long of a photoperiod is used. New ground is being broken on this almost daily, and I am in the process of gathering as much information as I can from the DIYers so that some kind of ‘standard’ can be established.

1W chips are much better, IMO, for Algae Scrubbers, because you can pack them closer together, put them closer to the screen, and get near-perfectly even coverage. This mainly applies to off-the-shelf fixtures, which usually have one circuit board and the individual LED dies are close together. It’s hard to get 3/4” spacing using 1W chips on stars. But if you have ever had the opportunity to see a 1W LED grow lamp array in person, you would agree that they are bright as #@$&*^!%. I’m talking blindingly bright, and extremely even coverage. As far as the wattage comparison for those – not sure. The “1/5” numbers came from the DIY 3W LED folks…

Other thoughts on LEDs

Previously, I wrote that you probably should not rely on an LED Algae Scrubber for total filtration, only for supplemental filtration. This is no longer the case, not by a long shot.

Unless you are short on immediate cash and not comfortable DIYing some LEDs, there’s just no reason not to do an LED Algae Scrubber, in my opinion.

It is important to note that there has been no study that I could find that indicates what exact LED spectrum is ‘perfect’ for algae growth for this specific purpose. So there is a lot of new ground being broken right now.

Just make sure you realize that:

1) LED Algae Scrubbers do not have as long of a track record. Then again, the modern Algae Scrubber has really only been around itself for about 4 years.

2) Only recently have there been builds with any sort of success. However, some of those builds have been extremely successful.

3) Fixtures themselves are still not tested for long-term stability and reliability (mostly related to moisture issues)

4) If you build one, you’re going to be on the cutting edge, which can cut both ways. Take your time and think it through well, and don’t be afraid to ask a lot of questions.

There are LED floodlights available at the local hardware stores and other Big Box stores. Do not use these. This one below is a 3000K 75W incandescent equivalent, which equates roughly to an 18W CFL:

RC_reefkeeper2.jpg


RC_reefkeeper2-2-1.jpg


The problem is this: when it comes to LED, you have to throw the Kelvin rating out the window. It means nothing for Algae Scrubbers, it is only good for trying to match the color rendering given by a comparable fluorescent lamp that is used in a home or office. Remember, LEDs are a different type of light source and isn’t UV based and shifted with phosphors. Any LED lamp/bulb/floodlight/etc you can buy in a store that is not specifically a grow lamp is completely useless
 
Last edited:
OP
OP
Turbo's Aquatics

Turbo's Aquatics

Super Duper Member
View Badges
Joined
Jun 7, 2011
Messages
2,799
Reaction score
4,022
Location
West Des Moines, IA
Rating - 0%
0   0   0
Electrical Protection

This should really go without saying, but you should always plug your lights into Ground-Fault protected receptacles (GFCI).

Always use waterproof sockets for your CFLs and end caps for your T5HO lamps. This is a little more expensive, but is necessary to avoid corrosion and electrocution. Generally, waterproof CFL sockets do a pretty good job of sealing the base and socket from moisture, but they still should be silicone sealed for an extra layer of protection. T5HO waterproof end caps do an excellent job of sealing the end of the lamp, but the wires that feed into the bottom of the sockets are not sealed, so after all wiring is complete, you need to fill in the bottom with silicone caulk.

You can't see it, but there will be tiny amounts of salt spray that will build up where you screw a CFL bulb in, and also where you make electrical connections. When the buildup gets thick enough, it can short out and trip a breaker or GFCI receptacle, or shock you. So each time you replace a CFL screw-in lamp, re-seal it. You should be able to pour water over it without it causing a problem (but don’t try it). Use GE Silicone I Door & Window caulk, which is generally accepted as aquarium safe, especially since you don’t intend for it to be in direct contact with water anyways.

Moisture protection for LED fixtures, DIY or off-the-shelf, is the biggest issue facing the progression of LED Algae Scrubbers. At this point, it’s just a risk that you either take or try to mitigate against. So far, no build that I have seen has incorporated adequate moisture protection, aside from passive cooling and spray-coating a DIY fixture.

Screen Break-in Period

Since the time frame by which you will see certain types of growth largely depends on the bio-load, initial nutrient conditions of the system, and strength of the scrubber, not everyone will see the same growth progression. Some have taken months to get a full screen of green growth; others get great results in just a few weeks. However, every screen must go through an initial break-in period, and that is relatively independent of anything else. Usually, the first week or two of growth is almost identical for any scrubber; after that, different system will tend to diverge depending on the conditions.

When you first start up your algae scrubber, even with the screen significantly roughed up, it is still relatively slick on a microscopic level. It is plastic, after all. The reason behind roughing up the screen is to vastly increase the surface area, and to give long strands of algae something to hold on to.

As the tank water cascades over the screen, there will initially be a buildup of brown slime, similar to what you see on the insides of your tank plumbing (and like what you clean out of your pump). Over time, this growth on the screen will strongly adhere to the screen. The bond is so strong that you would have to soak the material in vinegar to completely remove the algae. This may sound familiar to anyone running pumps or powerheads (which should pretty much include everyone).

During the break-in period, this brown layer is easily rinsed away (with a sink sprayer, for instance). For the first few weeks, a very light cleaning is all that is needed – just lightly running tap water. A gentle swipe of your fingertips will take most of this layer off, but will leave enough behind that if you put a new screen next to it for comparison, you will see a slight color difference. You want to leave behind anything that doesn’t easily wash away, including whatever is growing in the holes. You definitely don’t want to scrub the screen with a brush of any kind. Any growth you get for the first few weeks should be easily removed with your fingertips (not nails). If you happen to get some long green hair algae strands, you should be able to remove those with your fingernails (gently).

Usually after the second cleaning, the screen will have developed a foundation upon which algae will be able to form a good bond. What type of algae will grow next is dependent upon factors stated in the first paragraph of this section. Regardless of the type of growth, the screen will continue to mature to the point where if and when a thick mat of algae grows, it will stay firmly attached to the screen. This is usually attained around the 4-6 week point, and can be verified when algae grows inside the ‘squares’ of the screen and does not come loose during cleaning.

My screen break-in cleaning technique progressed as follows:

Week 1: Rinse with slow running tap water

Week 2: Same, except used fingertips to rub screen

Week 3: Rinse off with running water, then rub with fingertips

Week 4: Same

Week 5: Same, had to use backs of fingernails in some places

Week 6: Algae firmly attached. Used back of fingernails across entire screen (now I use a plastic scraper)

Every scrubber will have slightly different growth progression, but the guideline above gives you an idea of what to expect. See “Algae Growth Types” for some additional information.

Cleaning the screen

Cleaning the screen should be done remote from the tank. A common complaint of the past was that an Algal Turf Scrubber turned the water yellow, but that was because algae was generally removed from the tank with the screen in place, or it wasn’t well rinsed.

If you have lots of pod-eaters in your tank, and your screen is nice and green (no slimy growth) you can consider swishing the screen in the tank every once in a while before cleaning. I did this a few times, but I really don’t anymore.

IMG_8903.jpg


Screen cleaning should be done in room temperature tap water. The reason is that freshwater kills pods that are continually munching on the screen. There will be millions more in no time, you just don’t want them causing algae to detach between cleanings.

I use a cutting board and a plastic pot scraper similar to this one https://www.pamperedchef.com/ordering/prod_details.tpc?prodId=241&catId=9 to scrape the algae off the screen.

You will need to use an old toothbrush or a stiff-bristled scrub brush to remove any algae that grows on the smooth area at the top of the screen. I also use a scrub brush to remove any red turf. Red turf seems to grow well in the lower light areas. I have since trimmed these areas off the screen since I needed to make it smaller.

The slot tube also should be cleaned by scrubbing with a brush and rinsing. If you have an enclosed box device, you will likely need to clean algae out of there occasionally too. I have to do this every cleaning, it’s amazing how well algae attaches to a smooth surface.

After all the scraping and scrubbing is done, give the screen a good rinse (15-20 seconds) in fast running water.

Cleaning frequency

For the first 4-6 weeks, cleaning every 7 days is probably a good idea (see the ‘Screen Break-in Period’).

The exception is the ultra-high nutrient system that results in a black slime coating forming every 2 or 3 days. Such growth must be completely removed, as soon as possible - at the most every 3 days (see “Algae Growth Types”)

The general rule has been to clean your screen every 7 days. This is still the rule for single sided and non-vertical Algae Scrubbers.

If you run a double-lit vertical Algae Scrubber, now it is allowable to let the screen grow as long as 10, and in some cases, 14 days. Again, you need to pay attention to your screen growth, and that it as simple as checking it once a day, because the frequency of necessary cleaning relates to what kind of growth you’re getting.

I nice, thick mat of emerald green hair algae does the best filtering.

Regardless of growth type, as the algae mat grows thicker, the outer layers block light (and flow) to the lower layers, specifically where the algae attaches to the screen. This causes weakening of the strands, which can lead to algae detaching from the screen. This is more likely to happen with a single-sided screen, because the light intensity less at the screen level. It is less likely to happen in an enclosed-box 3D growth type system, as the algae is supported a little better.

What really tells the story is what the algae mat looks like when you clean it. If you are regularly cleaning off a thick mat of green algae that is firmly attached to the screen, you can probably let this go for a few more days between cleanings. Increase by one day at a time and monitor closely. If the algae becomes a lot easier to clean off, or becomes straw-like near the screen, this means the algae in the lower layers is not getting enough light and/or flow, and is dying, and you’ve reached (or possibly exceeded) the limit on how long you can go between cleanings.

If you are getting a thin layer of algae, but it’s not too dark (maybe a darker green or thin and brown, and you can still see the screen) you can let the screen grow for a few more days. The key here is that as long as light is penetrating all the way down to the algae attached to the screen, you can let it grow. You want to allow the green algae, however much you are getting, a chance to grow.

If you are getting a little thicker mat of brown growth, don’t go over 7 days. Same goes for the yellow, rubbery growth. You can clean these more frequently than 7 days; try to leave as much green hair algae that you have on the screen. If you are getting black, slimy growth, clean about every 3 days.
 
Last edited:
OP
OP
Turbo's Aquatics

Turbo's Aquatics

Super Duper Member
View Badges
Joined
Jun 7, 2011
Messages
2,799
Reaction score
4,022
Location
West Des Moines, IA
Rating - 0%
0   0   0
Slot pipe clog prevention

This issue is brought up on a pretty regular basis. Obviously, no one wants an overflow pipe to clog and overflow their tank. Most people take precautions to prevent livestock from entering the overflow pipe, such as an intake screen. In the case of the scrubber, they’re worried about the algae growing thick enough to stop flow at the point where the screen and pipe slot meet.

Almost without exception, this question is posed by someone who studies the design, but has never actually built or operated a scrubber for any length of time. I’m not trying to belittle anyone posing the question by saying that, rather just making the point that if you run a properly built scrubber, you’ll understand that this is really not a concern. Here’s why:

If you properly build and maintain a scrubber, there is virtually no chance that algae will grow thick enough to block the slot. I’m not saying that algae will not grow at the junction point of the slot and screen, it most certainly will to a certain extent. The water on the screen below the slot will get partially diverted over the top of the algae mat, as water takes the path of least resistance. As you approach the slot, the flow area is restricted to the narrow space between the pipe slot and the screen. This creates an area of flow pressure under which algae cannot grow to any significant thickness without succumbing to the pressure of the flow and releasing from the (smooth) screening material. Proper cleaning of the slot and the smooth portion of the screen during weekly screen cleanings virtually eliminates any chance of the slot clogging.

As for the interior of the overflow pipe and slot pipe, these can be clogged by variety of means. The most obvious of example is a snail, anemone, or other tank mate that makes its way down the pipe. This is a potential problem for any overflow pipe, but adding a slotted pipe with a cap on the end just makes some people nervous, because there’s no place for that obstruction to exit the overflow pipe. Fortunately, this is only a problem when you insert the screen too far into the slot pipe. If you only insert the screen far enough that is extends about 1/8” to ¼” above the inside of the pipe, then anything that makes it all the way through the plumbing to the slot pipe will get pushed to the end of the pipe by water pressure, and should only partially block the flow, and only at the end of the screen, if at all.

If you insert the screen all the way into the slot until it contacts the inside of the pipe, the obstruction could form at the beginning of the slot tube, and could substantially or completely block the water flow. However, this is perfectly fine as long as the inlet to your overflow pipe has a strainer on it that would prevent anything from entering the pipe.

I don't know if there is any advantage to full insertion vs. minimal insertion. Inserting the screen further into the slot pipe may even the flow out a bit, but I haven't noticed any glaring issues with the way I do it. This is why I recommend inserting the screen such that it protrudes no further than ¼” into the interior of the slot pipe.

With all that said, if you’re still concerned about the issue, and don’t want to take any chances at all (and you would be hard pressed to find someone to blame you), then there are a few techniques that can be implemented that will reduce or completely eliminate the chance of a blockage of the slot pipe causing your tank to overflow. Notice that I only mention a blockage of the slot pipe. This is because a blockage of the overflow plumbing before] the slot pipe is a totally different issue, but some of the solutions below will apply to both.

Screen modification

You can remove some of the horizontal pieces from the smooth section of screen, the idea being that with the horizontal portion removed, there will be a faster flow of water and less area for the algae to attach to. Something like this:

RC_fppfScreen.jpg


The larger open space means that cleaning off the algae that grows between the squares is much easier. I haven’t seen many people use this technique, and haven’t had much feedback either way, but I would expect that this could result in slightly less flow impediment at the junction point, which might mean slightly higher flow requirements in order to get even flow coverage. But that’s just a guess.

Crosscuts

Originally, it was recommended to place crosscuts in the slot tube. You will see this on older builds. This is not recommended anymore, so don't do it. The idea was to allow for water to continue to flow if the algae grew up into the slot and clogged it, and also to prevent squirting. The result was that algae grew easily into the slot, because the pressure wasn't high enough to prevent it - flow was just diverted to the crosscuts. Then, the pressure was higher through the crosscuts, which resulted in squirting. In essence, crosscuts created the problem which they were supposed to solve. This is basically how the concept of pressure preventing growth (as described above) was brought into focus.

Herbie or BeanAnimal

The best way to run a scrubber, for more than one reason, is to feed directly from the full siphon standpipe of a Herbie (2-pipe) or BeanAnimal (3-pipe) system. I don’t want to go into a large amount of detail about these systems, or debate the advantages or disadvantages, so I’ll just briefly describe them.

These systems utilize the concept of the “tuned” standpipe; the first standpipe (“Siphon”) has a valve on it that can be adjusted until the rate of flow through that pipe is just below the rate of flow of the return pump, and the second pipe (“Open”) handles the excess without gurgling and flushing. The BeanAnimal system uses a third “Emergency” standpipe and has a modification to the “Open” standpipe that allows that pipe to “take over” as a full siphon in the case of a total blockage of the “Siphon”.

DSC03313.jpg


http://beananimal.com/projects/silent-and-fail-safe-aquarium-overflow-system.aspx

These systems are designed with a backup standpipe that is able to handle the full flow of the system in the case of a partial or total blockage of the main siphon pipe. This allows for the full head pressure of a column of water above the scrubber slot, which results in a higher pressure at the slot and even less chance of algae growth near the slot.

There are other considerations when running a scrubber off a tuned pipe system that I don’t want to get into here. I just wanted bring that option to light.

Slot pipe bypass

On some early designs, you can see a PVC tee in the overflow pipe for an “emergency” or “clog bypass”. The thought process was similar to the “crosscuts” idea, in that water would flow through the “bypass” if the slot pipe got clogged with algae growth at the pipe/screen junction, and the result was the same. What would usually occur is that the “bypass” would run very easily and not allow pressure to build up at the pipe/screen junction, and occasionally it would divert flow completely. This also helped bring “pressure preventing growth” into focus, and thus it is not recommended.

However, there is a modification of this concept that will allow the pressure on the slot pipe to stay high, while still allowing for an “emergency” or “clog bypass”. The key is that the alternate branch of piping must be as high above the slot pipe as possible, and must not be a closed pipe (or it will siphon).

Here is a sketchup of the basic concept:

Emergencyoverflow.jpg


The left side represents the overflow pipe that directly feeds the scrubber. The first PVC tee can really be placed anywhere with any orientation, but lining up the primary flow through the ends is best, with the bypass flow coming out of the side of the tee. The bypass line should then elbow upwards as high as possible, then elbow over to horizontal into another tee. The pipe below the second tee extends to the sump. The pipe above the tee provides an anti-siphon relief and should extend to the top of the trim on the tank. The bypass pipe should be one size larger than the rest of the plumbing from the point of the second tee to the sump, at least in my opinion.

If the overflow is from a drilled bottom / reef-ready tank, this means that you will have to run the bypass pipe up about 1/2 way up the back or side of the tank, keeping in mind that the level your standpipe/durso inside the overflow in your tank will need to be several inches higher. If you’re running this of an HOB type overflow, you still want the first tee as low as possible, but since you already have the back of the tank to work with, you can place it before you elbow towards the sump, then go vertically up the tank and elbow over to the second tee.

The important concepts to follow here are 1) the second tee is higher than the first, preventing free-flow through the bypass, 2) the second tee is high enough to prevent unwanted bypass, 3) the bypass line is not allowed to easily form a siphon, and 4) the bypass line should be able to handle 100% flow from the tank in case of a blockage before the slot pipe.

All pipes should be welded (not friction fit) and appropriately supported and secured in place, such as with straps or clamps on the stand or a wall.
 
OP
OP
Turbo's Aquatics

Turbo's Aquatics

Super Duper Member
View Badges
Joined
Jun 7, 2011
Messages
2,799
Reaction score
4,022
Location
West Des Moines, IA
Rating - 0%
0   0   0
End of Summary

Well that’s it for now. I tried to incorporate as much as I could into this one. There might be a few things to add down the line before the new version is released. Also people will continue to use the older version and there will undoubtedly be helpful hints that come up along the way, so there’s no ruling out a second part.

Happy Scrubbing!
 
OP
OP
Turbo's Aquatics

Turbo's Aquatics

Super Duper Member
View Badges
Joined
Jun 7, 2011
Messages
2,799
Reaction score
4,022
Location
West Des Moines, IA
Rating - 0%
0   0   0
This was posted on another site and I felt it was worth sharing. It is an alternative to the slotted pipe (he admits it's "experimental") and also an expansion on the saran wrap idea - quite a good one also.

I've been unhappy with the slot design on my scrubber. It's always been a bit finicky and prone to getting growth up in it. After I switched to Herbie style drains, that meant that it would throw off the balance of the drains and send water down the backup drains as the algae grew. I tried several light blocking schemes, but they didn't seem to fix the problem. Since the slot would get gummed up after a week or so, I could never let the scrubber really grow to the "3D" stage.

The current solution to the problem, which I have only run now for two weeks, so it is still "experimental", does away with the slot altogether. To hang the screen, I made a "loop" of plastic canvas, and stitched that to the top of the screen with braided fishing line. The screen then hangs from the pipe by the loop, and the pipe just slides into the loop. No need for zip ties or curtain rings to hold a screen in a slot. For flow, I drilled a 3/16" hole every 1/2" along the pipe. The holes point down. The water flows out of the holes into the area where the loop joins the screen, then through the holes in the plastic canvas loop and down either side of the screen. The flow is very even along the screen.

For reference, the scrubber box is roughly 20" long by 10" high. I added an extension to the box so the pipe actually sits up above the box by an inch. The pipe is 3/4", about 20" long. Flow comes in from both ends. Roughly 800-900 gph of total flow. There are two screens, each roughly 10" by 10". The scrubber is LED lit. See one of my other threads for details on the LEDs.

Have a look at the pictures. Maybe that will help my explanation...

I did get some spray where the loop joined the screen, since the pipe sits above the box, that would have killed the solution, but then something Floyd mentioned in one of his posts caught my attention... Saranwrap. I laid a piece of Saranwrap over the loop and stopped the spray immediately. The drag created by the flow pulls the plastic wrap right down to the screen, but it doesn't stop the flow, it just evens it out a bit. Then, I wondered if a piece of thin plastic from a black plastic garbage bag would do the job, since it would also be a great light blocker as well. I tried it and it worked like a charm.

I'm extremely pleased with how the new setup is working-- no spray, no growth into the slot messing up the flow, perfectly even flow across the screen. I let it go for two weeks and just about filled up the box with algae.

If you are having trouble with the slot-- cutting it, getting it the right width, keeping it clean, etc., give some thought to trying this system. Even if you stick with the slot, try the garbage bag light blocker, I think you'll be pleased with what it does for evening the flow.


Pic1-- screen hanging from the pipe by the loop
Pic2-- the pipe with the holes
Pic3-- screen hanging in the box
Pic4-- with the black plastic as a spray guard

Note on the screen on the left side in Pic2-- this is a new screen, but I stitched pieces of an old screen to it to seed it. I'll let it run this way for another couple weeks, then take the old pieces off.

AS_MorganAtlantanoslot1.jpg


AS_MorganAtlantanoslot2.jpg


AS_MorganAtlantanoslot3.jpg


AS_MorganAtlantanoslot4.jpg
 
OP
OP
Turbo's Aquatics

Turbo's Aquatics

Super Duper Member
View Badges
Joined
Jun 7, 2011
Messages
2,799
Reaction score
4,022
Location
West Des Moines, IA
Rating - 0%
0   0   0
The only add-on I have for this is that some kind of step should be taken to keep the black plastic (or saran wrap for that matter) in place no matter what. Something dislodging that piece of material, say after a power outage where it dried out or something like that, would be a total disaster. I follow Murphy's Law when it comes to these things!!
 

Reef Breeders

ReefBreeders.com
View Badges
Joined
Dec 21, 2010
Messages
4,521
Reaction score
758
Location
North Kingstown, RI
Rating - 0%
0   0   0
Just built mine today, it has been a year since i first saw this thread, about time, right? I will be replacing the current lights with 2x PAR38's, with 10 660nm reds, and 2 455nm royal blues.
IMG_2191.jpg

IMG_2190.jpg

IMG_2189.jpg

IMG_2188.jpg
 
OP
OP
Turbo's Aquatics

Turbo's Aquatics

Super Duper Member
View Badges
Joined
Jun 7, 2011
Messages
2,799
Reaction score
4,022
Location
West Des Moines, IA
Rating - 0%
0   0   0
Which exact fixture are you going to replace the CFLs with? Generally the LED lamps are better for smaller screens, not many have tried them, they're usually 12x 1W chips and only good for a 4x4 screen, maybe a bit larger, but not much.

How much are you feeding?
 

orthokardia

Well-Known Member
View Badges
Joined
Jun 2, 2010
Messages
830
Reaction score
5
Location
manchester, tn
Rating - 0%
0   0   0
I would like some info on an overflow based (in the overflow) scrubber design. You eluded to one for the sumpless crowd. Can I just shoot leds in from the back of the tank through the glass.

thx
-bart
 

quigimon

Active Member
View Badges
Joined
Sep 4, 2012
Messages
198
Reaction score
0
Location
Springfield Tn
Rating - 0%
0   0   0
I would like some info on an overflow based (in the overflow) scrubber design. You eluded to one for the sumpless crowd. Can I just shoot leds in from the back of the tank through the glass.

thx
-bart
i would think that algae growth on the glass would inhibit light eventually resulting in having to clean the glass to get light to the scrubber, unless that's not an issue for you.
 

HPballer76

Community Member
View Badges
Joined
Nov 5, 2012
Messages
84
Reaction score
0
Location
SLC, Utah
Rating - 0%
0   0   0
could someone help me calculate the length and width of screen i will need for my new build? i'm a little confused on how to get the right dimensions. it will be on a 125g display with 40g sump, remote 20g fuge and 20g frag tank plumbed in. was also thinking of putting the scrubber in its own tank as well like a 10g but not sure on the size of that since i don't know the size of screen i will need yet.
 
OP
OP
Turbo's Aquatics

Turbo's Aquatics

Super Duper Member
View Badges
Joined
Jun 7, 2011
Messages
2,799
Reaction score
4,022
Location
West Des Moines, IA
Rating - 0%
0   0   0
i would think that algae growth on the glass would inhibit light eventually resulting in having to clean the glass to get light to the scrubber, unless that's not an issue for you.

Conveniently, LEDs are so intense that they will prevent the algae from growing on the glass right in front of them, if they are intense enough. My 3W LEDs @ 700mA on my UAS enclosed box leave zero growth directly in front of them, even with a diffuser.

could someone help me calculate the length and width of screen i will need for my new build? i'm a little confused on how to get the right dimensions. it will be on a 125g display with 40g sump, remote 20g fuge and 20g frag tank plumbed in. was also thinking of putting the scrubber in its own tank as well like a 10g but not sure on the size of that since i don't know the size of screen i will need yet.

Screen size should be based on the amount you feed, not the volume of your tank. The caveat to this I have found is that the larger the tank, the wider you should have the scrubber, if possible, because you want to turn the water over at a faster rate so you can effectively filter the whole system. Simply increasing the flow on a tall, narrow screen may not be as effective.
 
Back
Top