DIY: 1-Sheet Laminated Plywood Stand

TheHarold

5000 Club Member
View Badges
Joined
Oct 3, 2015
Messages
5,148
Reaction score
8,760
Rating - 0%
0   0   0
Here are some photos from my plywood laminated-style stand. The construction is made up of 3" wide birch 3/4" plywood strips, that are laminated into 1.5" beams. This strategy lets me always have side-grain to screw and glue with- I will have a photo below of what a section looks like.

@JoshH I was reading your thread and I read that you might be planning on making a stand, which is why I decided to share here :)


The plan:
PWNHkPn.jpg


Cutting down the plywood into 3" strips:

qXWP1MZ.jpg


Starting assembly- you can see all the screws in the side panel.

sPQsgq8.jpg


This is what the upper corners look like. You can see how the plywood boards ALL overlap for strength :
3pR7IQU.jpg


And then gluing on the top! The streaks on the sides are just wood filler, filling in the screw holes and wood defects.

GDIxUei.jpg


And then here it is with a few coats of paint- I wanted to sand it down one more time and put on a final coat :).

Fheh4MA.jpg


After paint, with neoprene on top. Note that it is sitting flat; the apparent "gaps" on the feet are just the chamfers that prevent the wood from splitting.
ywQKRYC.jpg


With back panels, before I removed them and turned them into side panels:
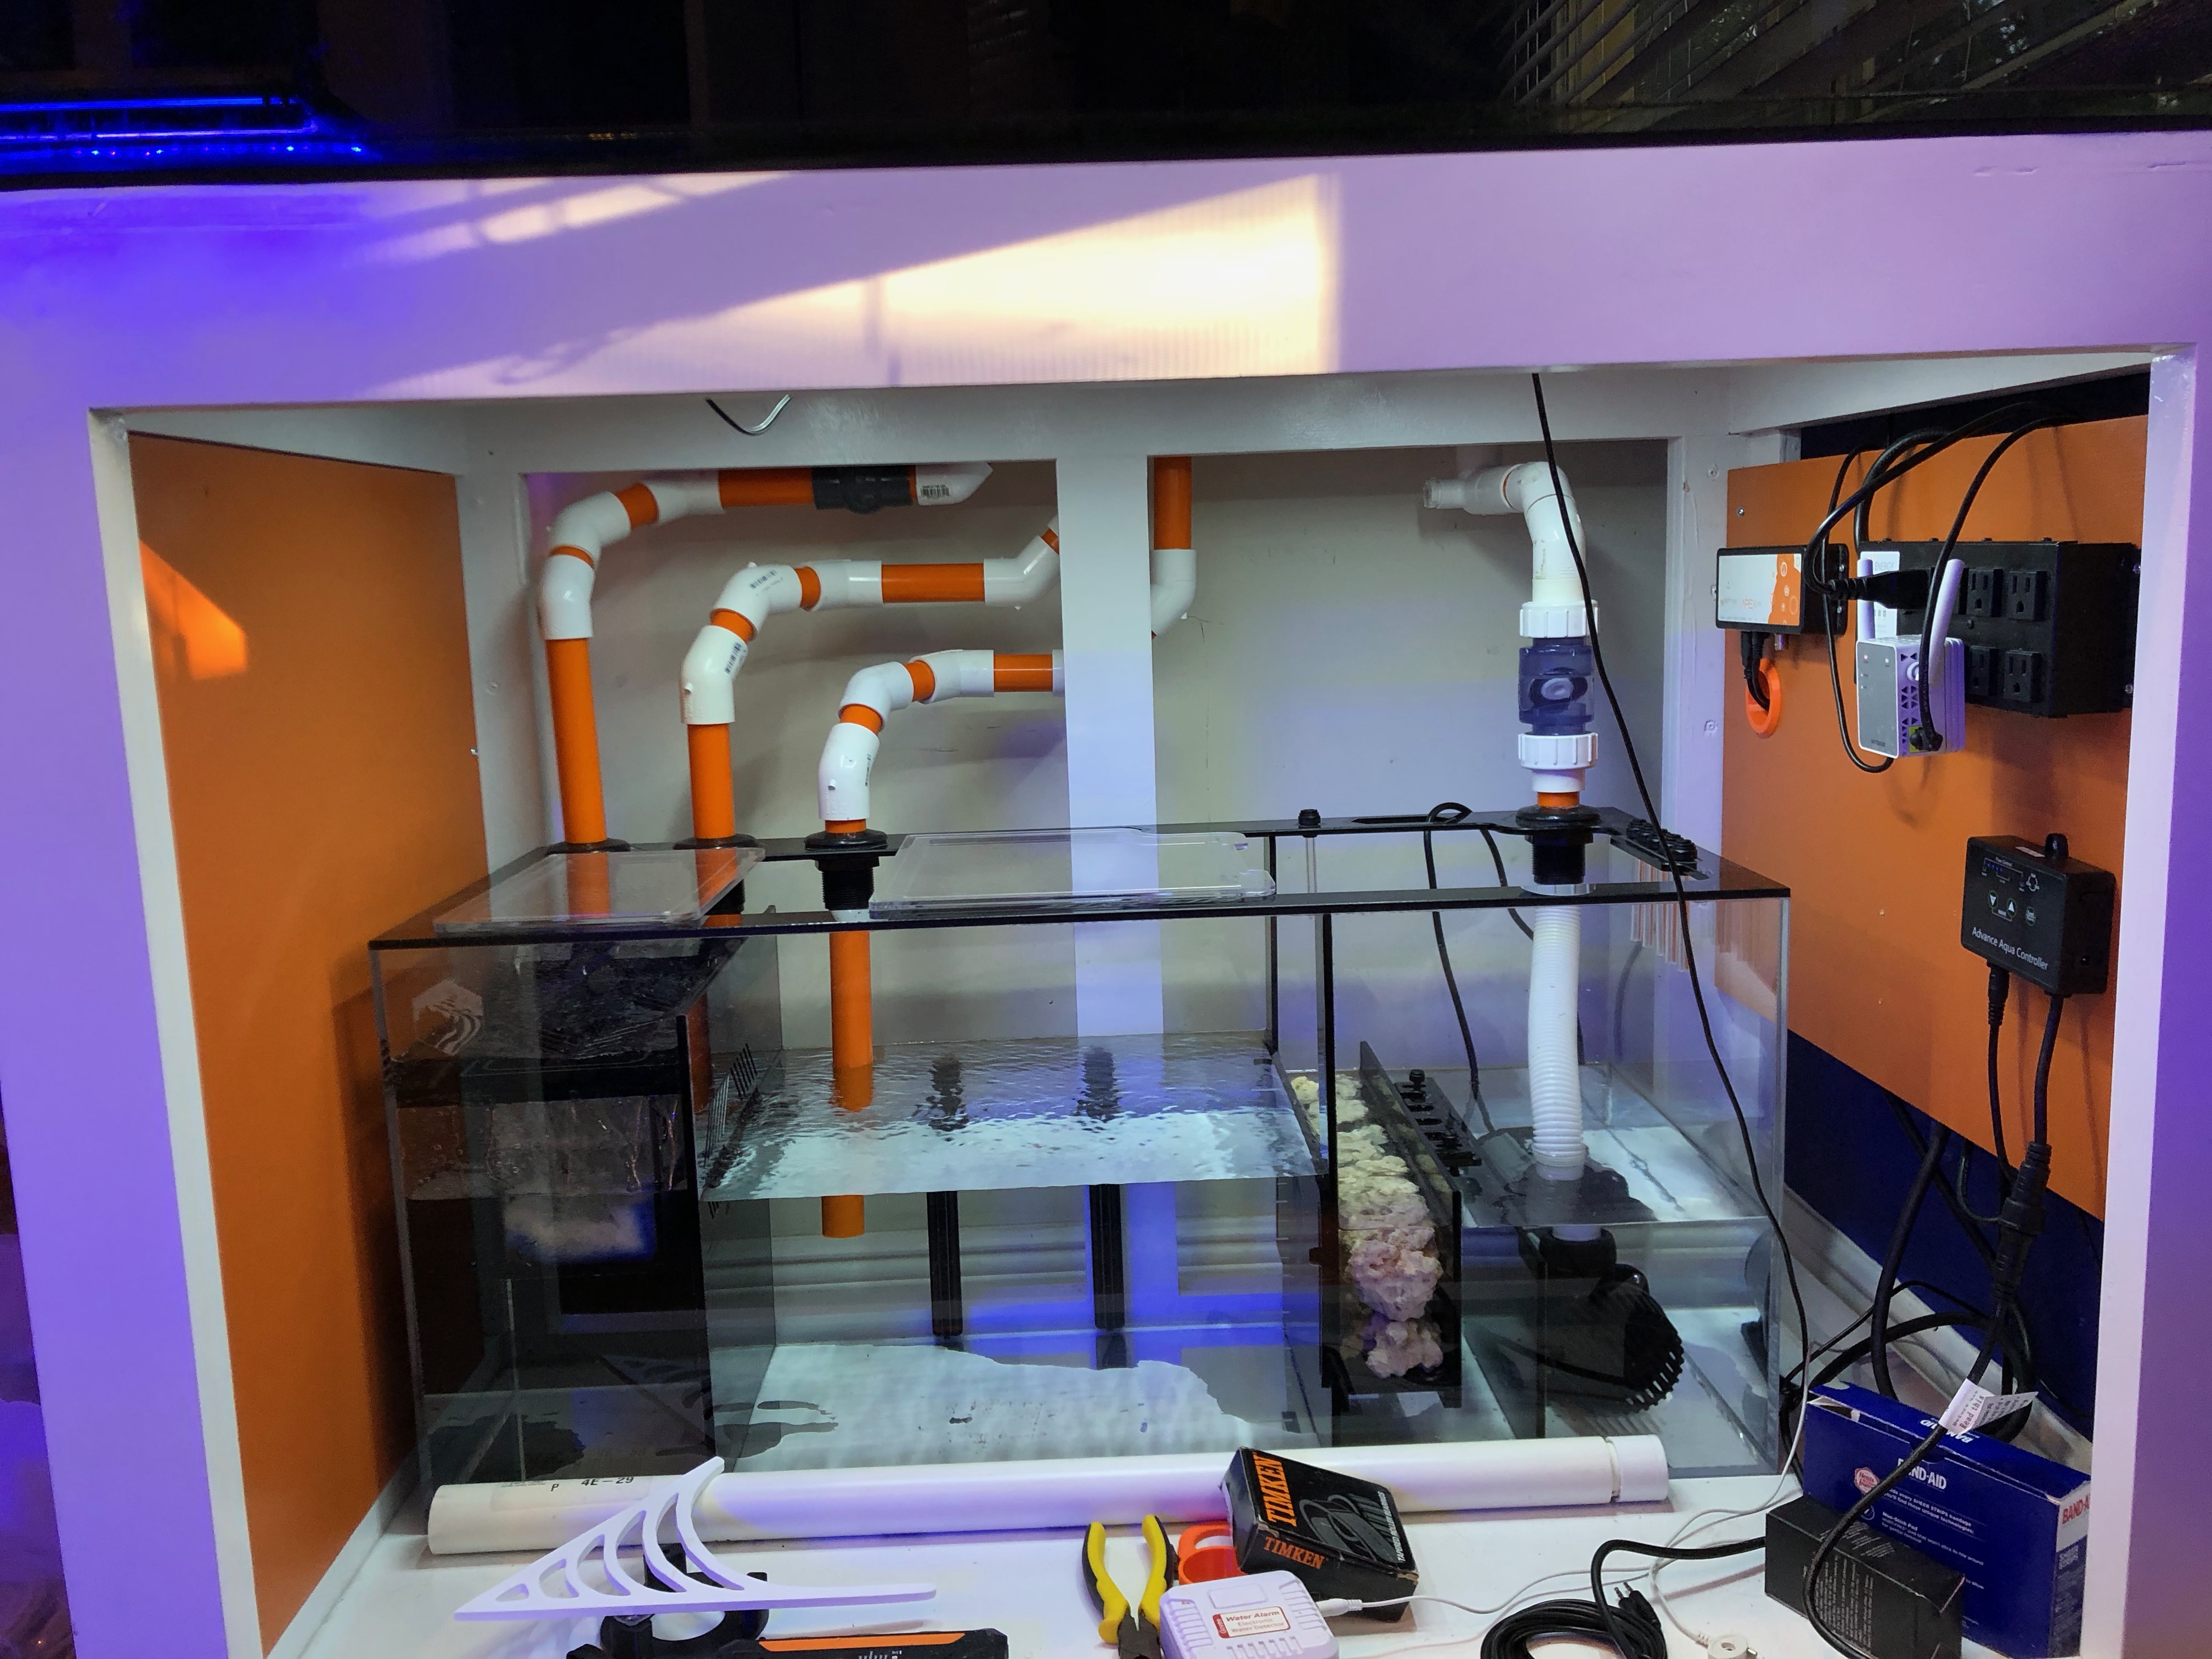
Cs1E5Sj.jpg


Final layout:
G3iFw2v.jpg
 
Last edited:

JoshH

Tank Status: Wet...ish, growing things....
View Badges
Joined
Dec 3, 2016
Messages
9,994
Reaction score
35,394
Location
Humble
Rating - 0%
0   0   0
Here are some photos from my plywood laminated-style stand. The construction is made up of 3" wide birth 3/4" plywood strips, that are laminated into 1.5" beams. This strategy lets me always have side-grain to screw and glue with- I will have a photo below of what a section looks like.

@JoshH I was reading your thread and I read that you might be planning on making a stand, which is why I decided to share here :)


The plan:
PWNHkPn.jpg


Cutting down the plywood into 3" strips:

qXWP1MZ.jpg


Starting assembly- you can see all the screws in the side panel.

sPQsgq8.jpg


This is what the upper corners look like. You can see how the plywood boards ALL overlap for strength :
3pR7IQU.jpg


And then gluing on the top! The streaks on the sides are just wood filler, filling in the screw holes and wood defects.

GDIxUei.jpg


And then here it is with a few coats of paint- I still want to sand it down one more time and put on a final coat :).

Fheh4MA.jpg

Beautiful!!!! I did decide to go the plywood route as well only mine, now looking at it, might be wildly over built ;):p

I went with all solid exterior walls (except for the side facing into the fish area) with a 3" interior reinforcement frame of plywood as well.
20190410_204008.jpg
20190410_204044.jpg
20190527_144620.jpg
20190527_144629.jpg
 
OP
OP
TheHarold

TheHarold

5000 Club Member
View Badges
Joined
Oct 3, 2015
Messages
5,148
Reaction score
8,760
Rating - 0%
0   0   0
Beautiful!!!! I did decide to go the plywood route as well only mine, now looking at it, might be wildly over built ;):p

I went with all solid exterior walls (except for the side facing into the fish area) with a 3" interior reinforcement frame of plywood as well.
20190410_204008.jpg
20190410_204044.jpg
20190527_144620.jpg
20190527_144629.jpg

Lol! I didn’t realize you finished haha. I read the first and last page of the thread lol

Yeah this is a frag tank; 44x28x14. This should be more than enough :)
 

JoshH

Tank Status: Wet...ish, growing things....
View Badges
Joined
Dec 3, 2016
Messages
9,994
Reaction score
35,394
Location
Humble
Rating - 0%
0   0   0
Lol! I didn’t realize you finished haha. I read the first and last page of the thread lol

Yeah this is a frag tank; 44x28x14. This should be more than enough :)

It still needs a little touching up after moving it around so much but it's done for now until I start playing with my closed loop system :):):)

And Jez your frag tank is almost as big as my new DT;Jawdrop

BTW I'm stealing this frame design for my frag and QT tanks down the road, just so you know:cool:
 
Last edited:
OP
OP
TheHarold

TheHarold

5000 Club Member
View Badges
Joined
Oct 3, 2015
Messages
5,148
Reaction score
8,760
Rating - 0%
0   0   0
It still needs a little touching up after moving it around so much but it's done for now until I start playing with my closed loop system :):):)

And Jez your frag tank is almost as big as my new DT;Jawdrop

BTW I'm stealing this frame design for my frag and QT tanks down the road, just so you know:cool:

I am very excited about this frag tank. In the center will be a rotating 22" diameter round frag rack, that holds 200 corals. It is the sexy locking style from Zen Reef.

This is an experimental design; a continuation of the smaller motorized frag disks I have in my display tank. So far the results have been extremely promising with Acropora :)

Steal away! I was editing this post when you liked it, I think. Lol
 

redfishbluefish

Stay Positive, Stay Productive
View Badges
Joined
Mar 22, 2012
Messages
11,712
Reaction score
25,761
Location
Sayreville, NJ
Rating - 0%
0   0   0
Looking good....I'm liking it....nicely done. The first time I saw a commercial stand for a 180 gallon tank, I was shocked....so flimsy looking. This stand of yours looks solid. Again, good job.
 
OP
OP
TheHarold

TheHarold

5000 Club Member
View Badges
Joined
Oct 3, 2015
Messages
5,148
Reaction score
8,760
Rating - 0%
0   0   0
Looking good....I'm liking it....nicely done. The first time I saw a commercial stand for a 180 gallon tank, I was shocked....so flimsy looking. This stand of yours looks solid. Again, good job.

Thanks man. I had the same thoughts when I looked at my Red Sea Reefer stand; there is so little material. My stand should easily hold 1000lbs. I can stand on the (unsupported) front brace and it doesn't even bend a little. Crazy stiff, plywood. Cheap too.

The plywood was like $50, and then I used around $40 of assorted materials (glue, 1.25 & 2" screws, wood filler, primer, paint). Though I guess that cost assumes you have a table saw to cut all of these lengths, as well as a random orbit sander.

I will probably end up buying a quarter sheet of 3/4" ply, to make the bottom area a shelf, and a quarter sheet of 1/2" ply, to make a back (for mounting stuff).
 

Mastiffsrule

Where ever you go, there you are, so be nice 2 you
View Badges
Joined
Feb 10, 2019
Messages
8,440
Reaction score
33,571
Location
Charlotte
Rating - 0%
0   0   0
Both awesome stands. I wish I could do that.

I did my stand out of 2x4 and 2x6 but just the frame. I am still waiting for it to collapse after 10 years. I had to get a friend to do a separate cabinet face.

Really nice
 

Peace River

Thrive Master
View Badges
Joined
Apr 29, 2014
Messages
21,552
Reaction score
164,783
Location
USA
Rating - 100%
1   0   0
@TheHarold and @JoshH - great woodworking on both of your tank stands! These are definitely a couple of stands to model a DIY build after - impressive work!

[...]
The plywood was like $50, and then I used around $40 of assorted materials (glue, 1.25 & 2" screws, wood filler, primer, paint). Though I guess that cost assumes you have a table saw to cut all of these lengths, as well as a random orbit sander.


I realize that it was probably spellcheck run amok, but the "random orbit sander" made me laugh! :)
 
OP
OP
TheHarold

TheHarold

5000 Club Member
View Badges
Joined
Oct 3, 2015
Messages
5,148
Reaction score
8,760
Rating - 0%
0   0   0
Both awesome stands. I wish I could do that.

I did my stand out of 2x4 and 2x6 but just the frame. I am still waiting for it to collapse after 10 years. I had to get a friend to do a separate cabinet face.

Really nice

Nothing wrong with using 2x4s! I considered it- using my planer/jointer to make them perfectly square pine boards. But after planing, they would get BELOW 1.5" in thickness. So laminated plywood is thicker, less likely to warp (due to crosshatch grain orientation), etc.
 
OP
OP
TheHarold

TheHarold

5000 Club Member
View Badges
Joined
Oct 3, 2015
Messages
5,148
Reaction score
8,760
Rating - 0%
0   0   0
@TheHarold and @JoshH - great woodworking on both of your tank stands! These are definitely a couple of stands to model a DIY build after - impressive work!

I realize that it was probably spellcheck run amok, but the "random orbit sander" made me laugh! :)

Thanks! And no, not spellcheck. "Random Orbit Sander" is a pretty standard term, I thought? Though I guess you mean as opposed to "orbital"... Hmm. ;Bookworm

L9Rff8o.png
 

Fin

Professional Procrastinator
View Badges
Joined
Sep 28, 2013
Messages
7,860
Reaction score
43,914
Location
Lake Charles LA
Rating - 0%
0   0   0
Here are some photos from my plywood laminated-style stand. The construction is made up of 3" wide birch 3/4" plywood strips, that are laminated into 1.5" beams. This strategy lets me always have side-grain to screw and glue with- I will have a photo below of what a section looks like.

@JoshH I was reading your thread and I read that you might be planning on making a stand, which is why I decided to share here :)


The plan:
PWNHkPn.jpg


Cutting down the plywood into 3" strips:

qXWP1MZ.jpg


Starting assembly- you can see all the screws in the side panel.

sPQsgq8.jpg


This is what the upper corners look like. You can see how the plywood boards ALL overlap for strength :
3pR7IQU.jpg


And then gluing on the top! The streaks on the sides are just wood filler, filling in the screw holes and wood defects.

GDIxUei.jpg


And then here it is with a few coats of paint- I still want to sand it down one more time and put on a final coat :).

Fheh4MA.jpg
That came out really nice. Like the color too.
 

Peace River

Thrive Master
View Badges
Joined
Apr 29, 2014
Messages
21,552
Reaction score
164,783
Location
USA
Rating - 100%
1   0   0
Thanks! And no, not spellcheck. "Random Orbit Sander" is a pretty standard term, I thought? Though I guess you mean as opposed to "orbital"... Hmm. ;Bookworm

You're right - even though I have been using tools for many years and probably have about three of these sanders in my garage, I have always referred to them as orbital sanders. When I read your post, I was thinking about a few tools that I have thought about putting into random orbit! :)

Either way, great job on the stand!
 
OP
OP
TheHarold

TheHarold

5000 Club Member
View Badges
Joined
Oct 3, 2015
Messages
5,148
Reaction score
8,760
Rating - 0%
0   0   0
You're right - even though I have been using tools for many years and probably have about three of these sanders in my garage, I have always referred to them as orbital sanders. When I read your post, I was thinking about a few tools that I have thought about putting into random orbit! :)

Either way, great job on the stand!

Yes.... I have thrown Harbor Fright oscillating tools into orbit LOL
 

Peace River

Thrive Master
View Badges
Joined
Apr 29, 2014
Messages
21,552
Reaction score
164,783
Location
USA
Rating - 100%
1   0   0
Yes.... I have thrown Harbor Fright oscillating tools into orbit LOL

After a little bit more research it appears that there is a difference between an orbital sander and a random orbit sander so I stand corrected and I can now start calling them by there correct names. ;Sorry

Excuse me while I head out to my garage to recount . . . :)
 
OP
OP
TheHarold

TheHarold

5000 Club Member
View Badges
Joined
Oct 3, 2015
Messages
5,148
Reaction score
8,760
Rating - 0%
0   0   0
After a little bit more research it appears that there is a difference between an orbital sander and a random orbit sander so I stand corrected and I can now start calling them by there correct names. ;Sorry

Excuse me while I head out to my garage to recount . . . :)

One is square and jiggles, while the other is round and spins? Excuse my fancy language lol
 

JoshH

Tank Status: Wet...ish, growing things....
View Badges
Joined
Dec 3, 2016
Messages
9,994
Reaction score
35,394
Location
Humble
Rating - 0%
0   0   0
I'm not sure how I missed all these updates ! Lol

Both awesome stands. I wish I could do that.

I did my stand out of 2x4 and 2x6 but just the frame. I am still waiting for it to collapse after 10 years. I had to get a friend to do a separate cabinet face.

Really nice

Thank you very much, I will say this, as long as you have the appropriate tools and a basic understanding of woodworking you can build one yourself. I'd be more than happy to walk you through building one if you ever wanted to. Mine is just a little more elaborate version of @TheHarold s build with some routered pine trim.

@TheHarold and @JoshH - great woodworking on both of your tank stands! These are definitely a couple of stands to model a DIY build after - impressive work!


I realize that it was probably spellcheck run amok, but the "random orbit sander" made me laugh! :)

Thank you very much for the compliment. I feel I should probably post a few more pictures of my building process on mine as well lol. I partially went through what I did in my build thread but not in crazy detail.
I think the greatest advantage to plywood is, for the same reason Lam beams are becoming SO popular in construction. They are slimmer and WAY stronger products over all and don't twist over time.

I too have a random orbit sander and not an orbital sander :p as well as numerous other tools, I don't own every tool, maybe one day;)

Oh and my build consisted of 3 1/2 sheets of 3/4 Plywood with very little waste, I hate wood waste and make best efforts to use every square inch of wood I can out of a sheet. And some laminated 1/2" Pine boards used for all the routered trim.
 
Last edited:

Antics

Valuable Member
View Badges
Joined
Jun 12, 2016
Messages
2,465
Reaction score
17,807
Location
Florida
Rating - 100%
1   0   0
This looks a lot lighter and cleaner than the 2x4 frame stands I've always done. Makes me want to make a new stand all together!

Added the foam! Next comes the side panels. The back panels will be Apex Orange :)

What foam is this?
 

Tentacled trailblazer in your tank: Have you ever kept a large starfish?

  • I currently have a starfish in my tank.

    Votes: 24 29.6%
  • Not currently, but I have kept a starfish in the past.

    Votes: 18 22.2%
  • I have never kept a starfish, but I hope to in the future.

    Votes: 21 25.9%
  • I have no plans to keep a starfish.

    Votes: 18 22.2%
  • Other.

    Votes: 0 0.0%
Back
Top